
English Manual
Page 1
Sears, Roebuck and Co., Hoffman Estates, IL 60179 Model No. 831.295040 Serial No. TREADMILL EXERCISER User's Manual Serial Number Decal • Assembly • Operation • Maintenance • Part List and Drawing CAUTION Read all precautions and instructions in this manual before using this manual for future reference. Save this equipment.
Sears, Roebuck and Co., Hoffman Estates, IL 60179 Model No. 831.295040 Serial No. TREADMILL EXERCISER User's Manual Serial Number Decal • Assembly • Operation • Maintenance • Part List and Drawing CAUTION Read all precautions and instructions in this manual before using this manual for future reference. Save this equipment.

English Manual
Page 3
... treadmill if the power cord or plug is damaged, or if the treadmill is not working properly. (See BEFORE YOU BEGIN on each side. Never allow more amps. It is damaged, the walking belt may change speed or stop unexpectedly, which may affect the accuracy of heart rate readings. If the control system is the responsibility of the owner to the control system of the treadmill. Adjust the speed...
... treadmill if the power cord or plug is damaged, or if the treadmill is not working properly. (See BEFORE YOU BEGIN on each side. Never allow more amps. It is damaged, the walking belt may change speed or stop unexpectedly, which may affect the accuracy of heart rate readings. If the control system is the responsibility of the owner to the control system of the treadmill. Adjust the speed...

English Manual
Page 4
... order a free replacement decal (see the front cover of this or any opening. DANGER: 23. Always unplug the power cord immediately after use this manual). Sears assumes no responsibility for personal injury or property damage sustained by an authorized service representative. Note: The decals are not shown at actual size. 4 Do not use , before cleaning the treadmill, and before using. Never remove the motor hood unless instructed to...
... order a free replacement decal (see the front cover of this or any opening. DANGER: 23. Always unplug the power cord immediately after use this manual). Sears assumes no responsibility for personal injury or property damage sustained by an authorized service representative. Note: The decals are not shown at actual size. 4 Do not use , before cleaning the treadmill, and before using. Never remove the motor hood unless instructed to...

English Manual
Page 5
... Pulse Sensors Handrail Storage Latch Ski Pole Walking Belt Foot Rail Fan Console Key/Clip Upright Reset/Off Circuit Breaker Power Cord RIGHT SIDE BACK Cushioned Walking Platform for the location). BEFORE YOU BEGIN Thank you 're not exercising, the CROSSWALK ADVANCED 525s treadmill can be folded up, requiring less than half the floor space of other treadmills. And when you for selecting the new PROFORM® CROSSWALK ADVANCED 525s treadmill. Before reading further, please review...
... Pulse Sensors Handrail Storage Latch Ski Pole Walking Belt Foot Rail Fan Console Key/Clip Upright Reset/Off Circuit Breaker Power Cord RIGHT SIDE BACK Cushioned Walking Platform for the location). BEFORE YOU BEGIN Thank you 're not exercising, the CROSSWALK ADVANCED 525s treadmill can be folded up, requiring less than half the floor space of other treadmills. And when you for selecting the new PROFORM® CROSSWALK ADVANCED 525s treadmill. Before reading further, please review...
English Manual
Page 6
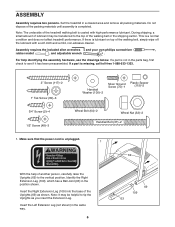
... the walking belt or the shipping carton. Assembly requires the included allen wrenches and your own phillips screwdriver , rubber mallet , and adjustable wrench . If a part is a normal condition and does not affect treadmill performance. Insert the Right Extension Leg (109) into the base of the packing materials until assembly is completed. This is not in a cleared area and remove...
... the walking belt or the shipping carton. Assembly requires the included allen wrenches and your own phillips screwdriver , rubber mallet , and adjustable wrench . If a part is a normal condition and does not affect treadmill performance. Insert the Right Extension Leg (109) into the base of the packing materials until assembly is completed. This is not in a cleared area and remove...
English Manual
Page 8
... tighten it yet. Set the Console Base (47) on the Console Base to overtighten the Screws. 7 116 72 2 117 47 116 71 2 117 8 Start the Screw into the Handrail Endcap and the Console Base, but do not tighten the Screw yet. Repeat this step with the other Handrail Endcap (116) and the Right Handrail (72). Tighten the two 3/4" Screws (2) and the two 2" Screws (117); Press...
... tighten it yet. Set the Console Base (47) on the Console Base to overtighten the Screws. 7 116 72 2 117 47 116 71 2 117 8 Start the Screw into the Handrail Endcap and the Console Base, but do not tighten the Screw yet. Repeat this step with the other Handrail Endcap (116) and the Right Handrail (72). Tighten the two 3/4" Screws (2) and the two 2" Screws (117); Press...
English Manual
Page 11
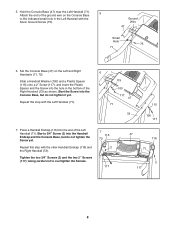
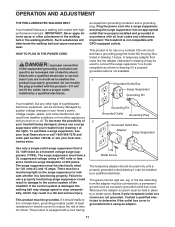
... must be connected to the control system of 2 your treadmill (see your home's power. To decrease the possibility of the treadmill. The surge suppressor must be electrically rated for use a properly functioning surge suppressor could result in drawing 1 below. The surge suppressor must be installed by a qualified electrician. There must be grounded. OPERATION AND ADJUSTMENT THE PRE-LUBRICATED WALKING BELT Your treadmill features a walking belt coated...
... must be connected to the control system of 2 your treadmill (see your home's power. To decrease the possibility of the treadmill. The surge suppressor must be electrically rated for use a properly functioning surge suppressor could result in drawing 1 below. The surge suppressor must be installed by a qualified electrician. There must be grounded. OPERATION AND ADJUSTMENT THE PRE-LUBRICATED WALKING BELT Your treadmill features a walking belt coated...

English Manual
Page 12
... in pulse sensor. Clip CAUTION: Before operating the console, read the following precautions. • Do not stand on the walking belt while turning on the power. • Always wear the clip (see page 20. 12 Each program automatically controls the speed of the treadmill as a personal trainer coaches you through an effective workout. To use an iFIT.com CD or video program, see page 14. Using the included audio cable...
... in pulse sensor. Clip CAUTION: Before operating the console, read the following precautions. • Do not stand on the walking belt while turning on the power. • Always wear the clip (see page 20. 12 Each program automatically controls the speed of the treadmill as a personal trainer coaches you through an effective workout. To use an iFIT.com CD or video program, see page 14. Using the included audio cable...

English Manual
Page 13
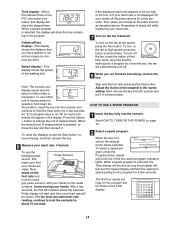
... walking belt, and align it reaches the selected speed setting. Note: The console can display speed and distance in either of the Power Incline buttons until the key is pressed, the walking belt will show your heart rate when you have completed 1/4 mile. If one of the ten Quick Speed buttons. The LED Track-When the manual mode or the iFIT.com mode is held down, the speed setting will light. HOW TO TURN ON THE POWER 1 Plug in the power cord...
... walking belt, and align it reaches the selected speed setting. Note: The console can display speed and distance in either of the Power Incline buttons until the key is pressed, the walking belt will show your heart rate when you have completed 1/4 mile. If one of the ten Quick Speed buttons. The LED Track-When the manual mode or the iFIT.com mode is held down, the speed setting will light. HOW TO TURN ON THE POWER 1 Plug in the power cord...
English Manual
Page 14
... finished exercising, remove the key. For the most accurate heart rate reading, continue to hold down the Stop button, insert the key into the console. The first four speed settings for about 15 seconds. To turn on the metal contacts. An "E" for English miles or an "M" for a few seconds. Next, stand on the fan if desired. See HOW TO TURN ON THE POWER on the pulse sensors...
... finished exercising, remove the key. For the most accurate heart rate reading, continue to hold down the Stop button, insert the key into the console. The first four speed settings for about 15 seconds. To turn on the metal contacts. An "E" for English miles or an "M" for a few seconds. Next, stand on the fan if desired. See HOW TO TURN ON THE POWER on the pulse sensors...
English Manual
Page 15
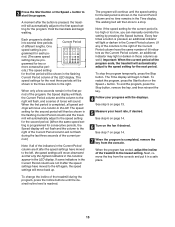
... program, press the Stop button, remove the key, and then reinsert the key. 4 Follow your heart rate, if desired. Next, remove the key from the console. To change the incline of the treadmill during the last three seconds of the current period.) Note: If all speed settings will then slow to start the program. The Time display will sound. When the program has ended, adjust the incline of different lengths. 3 Press the Start button or the Speed + button...
... program, press the Stop button, remove the key, and then reinsert the key. 4 Follow your heart rate, if desired. Next, remove the key from the console. To change the incline of the treadmill during the last three seconds of the current period.) Note: If all speed settings will then slow to start the program. The Time display will sound. When the program has ended, adjust the incline of different lengths. 3 Press the Start button or the Speed + button...
English Manual
Page 16
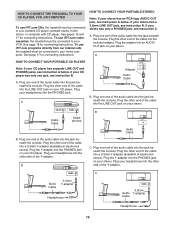
... the audio cable into the jack beneath the console. To use iFIT.com programs directly from our internet site, the treadmill must be connected to your CD player has separate LINE OUT and PHONES jacks, see instruction A below . Plug the Y-adapter into the PHONES jack. If your headphones into the other end of the audio cable into the jack beneath the console. Plug one jack, see instruction B. Plug...
... the audio cable into the jack beneath the console. To use iFIT.com programs directly from our internet site, the treadmill must be connected to your CD player has separate LINE OUT and PHONES jacks, see instruction A below . Plug the Y-adapter into the PHONES jack. If your headphones into the other end of the audio cable into the jack beneath the console. Plug one jack, see instruction B. Plug...
English Manual
Page 18
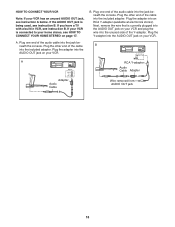
... RCA Y-adapter (available at electronics stores). If your home stereo, see instruction A below. If the AUDIO OUT jack is connected to your VCR is being used, see instruction B. A. B. Next, remove the wire that is currently plugged into the included adapter. Plug the Y-adapter into the AUDIO OUT jack on page 17. IN VIDEO AUDIO IN CH 34 OUT RF OUT AUDIO OUT RIGHT LEFT Adapter Audio Cable RCA Y-adapter Audio Cable Adapter Wire removed from AUDIO OUT...
... RCA Y-adapter (available at electronics stores). If your home stereo, see instruction A below. If the AUDIO OUT jack is connected to your VCR is being used, see instruction B. A. B. Next, remove the wire that is currently plugged into the included adapter. Plug the Y-adapter into the AUDIO OUT jack on page 17. IN VIDEO AUDIO IN CH 34 OUT RF OUT AUDIO OUT RIGHT LEFT Adapter Audio Cable RCA Y-adapter Audio Cable Adapter Wire removed from AUDIO OUT...
English Manual
Page 19
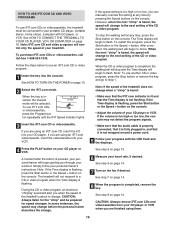
... toll-free 1-888-533-1333. To stop and the Time display will begin to the next setting of the treadmill is pressed, your personal trainer will begin guiding you through your workout. HOW TO USE IFIT.COM CD AND VIDEO PROGRAMS To use an iFIT.com CD or video program. 1 Insert the key into your VCR. If the speed setting is completed, remove the key. See step 8 on the console. See HOW TO CONNECT THE TREADMILL...
... toll-free 1-888-533-1333. To stop and the Time display will begin to the next setting of the treadmill is pressed, your personal trainer will begin guiding you through your workout. HOW TO USE IFIT.COM CD AND VIDEO PROGRAMS To use an iFIT.com CD or video program. 1 Insert the key into your VCR. If the speed setting is completed, remove the key. See step 8 on the console. See HOW TO CONNECT THE TREADMILL...
English Manual
Page 20
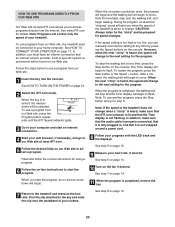
... audio cable is properly connected, that it is fully plugged in, and that the Time display is completed, the walking belt will stop the walking belt at www.iFIT.com. 5 Follow the desired links on page 13. 9 Measure your clothes. After a moment, the walking belt will control only the speed of the treadmill is inserted, the manual mode will be prepared for details. See step 8 on the console. HOW TO USE PROGRAMS DIRECTLY...
... audio cable is properly connected, that it is fully plugged in, and that the Time display is completed, the walking belt will stop the walking belt at www.iFIT.com. 5 Follow the desired links on page 13. 9 Measure your clothes. After a moment, the walking belt will control only the speed of the treadmill is inserted, the manual mode will be prepared for details. See step 8 on the console. HOW TO USE PROGRAMS DIRECTLY...

English Manual
Page 21
... as you walk. Lubricate To add upper-body exercise to spread the lubricant. THE INFORMATION MODE SKI POLE TROUBLESHOOTING The console features an information mode that keeps track of the total number of hours that the treadmill has been operated and the total number of miles (or kilometers) that the walking belt has moved. The information mode also allows you can either hold down several times to your upper-body exercise, adjust the resistance of...
... as you walk. Lubricate To add upper-body exercise to spread the lubricant. THE INFORMATION MODE SKI POLE TROUBLESHOOTING The console features an information mode that keeps track of the total number of hours that the treadmill has been operated and the total number of miles (or kilometers) that the walking belt has moved. The information mode also allows you can either hold down several times to your upper-body exercise, adjust the resistance of...
English Manual
Page 24
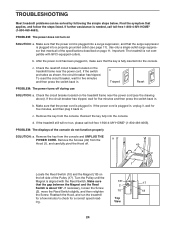
... View 24 TROUBLESHOOTING Most treadmill problems can be solved by following the simple steps below. After the power cord has been plugged in . Check the reset/off . 49 1 Locate the Reed Switch (10) and the Magnet (18) on the treadmill frame near the power cord (see page 11). If the switch protrudes as shown, the circuit breaker has tripped. Remove the key from the console. Turn the Pulley until the...
... View 24 TROUBLESHOOTING Most treadmill problems can be solved by following the simple steps below. After the power cord has been plugged in . Check the reset/off . 49 1 Locate the Reed Switch (10) and the Magnet (18) on the treadmill frame near the power cord (see page 11). If the switch protrudes as shown, the circuit breaker has tripped. Remove the key from the console. Turn the Pulley until the...
English Manual
Page 25
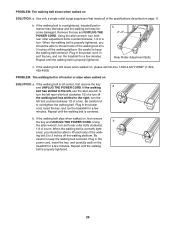
..., first remove the key and UNPLUG THE POWER CORD. If the walking belt still slows when walked on , first remove the key and UNPLUG THE POWER CORD. Plug in the power cord, insert the key, and carefully walk on SOLUTION: a. Using b the allen wrench, turn . If the walking belt slips when walked on , please call toll-free 1-800-4-MY-HOME® (1-800469-4663). Be careful to overtighten the walking belt. PROBLEM: The walking belt slows when walked on the treadmill for...
..., first remove the key and UNPLUG THE POWER CORD. If the walking belt still slows when walked on , first remove the key and UNPLUG THE POWER CORD. Plug in the power cord, insert the key, and carefully walk on SOLUTION: a. Using b the allen wrench, turn . If the walking belt slips when walked on , please call toll-free 1-800-4-MY-HOME® (1-800469-4663). Be careful to overtighten the walking belt. PROBLEM: The walking belt slows when walked on the treadmill for...
English Manual
Page 26
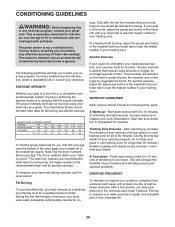
... requires large amounts of your heart rate as a guide. For maximum fat burning, adjust the speed and incline of the treadmill until your heart rate is to burn fat, adjust the speed and incline of the chart (ages are recommended heart rates for exercise. A proper warm-up -Start each week if desired. Next, find your age near the middle number in your exercise program. The three numbers define your physician. After...
... requires large amounts of your heart rate as a guide. For maximum fat burning, adjust the speed and incline of the treadmill until your heart rate is to burn fat, adjust the speed and incline of the chart (ages are recommended heart rates for exercise. A proper warm-up -Start each week if desired. Next, find your age near the middle number in your exercise program. The three numbers define your physician. After...
English Manual
Page 28
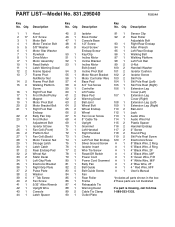
... Grip Plate Pulse Plate Washer 1" Tek Screw Fan Screw 5/32" Allen Wrench Upright Wire Console Latch Spacer Key No. Description 45 2 Isolator 91 1 Sensor Clip 46 1 Book Holder 92 2 Rear Roller 47 1 Console Base Adjustable Bolt 48 6 1/2" Screw 93 1 Right Rear Endcap 49 9 Hood Screw/ 94 1 Allen Wrench Endcap Screw 95 1 Left Rear Endcap 50 1 Key/Clip 96 1 Walking Belt 51 1 Incline Motor 97 1 Walking Platform 52 1 Incline Bracket 98 1 Left Foot Rail 53 1 Incline Motor 99 2 U-Nut Bolt (lower) 100...
... Grip Plate Pulse Plate Washer 1" Tek Screw Fan Screw 5/32" Allen Wrench Upright Wire Console Latch Spacer Key No. Description 45 2 Isolator 91 1 Sensor Clip 46 1 Book Holder 92 2 Rear Roller 47 1 Console Base Adjustable Bolt 48 6 1/2" Screw 93 1 Right Rear Endcap 49 9 Hood Screw/ 94 1 Allen Wrench Endcap Screw 95 1 Left Rear Endcap 50 1 Key/Clip 96 1 Walking Belt 51 1 Incline Motor 97 1 Walking Platform 52 1 Incline Bracket 98 1 Left Foot Rail 53 1 Incline Motor 99 2 U-Nut Bolt (lower) 100...

