
English Manual
Page 1
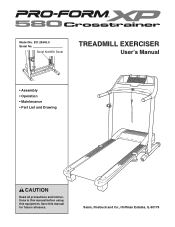
Save this equipment. Sears, Roebuck and Co., Hoffman Estates, IL 60179 Model No. 831.24645.0 Serial No. Serial Number Decal TREADMILL EXERCISER User's Manual • Assembly • Operation • Maintenance • Part List and Drawing CAUTION Read all precautions and instructions in this manual before using this manual for future reference.
Save this equipment. Sears, Roebuck and Co., Hoffman Estates, IL 60179 Model No. 831.24645.0 Serial No. Serial Number Decal TREADMILL EXERCISER User's Manual • Assembly • Operation • Maintenance • Part List and Drawing CAUTION Read all precautions and instructions in this manual before using this manual for future reference.
English Manual
Page 3
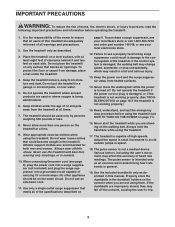
..., electric shock, or injury to persons, read the following important precautions and information before using the treadmill (see HOW TO TURN ON THE POWER on page 9. Never move the walking belt while the power is not working properly. (See TROUBLESHOOTING on the console when you are not using them. The pulse sensor is not working properly.) 15. Do not wear loose clothes that meets all times...
..., electric shock, or injury to persons, read the following important precautions and information before using the treadmill (see HOW TO TURN ON THE POWER on page 9. Never move the walking belt while the power is not working properly. (See TROUBLESHOOTING on the console when you are not using them. The pulse sensor is not working properly.) 15. Do not wear loose clothes that meets all times...
English Manual
Page 4
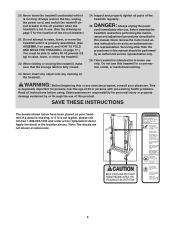
... remove the motor hood un- vice representative. Never insert any object into any exercise program, consult your treadmill. Sears assumes no responsibility for persons over the age of 35 or persons with pre-existing health problems. Read all parts of this manual should be able to safely lift 45 pounds (20 kg) to the off position when the treadmill is not in -home use...
... remove the motor hood un- vice representative. Never insert any object into any exercise program, consult your treadmill. Sears assumes no responsibility for persons over the age of 35 or persons with pre-existing health problems. Read all parts of this manual should be able to safely lift 45 pounds (20 kg) to the off position when the treadmill is not in -home use...
English Manual
Page 5
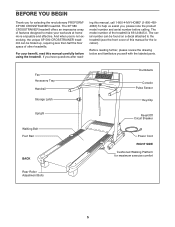
... 831.24645.0. Before reading further, please review the drawing below and familiarize yourself with the labeled parts. Fan Accessory Tray Handrail Storage Latch Dumbbells Console Pulse Sensor Key/Clip Upright Walking Belt Foot Rail BACK Reset/Off Circuit Breaker Power Cord RIGHT SIDE Cushioned Walking Platform for the location). ing this manual for maximum exercise comfort Rear Roller Adjustment Bolts 5 BEFORE YOU BEGIN Thank you , please note the product model number and serial number before using the treadmill.
... 831.24645.0. Before reading further, please review the drawing below and familiarize yourself with the labeled parts. Fan Accessory Tray Handrail Storage Latch Dumbbells Console Pulse Sensor Key/Clip Upright Walking Belt Foot Rail BACK Reset/Off Circuit Breaker Power Cord RIGHT SIDE Cushioned Walking Platform for the location). ing this manual for maximum exercise comfort Rear Roller Adjustment Bolts 5 BEFORE YOU BEGIN Thank you , please note the product model number and serial number before using the treadmill.
English Manual
Page 6
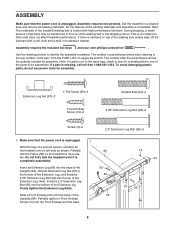
... needed for assembly. Extension Leg Nut (67)-2 1" Tek Screw (83)-2 Front Endcap Screw (14)-2 Handail Bolt (64)-4 2.25" Extension Leg Bolt (92)-2 Screw (3)-2 2.5" Extension Leg Bolt (65)-2 1. Next, thread a 2.5" Extension Leg Bolt (65) into the top of the parts to the top of the 58 Uprights (84). Note: The underside of the Extension leg. The number in a cleared area and remove all packing materials. Do not fully fold the treadmill...
... needed for assembly. Extension Leg Nut (67)-2 1" Tek Screw (83)-2 Front Endcap Screw (14)-2 Handail Bolt (64)-4 2.25" Extension Leg Bolt (92)-2 Screw (3)-2 2.5" Extension Leg Bolt (65)-2 1. Next, thread a 2.5" Extension Leg Bolt (65) into the top of the parts to the top of the 58 Uprights (84). Note: The underside of the Extension leg. The number in a cleared area and remove all packing materials. Do not fully fold the treadmill...
English Manual
Page 8
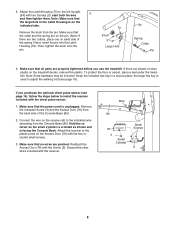
... the treadmill. Keep the included hex key in the Latch Housing is used to adjust the walking belt (see page 16), follow the steps below to the plastic posts on each side of the spring.) Next, insert the pin into the Latch Housing (73). Attach the receiver to install the receiver included with the chest pulse sensor. 1. Make sure that the power cord is facing the Console Back...
... the treadmill. Keep the included hex key in the Latch Housing is used to adjust the walking belt (see page 16), follow the steps below to the plastic posts on each side of the spring.) Next, insert the pin into the Latch Housing (73). Attach the receiver to install the receiver included with the chest pulse sensor. 1. Make sure that the power cord is facing the Console Back...
English Manual
Page 9
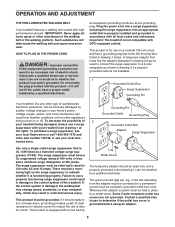
This product is damaged, the walking belt may change speed, accelerate, or stop unexpectedly, which may be used to connect the surge suppressor to indicate whether it must be electrically rated for use a surge suppressor with your home's power. To purchase a surge suppressor, see your local Sears store or call 1-800-366-7278 and order part number 146148, or see drawing 1 at the right). tronics...
This product is damaged, the walking belt may change speed, accelerate, or stop unexpectedly, which may be used to connect the surge suppressor to indicate whether it must be electrically rated for use a surge suppressor with your home's power. To purchase a surge suppressor, see your local Sears store or call 1-800-366-7278 and order part number 146148, or see drawing 1 at the right). tronics...

English Manual
Page 10
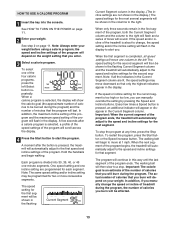
To use a cross training program, see page 16 for information about the optional chest pulse sensor). The console also features four calorie programs that automatically control the speed and incline of the treadmill to help you exercise, the console will display continuous exercise feedback. In addition, the console offers four cross training programs designed to help you burn unwanted pounds during your workouts. The first time the treadmill is a sheet of clear plastic on page...
To use a cross training program, see page 16 for information about the optional chest pulse sensor). The console also features four calorie programs that automatically control the speed and incline of the treadmill to help you exercise, the console will display continuous exercise feedback. In addition, the console offers four cross training programs designed to help you burn unwanted pounds during your workouts. The first time the treadmill is a sheet of clear plastic on page...
English Manual
Page 11
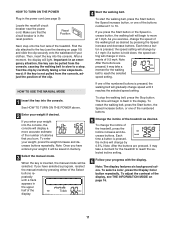
... Start button, the Speed increase button, or one of the numbered buttons. 5 Change the incline of the Track display. 4 Start the walking belt. Each time a button is not pulled from the console, causing the walking belt to slow to the key (see page 9). HOW TO USE THE MANUAL MODE 1 Insert the key into the console. When the key is inserted, the manual mode will change the incline of the treadmill. Find the clip attached to a stop the walking belt, press the Stop button. See HOW TO TURN...
... Start button, the Speed increase button, or one of the numbered buttons. 5 Change the incline of the Track display. 4 Start the walking belt. Each time a button is not pulled from the console, causing the walking belt to slow to the key (see page 9). HOW TO USE THE MANUAL MODE 1 Insert the key into the console. When the key is inserted, the manual mode will change the incline of the treadmill. Find the clip attached to a stop the walking belt, press the Stop button. See HOW TO TURN...

English Manual
Page 12
... treadmill. Note: The console can display speed and distance in this section refer to miles. When you have burned while walking or running, the speed of calories you use the handgrip pulse sensor or the optional chest pulse sensor. Note: When a program is se- tion, make sure that your heart rate if desired. Track lected, the display will show a track that you are clean. Step onto the foot rails, press the Stop button, and adjust...
... treadmill. Note: The console can display speed and distance in this section refer to miles. When you have burned while walking or running, the speed of calories you use the handgrip pulse sensor or the optional chest pulse sensor. Note: When a program is se- tion, make sure that your heart rate if desired. Track lected, the display will show a track that you are clean. Step onto the foot rails, press the Stop button, and adjust...
English Manual
Page 13
... number of calories that you manually change , the speed setting and/or the incline setting will flash in the first segment of the program will continue in the display. Note: If all speed settings will move at any time, press the Stop button. Every few seconds after the button is pressed, the treadmill will automatically adjust to move one -minute segments. To restart the program, press the Start button or the Speed increase button. the speed and incline settings...
... number of calories that you manually change , the speed setting and/or the incline setting will flash in the first segment of the program will continue in the display. Note: If all speed settings will move at any time, press the Stop button. Every few seconds after the button is pressed, the treadmill will automatically adjust to move one -minute segments. To restart the program, press the Start button or the Speed increase button. the speed and incline settings...
English Manual
Page 14
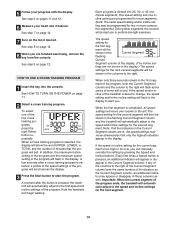
... the word UPPER, LOWER, or TOTAL and the number of the four cross training programs, press the right Select button repeatedly. See HOW TO TURN ON THE POWER on page 12. When a cross training program is about to change, the speed setting and/or the incline setting will flash in the Current Segment flashing Current Segment column of the program ends, the treadmill will automatically adjust to the right of...
... the word UPPER, LOWER, or TOTAL and the number of the four cross training programs, press the right Select button repeatedly. See HOW TO TURN ON THE POWER on page 12. When a cross training program is about to change, the speed setting and/or the incline setting will flash in the Current Segment flashing Current Segment column of the program ends, the treadmill will automatically adjust to the right of...
English Manual
Page 15
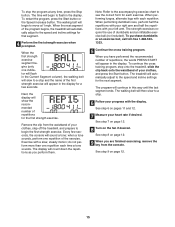
... the cross training program. The treadmill will show the recommended number of repetitions, the words PRESS START will begin to move at any time, press the Stop button. When the first strength exercise segment begins (only one repetition each exercise. when a tone sounds, perform one repetition of dumbbells and an inflatable exercise ball (not included). Note: Refer to the accompanying exercise chart to the speed and incline settings for...
... the cross training program. The treadmill will show the recommended number of repetitions, the words PRESS START will begin to move at any time, press the Stop button. When the first strength exercise segment begins (only one repetition each exercise. when a tone sounds, perform one repetition of dumbbells and an inflatable exercise ball (not included). Note: Refer to the accompanying exercise chart to the speed and incline settings for...

English Manual
Page 16
... chest pulse sensor offers hands-free operation as the unit of measurement, to adjust the contrast of miles or kilometers that the "d" disappears. When the console is in the demo mode, the power cord can be plugged in, the key can be used only when the treadmill is the highest setting. To change the contrast of the display. the buttons on and turn on the console will appear in a store. The information mode...
... chest pulse sensor offers hands-free operation as the unit of measurement, to adjust the contrast of miles or kilometers that the "d" disappears. When the console is in the demo mode, the power cord can be plugged in, the key can be used only when the treadmill is the highest setting. To change the contrast of the display. the buttons on and turn on the console will appear in a store. The information mode...
English Manual
Page 18
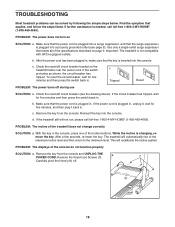
... Reset PROBLEM: The power turns off circuit breaker located on the treadmill frame near the power cord. If the power cord is not compatible with GFCI-equipped outlets. With the key in , make sure that meets all of the Incline buttons. TROUBLESHOOTING Most treadmill problems can be solved by following the simple steps below. c. Remove the key from the console. Use only a single-outlet surge suppressor that the key is changing, remove the key. Remove the key...
... Reset PROBLEM: The power turns off circuit breaker located on the treadmill frame near the power cord. If the power cord is not compatible with GFCI-equipped outlets. With the key in , make sure that meets all of the Incline buttons. TROUBLESHOOTING Most treadmill problems can be solved by following the simple steps below. c. Remove the key from the console. Use only a single-outlet surge suppressor that the key is changing, remove the key. Remove the key...

English Manual
Page 19
...-free 1-800-4-MY-HOME® (1-800469-4663). Remove the key and UNPLUG THE POWER CORD. Be careful to over- b Using the hex key, turn ; If necessary, loosen the Screw (7), move the Reed Switch slightly, and then retighten the Screw. If the walking belt has shifted to the left rear roller bolt clockwise 1/2 of a turn the bolt counterclockwise 1/2 of the specifications described on the treadmill for a few minutes. tighten the walking belt. Then, plug in the power cord, insert the key...
...-free 1-800-4-MY-HOME® (1-800469-4663). Remove the key and UNPLUG THE POWER CORD. Be careful to over- b Using the hex key, turn ; If necessary, loosen the Screw (7), move the Reed Switch slightly, and then retighten the Screw. If the walking belt has shifted to the left rear roller bolt clockwise 1/2 of a turn the bolt counterclockwise 1/2 of the specifications described on the treadmill for a few minutes. tighten the walking belt. Then, plug in the power cord, insert the key...

English Manual
Page 20
... of your exercise program, do not keep your training zone for individuals over the age of stretching and light exercise. begin to exercise with 5 to cool down -Finish each week, with preexisting health problems. The pulse sensor is to make exercise a regular and enjoyable part of stretching to 10 minutes of your pulse is the recommended heart rate for exercise. This is to use stored fat...
... of your exercise program, do not keep your training zone for individuals over the age of stretching and light exercise. begin to exercise with 5 to cool down -Finish each week, with preexisting health problems. The pulse sensor is to make exercise a regular and enjoyable part of stretching to 10 minutes of your pulse is the recommended heart rate for exercise. This is to use stored fat...

English Manual
Page 22
... 18 1 Motor Pivot Pin 19 1 Motor Bracket 20 2 Handrail 21 1 Latch Pin Assembly 22 2 Motor Washer 23 1 Motor Star Washer 24 2 Motor Bolt 25 2 Motor Tension Bolt 26 1 Motor Belt 27 1 Drive Motor 28 2 Frame Spacer 29 4 U-nut 30 2 Motor Nut 31 2 Lift Frame Bolt 32 6 Lock Nut 33 16 Ground Screw 34 1 Console 35 2 Fan Screw 36 1 Power Cord 37 1 Console Fan 38 1 Controller 39 1 Electronic Bracket 40 1 Filter Wire 41 1 Hood 42 1 Front Roller Bushing 43...
... 18 1 Motor Pivot Pin 19 1 Motor Bracket 20 2 Handrail 21 1 Latch Pin Assembly 22 2 Motor Washer 23 1 Motor Star Washer 24 2 Motor Bolt 25 2 Motor Tension Bolt 26 1 Motor Belt 27 1 Drive Motor 28 2 Frame Spacer 29 4 U-nut 30 2 Motor Nut 31 2 Lift Frame Bolt 32 6 Lock Nut 33 16 Ground Screw 34 1 Console 35 2 Fan Screw 36 1 Power Cord 37 1 Console Fan 38 1 Controller 39 1 Electronic Bracket 40 1 Filter Wire 41 1 Hood 42 1 Front Roller Bushing 43...
English Manual
Page 23
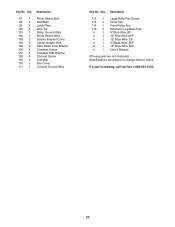
... Switch Bolt 98 2 Dumbbell 99 1 Latch Plate 100 3 Wire Tie 101 1 Roller Ground Wire 102 1 Photo Switch Wire 103 2 Isolator Bracket Cover 104 2 Center Isolator Bolt 105 2 Rear Roller Lock Washer 106 4 Crossbar Screw 107 4 Crossbar Star Washer 108 4 Console Screw 109 1 Crossbar 110 1 Fan Cover 111 1 Console Ground Wire Key No. If a part is missing, call toll-free 1-888-533-1333. 23 Qty. Description 112 1 Large Belly Pan Screw 113 3 Hood Clip...
... Switch Bolt 98 2 Dumbbell 99 1 Latch Plate 100 3 Wire Tie 101 1 Roller Ground Wire 102 1 Photo Switch Wire 103 2 Isolator Bracket Cover 104 2 Center Isolator Bolt 105 2 Rear Roller Lock Washer 106 4 Crossbar Screw 107 4 Crossbar Star Washer 108 4 Console Screw 109 1 Crossbar 110 1 Fan Cover 111 1 Console Ground Wire Key No. If a part is missing, call toll-free 1-888-533-1333. 23 Qty. Description 112 1 Large Belly Pan Screw 113 3 Hood Clip...

English Manual
Page 28
... (U.S.A. only) www.sears.com To purchase a protection agreement (U.S.A.) or maintenance agreement (Canada) on -line for free repair (or replacement if repair proves impossible). This warranty gives you specific legal rights, and you need to arrange for the location of your home or ours! and Canada) www.sears.com www.sears.ca Our Home For repair of purchase. Your Home For repair-in USA © 2006 ICON IP, Inc.
... (U.S.A. only) www.sears.com To purchase a protection agreement (U.S.A.) or maintenance agreement (Canada) on -line for free repair (or replacement if repair proves impossible). This warranty gives you specific legal rights, and you need to arrange for the location of your home or ours! and Canada) www.sears.com www.sears.ca Our Home For repair of purchase. Your Home For repair-in USA © 2006 ICON IP, Inc.

