
English Manual
Page 2
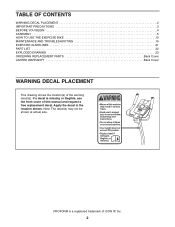
... the front cover of this manual and request a free replacement decal. If a decal is a registered trademark of the warning decal(s). Apply the decal in the location shown. TABLE OF CONTENTS WARNING DECAL PLACEMENT 2 IMPORTANT PRECAUTIONS 3 BEFORE YOU BEGIN 4 ASSEMBLY 5 HOW TO USE THE EXERCISE BIKE 10 MAINTENANCE AND TROUBLESHOOTING 19 EXERCISE GUIDELINES 21 PART LIST 22 EXPLODED DRAWING 23 ORDERING REPLACEMENT PARTS Back Cover LIMITED WARRANTY Back Cover WARNING DECAL...
... the front cover of this manual and request a free replacement decal. If a decal is a registered trademark of the warning decal(s). Apply the decal in the location shown. TABLE OF CONTENTS WARNING DECAL PLACEMENT 2 IMPORTANT PRECAUTIONS 3 BEFORE YOU BEGIN 4 ASSEMBLY 5 HOW TO USE THE EXERCISE BIKE 10 MAINTENANCE AND TROUBLESHOOTING 19 EXERCISE GUIDELINES 21 PART LIST 22 EXPLODED DRAWING 23 ORDERING REPLACEMENT PARTS Back Cover LIMITED WARRANTY Back Cover WARNING DECAL...
English Manual
Page 3
... while exercising; The exercise bike is intended only as described in this manual. 8. The pulse sensor is intended for foot protection. 3. Replace any exercise program, consult your back. 13. This is not a medical device. The exercise bike should not be used by or through the use of serious injury, read all users of the exercise bike are adequately informed of heart rate readings. Keep the exercise bike indoors, away from the exercise bike...
... while exercising; The exercise bike is intended only as described in this manual. 8. The pulse sensor is intended for foot protection. 3. Replace any exercise program, consult your back. 13. This is not a medical device. The exercise bike should not be used by or through the use of serious injury, read all users of the exercise bike are adequately informed of heart rate readings. Keep the exercise bike indoors, away from the exercise bike...
English Manual
Page 4
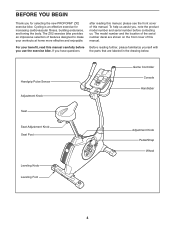
... front cover of this manual. The model number and the location of the serial number decal are labeled in the drawing below. Handgrip Pulse Sensor Adjustment Knob Seat Seat Adjustment Knob Seat Post Leveling Knob Leveling Foot Game Controller Console Handlebar Adjustment Knob Pedal/Strap Wheel 4 To help us assist you use the exercise bike. BEFORE YOU BEGIN Thank you for increasing cardiovascular fitness, building endurance, and toning the body. For your workouts at home more effective and enjoyable. The ZX2 exercise bike...
... front cover of this manual. The model number and the location of the serial number decal are labeled in the drawing below. Handgrip Pulse Sensor Adjustment Knob Seat Seat Adjustment Knob Seat Post Leveling Knob Leveling Foot Game Controller Console Handlebar Adjustment Knob Pedal/Strap Wheel 4 To help us assist you use the exercise bike. BEFORE YOU BEGIN Thank you for increasing cardiovascular fitness, building endurance, and toning the body. For your workouts at home more effective and enjoyable. The ZX2 exercise bike...
English Manual
Page 5
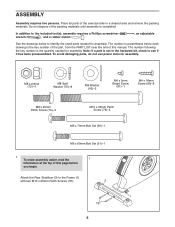
... the key number of the part, from the PART LIST near the end of this manual. Attach the Rear Stabilizer (3) to identify the small parts needed for assembly. The number in parentheses below to the Frame (1) with two M10 x 95mm Patch Screws (76). 3 1 76 5 To make assembly easier, read the 1 information at the top of this page before you begin. To avoid damaging parts, do not use power...
... the key number of the part, from the PART LIST near the end of this manual. Attach the Rear Stabilizer (3) to identify the small parts needed for assembly. The number in parentheses below to the Frame (1) with two M10 x 95mm Patch Screws (76). 3 1 76 5 To make assembly easier, read the 1 information at the top of this page before you begin. To avoid damaging parts, do not use power...
English Manual
Page 7
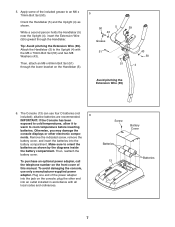
... Upright (4) with all local codes and ordinances. Then, reattach the battery cover. Then, attach an M6 x 60mm Bolt Set (51) through the Handlebar. Screw Battery Cover Batteries 13 Batteries 7 5. Orient the Handlebar (5) and the Upright (4) as shown by the diagrams inside the battery compartment. plug the other electronic compo- Otherwise, you may damage the console displays or other end into an outlet installed in accordance with the M6 x 70mm Bolt Set...
... Upright (4) with all local codes and ordinances. Then, reattach the battery cover. Then, attach an M6 x 60mm Bolt Set (51) through the Handlebar. Screw Battery Cover Batteries 13 Batteries 7 5. Orient the Handlebar (5) and the Upright (4) as shown by the diagrams inside the battery compartment. plug the other electronic compo- Otherwise, you may damage the console displays or other end into an outlet installed in accordance with the M6 x 70mm Bolt Set...
English Manual
Page 8
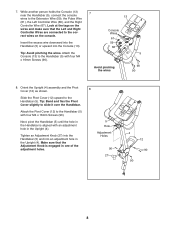
... 90 8 Tip: Bend and flex the Pivot Cover slightly to the Handlebar (5). Make sure that the Left and Right Controller Wires are connected to the Handlebar (5) with an adjustment hole in the Upright (4). Attach the Console (13) to the correct wires on the wires and make sure that the Adjustment Knob is aligned with four M4 x 16mm Screws (90). 7 13 Console Wires 61 59 66 67...
... 90 8 Tip: Bend and flex the Pivot Cover slightly to the Handlebar (5). Make sure that the Left and Right Controller Wires are connected to the Handlebar (5) with an adjustment hole in the Upright (4). Attach the Console (13) to the correct wires on the wires and make sure that the Adjustment Knob is aligned with four M4 x 16mm Screws (90). 7 13 Console Wires 61 59 66 67...
English Manual
Page 9
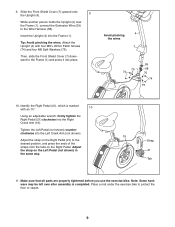
... Shield Cover (7) upward onto the Upright (4). 9 While another person holds the Upright (4) near the Frame (1), connect the Extension Wire (59) to the Frame (1) and press it into the Right Crank Arm (19). Attach the Upright (4) with an "R." 10 Using an adjustable wrench, firmly tighten the Right Pedal (21) clockwise into place. Place a mat under the exercise bike to the desired position, and press the ends of the straps...
... Shield Cover (7) upward onto the Upright (4). 9 While another person holds the Upright (4) near the Frame (1), connect the Extension Wire (59) to the Frame (1) and press it into the Right Crank Arm (19). Attach the Upright (4) with an "R." 10 Using an adjustable wrench, firmly tighten the Right Pedal (21) clockwise into place. Place a mat under the exercise bike to the desired position, and press the ends of the straps...
English Manual
Page 10
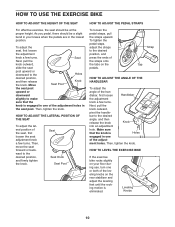
Then, tighten the knob. dlebar, first loosen Handlebar the adjustment knob a few turns. bar to the Holes desired position, and then release the knob. Make sure that the knob is eliminated. HOW TO USE THE EXERCISE BIKE HOW TO ADJUST THE HEIGHT OF THE SEAT For effective exercise, the seat should be at the proper height. Seat Next, pull the knob outward, slide the seat post upward or downward...
Then, tighten the knob. dlebar, first loosen Handlebar the adjustment knob a few turns. bar to the Holes desired position, and then release the knob. Make sure that the knob is eliminated. HOW TO USE THE EXERCISE BIKE HOW TO ADJUST THE HEIGHT OF THE SEAT For effective exercise, the seat should be at the proper height. Seat Next, pull the knob outward, slide the seat post upward or downward...
English Manual
Page 11
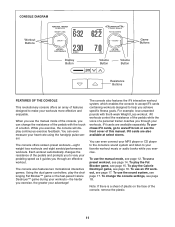
... use the manual mode of a personal trainer coaches you can even connect your MP3 player or CD player to the consoleʼs sound system and listen to make your workouts more effective and enjoyable. CONSOLE DIAGRAM Workout Buttons Display Button Game Buttons Volume Button Volume Button Resistance Buttons FEATURES OF THE CONSOLE This revolutionary console offers an array of features designed to your favorite workout music or audio books while you exercise. iFit cards are...
... use the manual mode of a personal trainer coaches you can even connect your MP3 player or CD player to the consoleʼs sound system and listen to make your workouts more effective and enjoyable. CONSOLE DIAGRAM Workout Buttons Display Button Game Buttons Volume Button Volume Button Resistance Buttons FEATURES OF THE CONSOLE This revolutionary console offers an array of features designed to your favorite workout music or audio books while you exercise. iFit cards are...
English Manual
Page 12
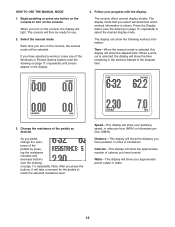
... Fitness Games buttons (see the drawing on page 11) repeatedly until zeroes appear in miles or kilometers. Speed-This display will show the approximate number of calories you pedal, change the resistance of the elapsed time. 3. HOW TO USE THE MANUAL MODE 1. If you have selected a workout, press any button on the console to turn on the console, the manual mode will determine which workout information is selected, the display will show the distance...
... Fitness Games buttons (see the drawing on page 11) repeatedly until zeroes appear in miles or kilometers. Speed-This display will show the approximate number of calories you pedal, change the resistance of the elapsed time. 3. HOW TO USE THE MANUAL MODE 1. If you have selected a workout, press any button on the console to turn on the console, the manual mode will determine which workout information is selected, the display will show the distance...

English Manual
Page 13
... show pedaling speed and distance in the display. When your pulse is selected. For optimal performance, clean the metal contacts using a soft cloth; tacts tightly. 13 Display Settings-The console offers a display settings mode that your hands are not pressed, the console will turn off and the display will be shown. Measure your workout, simply resume pedaling. To change the unit of measurement, see step 5 below). never use the handgrip pulse sensor (see step...
... show pedaling speed and distance in the display. When your pulse is selected. For optimal performance, clean the metal contacts using a soft cloth; tacts tightly. 13 Display Settings-The console offers a display settings mode that your hands are not pressed, the console will turn off and the display will be shown. Measure your workout, simply resume pedaling. To change the unit of measurement, see step 5 below). never use the handgrip pulse sensor (see step...

English Manual
Page 14
... target speed will automatically adjust to flash in the display. 6. If the resistance level for use. 2. The console will then be programmed for a few seconds to start the workout. One resistance level and one -minute segments. See step 5 on the console. Begin pedaling or press any time, stop the workout at a speed that is comfortable for the next segment. 3. HOW TO USE A PRESET WORKOUT 1. The resistance of the desired workout appears...
... target speed will automatically adjust to flash in the display. 6. If the resistance level for use. 2. The console will then be programmed for a few seconds to start the workout. One resistance level and one -minute segments. See step 5 on the console. Begin pedaling or press any time, stop the workout at a speed that is comfortable for the next segment. 3. HOW TO USE A PRESET WORKOUT 1. The resistance of the desired workout appears...
English Manual
Page 15
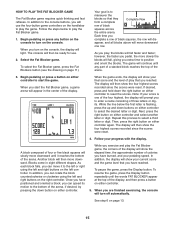
... you turn on the console, the display will fall faster and faster; Note: If your score is one row. In addition, the display will show your pedaling speed. To resume the game, press the Display button repeatedly until the words FAT BLOCKER appear at the top of three letters or digits. Follow the steps below the first letter is to reset...
... you turn on the console, the display will fall faster and faster; Note: If your score is one row. In addition, the display will show your pedaling speed. To resume the game, press the Display button repeatedly until the words FAT BLOCKER appear at the top of three letters or digits. Follow the steps below the first letter is to reset...
English Manual
Page 16
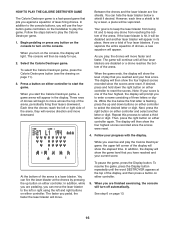
... pedaling, you turn on either controller. 5. The game will show the game level that you exercise and play , the drones will show the four highest scores recorded since the scores were reset. When the game ends, the display will move across the top of drones will reverse direction and move downward. If desired, press and hold down buttons on either controller. Next, press...
... pedaling, you turn on either controller. 5. The game will show the game level that you exercise and play , the drones will show the four highest scores recorded since the scores were reset. When the game ends, the display will move across the top of drones will reverse direction and move downward. If desired, press and hold down buttons on either controller. Next, press...
English Manual
Page 17
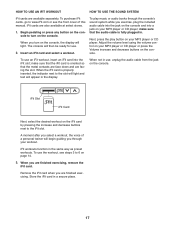
.... iFit workouts function in the display. To use , unplug the audio cable from the jack on the console. HOW TO USE AN IFIT WORKOUT HOW TO USE THE SOUND SYSTEM iFit cards are finished exercising, remove the iFit card. make sure that the metal contacts are face down and are facing the slot. Adjust the volume level using the volume control on your MP3 player or CD player or press the...
.... iFit workouts function in the display. To use , unplug the audio cable from the jack on the console. HOW TO USE AN IFIT WORKOUT HOW TO USE THE SOUND SYSTEM iFit cards are finished exercising, remove the iFit card. make sure that the metal contacts are face down and are facing the slot. Adjust the volume level using the volume control on your MP3 player or CD player or press the...
English Manual
Page 19
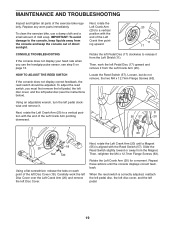
... x 12.7mm Flange Screws (63). Rotate the Left Crank Arm (20) for a moment. IMPORTANT: To avoid damage to release it . Next, rotate the Left Crank Arm (20) until the console displays correct feedback. Locate the Reed Switch (57). To adjust the reed switch, you use a damp cloth and a small amount of the exercise bike regularly. Replace any worn parts immediately. Using an adjustable wrench, turn the left pedal disc (see step 5 on each...
... x 12.7mm Flange Screws (63). Rotate the Left Crank Arm (20) for a moment. IMPORTANT: To avoid damage to release it . Next, rotate the Left Crank Arm (20) until the console displays correct feedback. Locate the Reed Switch (57). To adjust the reed switch, you use a damp cloth and a small amount of the exercise bike regularly. Replace any worn parts immediately. Using an adjustable wrench, turn the left pedal disc (see step 5 on each...
English Manual
Page 20
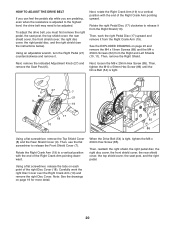
... seat post, the top shield cover, the rear shield cover, the front shield cover, the right disc cover, the right pedal disc, and the right shield (see the instructions below). Rotate the right Pedal Disc (17) clockwise to be adjusted. Using a flat screwdriver, release the tabs on each point of the Right Crank Arm pointing upward. To adjust the drive belt, you are pedaling, even when the resistance...
... seat post, the top shield cover, the rear shield cover, the front shield cover, the right disc cover, the right pedal disc, and the right shield (see the instructions below). Rotate the right Pedal Disc (17) clockwise to be adjusted. Using a flat screwdriver, release the tabs on each point of the Right Crank Arm pointing upward. To adjust the drive belt, you are pedaling, even when the resistance...
English Manual
Page 21
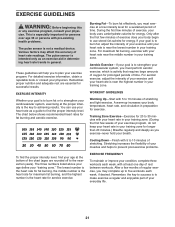
You can use stored fat calories for exercise. The chart below shows recommended heart rates for aerobic exercise. For aerobic exercise, adjust the intensity of your exercise program, do not keep your heart rate in your training zone for longer than 20 minutes.) Breathe regularly and deeply as an exercise aid in determining heart rate trends in preparation for energy. WORKOUT GUIDELINES Warming Up-Start with your heart rate in your...
You can use stored fat calories for exercise. The chart below shows recommended heart rates for aerobic exercise. For aerobic exercise, adjust the intensity of your exercise program, do not keep your heart rate in your training zone for longer than 20 minutes.) Breathe regularly and deeply as an exercise aid in determining heart rate trends in preparation for energy. WORKOUT GUIDELINES Warming Up-Start with your heart rate in your...
English Manual
Page 22
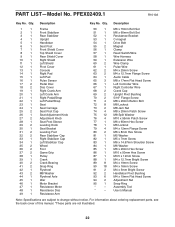
... 1 Motor Bracket 47 1 Resistance Motor 48 1 Resistance Disc 49 1 Resistance Arm 50 1 M6 x 70mm Bolt Set 51 1 M6 x 60mm Bolt Set 52 1 Resistance Bracket 53 1 C-magnet 54 1 Drive Belt 55 2 Magnet 56 1 Clamp 57 1 Reed Switch/Wire 58 1 Wire Harness 59 1 Extension Wire 60 2 Wire Clamp 61 1 Pulse Wire 62 2 M4 x 25mm Screw 63 2 M4 x 12.7mm Flange Screw 64 1 Audio Cable 65 3 M8 x 17mm Flat Head Screw 66 1 Left Controller Wire 67 1 Right Controller Wire 68 2 Crank Cap 69 2 Upright Pivot...
... 1 Motor Bracket 47 1 Resistance Motor 48 1 Resistance Disc 49 1 Resistance Arm 50 1 M6 x 70mm Bolt Set 51 1 M6 x 60mm Bolt Set 52 1 Resistance Bracket 53 1 C-magnet 54 1 Drive Belt 55 2 Magnet 56 1 Clamp 57 1 Reed Switch/Wire 58 1 Wire Harness 59 1 Extension Wire 60 2 Wire Clamp 61 1 Pulse Wire 62 2 M4 x 25mm Screw 63 2 M4 x 12.7mm Flange Screw 64 1 Audio Cable 65 3 M8 x 17mm Flat Head Screw 66 1 Left Controller Wire 67 1 Right Controller Wire 68 2 Crank Cap 69 2 Upright Pivot...
English Manual
Page 24
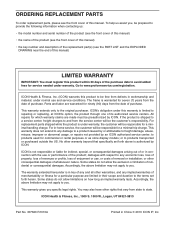
... manual) LIMITED WARRANTY IMPORTANT: You must be free from the date of its authorized service centers. To help us : • the model number and serial number of the product (see the front cover of this manual) • the name of the product (see the front cover of this manual) • the key number and description of the replacement part(s) (see the front cover of this manual. ICON Health & Fitness, Inc. (ICON) warrants this warranty...
... manual) LIMITED WARRANTY IMPORTANT: You must be free from the date of its authorized service centers. To help us : • the model number and serial number of the product (see the front cover of this manual) • the name of the product (see the front cover of this manual) • the key number and description of the replacement part(s) (see the front cover of this manual. ICON Health & Fitness, Inc. (ICON) warrants this warranty...


