
Instruction Manual
Page 1
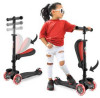
HURFS96 ScootKid 3-Wheel Kids Scooter Child & Toddler Toy Scooter with Built-in LED Wheel Lights, Fold-Out Comfort Seat (Ages 1+)
HURFS96 ScootKid 3-Wheel Kids Scooter Child & Toddler Toy Scooter with Built-in LED Wheel Lights, Fold-Out Comfort Seat (Ages 1+)

Instruction Manual
Page 2
Before riding your new scooter, please review the attached instructions carefully. Ride safely, and enjoy! Dear customer, Thank you can refer back to them in a safe place so you for choosing the Hurtle Scootkid Scooter! You have received a quality product, backed by our excellent customer support. Store them as needed.
Before riding your new scooter, please review the attached instructions carefully. Ride safely, and enjoy! Dear customer, Thank you can refer back to them in a safe place so you for choosing the Hurtle Scootkid Scooter! You have received a quality product, backed by our excellent customer support. Store them as needed.

Instruction Manual
Page 3
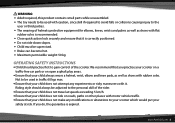
Have fun with your kind attention. IMPORTANT INSTRUCTIONS AND WARNINGS IMPORTANT: Before you allow your new scooter, please read the operating safety instructions carefully rstly, and ensure that the wheels have acquired a high quality product and also...use the scooter after -sales service. Wear protective gear when riding. They include these instructions in the future. Adult supervision for your new scooter! Please kindly note that the screws may come loose by your child to change without notice, thanks for assembly and use. IMPORTANT: Undoing the axle screws several times...
Have fun with your kind attention. IMPORTANT INSTRUCTIONS AND WARNINGS IMPORTANT: Before you allow your new scooter, please read the operating safety instructions carefully rstly, and ensure that the wheels have acquired a high quality product and also...use the scooter after -sales service. Wear protective gear when riding. They include these instructions in the future. Adult supervision for your new scooter! Please kindly note that the screws may come loose by your child to change without notice, thanks for assembly and use. IMPORTANT: Undoing the axle screws several times...
Instruction Manual
Page 4
... practice rst to gain control of the scooter. www.PyleUSA.com 4 If you practice your scooter on a tra c-free car park or on roads, paths or other places with motor vehicle tra c. • Ensure that your child does not make any experiments or risky ...toy needs to be used in tra c 60 kgs max. • Ensure that your child does not attempt any modi cations or alterations to your scooter which would put your safety at rubber soles is recommended. • Close quick-action lock securely and ensure that it . OPERATING SAFETY INSTRUCTIONS • Child should always be adjusted...
... practice rst to gain control of the scooter. www.PyleUSA.com 4 If you practice your scooter on a tra c-free car park or on roads, paths or other places with motor vehicle tra c. • Ensure that your child does not make any experiments or risky ...toy needs to be used in tra c 60 kgs max. • Ensure that your child does not attempt any modi cations or alterations to your scooter which would put your safety at rubber soles is recommended. • Close quick-action lock securely and ensure that it . OPERATING SAFETY INSTRUCTIONS • Child should always be adjusted...
Instruction Manual
Page 5
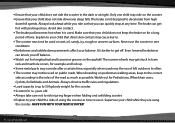
.... Never use . When boarding on for 3+ years old • Always take care not to risk injuring ngers when folding and unfolding scooter. • Explain to your child the risks of time. The brake is used on the scooter. • Ensure that your child that you o balance. • Watch out for Pedestrians, Wheelchair users, Cyclists, Rollerblade and Animals. Always...
.... Never use . When boarding on for 3+ years old • Always take care not to risk injuring ngers when folding and unfolding scooter. • Explain to your child the risks of time. The brake is used on the scooter. • Ensure that your child that you o balance. • Watch out for Pedestrians, Wheelchair users, Cyclists, Rollerblade and Animals. Always...
Instruction Manual
Page 6
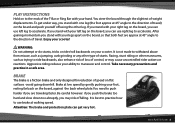
... back on the board, against the back wheel plate.You need to the direction of travel . Racing, stunt riding or other leg. Brake at walking speed. PLAY INSTRUCTIONS Hold on to maneuver and control. WARNING: Do not attempt or do stunts, tricks or rider/roll backwards on the board, you can use right leg to ...however: if you push the brake too hard and slow down too abruptly, you stand with your legs apart on the board and push yourself o using the other maneuvers, such as jumping, curb grinding or any other type of the T-Bar or Ring Bar with your left leg to accelerate. www....
... back on the board, against the back wheel plate.You need to the direction of travel . Racing, stunt riding or other leg. Brake at walking speed. PLAY INSTRUCTIONS Hold on to maneuver and control. WARNING: Do not attempt or do stunts, tricks or rider/roll backwards on the board, you can use right leg to ...however: if you push the brake too hard and slow down too abruptly, you stand with your legs apart on the board and push yourself o using the other maneuvers, such as jumping, curb grinding or any other type of the T-Bar or Ring Bar with your left leg to accelerate. www....
Instruction Manual
Page 7
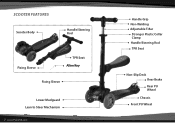
SCOOTER FEATURES Scooter Body Handle/Steering Rod Fixing Sleeve TPR Seat Allen Key Fixing Sleeve Lower Mudguard Lean to Steer Mechanism 7 www.PyleUSA.com Handle Grip Non-Welding Adjustable T-Bar Stronger Plastic Collar Clamp Handle/Steering Rod TPR Seat Non-Slip Deck Rear Brake Rear PU Wheel Chassis Front PU Wheel
SCOOTER FEATURES Scooter Body Handle/Steering Rod Fixing Sleeve TPR Seat Allen Key Fixing Sleeve Lower Mudguard Lean to Steer Mechanism 7 www.PyleUSA.com Handle Grip Non-Welding Adjustable T-Bar Stronger Plastic Collar Clamp Handle/Steering Rod TPR Seat Non-Slip Deck Rear Brake Rear PU Wheel Chassis Front PU Wheel
Instruction Manual
Page 8
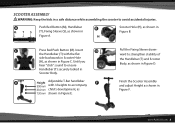
Pull the Fixing Sleeve downward to accompany child's development, as shown in Figure D. E Height Adjustable T-Bar handlebar F with the at side backwards in Scooter Hole (H), as shown in Figure C. Finish the Scooter Assembly and adjust Height as shown in Figure ... you hear "click" sound to avoid accidental injuries. C Press Red Push Button (M). H Scooter Hole (H), as shown in Figure B. A Push Red Button (M), Handlebar B M T S (T), Fixing Sleeve (S), as shown in Figure A. SCOOTER ASSEMBLY WARNING: Keep the kids in a safe distance while assembling the scooter...
Pull the Fixing Sleeve downward to accompany child's development, as shown in Figure D. E Height Adjustable T-Bar handlebar F with the at side backwards in Scooter Hole (H), as shown in Figure C. Finish the Scooter Assembly and adjust Height as shown in Figure ... you hear "click" sound to avoid accidental injuries. C Press Red Push Button (M). H Scooter Hole (H), as shown in Figure B. A Push Red Button (M), Handlebar B M T S (T), Fixing Sleeve (S), as shown in Figure A. SCOOTER ASSEMBLY WARNING: Keep the kids in a safe distance while assembling the scooter...
Instruction Manual
Page 9
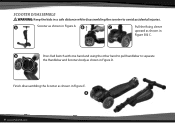
D Press Red Switch with one hand and using the other hand to pull handlebar to avoid accidental injuries. SCOOTER DISASSEMBLE WARNING: Keep the kids in Figure E. E 9 www.PyleUSA.com A Scooter as shown in Figure A B C Pull the xing sleeve upward as shown in Figure B & C. Finish disassembling the Scooter as shown in a safe distance while disassembling the scooter to separate the Handlebar and Scooters body as shown in Figure D.
D Press Red Switch with one hand and using the other hand to pull handlebar to avoid accidental injuries. SCOOTER DISASSEMBLE WARNING: Keep the kids in Figure E. E 9 www.PyleUSA.com A Scooter as shown in Figure A B C Pull the xing sleeve upward as shown in Figure B & C. Finish disassembling the Scooter as shown in a safe distance while disassembling the scooter to separate the Handlebar and Scooters body as shown in Figure D.
Instruction Manual
Page 10
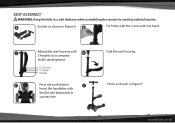
Fold the seat housing E Press red push button. Insert the handlebar with the at side backwards in Figure A B Fix rmly with the screw with D 3 heights to avoid accidental injuries. A Scooter as shown in Figure F. F Finish as shown in scooter hole www.PyleUSA.com 10 C Adjustable seat housing with one hand. SEAT ASSEMBLY WARNING: Keep the kids in a safe distance while assembling the scooter to accompany child's development.
Fold the seat housing E Press red push button. Insert the handlebar with the at side backwards in Figure A B Fix rmly with the screw with D 3 heights to avoid accidental injuries. A Scooter as shown in Figure F. F Finish as shown in scooter hole www.PyleUSA.com 10 C Adjustable seat housing with one hand. SEAT ASSEMBLY WARNING: Keep the kids in a safe distance while assembling the scooter to accompany child's development.
Instruction Manual
Page 11
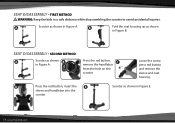
FIRST METHOD WARNING: Keep the kids in Figure A. Press the red button, C remove the handlebar from the hole on the scooter Loose the screw, press red button and remove the sleeve and seat housing. A Scooter as shown in Figure A. B Fold the seat housing up as shown in a safe distance while disassembling the scooter to avoid accidental injuries. SEAT DISASSEMBLY - SECOND METHOD A Scooter as shown in Figure E. 11 www.PyleUSA.com D Press the red button, insert the E sleeve and handlebar into the scooter Scooter as shown B in Figure B. SEAT DISASSEMBLY -
FIRST METHOD WARNING: Keep the kids in Figure A. Press the red button, C remove the handlebar from the hole on the scooter Loose the screw, press red button and remove the sleeve and seat housing. A Scooter as shown in Figure A. B Fold the seat housing up as shown in a safe distance while disassembling the scooter to avoid accidental injuries. SEAT DISASSEMBLY - SECOND METHOD A Scooter as shown in Figure E. 11 www.PyleUSA.com D Press the red button, insert the E sleeve and handlebar into the scooter Scooter as shown B in Figure B. SEAT DISASSEMBLY -
Instruction Manual
Page 12
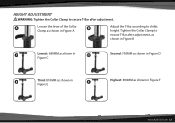
HEIGHT ADJUSTMENT WARNING: Tighten the Collar Clamp to ensure T-Bar after adjustment. Tighten the Collar Clamp to secure T-Bar after adjustrnent, as shown in Figure B C Lowest: 680MM as shown in D Figure C Second: 730MM as shown in Figure D E Third: 810MM as shown in F Figure E Highest: 890MM as shown in Figure F www.PyleUSA.com 12 A Loosen the lever of the Collar B Clamp as shown in Figure A Adjust the T-Bar according to childs height.
HEIGHT ADJUSTMENT WARNING: Tighten the Collar Clamp to ensure T-Bar after adjustment. Tighten the Collar Clamp to secure T-Bar after adjustrnent, as shown in Figure B C Lowest: 680MM as shown in D Figure C Second: 730MM as shown in Figure D E Third: 810MM as shown in F Figure E Highest: 890MM as shown in Figure F www.PyleUSA.com 12 A Loosen the lever of the Collar B Clamp as shown in Figure A Adjust the T-Bar according to childs height.

Instruction Manual
Page 13
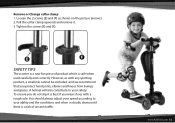
... Allen Key counterclockwise to loosen the screw Right Wheel Turn the Allen Key clockwise to loosen the screw Change Deck A 1. A 13 www.PyleUSA.com A A A A The back wheel on the picture (arrows). 2. Remove deck and tighten the screw (A). 3. MAINTENANCE INSTRUCTIONS Change Wheel The wheels wear down with the new board. In the interests of braking. Check for tight t after...
... Allen Key counterclockwise to loosen the screw Right Wheel Turn the Allen Key clockwise to loosen the screw Change Deck A 1. A 13 www.PyleUSA.com A A A A The back wheel on the picture (arrows). 2. Remove deck and tighten the screw (A). 3. MAINTENANCE INSTRUCTIONS Change Wheel The wheels wear down with the new board. In the interests of braking. Check for tight t after...
Instruction Manual
Page 14
...adjust your speed according to your ability and the conditions and when in doubt, dismount if there is a risk of product which is safe when used carefully and correctly. Loosen the 2 screws (E) and (F) as with a rough sole. To ensure you do not slip it . 3. www.PyleUSA.com 14 Pull... the collar clamp upwards and remove it is a new fun piece of unseen tra c. However, as shown on the picture (arrows). 2. Remove or Change collar ...
...adjust your speed according to your ability and the conditions and when in doubt, dismount if there is a risk of product which is safe when used carefully and correctly. Loosen the 2 screws (E) and (F) as with a rough sole. To ensure you do not slip it . 3. www.PyleUSA.com 14 Pull... the collar clamp upwards and remove it is a new fun piece of unseen tra c. However, as shown on the picture (arrows). 2. Remove or Change collar ...
Instruction Manual
Page 15
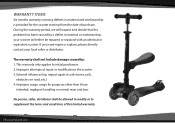
... External inlluences (eg. If you need repair or replace, please directly contact your scooter will inspect and decide that the problem has been caused by : 1. Improper attempts at repair or modi cations the scooter. 3. Improper usage, usage for the scooter starting from the date of this limited warranty...workmanship is provided for purposes other than those intended, negligent handling or normal wear and tear. WARRANTY ITEMS Six months warranty covering defects in material or workmanship, your local seller or distributor. During the warranty period, we will either be allowed to ...
... External inlluences (eg. If you need repair or replace, please directly contact your scooter will inspect and decide that the problem has been caused by : 1. Improper attempts at repair or modi cations the scooter. 3. Improper usage, usage for the scooter starting from the date of this limited warranty...workmanship is provided for purposes other than those intended, negligent handling or normal wear and tear. WARRANTY ITEMS Six months warranty covering defects in material or workmanship, your local seller or distributor. During the warranty period, we will either be allowed to ...
Instruction Manual
Page 16
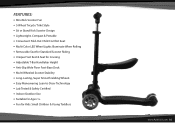
... for Cruising • Adjustable T-Bar Handlebar Height • Anti-Slip Wide Floor Foot-Base Deck • Multi-Wheeled Scooter Stability • Long-Lasting, Super Smooth Gliding Wheels • Easy Maneuvering Lean-to-Steer Technology • Lab Tested & Safety Certi ed • Indoor/Outdoor Use • Suitable for Ages 1+ • Fun for Kids: Small Children & Young...
... for Cruising • Adjustable T-Bar Handlebar Height • Anti-Slip Wide Floor Foot-Base Deck • Multi-Wheeled Scooter Stability • Long-Lasting, Super Smooth Gliding Wheels • Easy Maneuvering Lean-to-Steer Technology • Lab Tested & Safety Certi ed • Indoor/Outdoor Use • Suitable for Ages 1+ • Fun for Kids: Small Children & Young...

Instruction Manual
Page 17
WHAT'S IN THE BOX: • (1) Scooter • (1) Simple Tools for Assembly TECHNICAL SPECS: • Construction Material: ALU + Nylon + PP + TPR + PU • Wheel Type / Wheel Material: Engineered Polyurethane • Recommended Age: 1 Year and Up • Weight Capacity: Up to 132 lbs. (Seat Capacity: 45 lbs.) • Handlebar Height Setting: 25.5'', 27.5'', 31.0'', 34.0'' -inches • Wheel Size: 4.72'' x 3.15'' -inches • Total Scooter Size (L x W x H): 22.4'' x 9.6'' ʢx 25.5''-34" ʣ-inches 17 www.PyleUSA.com
WHAT'S IN THE BOX: • (1) Scooter • (1) Simple Tools for Assembly TECHNICAL SPECS: • Construction Material: ALU + Nylon + PP + TPR + PU • Wheel Type / Wheel Material: Engineered Polyurethane • Recommended Age: 1 Year and Up • Weight Capacity: Up to 132 lbs. (Seat Capacity: 45 lbs.) • Handlebar Height Setting: 25.5'', 27.5'', 31.0'', 34.0'' -inches • Wheel Size: 4.72'' x 3.15'' -inches • Total Scooter Size (L x W x H): 22.4'' x 9.6'' ʢx 25.5''-34" ʣ-inches 17 www.PyleUSA.com

Instruction Manual
Page 18
Questions? Issues? Phone: (1) 718-535-1800 Email: [email protected] We are here to help!
Questions? Issues? Phone: (1) 718-535-1800 Email: [email protected] We are here to help!