
User Guide
Page 2
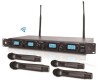
... 10 System Composition PDWM4350U Receiver PDWM4360U Receiver (2) Handheld Mics (4) Handheld Mics (2) Belt-Pack Transmitters AC Power Adapter (2) Lavalier Mics Rack Mount Kit (2) Headset Mics Batteries AC Power Adapter Rack Mount Kit Batteries 1 Thank you for future reference. This professional wireless microphone system operates on the body-pack and hand-held transmitters warns the user that it can be used simultaneously to environmental RF (Radio Frequency) noise. 5. Passes Q.C. Each system...
... 10 System Composition PDWM4350U Receiver PDWM4360U Receiver (2) Handheld Mics (4) Handheld Mics (2) Belt-Pack Transmitters AC Power Adapter (2) Lavalier Mics Rack Mount Kit (2) Headset Mics Batteries AC Power Adapter Rack Mount Kit Batteries 1 Thank you for future reference. This professional wireless microphone system operates on the body-pack and hand-held transmitters warns the user that it can be used simultaneously to environmental RF (Radio Frequency) noise. 5. Passes Q.C. Each system...

User Guide
Page 3
... the wireless system audio signal level. 7."RF" signal Indicator:It glows when the Receiver receive RF signal from Transmitter. 8.Antenna. 9.XLR Balanced Output Jack: Connect the audio cable from this jack to the input port of amplifier, mixer. 10.Volume Knob: Adjust the volume output of receiver. 11.1/4" Audio Output Jack: Connect the audio cable from this jack to install the battery. 4 Power Jack: Connect the...
... the wireless system audio signal level. 7."RF" signal Indicator:It glows when the Receiver receive RF signal from Transmitter. 8.Antenna. 9.XLR Balanced Output Jack: Connect the audio cable from this jack to the input port of amplifier, mixer. 10.Volume Knob: Adjust the volume output of receiver. 11.1/4" Audio Output Jack: Connect the audio cable from this jack to install the battery. 4 Power Jack: Connect the...

User Guide
Page 4
... Button: Sets channel data. 5 TRANSMITTER BATTERY INSTALLATION 1. Belt Clip: Attach the transmitter to open. 2. Gain Adjusting Volume: Adjust the transmitter audio input gain. 8.State Setting Switch: Set the using state of transmitter. 3. Battery Installation of power and should renew the battery. 6. Power and Audio Mute Switch. 2. Push down to open the battery cover, Insert the supplied batteries into battery jar in polarity and close the battery cover. Audio Input...
... Button: Sets channel data. 5 TRANSMITTER BATTERY INSTALLATION 1. Belt Clip: Attach the transmitter to open. 2. Gain Adjusting Volume: Adjust the transmitter audio input gain. 8.State Setting Switch: Set the using state of transmitter. 3. Battery Installation of power and should renew the battery. 6. Power and Audio Mute Switch. 2. Push down to open the battery cover, Insert the supplied batteries into battery jar in polarity and close the battery cover. Audio Input...
User Guide
Page 5
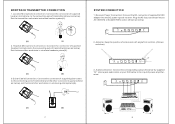
... ) Set the transmitter work state in wireless headset system(H). 2. Headset Microphone Connection: Connect the connecter of supplied headset microphone to the connecting jack of receiver. SYSTEM CONNECTION 1. Lavalier Microphone Connection: Connect the connecter of supplied lavalier microphone to the connecting jack of supplied AC/DC adapter into an AC120/60Hz or AC220V/50Hz outlet. (Shown as below ) 2. Audio Connection: Connect the corresponding output of receiver by supplied 1/4" phone jack audio cable or your XLR cable...
... ) Set the transmitter work state in wireless headset system(H). 2. Headset Microphone Connection: Connect the connecter of supplied headset microphone to the connecting jack of receiver. SYSTEM CONNECTION 1. Lavalier Microphone Connection: Connect the connecter of supplied lavalier microphone to the connecting jack of supplied AC/DC adapter into an AC120/60Hz or AC220V/50Hz outlet. (Shown as below ) 2. Audio Connection: Connect the corresponding output of receiver by supplied 1/4" phone jack audio cable or your XLR cable...

User Guide
Page 7
... Power Requirements: 2 x AA (1.5V) Dimensions: 10.5 x 6.5 x 3cm PDWM4360U Wireless Microphone System, UHF Quad Channel, 4 Handheld Microphones, Rack Mountable UHF Band Receiver System Quad Frequency Channel Design (Channel 1, 2, 3, 4) Broad Frequency Response Range & Low Distortion High Signal/Noise Ratio Performance RF Signal & AF Signal LED Indicators Radio Frequency and Audio Frequency LCD Digital Display with Channel & Frequency Readout Independent Channel Adjustable Volume Controls Easy-to-Use...
... Power Requirements: 2 x AA (1.5V) Dimensions: 10.5 x 6.5 x 3cm PDWM4360U Wireless Microphone System, UHF Quad Channel, 4 Handheld Microphones, Rack Mountable UHF Band Receiver System Quad Frequency Channel Design (Channel 1, 2, 3, 4) Broad Frequency Response Range & Low Distortion High Signal/Noise Ratio Performance RF Signal & AF Signal LED Indicators Radio Frequency and Audio Frequency LCD Digital Display with Channel & Frequency Readout Independent Channel Adjustable Volume Controls Easy-to-Use...


