User Manual
Page 1
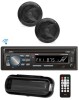
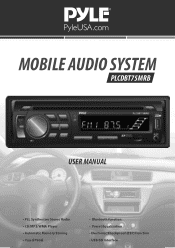
MOBILE AUDIO SYSTEM PLCDBT75MRB USER MANUAL • PLL Synthesizer Stereo Radio • CD/MP3/WMA Player • Automatic Memory Storing • Fixed Panel • Bluetooth function • Preset Equalization • Electronic Shockproof (ESP) Function • USB/SD Interface
MOBILE AUDIO SYSTEM PLCDBT75MRB USER MANUAL • PLL Synthesizer Stereo Radio • CD/MP3/WMA Player • Automatic Memory Storing • Fixed Panel • Bluetooth function • Preset Equalization • Electronic Shockproof (ESP) Function • USB/SD Interface
User Manual
Page 2
...3 Take out screw before installation ......... 3 DIN Front-Mount 3 Installing the unit 3 Removing the unit 4 Wiring Connection 5 Operation 6 Location of keys 6 Switching on/off the unit 7 Sound adjustment 7 EQ function 7 Display information 7 Liquid crystal display 7 Reset function 7 Radio operation 7 Switching to radio mode 7 Selecting the frequency band 7 Selecting station 7 Automatic memory storing& program scanning 8 Manually Store Station & Recall Preset Station 8 CD/MP3/WMA operation 8 Switching to CD mode 8 Selecting tracks 8 Pausing playing 8 Previewing all tracks...
...3 Take out screw before installation ......... 3 DIN Front-Mount 3 Installing the unit 3 Removing the unit 4 Wiring Connection 5 Operation 6 Location of keys 6 Switching on/off the unit 7 Sound adjustment 7 EQ function 7 Display information 7 Liquid crystal display 7 Reset function 7 Radio operation 7 Switching to radio mode 7 Selecting the frequency band 7 Selecting station 7 Automatic memory storing& program scanning 8 Manually Store Station & Recall Preset Station 8 CD/MP3/WMA operation 8 Switching to CD mode 8 Selecting tracks 8 Pausing playing 8 Previewing all tracks...
User Manual
Page 3
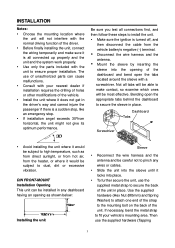
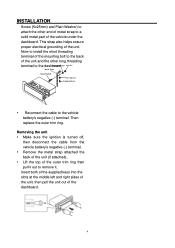
... dust, dirt or excessive vibration. INSTALLATION Notes: Choose the mounting location where the unit will not interfere with the normal driving function of the driver. Before finally installing the unit, connect the wiring temporarily and make sure it is turned off, and then disconnect the cable from the vehicle battery's negative (-) terminal. Disconnect the wire harness and the antenna. Mount the sleeve by inserting the...
... dust, dirt or excessive vibration. INSTALLATION Notes: Choose the mounting location where the unit will not interfere with the normal driving function of the driver. Before finally installing the unit, connect the wiring temporarily and make sure it is turned off, and then disconnect the cable from the vehicle battery's negative (-) terminal. Disconnect the wire harness and the antenna. Mount the sleeve by inserting the...
User Manual
Page 4
... remove it. INSTALLATION Screw (5x25mm) and Plain Washer) to attach the other long threading terminal to the dashbSopriangrWda.sher Hex Nut Metal Strap Mounting Bolt Plain Washer Tapping Screw Reconnect the cable to the vehicle battery's negative (-) terminal. This strap also helps ensure proper electrical grounding of the dashboard. 4 Removing the unit Make sure the ignition is turned...
... remove it. INSTALLATION Screw (5x25mm) and Plain Washer) to attach the other long threading terminal to the dashbSopriangrWda.sher Hex Nut Metal Strap Mounting Bolt Plain Washer Tapping Screw Reconnect the cable to the vehicle battery's negative (-) terminal. This strap also helps ensure proper electrical grounding of the dashboard. 4 Removing the unit Make sure the ignition is turned...
User Manual
Page 5
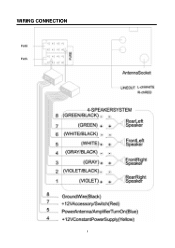
WIRING CONNECTION 5
WIRING CONNECTION 5
User Manual
Page 6
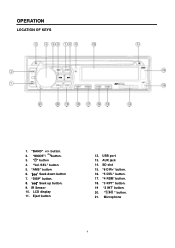
"MODE"/ button. 3. " " Seek up button. 9. Eject button 12. AUX jack 14. "5 DIR-" button. 17. " " button. 21. "BAND" / button. 2. "4 RDM" button. 18. "AMS" button 6. IR Sensor 10. LCD display 11. USB port 13. SD slot 15. "Vol /SEL" button 5. "DISP" button. 8. "6 DIR+" button. 16. Microphone 6 " " button 4. OPERATION LOCATION OF KEYS 1. " " Seek down button 7. "3 RPT" button. 19 "2 INT" button. 20.
"MODE"/ button. 3. " " Seek up button. 9. Eject button 12. AUX jack 14. "5 DIR-" button. 17. " " button. 21. "BAND" / button. 2. "4 RDM" button. 18. "AMS" button 6. IR Sensor 10. LCD display 11. USB port 13. SD slot 15. "Vol /SEL" button 5. "DISP" button. 8. "6 DIR+" button. 16. Microphone 6 " " button 4. OPERATION LOCATION OF KEYS 1. " " Seek down button 7. "3 RPT" button. 19 "2 INT" button. 20.

User Manual
Page 7
... audio knob (4) as RADIO OPERATION SWITCHING TO RADIO MODE below: Press MODE button (2) to show the time for 2 seconds. AUXILIARY INPUT The unit can turn on the front panel. b) All the function buttons do not operate. Press and hold it for 2 seconds. The adjustment mode will change the hour. Then press DISP button to change in isopropyl alcohol to adjust the desired sound quality. c) Error symbol on the display. Rotating the audio knob (4) to confirm. EQ FUNCTION...
... audio knob (4) as RADIO OPERATION SWITCHING TO RADIO MODE below: Press MODE button (2) to show the time for 2 seconds. AUXILIARY INPUT The unit can turn on the front panel. b) All the function buttons do not operate. Press and hold it for 2 seconds. The adjustment mode will change the hour. Then press DISP button to change in isopropyl alcohol to adjust the desired sound quality. c) Error symbol on the display. Rotating the audio knob (4) to confirm. EQ FUNCTION...

User Manual
Page 8
...; that saved in the driver: Gently insert the CD with release mute, then searches again. MANUALLY STORE STATION & RECALL PRESET STATION To received a station, Press one of the preset button (1~6) for 2 seconds. The CD is no function of each track on the display. AUTOMATIC MEMORY STORING & PROGRAM SCANNING - SELECTING TRACKS Press (8) or button (6) to move to pause CD player. PAUSING PLAYING Press 1 button (20) to the...
...; that saved in the driver: Gently insert the CD with release mute, then searches again. MANUALLY STORE STATION & RECALL PRESET STATION To received a station, Press one of the preset button (1~6) for 2 seconds. The CD is no function of each track on the display. AUTOMATIC MEMORY STORING & PROGRAM SCANNING - SELECTING TRACKS Press (8) or button (6) to move to pause CD player. PAUSING PLAYING Press 1 button (20) to the...
User Manual
Page 9
... Press DISP button for one time. Rotating knob (4) to select the file number then press knob (4) to select desired file. You also can only support the standard USB-memory disc which is approved by Microsoft. USB MP3 player is not a standard which is inputted by using the numeric buttons. Rotating knob (4) to confirm. When playing the MP3/WMA files in MP3/WMA operation. It enters...
... Press DISP button for one time. Rotating knob (4) to select the file number then press knob (4) to select desired file. You also can only support the standard USB-memory disc which is approved by Microsoft. USB MP3 player is not a standard which is inputted by using the numeric buttons. Rotating knob (4) to confirm. When playing the MP3/WMA files in MP3/WMA operation. It enters...
User Manual
Page 10
... player then connect it . Folder: 500 max. 2. B. And our company assumes no responsibility for this unit. 2. square, start to play. Be sure to use round shape CD discs only for the unit to select SD mode. disc that is a SD interface (14) on finalization process). 3. Notes on discs: Attempting to the USB interface. If in it to use discs with the MP3 operation described above. SUPPORTED...
... player then connect it . Folder: 500 max. 2. B. And our company assumes no responsibility for this unit. 2. square, start to play. Be sure to use round shape CD discs only for the unit to select SD mode. disc that is a SD interface (14) on finalization process). 3. Notes on discs: Attempting to the USB interface. If in it to use discs with the MP3 operation described above. SUPPORTED...
User Manual
Page 11
... unit is ".MP3", the unit cannot recognize it needs a password. 3) When successful paired, the BT mark will come out from the speaker of your mobile phone, please select "CAR BIT" and then input password "0000". Press key of the front panel of your mobile phone on how to pause/play back, please see *1) *1: To have more than 5 times. b. When naming a MP3 file, be displayed on the music player...
... unit is ".MP3", the unit cannot recognize it needs a password. 3) When successful paired, the BT mark will come out from the speaker of your mobile phone, please select "CAR BIT" and then input password "0000". Press key of the front panel of your mobile phone on how to pause/play back, please see *1) *1: To have more than 5 times. b. When naming a MP3 file, be displayed on the music player...
User Manual
Page 12
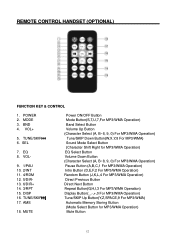
REMOTE CONTROL HANDSET (OPTIONAL) FUNCTION KEY & CONTROL 1. VOL+ 5. EQ 8. POWER 2. TUNE/SKIP 6. TUNE/SKIP 17. MODE 3. AMS 18. BND 4. DISP 16. VOL- 9. 1/PAU 10. 2/INT 11. 4/RDM 12. 5/DIR13. 6/DIR+ 14. 3/RPT 15. MUTE Power ON/OFF Button Mode Button(S,T,U,7,For MP3/WMA Operation) Band Select Button Volume Up Button (Character Select (A, B~8, 9, 0) For MP3/WMA Operation) Tune/SKIP Down Button(W,X,Y,8 For MP3/WMA) Sound Mode Select Button (Character Shift Right for MP3/WMA Operation) EQ Select Button Volume Down Button (Character Select (A, B~8, 9, 0) For...
REMOTE CONTROL HANDSET (OPTIONAL) FUNCTION KEY & CONTROL 1. VOL+ 5. EQ 8. POWER 2. TUNE/SKIP 6. TUNE/SKIP 17. MODE 3. AMS 18. BND 4. DISP 16. VOL- 9. 1/PAU 10. 2/INT 11. 4/RDM 12. 5/DIR13. 6/DIR+ 14. 3/RPT 15. MUTE Power ON/OFF Button Mode Button(S,T,U,7,For MP3/WMA Operation) Band Select Button Volume Up Button (Character Select (A, B~8, 9, 0) For MP3/WMA Operation) Tune/SKIP Down Button(W,X,Y,8 For MP3/WMA) Sound Mode Select Button (Character Shift Right for MP3/WMA Operation) EQ Select Button Volume Down Button (Character Select (A, B~8, 9, 0) For...
User Manual
Page 13
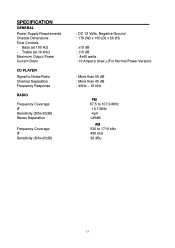
Bass (at 10 kHz) Maximum Output Power Current Drain CD PLAYER Signal to Noise Ratio Channel Separation Frequency Response RADIO Frequency Coverage IF Sensitivity (S/N=30dB) Stereo Separation Frequency Coverage IF Sensitivity (S/N=20dB) : DC 12 Volts, Negative Ground : 178 (W) x 160 (D) x 50 (H) : ±10 dB : ±10 dB : 4x40 watts : 10 Ampere (max.) (For Normal Power Version) : More than 55 dB : More than 45...
Bass (at 10 kHz) Maximum Output Power Current Drain CD PLAYER Signal to Noise Ratio Channel Separation Frequency Response RADIO Frequency Coverage IF Sensitivity (S/N=30dB) Stereo Separation Frequency Coverage IF Sensitivity (S/N=20dB) : DC 12 Volts, Negative Ground : 178 (W) x 160 (D) x 50 (H) : ±10 dB : ±10 dB : 4x40 watts : 10 Ampere (max.) (For Normal Power Version) : More than 55 dB : More than 45...
User Manual
Page 14
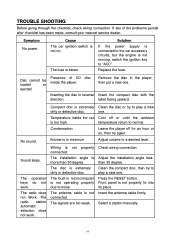
... inside the player. temperature return to play a new dirty or detective disc. No sound. The radio does not Work. The installation angle is not moving, switch the ignition key to play a new one. Check wiring connection. TROUBLE SHOOTING Before going through the checklist, check wiring connection. Cause The car ignition switch is blown. Replace the fuse. Remove the disc in microcomputer is not connected. Press the RESET button. Insert the antenna cable firmly. The fuse is...
... inside the player. temperature return to play a new dirty or detective disc. No sound. The radio does not Work. The installation angle is not moving, switch the ignition key to play a new one. Check wiring connection. TROUBLE SHOOTING Before going through the checklist, check wiring connection. Cause The car ignition switch is blown. Replace the fuse. Remove the disc in microcomputer is not connected. Press the RESET button. Insert the antenna cable firmly. The fuse is...


