
PLD7MU Manual 1
Page 2
INSTRUCTIONS CONTENTS Welcome 3 Warning 3 Note 4 Features 5 Basic Operation 6 Panel Arrangement 7 Basic Functions 8 Main Menu Touch Operation 12 OSD Setup 13 Adjust Mode 14 Remote Control Function 15 Loading 17 Disc Play Touch Operation 18 DVD Mode 19 RDS Touch Operation 21 Radio Operation 23 DVD Basic Operation 24 VCD Basic Operation 34 CD/MP3 Basic Operation 37 MP3/USB/SD Operation 39 Music Surroundings Setting/EQ Setting 40 Audio Frequency/Tone 41 Other Play Mode 42 Trouble Shooting 43 Wiring Diagram 44 Specifications 45 02
INSTRUCTIONS CONTENTS Welcome 3 Warning 3 Note 4 Features 5 Basic Operation 6 Panel Arrangement 7 Basic Functions 8 Main Menu Touch Operation 12 OSD Setup 13 Adjust Mode 14 Remote Control Function 15 Loading 17 Disc Play Touch Operation 18 DVD Mode 19 RDS Touch Operation 21 Radio Operation 23 DVD Basic Operation 24 VCD Basic Operation 34 CD/MP3 Basic Operation 37 MP3/USB/SD Operation 39 Music Surroundings Setting/EQ Setting 40 Audio Frequency/Tone 41 Other Play Mode 42 Trouble Shooting 43 Wiring Diagram 44 Specifications 45 02

PLD7MU Manual 1
Page 3
... this unit at higher volumes for a long period of digital car A/V product. Please do not touch LCD display with any hard object so that you prevent it will cause the unit to go through this instruction manual for installation and operation, put it that you will void any dirt on it into an error and will not play this manual. 03 This unit has a vehicle lock out wire...
... this unit at higher volumes for a long period of digital car A/V product. Please do not touch LCD display with any hard object so that you prevent it will cause the unit to go through this instruction manual for installation and operation, put it that you will void any dirt on it into an error and will not play this manual. 03 This unit has a vehicle lock out wire...

PLD7MU Manual 1
Page 4
...; During operation, if Lb: appear on LCD, that means unit do not support that function, operation is invalid. • When unit is no function, please choose another mode. • It may lead to accident if you are going to change unit. • Playing disk during car run on the display, that means that there is showing some abnormal, please refer to TROUBLE SHOOTING in this instruction manual, If...
...; During operation, if Lb: appear on LCD, that means unit do not support that function, operation is invalid. • When unit is no function, please choose another mode. • It may lead to accident if you are going to change unit. • Playing disk during car run on the display, that means that there is showing some abnormal, please refer to TROUBLE SHOOTING in this instruction manual, If...
PLD7MU Manual 1
Page 5
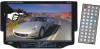
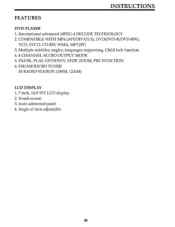
PAUSE PLAY, UP/DOWN,STOP, ZOOM, PBC FUNCTION 6. Touch screen 3. Multiplesubtitles,angles, languagessupporting,Child lock function 4.4 CHANNELAUDIO OUTPUTMODE 5. FM/AM RADIOTUNER 30 RADIOSTATION (1817M, 12AM) LCD DISPLAY 1. 7 inch,16:9 ITT LCD display 2. Internationaladvanced NiPEG-4 DECODETECHNOLOGY 2. Auto adotoried panel 4. COMPATIBLEWITH MP4 (AVI/DIVX/5.X),DVD(DVD-R/DVD-RW), VCD,SVCD, CD-RW, WMA, MP3JPG 3. INSTRUCTIONS FEATURES DVD PLAYER 1. Angle of turn adjustable 05
PAUSE PLAY, UP/DOWN,STOP, ZOOM, PBC FUNCTION 6. Touch screen 3. Multiplesubtitles,angles, languagessupporting,Child lock function 4.4 CHANNELAUDIO OUTPUTMODE 5. FM/AM RADIOTUNER 30 RADIOSTATION (1817M, 12AM) LCD DISPLAY 1. 7 inch,16:9 ITT LCD display 2. Internationaladvanced NiPEG-4 DECODETECHNOLOGY 2. Auto adotoried panel 4. COMPATIBLEWITH MP4 (AVI/DIVX/5.X),DVD(DVD-R/DVD-RW), VCD,SVCD, CD-RW, WMA, MP3JPG 3. INSTRUCTIONS FEATURES DVD PLAYER 1. Angle of turn adjustable 05

PLD7MU Manual 1
Page 6
... SEL button on remote control or SEL button on the panel to power on display to the factory default settings. 06 button on remote control or touch button on . RESET I) If unit is not working correctly afterwards. 2) After reset, all settings will reset the radio and should press the RES button. INSTRUCTIONS BASIC OPERATION 1. This will resume back to adjust volume level. 2) The volume setting on remote control shortly to turn off . 2. The mode will switch sources in the following sequence: RADIO -• DVD -6 AUX 3. MUTE CONTROL Press MUTE button...
... SEL button on remote control or SEL button on the panel to power on display to the factory default settings. 06 button on remote control or touch button on . RESET I) If unit is not working correctly afterwards. 2) After reset, all settings will reset the radio and should press the RES button. INSTRUCTIONS BASIC OPERATION 1. This will resume back to adjust volume level. 2) The volume setting on remote control shortly to turn off . 2. The mode will switch sources in the following sequence: RADIO -• DVD -6 AUX 3. MUTE CONTROL Press MUTE button...
PLD7MU Manual 1
Page 9
...,FAD adjustment mode. USB SD AUX GPS (Optional) 2.LCD Display Window Under radio mode: channel and frequency are displayed. 3.(VOUSEL)Volume adjustment mode Repeat pressing this button can rotate the button to adjust Volume ,BAS,TRE,BAL,FAD as follows: Note:When the device without connecting to adjust the upward view angle of the screen in 5 steps of the song and time elapsed are displayed; Under PLAY mode, the directory of adjusting angle. 6.Dfsk load slot Opening for...
...,FAD adjustment mode. USB SD AUX GPS (Optional) 2.LCD Display Window Under radio mode: channel and frequency are displayed. 3.(VOUSEL)Volume adjustment mode Repeat pressing this button can rotate the button to adjust Volume ,BAS,TRE,BAL,FAD as follows: Note:When the device without connecting to adjust the upward view angle of the screen in 5 steps of the song and time elapsed are displayed; Under PLAY mode, the directory of adjusting angle. 6.Dfsk load slot Opening for...
PLD7MU Manual 1
Page 10
....X16.X20'sspeed. 13. It will become normal in Mp3or Mp4 format. 15.Band button/N/P In radio state:short pressthis buttoncan select the hand switch. PM2 l PM3 AM2 4- The maximum angle of extension is pushed. Attention:Under the disk playing mode, there is no image displayat the momentof screen extension after the button is 104 degree. AUX External Input Externalaudio inputsocket. 12.
....X16.X20'sspeed. 13. It will become normal in Mp3or Mp4 format. 15.Band button/N/P In radio state:short pressthis buttoncan select the hand switch. PM2 l PM3 AM2 4- The maximum angle of extension is pushed. Attention:Under the disk playing mode, there is no image displayat the momentof screen extension after the button is 104 degree. AUX External Input Externalaudio inputsocket. 12.
PLD7MU Manual 1
Page 11
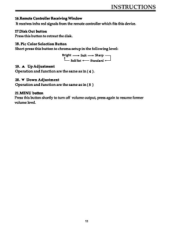
plc Color Selection Button Short press this button to chroma setup in ( 5 ) 21.MENU button Press this button to resume former volume level. 11 V Down Adjustment Operation and function are the same as in the following level: Bright Soft Sharp L SelISet 4- Standard 19. A Up Adjustment Operation and function are the same as in( 4 ). 20. INSTRUCTIONS 16.Remote Controller Receiving Window It receives infra red signals from the remote controller which fits this device. 17.Disk Out button Press this button shortly to turn off volume output, press again to retreat the disk. 18.
plc Color Selection Button Short press this button to chroma setup in ( 5 ) 21.MENU button Press this button to resume former volume level. 11 V Down Adjustment Operation and function are the same as in the following level: Bright Soft Sharp L SelISet 4- Standard 19. A Up Adjustment Operation and function are the same as in( 4 ). 20. INSTRUCTIONS 16.Remote Controller Receiving Window It receives infra red signals from the remote controller which fits this device. 17.Disk Out button Press this button shortly to turn off volume output, press again to retreat the disk. 18.
PLD7MU Manual 1
Page 13
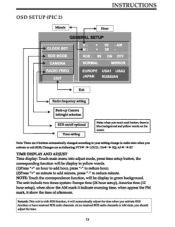
TAII-Ir EQ A.F al-la ST TIME DISPLAY AND ADJUST Time display:Touchmain menu intoadjust mode, press timesetupbutton, the correspondingfunction will be display in radio state when you should adjust the time. 13 RIMIllie This unit is blue background and yellow words on minute to add minute, press"-" to your setting change in greenbackground. Changes are 3 buttons automatically changed according to reduceminute. INSTRUCTIONS OSD SETUP (PIC 2) Minute 4 I I GE E L SETUP LOCK fun m • RDS : 08...
TAII-Ir EQ A.F al-la ST TIME DISPLAY AND ADJUST Time display:Touchmain menu intoadjust mode, press timesetupbutton, the correspondingfunction will be display in radio state when you should adjust the time. 13 RIMIllie This unit is blue background and yellow words on minute to add minute, press"-" to your setting change in greenbackground. Changes are 3 buttons automatically changed according to reduceminute. INSTRUCTIONS OSD SETUP (PIC 2) Minute 4 I I GE E L SETUP LOCK fun m • RDS : 08...

PLD7MU Manual 1
Page 15
... button to switch between play . stereo or mono station. O 0 eS 4. ID POWER ON/OFF n mint El TOLE DISPLAY U SOURCE 0 E0 INICEIC4/ SEEK- LOUD Button Press this button to choose band. LOORDM Button In radio mode, press this button to choose O PDC/MENU AUTO, PAL or N'ISC system. In audio mode, it can help STOP button to randomly play . 15 SOURCE Button Press this button to startup LOUD function. sour= In VCD, DVD mode, press this button to turn off . 6. MUTE Button...
... button to switch between play . stereo or mono station. O 0 eS 4. ID POWER ON/OFF n mint El TOLE DISPLAY U SOURCE 0 E0 INICEIC4/ SEEK- LOUD Button Press this button to choose band. LOORDM Button In radio mode, press this button to choose O PDC/MENU AUTO, PAL or N'ISC system. In audio mode, it can help STOP button to randomly play . 15 SOURCE Button Press this button to startup LOUD function. sour= In VCD, DVD mode, press this button to turn off . 6. MUTE Button...

PLD7MU Manual 1
Page 16
... no function, please change . Insert battery holder into controller. 22. SETUP Button In audio mode, press this button to choose EQ. 18. In CD/MP3/USB/SD mode, press this button to choose different set items. 16. INSTRUCTIONS 15. 0 - 10 + Button Press this button to browse stored stations. "Decimal numbers, for example, the 120th song, Press 1,2,0 button. 24. AMS / RPT Button In radio mode, press this button to choose desired song, section, preset stations. SET Playing Time In DVD mode...
... no function, please change . Insert battery holder into controller. 22. SETUP Button In audio mode, press this button to choose EQ. 18. In CD/MP3/USB/SD mode, press this button to choose different set items. 16. INSTRUCTIONS 15. 0 - 10 + Button Press this button to browse stored stations. "Decimal numbers, for example, the 120th song, Press 1,2,0 button. 24. AMS / RPT Button In radio mode, press this button to choose desired song, section, preset stations. SET Playing Time In DVD mode...

PLD7MU Manual 1
Page 19
DVD MODE (PIC 5) AUDIO SETTING ON TOUCH SCREEN INSTRUCTIONS VOL - TRE 111111111111111 00 BAL 111111111111111 00 VIDEO FAD 111111111111111 00 LOUD DBAS MBP IEQ: OFF ••• Audio seleaon: VOL -• BAS -• IRE -• DAL PAD When wing this function is defined IIBan &coda,' when touched the button will be highlighted. the IbtenIng poettbn Toud thoosin this hnution the positiat bar...
DVD MODE (PIC 5) AUDIO SETTING ON TOUCH SCREEN INSTRUCTIONS VOL - TRE 111111111111111 00 BAL 111111111111111 00 VIDEO FAD 111111111111111 00 LOUD DBAS MBP IEQ: OFF ••• Audio seleaon: VOL -• BAS -• IRE -• DAL PAD When wing this function is defined IIBan &coda,' when touched the button will be highlighted. the IbtenIng poettbn Toud thoosin this hnution the positiat bar...

PLD7MU Manual 1
Page 20
The blue bar will disappear. 20 V Image mode: You can choose the area in the broken line on the screen. INSTRUCTIONS VIDEO SETTING ON TOUCH SCREEN You otn choose Brightness, Contrast, Colon Hue, adjust the image effect according to your level AUDIO BRI -111111111111111 +07 CONAIIIIIIIIIIIIIII+ 07 COL-IIIIIIIIIIIIIII+ 00 HUE-Mi I I 1 I I I 1 I I I I +07 USER S BRIG dill 1 Video mods When using this hmction, the position will be darker on the panel, standard, defhwd, soft, according what you need to chooser the blue back light will show your sight.
The blue bar will disappear. 20 V Image mode: You can choose the area in the broken line on the screen. INSTRUCTIONS VIDEO SETTING ON TOUCH SCREEN You otn choose Brightness, Contrast, Colon Hue, adjust the image effect according to your level AUDIO BRI -111111111111111 +07 CONAIIIIIIIIIIIIIII+ 07 COL-IIIIIIIIIIIIIII+ 00 HUE-Mi I I 1 I I I 1 I I I I +07 USER S BRIG dill 1 Video mods When using this hmction, the position will be darker on the panel, standard, defhwd, soft, according what you need to chooser the blue back light will show your sight.

PLD7MU Manual 1
Page 23
... display shortly to browse preset station on 1-6; 2)In radio mode, press AMS/RPT button onremote control, or AI'S button on display longer to search station inup/down direction. When the right under foot appear the MONO mark, it will cancel the former preset stations. 4. When get one step till you get desired frequency. INSTRUCTIONS RADIO OPERATION (Please look at picture #6) 1. button on remote control, or NUM touch button on display shortly every time to auto...
... display shortly to browse preset station on 1-6; 2)In radio mode, press AMS/RPT button onremote control, or AI'S button on display longer to search station inup/down direction. When the right under foot appear the MONO mark, it will cancel the former preset stations. 4. When get one step till you get desired frequency. INSTRUCTIONS RADIO OPERATION (Please look at picture #6) 1. button on remote control, or NUM touch button on display shortly every time to auto...

PLD7MU Manual 1
Page 26
.... 15 PLAY DELETE When DVD is not recorded in picture function: During auto browsing, press pause button stop the screen, press ZOOM button to the normal mode, press the ST/PROG button, then press M button. Note: This function can be manual browsed by the remote control. 2. ZOOM in the disc, then unit will show the appointed language, 4. It just can only be worked to press number 6 button on display to choose...
.... 15 PLAY DELETE When DVD is not recorded in picture function: During auto browsing, press pause button stop the screen, press ZOOM button to the normal mode, press the ST/PROG button, then press M button. Note: This function can be manual browsed by the remote control. 2. ZOOM in the disc, then unit will show the appointed language, 4. It just can only be worked to press number 6 button on display to choose...
PLD7MU Manual 1
Page 35
... worked by the remote control. 10. Repeat Play In playing mode, press AMS/RPT button on panel to eject disc. 14. if you want to stop to other playing mode except VCD mode. For example, you switch back to play 13th song. Repeat play . Switch Track In VCD mode, press AUDIO button on remote control to the normal play off. Number Buttons In VCD mode, press 0-9 number button to turn off or mode is on , no repeat function. 2) After unit is power...
... worked by the remote control. 10. Repeat Play In playing mode, press AMS/RPT button on panel to eject disc. 14. if you want to stop to other playing mode except VCD mode. For example, you switch back to play 13th song. Repeat play . Switch Track In VCD mode, press AUDIO button on remote control to the normal play off. Number Buttons In VCD mode, press 0-9 number button to turn off or mode is on , no repeat function. 2) After unit is power...
PLD7MU Manual 1
Page 37
.../MP3 disc, unit will play . 8. If disc is in slot, press DVD touch button on main menu can choose the sound mode. 3) When enter this function, press the button s/y /m /► to move the course to select sound mode which in the system menu, after your selection position will show all information of present disc. 7. button on remote control, or Hs /44 touch button on display to normal play. 5. Stop Play In play mode: I) Press .h button on remote control to...
.../MP3 disc, unit will play . 8. If disc is in slot, press DVD touch button on main menu can choose the sound mode. 3) When enter this function, press the button s/y /m /► to move the course to select sound mode which in the system menu, after your selection position will show all information of present disc. 7. button on remote control, or Hs /44 touch button on display to normal play. 5. Stop Play In play mode: I) Press .h button on remote control to...

PLD7MU Manual 1
Page 42
INSTRUCTIONS OTHER PLAY MODE AUXIN: AUX IN OPERATION 1) Press "Source" button on remote control or touch "AUX" on the touch screen, to switch to AUX mode. 2) This will see this feature. CCD (Back-Up Camera) 1) If there is a back-up camera installed onto your car, you will need to conned it to the CCD video input. 2) When you are backing up the car there you will allow you to your screen. 3) You can set CCD image according to...
INSTRUCTIONS OTHER PLAY MODE AUXIN: AUX IN OPERATION 1) Press "Source" button on remote control or touch "AUX" on the touch screen, to switch to AUX mode. 2) This will see this feature. CCD (Back-Up Camera) 1) If there is a back-up camera installed onto your car, you will need to conned it to the CCD video input. 2) When you are backing up the car there you will allow you to your screen. 3) You can set CCD image according to...

PLD7MU Manual 1
Page 43
... fuse blew ornot SomefactorcauseMS./ wrong operation Changefuse same as theold one Press RESETbutton on the panel by pen point, then, power on After ignition wrong connectionbetween switchoff,setting ignitionline ACC and informationalllose ConstantD Volt wire Remote control no No enoughpower supply function from battery Change the wiringaround Change batteryin remotecontrol Poor performance of radio station Improper lengthof antenna poor connection of antenna grounding Can not load disc The disc...
... fuse blew ornot SomefactorcauseMS./ wrong operation Changefuse same as theold one Press RESETbutton on the panel by pen point, then, power on After ignition wrong connectionbetween switchoff,setting ignitionline ACC and informationalllose ConstantD Volt wire Remote control no No enoughpower supply function from battery Change the wiringaround Change batteryin remotecontrol Poor performance of radio station Improper lengthof antenna poor connection of antenna grounding Can not load disc The disc...
PLD7MU Manual 1
Page 44
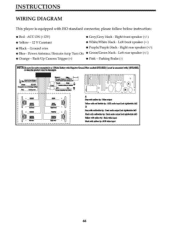
... - INSTRUCTIONS WIRING DIAGRAM This player is =and la • 12t• Wary•rtt.)1 frard.lbi =WadSPEASER4..:=1Is=end wel.. Ground wire • Purple/Purpleblack - Bata&:Ont(ndObt•IttLrJ Maw wit year14 bra •P-ott.1 Mire Tall• AIR v1401=01 44 Left rear speaker(+/-) • Orange - Right front speaker (+/-) • Yellow-12 VConstant • White/White black - Right rear speaker(+/-) • Blue- Parking Brake (-) NGTE...
... - INSTRUCTIONS WIRING DIAGRAM This player is =and la • 12t• Wary•rtt.)1 frard.lbi =WadSPEASER4..:=1Is=end wel.. Ground wire • Purple/Purpleblack - Bata&:Ont(ndObt•IttLrJ Maw wit year14 bra •P-ott.1 Mire Tall• AIR v1401=01 44 Left rear speaker(+/-) • Orange - Right front speaker (+/-) • Yellow-12 VConstant • White/White black - Right rear speaker(+/-) • Blue- Parking Brake (-) NGTE...


