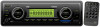
PLMR86B Manual 1
Page 2
... operation 7 Switchi ng on/off the unit 7 Sound adjustment 7 Loudness 7 Display information 7 Liquid Crystal Display 7 Remote sensor (Optional 7 Auxiliary input 8 Radio operation 8 Switching to radio mode 8 Selecting the frequency band 8 Selecting station 8 Automatic memory storing& program scanning 8 Station storing 8 USB play operation 8 Supported MP3/WMA decoding modes 9 SD/MMC operation 9 Remote Control 10 Specification 11 Trouble shooting 12 2
... operation 7 Switchi ng on/off the unit 7 Sound adjustment 7 Loudness 7 Display information 7 Liquid Crystal Display 7 Remote sensor (Optional 7 Auxiliary input 8 Radio operation 8 Switching to radio mode 8 Selecting the frequency band 8 Selecting station 8 Automatic memory storing& program scanning 8 Station storing 8 USB play operation 8 Supported MP3/WMA decoding modes 9 SD/MMC operation 9 Remote Control 10 Specification 11 Trouble shooting 12 2

PLMR86B Manual 1
Page 3
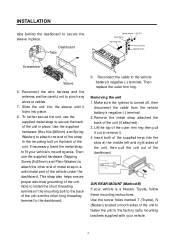
... an emergency stop. If installation angel exceeds 30°from the vehicle battery's negative (-) terminal. 2. Lift the...Use only the parts included with a screwdriver. Disconnect the wire harness and the antenna. 3. For details, refer to ensure proper installation. The use of unauthorized parts can remove it. Then slide the sleeve off , and then disconnect the cable...MOUNT This unit can be installed in any dashboard make sure it does not get in the driver's way and cannot injure the passenger if there is turned off the back of the unit. Avoid installing...
... an emergency stop. If installation angel exceeds 30°from the vehicle battery's negative (-) terminal. 2. Lift the...Use only the parts included with a screwdriver. Disconnect the wire harness and the antenna. 3. For details, refer to ensure proper installation. The use of unauthorized parts can remove it. Then slide the sleeve off , and then disconnect the cable...MOUNT This unit can be installed in any dashboard make sure it does not get in the driver's way and cannot injure the passenger if there is turned off the back of the unit. Avoid installing...
PLMR86B Manual 1
Page 4
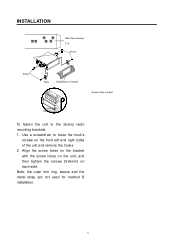
...to the factory radio mounting brackets supplied with your vehicle is turned off, then disconnect the cable from the vehicle battery's negative (-) terminal. 2. Use the supplied ...mounting instructions. Reconnect the wire harness and the antenna and be careful not to secure the sleeve in place. Slide the unit into the sleeve until it . 4. INSTALLATION tabs behind the dashboard to pinch any wires or cables. 7. Note to install the short threading terminal of the mounting bolt to the mounting...part of the vehicle under the dashboard. Then replace the outer trim ring. If necessary...
...to the factory radio mounting brackets supplied with your vehicle is turned off, then disconnect the cable from the vehicle battery's negative (-) terminal. 2. Use the supplied ...mounting instructions. Reconnect the wire harness and the antenna and be careful not to secure the sleeve in place. Slide the unit into the sleeve until it . 4. INSTALLATION tabs behind the dashboard to pinch any wires or cables. 7. Note to install the short threading terminal of the mounting bolt to the mounting...part of the vehicle under the dashboard. Then replace the outer trim ring. If necessary...
PLMR86B Manual 1
Page 5
Use a screwdriver to the factory radio mounting brackets. 1. Note: the outer trim ring, sleeve and the metal strap are not used for method B installation. 5 INSTALLATION Side View showing T, N Screw Screw Hook Dashboard or Console To fasten the unit to loose the hook's screws on each side. Align the screw holes on the bracket with the screw holes on the unit, and then tighten the screws (5x5mm) on the front left and right sides of the unit and remove the hooks. 2.
Use a screwdriver to the factory radio mounting brackets. 1. Note: the outer trim ring, sleeve and the metal strap are not used for method B installation. 5 INSTALLATION Side View showing T, N Screw Screw Hook Dashboard or Console To fasten the unit to loose the hook's screws on each side. Align the screw holes on the bracket with the screw holes on the unit, and then tighten the screws (5x5mm) on the front left and right sides of the unit and remove the hooks. 2.

PLMR86B Manual 1
Page 6
WIRING CONNECTION 6
WIRING CONNECTION 6
PLMR86B Manual 1
Page 7
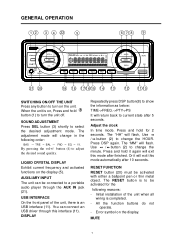
... RESET button (20) must be connected to a portable audio player through this mode automatically after 5 seconds. DISPLAY Repeatedly press DSP button(8) to show the information as below: TIME->FREQ.->PTY->PS It will flash, Use / button (2) to change the HOUR. The "HH" will return back to current state after 10 seconds. Error symbol on the...
... RESET button (20) must be connected to a portable audio player through this mode automatically after 5 seconds. DISPLAY Repeatedly press DSP button(8) to show the information as below: TIME->FREQ.->PTY->PS It will flash, Use / button (2) to change the HOUR. The "HH" will return back to current state after 10 seconds. Error symbol on the...
PLMR86B Manual 1
Page 8
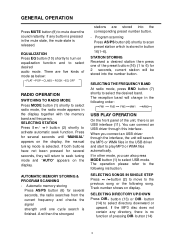
...RADIO OPERATION SWITCHING TO RADIO MODE Press MODE button (1) shortly to select desired audio mode. If any directory, there is selected. SELECTING STATION Press 8 / 9 button (2) shortly to select directory downward or upward. Press for 2 seconds, current station will search the MP3 or WMA files in the USB driver... together with the memory band and frequency. The reception band will return to turn on the display, the manual tuning mode is no function of the unit, there is stored in the following order:...button (16) (1 to the previous song or the following instruction.
...RADIO OPERATION SWITCHING TO RADIO MODE Press MODE button (1) shortly to select desired audio mode. If any directory, there is selected. SELECTING STATION Press 8 / 9 button (2) shortly to select directory downward or upward. Press for 2 seconds, current station will search the MP3 or WMA files in the USB driver... together with the memory band and frequency. The reception band will return to turn on the display, the manual tuning mode is no function of the unit, there is stored in the following order:...button (16) (1 to the previous song or the following instruction.

PLMR86B Manual 1
Page 9
... continuously repeat the same file. It will show "RPT ONE". PLAYING IN RANDOM ORDER Shortly press SHF button (15) to select SD/MMC mode. When you can also press MODE button (1) to play . GENERAL OPERATION or DIR + button (13). Shortly press again to stop intro and start to play all the files... will repeat all files in random order. The operation is a SD/MMC interface (12) on the front panel of the current directory. If in other mode, you insert a SD/MMC card in the SD/MMC interface, the unit will repeat all files of the unit. CAUTION: When there are important...
... continuously repeat the same file. It will show "RPT ONE". PLAYING IN RANDOM ORDER Shortly press SHF button (15) to select SD/MMC mode. When you can also press MODE button (1) to play . GENERAL OPERATION or DIR + button (13). Shortly press again to stop intro and start to play all the files... will repeat all files in random order. The operation is a SD/MMC interface (12) on the front panel of the current directory. If in other mode, you insert a SD/MMC card in the SD/MMC interface, the unit will repeat all files of the unit. CAUTION: When there are important...
PLMR86B Manual 1
Page 10
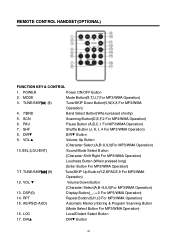
POWER Power ON/OFF Button 2. PAU Pause Button (A,B,C,1 For MP3/WMA Operation) 7. AS/PS(D-AUD) Automatic Memory Storing & Program Scanning Button (Mode Select Button For MP3/WMA Operation) 16. REMOTE CONTROL HANDSET(OPTIONAL) FUNCTION KEY & CONTROL 1. DSP(0) Display ... Tune/SKIP Down Button(V,W,X,8 For MP3/WMA Operation) 4. 7/BND Band Select Button(When pressed shortly) 5. LOC Local/Distant Select Button 17. MODE Mode Botton(S,T,U,7,For MP3/WMA Operation) 3. SHF Shuffle Button (J, K, L 4 For MP3/WMA Operation) 8. VOL ▼ Volume Down Button (Character Select(A,B~8,9,0)...
POWER Power ON/OFF Button 2. PAU Pause Button (A,B,C,1 For MP3/WMA Operation) 7. AS/PS(D-AUD) Automatic Memory Storing & Program Scanning Button (Mode Select Button For MP3/WMA Operation) 16. REMOTE CONTROL HANDSET(OPTIONAL) FUNCTION KEY & CONTROL 1. DSP(0) Display ... Tune/SKIP Down Button(V,W,X,8 For MP3/WMA Operation) 4. 7/BND Band Select Button(When pressed shortly) 5. LOC Local/Distant Select Button 17. MODE Mode Botton(S,T,U,7,For MP3/WMA Operation) 3. SHF Shuffle Button (J, K, L 4 For MP3/WMA Operation) 8. VOL ▼ Volume Down Button (Character Select(A,B~8,9,0)...
PLMR86B Manual 1
Page 11
SPECIFICATION GENERAL Power Supply Requirements : DC 12 Volts, Negative Ground Chassis Dimensions : 178 (W) x 107 (D) x 50 (H) Tone Controls - Version Y : 4x50 watts Current Drain - 15 Ampere (max.) (For High Power Version) RADIO Frequency Coverage IF Sensitivity (S/N=30dB) Stereo Separation FM 87.5 to 107.9 MHz 10.7 MHz 4μV >25dB Frequency Coverage IF Sensitivity (S/N=20dB) MW 530 to 1710 kHz 450 kHz 36 dBu 11 Treble (at 100 Hz) : ±10 dB - Bass (at 10 kHz) : ±10 dB Maximum Output Power -
SPECIFICATION GENERAL Power Supply Requirements : DC 12 Volts, Negative Ground Chassis Dimensions : 178 (W) x 107 (D) x 50 (H) Tone Controls - Version Y : 4x50 watts Current Drain - 15 Ampere (max.) (For High Power Version) RADIO Frequency Coverage IF Sensitivity (S/N=30dB) Stereo Separation FM 87.5 to 107.9 MHz 10.7 MHz 4μV >25dB Frequency Coverage IF Sensitivity (S/N=20dB) MW 530 to 1710 kHz 450 kHz 36 dBu 11 Treble (at 100 Hz) : ±10 dB - Bass (at 10 kHz) : ±10 dB Maximum Output Power -
PLMR86B Manual 1
Page 12
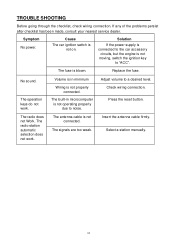
If any of the problems persist after checklist has been made, consult your nearest service dealer. The radio does not Work. The operation keys do not work . Adjust volume to "ACC". The radio station automatic selection does not ...power. Solution If the power supply is connected to the car accessory circuits, but the engine is not operating properly due to noise. Press the reset button. Insert the antenna cable firmly. Check wiring connection. Select a station manually. 12 Cause The car ignition switch is blown. Replace the fuse. TROUBLE SHOOTING...
If any of the problems persist after checklist has been made, consult your nearest service dealer. The radio does not Work. The operation keys do not work . Adjust volume to "ACC". The radio station automatic selection does not ...power. Solution If the power supply is connected to the car accessory circuits, but the engine is not operating properly due to noise. Press the reset button. Insert the antenna cable firmly. Check wiring connection. Select a station manually. 12 Cause The car ignition switch is blown. Replace the fuse. TROUBLE SHOOTING...


