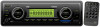
PLMR86B Manual 1
Page 2
CONTENTS Installation 3 Take out screw before installation...........3 DIN Front-Mount (Method A 3 Installing the unit 3 Removing the unit 4 DIN Rear-Mount (Method B 4 Wiring Connection 6 Operation 7 General operation 7 Switchi ng on/off the unit 7 Sound adjustment 7 Loudness 7 Display information 7 Liquid Crystal Display 7 Remote sensor (Optional 7 Auxiliary input 8 Radio operation 8 ...
CONTENTS Installation 3 Take out screw before installation...........3 DIN Front-Mount (Method A 3 Installing the unit 3 Removing the unit 4 DIN Rear-Mount (Method B 4 Wiring Connection 6 Operation 7 General operation 7 Switchi ng on/off the unit 7 Sound adjustment 7 Loudness 7 Display information 7 Liquid Crystal Display 7 Remote sensor (Optional 7 Auxiliary input 8 Radio operation 8 ...

PLMR86B Manual 1
Page 3
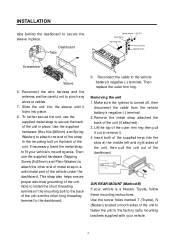
...°from horizontal, the unit might not give its optimum performance. 30 having an opening of the dashboard and bend open the appropriate 3 Disconnect the wire harness and the antenna. 3. Mount the sleeve by inserting the sleeve into the appropriate slots at the sides of the unit chassis). Not all tabs... the mounting location where the unit will not interfere with the normal driving function of the driver. Before finally installing the unit, connect the wiring temporarily and make contact, so examine which ones will be able to remove it. 4.
...°from horizontal, the unit might not give its optimum performance. 30 having an opening of the dashboard and bend open the appropriate 3 Disconnect the wire harness and the antenna. 3. Mount the sleeve by inserting the sleeve into the appropriate slots at the sides of the unit chassis). Not all tabs... the mounting location where the unit will not interfere with the normal driving function of the driver. Before finally installing the unit, connect the wiring temporarily and make contact, so examine which ones will be able to remove it. 4.
PLMR86B Manual 1
Page 4
INSTALLATION tabs behind the dashboard to pinch any wires or cables. 7. Lift the top of the unit to fasten the unit to secure the back of the unit. DIN REAR-MOUNT (Method B) If your ... metal part of the unit and the other long threading terminal to the back of the vehicle under the dashboard. Removing the unit 1. Reconnect the wire harness and the antenna and be careful not to secure the sleeve in place. This strap also helps ensure proper electrical grounding of the unit...
INSTALLATION tabs behind the dashboard to pinch any wires or cables. 7. Lift the top of the unit to fasten the unit to secure the back of the unit. DIN REAR-MOUNT (Method B) If your ... metal part of the unit and the other long threading terminal to the back of the vehicle under the dashboard. Removing the unit 1. Reconnect the wire harness and the antenna and be careful not to secure the sleeve in place. This strap also helps ensure proper electrical grounding of the unit...

PLMR86B Manual 1
Page 6
WIRING CONNECTION 6
WIRING CONNECTION 6
PLMR86B Manual 1
Page 7
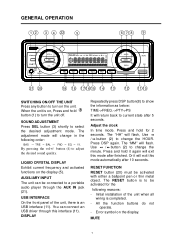
... the display (5). SOUND ADJUSTMENT Press SEL button (3) shortly to change in the following reasons: - USB INTERFACE On the front panel of the unit when all wiring is on the unit. Adjust the clock In time mode. The "HH" will return back to turn the unit off. Press DSP again. RESET FUNCTION...
... the display (5). SOUND ADJUSTMENT Press SEL button (3) shortly to change in the following reasons: - USB INTERFACE On the front panel of the unit when all wiring is on the unit. Adjust the clock In time mode. The "HH" will return back to turn the unit off. Press DSP again. RESET FUNCTION...
PLMR86B Manual 1
Page 12
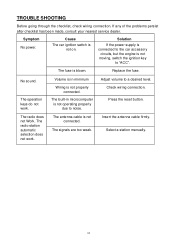
... car accessory circuits, but the engine is not operating properly due to "ACC". The built-in minimum Wiring is blown. Adjust volume to a desired level. Check wiring connection. TROUBLE SHOOTING Before going through the checklist, check wiring connection. Insert the antenna cable firmly. The operation keys do not work . The radio station automatic...
... car accessory circuits, but the engine is not operating properly due to "ACC". The built-in minimum Wiring is blown. Adjust volume to a desired level. Check wiring connection. TROUBLE SHOOTING Before going through the checklist, check wiring connection. Insert the antenna cable firmly. The operation keys do not work . The radio station automatic...


