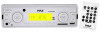
PLMR89WW Manual 1
Page 2
... out screw before installation ..........3 DIN Front-Mount (Method A 3 Installing the unit 3 Removing the unit 4 DIN Rear-Mount (Method B 4 Wiring Connection 6 Operation 7 General operation 7 Switchi ng on/off the unit 7 Sound adjustment 7 Loudness 7 Display information 7 ...
... out screw before installation ..........3 DIN Front-Mount (Method A 3 Installing the unit 3 Removing the unit 4 DIN Rear-Mount (Method B 4 Wiring Connection 6 Operation 7 General operation 7 Switchi ng on/off the unit 7 Sound adjustment 7 Loudness 7 Display information 7 ...

PLMR89WW Manual 1
Page 3
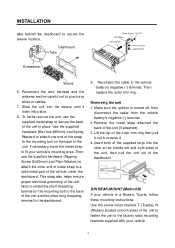
...and the antenna. 3. The two supplied keys release tabs inside the unit's sleeve so you test all connections first, and then follow these steps to install the unit. 1. Then slide the sleeve off , and then disconnect the cable from "Front" (conventional DIN Front-mount) or "Rear"(DIN Rear-mount... out to remove it does not get in any dashboard make sure it is all connected up ) into the opening as they will be properly installed either from the vehicle battery's negative (-) terminal. 2. L Key Outer Trim Ring Sleeve R Key DIN FRONT/REAR-MOUNT This unit can remove it would be ...
...and the antenna. 3. The two supplied keys release tabs inside the unit's sleeve so you test all connections first, and then follow these steps to install the unit. 1. Then slide the sleeve off , and then disconnect the cable from "Front" (conventional DIN Front-mount) or "Rear"(DIN Rear-mount... out to remove it does not get in any dashboard make sure it is all connected up ) into the opening as they will be properly installed either from the vehicle battery's negative (-) terminal. 2. L Key Outer Trim Ring Sleeve R Key DIN FRONT/REAR-MOUNT This unit can remove it would be ...
PLMR89WW Manual 1
Page 4
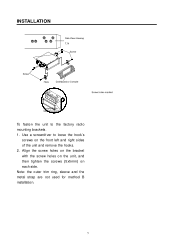
... the cable from the vehicle battery's negative (-) terminal. 2. Make sure the ignition is a Nissan, Toyota, follow these mounting instructions. Note to install the short threading terminal of the mounting bolt to the back of the unit and the other end of metal strap to a solid metal part... then pull the unit out of the unit to fasten the unit to the factory radio mounting brackets supplied with your vehicle. 4 INSTALLATION tabs behind the dashboard to secure the sleeve in place. Dashboard Tabs Screwdriver Spring Washer Hex Nut Metal Strap Mounting Bolt Plain Washer Tapping...
... the cable from the vehicle battery's negative (-) terminal. 2. Make sure the ignition is a Nissan, Toyota, follow these mounting instructions. Note to install the short threading terminal of the mounting bolt to the back of the unit and the other end of metal strap to a solid metal part... then pull the unit out of the unit to fasten the unit to the factory radio mounting brackets supplied with your vehicle. 4 INSTALLATION tabs behind the dashboard to secure the sleeve in place. Dashboard Tabs Screwdriver Spring Washer Hex Nut Metal Strap Mounting Bolt Plain Washer Tapping...
PLMR89WW Manual 1
Page 5
INSTALLATION Side View showing T, N Screw Screw Hook Dashboard or Console To fasten the unit to loose the hook's screws on each side. Align the screw holes on the bracket with the screw holes on the unit, and then tighten the screws (5x5mm) on the front left and right sides of the unit and remove the hooks. 2. Note: the outer trim ring, sleeve and the metal strap are not used for method B installation. 5 Use a screwdriver to the factory radio mounting brackets. 1.
INSTALLATION Side View showing T, N Screw Screw Hook Dashboard or Console To fasten the unit to loose the hook's screws on each side. Align the screw holes on the bracket with the screw holes on the unit, and then tighten the screws (5x5mm) on the front left and right sides of the unit and remove the hooks. 2. Note: the outer trim ring, sleeve and the metal strap are not used for method B installation. 5 Use a screwdriver to the factory radio mounting brackets. 1.

PLMR89WW Manual 1
Page 7
... (1) to change the minute. Use / button (2) to turn on the display. When the unit is an USB interface (11). Or it again will flash. Initial installation of the unit, there is on the display (5).
... (1) to change the minute. Use / button (2) to turn on the display. When the unit is an USB interface (11). Or it again will flash. Initial installation of the unit, there is on the display (5).