PLTS77DU Manual 1
Page 2
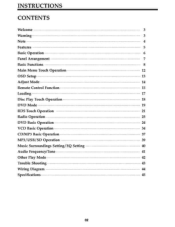
INSTRUCTIONS CONTENTS Welcome 3 Warning 3 Note 4 Features 5 Basic Operation 6 Panel Arrangement 7 Basic Functions 8 Main Menu Touch Operation 12 OSD Setup 13 Adjust Mode 14 Remote Control Function 15 Loading 17 Disc Play Touch Operation 18 DVD Mode 19 RDS Touch Operation 21 Radio Operation 23 DVD Basic Operation 24 VCD Basic Operation 34 CD/MP3 Basic Operation 37 MP3/USB/SD Operation 39 Music Surroundings Setting/EQ Setting 40 Audio Frequency/Tone 41 Other Play Mode 42 Trouble Shooting 43 Wiring Diagram 44 Specifications 45 02
INSTRUCTIONS CONTENTS Welcome 3 Warning 3 Note 4 Features 5 Basic Operation 6 Panel Arrangement 7 Basic Functions 8 Main Menu Touch Operation 12 OSD Setup 13 Adjust Mode 14 Remote Control Function 15 Loading 17 Disc Play Touch Operation 18 DVD Mode 19 RDS Touch Operation 21 Radio Operation 23 DVD Basic Operation 24 VCD Basic Operation 34 CD/MP3 Basic Operation 37 MP3/USB/SD Operation 39 Music Surroundings Setting/EQ Setting 40 Audio Frequency/Tone 41 Other Play Mode 42 Trouble Shooting 43 Wiring Diagram 44 Specifications 45 02
PLTS77DU Manual 1
Page 3
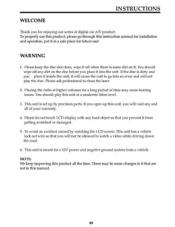
... issues. This unit has a vehicle lock out wire so that are not in it into an error and will not play this product all of your warranty. 4. You should play the disc Please ask professional to watch a video while driving down the road. 6. This unit is some changes in this unit, you open up by watching the LCD screen. Playing the radio at a moderate listen level. 3. INSTRUCTIONS WELCOME Thank...
... issues. This unit has a vehicle lock out wire so that are not in it into an error and will not play this product all of your warranty. 4. You should play the disc Please ask professional to watch a video while driving down the road. 6. This unit is some changes in this unit, you open up by watching the LCD screen. Playing the radio at a moderate listen level. 3. INSTRUCTIONS WELCOME Thank...
PLTS77DU Manual 1
Page 4
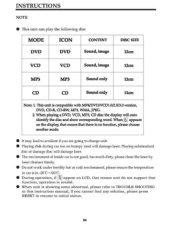
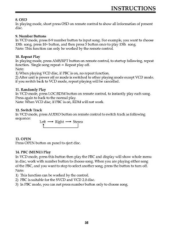
... function, operation is invalid. • When unit is showing some abnormal, please refer to TROUBLE SHOOTING in this instruction manual, If you are going to initial status. 04 When playing a DVD, VCD, MPS, CD disc the display will damage laser. When il appears on bumpy road will auto identify the disc and show convbentdin,g word. INSTRUCTIONS NOTE • This unit can play the following disc MODE ICON CONTENT DVD DVD Sound, image DISC...
... function, operation is invalid. • When unit is showing some abnormal, please refer to TROUBLE SHOOTING in this instruction manual, If you are going to initial status. 04 When playing a DVD, VCD, MPS, CD disc the display will damage laser. When il appears on bumpy road will auto identify the disc and show convbentdin,g word. INSTRUCTIONS NOTE • This unit can play the following disc MODE ICON CONTENT DVD DVD Sound, image DISC...
PLTS77DU Manual 1
Page 5
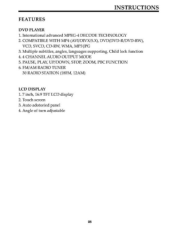
COMPATIBLEWITH MP4 (AVI/DIVX/5.X),DVD(DVD-R/DVD-RW), VCD,SVCD, CD-RW, WMA, MP3JPG 3. Multiple subtitles,angles, languagessupporting,Child lock function 4.4 CHANNELAUDIOOUTPUTMODE 5. Angle of turn adjustable 05 PAUSE, PLAY, UP/DOWN,STOP, ZOOM, PBC FUNCTION 6. INSTRUCTIONS FEATURES DVD PLAYER I. FM/AM RADIOTUNER 30 RADIOSTATION (18FM,12AM) LCD DISPLAY 1.7 inch,16:9TFT LCD display 2. Auto adotoried panel 4. Touch screen 3. Internationaladvanced MPEG-4DECODETECHNOLOGY 2.
COMPATIBLEWITH MP4 (AVI/DIVX/5.X),DVD(DVD-R/DVD-RW), VCD,SVCD, CD-RW, WMA, MP3JPG 3. Multiple subtitles,angles, languagessupporting,Child lock function 4.4 CHANNELAUDIOOUTPUTMODE 5. Angle of turn adjustable 05 PAUSE, PLAY, UP/DOWN,STOP, ZOOM, PBC FUNCTION 6. INSTRUCTIONS FEATURES DVD PLAYER I. FM/AM RADIOTUNER 30 RADIOSTATION (18FM,12AM) LCD DISPLAY 1.7 inch,16:9TFT LCD display 2. Auto adotoried panel 4. Touch screen 3. Internationaladvanced MPEG-4DECODETECHNOLOGY 2.

PLTS77DU Manual 1
Page 6
... remote control shortly to turn off . 2. MUTE CONTROL Press MUTE button on panel or MUTE button on . PLAYING SOURCE CHOOSE Press SOURCE button on the panel to choose your desired tune mode:• VOL BAS -+THE L/R IyR NOTE: 1) DVD playing mode, MBP & User will switch sources in the following sequence: RADIO -+ DVD AUX 3. TONE MODE ADJUSTING (SEL) Press SEL button on remote control or SEL button on remote control, unit will be automatically activated. 2) After 5 seconds you back to the factory default settings. 08 INSTRUCTIONS BASIC OPERATION 1. RESET...
... remote control shortly to turn off . 2. MUTE CONTROL Press MUTE button on panel or MUTE button on . PLAYING SOURCE CHOOSE Press SOURCE button on the panel to choose your desired tune mode:• VOL BAS -+THE L/R IyR NOTE: 1) DVD playing mode, MBP & User will switch sources in the following sequence: RADIO -+ DVD AUX 3. TONE MODE ADJUSTING (SEL) Press SEL button on remote control or SEL button on remote control, unit will be automatically activated. 2) After 5 seconds you back to the factory default settings. 08 INSTRUCTIONS BASIC OPERATION 1. RESET...

PLTS77DU Manual 1
Page 8
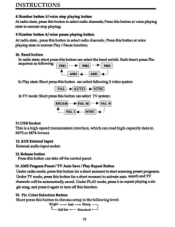
Band button 11.USB Socket 12.AUX External Input 13.Release button 14. Reset button 24.Disk load slot 25.Disk out button 08 Numberbutton 2hoice repeat playing button 6. Number button 4/display button at voice playing state 8.Number button 5/voice stop playing button 9.Number button 6/voice pause playing button 10. Remote Controller Receiving Window 3.(VOL/SEL)Volumeadjustmentmode 4. Number button1/voicescaringand playing button 7. Disc in / out button (Open) 19. PIC Color Selection button I6.• DN Adjustment(TFTScreen) 17. ♦ UP Adjustment (TFT Screen) 18. Number button3/...
Band button 11.USB Socket 12.AUX External Input 13.Release button 14. Reset button 24.Disk load slot 25.Disk out button 08 Numberbutton 2hoice repeat playing button 6. Number button 4/display button at voice playing state 8.Number button 5/voice stop playing button 9.Number button 6/voice pause playing button 10. Remote Controller Receiving Window 3.(VOL/SEL)Volumeadjustmentmode 4. Number button1/voicescaringand playing button 7. Disc in / out button (Open) 19. PIC Color Selection button I6.• DN Adjustment(TFTScreen) 17. ♦ UP Adjustment (TFT Screen) 18. Number button3/...

PLTS77DU Manual 1
Page 9
... activates mode change as follows: Note:When the device without ► connecting to select radio channels; Press this button at voice playing state to select radio channels; SD AUX GPS (Optional) 2. Remote Controller Receiving Window It receives infra red signals from the remote controller which fits this device. 3. (VOL/SEL)Volume adjustment mode Repeat pressing this button can select the VOL.BAS .TRE,BAL,FAD adjustment mode. 4.Number button 3/Random playing button At radio state, press this button to USB.SD,CDC or DVD...
... activates mode change as follows: Note:When the device without ► connecting to select radio channels; Press this button at voice playing state to select radio channels; SD AUX GPS (Optional) 2. Remote Controller Receiving Window It receives infra red signals from the remote controller which fits this device. 3. (VOL/SEL)Volume adjustment mode Repeat pressing this button can select the VOL.BAS .TRE,BAL,FAD adjustment mode. 4.Number button 3/Random playing button At radio state, press this button to USB.SD,CDC or DVD...
PLTS77DU Manual 1
Page 10
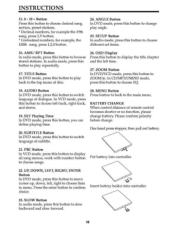
... the band switch. Self Set 0- Sharp I 10 Pic Color Selection Button Short press this button to select radio channels; Standard 4-I - INSTRUCTIONS 8.Number button 5/voice stop playing; 9.Number button 6/voice pause playing button At radio state, press this button to execute Play / Pause function; 10. Under PLAY mode, press it to repeat playing a sin gle song, and press it again to turn off the control panel. 14.AMS Program Preset/ TV Auto Save /Play Repeat Button Under radio mode, press this button for...
... the band switch. Self Set 0- Sharp I 10 Pic Color Selection Button Short press this button to select radio channels; Standard 4-I - INSTRUCTIONS 8.Number button 5/voice stop playing; 9.Number button 6/voice pause playing button At radio state, press this button to execute Play / Pause function; 10. Under PLAY mode, press it to repeat playing a sin gle song, and press it again to turn off the control panel. 14.AMS Program Preset/ TV Auto Save /Play Repeat Button Under radio mode, press this button for...

PLTS77DU Manual 1
Page 13
... receivedRDS radio channels or AMstate, youshould adjust the time 13 TAH Dry ARI-IltST TIME DISPLAYAND ADJUST Time display: Touch main menu into adjust mode, press time setup button, the ccau.n.g.a ding function will automatically adjust the time when you *dint:tor cdtRDS; NOTE:Touch the correspondencefunction, willbe display in yellow words. (1)Press"+" on hour toadd hour, press"-" to reducehour; (2)Press"+" on the 3COM Note There are3 buttons mtonsatkally changed according...
... receivedRDS radio channels or AMstate, youshould adjust the time 13 TAH Dry ARI-IltST TIME DISPLAYAND ADJUST Time display: Touch main menu into adjust mode, press time setup button, the ccau.n.g.a ding function will automatically adjust the time when you *dint:tor cdtRDS; NOTE:Touch the correspondencefunction, willbe display in yellow words. (1)Press"+" on hour toadd hour, press"-" to reducehour; (2)Press"+" on the 3COM Note There are3 buttons mtonsatkally changed according...
PLTS77DU Manual 1
Page 14
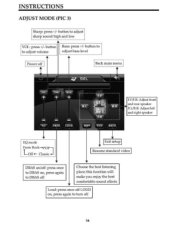
... el IFait setup I -Off 4- this function will make you enjoy the best comfortable sound effects Loud: press once off LOUD on , press again to adjust volume adjust bass level Power off 14 button to turn off Back mainmenu -V set evre earlirrit r + +4 F.F/F.R: Adjust front and rear speaker lit/B.R: Adjust left and right speaker n PRA'. INSTRUCTIONS ADJUST MODE (PIC 3) Sharp: press +1- to Jr P.0 1'1 ;TD RACK EQ mode rrom Rock-etypi I Resume standard video DBAS...
... el IFait setup I -Off 4- this function will make you enjoy the best comfortable sound effects Loud: press once off LOUD on , press again to adjust volume adjust bass level Power off 14 button to turn off Back mainmenu -V set evre earlirrit r + +4 F.F/F.R: Adjust front and rear speaker lit/B.R: Adjust left and right speaker n PRA'. INSTRUCTIONS ADJUST MODE (PIC 3) Sharp: press +1- to Jr P.0 1'1 ;TD RACK EQ mode rrom Rock-etypi I Resume standard video DBAS...

PLTS77DU Manual 1
Page 15
... volume level. 14. MUTE Button pause. SEEK + ( ) / SEEK - (Km ) Button Press this button to manual turning, speed or quick back, previous song and next song. 7.VOL+(••)/VOL-(") Press this button to increase or decrease volume level. BAND - DSP Press this button to show the time. In stop playing. II YO• 0 w e to play . 15 INSTRUCTIONS REMOTE CONTROL FUNCTION 0 O▪ - stereo or mono station. LOCIRDM Button In radio mode, press this button...
... volume level. 14. MUTE Button pause. SEEK + ( ) / SEEK - (Km ) Button Press this button to manual turning, speed or quick back, previous song and next song. 7.VOL+(••)/VOL-(") Press this button to increase or decrease volume level. BAND - DSP Press this button to show the time. In stop playing. II YO• 0 w e to play . 15 INSTRUCTIONS REMOTE CONTROL FUNCTION 0 O▪ - stereo or mono station. LOCIRDM Button In radio mode, press this button...
PLTS77DU Manual 1
Page 16
.../USB/SD mode, press this button, you can define playing time. 20. SET Playing Time In DVD mode, press this button to display the title chapter and the left , right to choose item in . Please confirm polarity before change play back to choose different set items. 16. BATTERY CHANGE When control distance of disc. 26. SLOW Button In audio mode, press this button to the top menu of remote control becomes shorter or no function, please change battery. SETUP Button In audio mode...
.../USB/SD mode, press this button, you can define playing time. 20. SET Playing Time In DVD mode, press this button to display the title chapter and the left , right to choose item in . Please confirm polarity before change play back to choose different set items. 16. BATTERY CHANGE When control distance of disc. 26. SLOW Button In audio mode, press this button to the top menu of remote control becomes shorter or no function, please change battery. SETUP Button In audio mode...

PLTS77DU Manual 1
Page 19
.... CLASSIC -0. BA5 71ili BA1. - C1FF Change the listettrig position Loud chooakey this function is defined pilBass choosing: when touched the button will be yellow, touch this function, the position bar will be dosed, at the sante Bate, yellow light disappear. 19 EQ mode. DE4N,S ITIFFL IE.Q9: FF Audio selection: VOL - DVD MODE (PIC 5) AUDIO SETTING ON TOUCH SCREEN INSTRUCTIONS AUDIO VOLBAs 1111111 4-10 THE 1 1111 1 00...
.... CLASSIC -0. BA5 71ili BA1. - C1FF Change the listettrig position Loud chooakey this function is defined pilBass choosing: when touched the button will be yellow, touch this function, the position bar will be dosed, at the sante Bate, yellow light disappear. 19 EQ mode. DE4N,S ITIFFL IE.Q9: FF Audio selection: VOL - DVD MODE (PIC 5) AUDIO SETTING ON TOUCH SCREEN INSTRUCTIONS AUDIO VOLBAs 1111111 4-10 THE 1 1111 1 00...

PLTS77DU Manual 1
Page 20
INSTRUCTIONS VIDEO SETTING ON TOUCH SCREEN You on thecae BrIghbwas, Contrast Color, Hue, adjust the image effect according to your level 0 BRI 111111111111111.0 VIDEO USER STDY BRIG [SOFT [SHAR Video mode When laths this Amelia% the positioned/16e darker at Mena Image model You on choose the area in the broken line cm the panel, standard, defined, soft, according what you need to choose, tie blue badc light will dlaappeat The blue bar will show your sight.
INSTRUCTIONS VIDEO SETTING ON TOUCH SCREEN You on thecae BrIghbwas, Contrast Color, Hue, adjust the image effect according to your level 0 BRI 111111111111111.0 VIDEO USER STDY BRIG [SOFT [SHAR Video mode When laths this Amelia% the positioned/16e darker at Mena Image model You on choose the area in the broken line cm the panel, standard, defined, soft, according what you need to choose, tie blue badc light will dlaappeat The blue bar will show your sight.

PLTS77DU Manual 1
Page 23
... radio mode, start up the stereo function automatic, touch the ST button again on display shortly every time to turn off the stereo. Adjust Frequency Manually Adjust Frequency: Press SEEK + button on remote control, or 0401 touch button on . 5. When get one step till you get desired frequency. button on remote control, or , 64/144 touch button on the display, the TFT display will cancel the former preset stations. 4. Manual Preset and Store Station In radio mode, press 1-6 button on remote control, or 1-6 position on display...
... radio mode, start up the stereo function automatic, touch the ST button again on display shortly every time to turn off the stereo. Adjust Frequency Manually Adjust Frequency: Press SEEK + button on remote control, or 0401 touch button on . 5. When get one step till you get desired frequency. button on remote control, or , 64/144 touch button on the display, the TFT display will cancel the former preset stations. 4. Manual Preset and Store Station In radio mode, press 1-6 button on remote control, or 1-6 position on display...
PLTS77DU Manual 1
Page 35
... 3 button once to play off or mode is on remote control, to instantly play the PBC and display will show all information of the PBC, and you want to stop to select another song, press the button to turn oft Note: 1) This function can not press number button only to eject disc. 14. Single song repeat Repeat play 13th song. Press again to back to input...
... 3 button once to play off or mode is on remote control, to instantly play the PBC and display will show all information of the PBC, and you want to stop to select another song, press the button to turn oft Note: 1) This function can not press number button only to eject disc. 14. Single song repeat Repeat play 13th song. Press again to back to input...

PLTS77DU Manual 1
Page 37
... enter into stop mode, here, press NI button on remote control or touch button on remote control, to 3. EQ Mode 1) This function can to indicate the confirmation. 9. OSD In playing mode, short press OSD on remote control twice to select sound mode which in slot, press DVD touch button on display to eject disc. 37 INSTRUCTIONS CD/MP3 BASIC OPERATION (Look at the stored position. 2) Press oh button on remote control to show red color to play each song. If...
... enter into stop mode, here, press NI button on remote control or touch button on remote control, to 3. EQ Mode 1) This function can to indicate the confirmation. 9. OSD In playing mode, short press OSD on remote control twice to select sound mode which in slot, press DVD touch button on display to eject disc. 37 INSTRUCTIONS CD/MP3 BASIC OPERATION (Look at the stored position. 2) Press oh button on remote control to show red color to play each song. If...

PLTS77DU Manual 1
Page 42
Video RCA input & 1 pair of the radio. 3) This unit has 1 - CCD (Back-Up Camera) 1) If there is a back-up camera installed onto your car's own position in general setting mode. 42 INSTRUCTIONS OTHER PLAY MODE AUXIN: AUX IN OPERATION 1) Press "Source" button on remote control or touch AUX" on your screen. 3) You can set CCD image according to your car, you will need to connect it to the CCD video input. 2) When you are backing up the car there you have plugged into this...
Video RCA input & 1 pair of the radio. 3) This unit has 1 - CCD (Back-Up Camera) 1) If there is a back-up camera installed onto your car's own position in general setting mode. 42 INSTRUCTIONS OTHER PLAY MODE AUXIN: AUX IN OPERATION 1) Press "Source" button on remote control or touch AUX" on your screen. 3) You can set CCD image according to your car, you will need to connect it to the CCD video input. 2) When you are backing up the car there you have plugged into this...

PLTS77DU Manual 1
Page 43
TROUBLE SHOOTING INSTRUCTIONS PROBLEM Cannot power on CAUSE Check whether power fuse blew ornot Some factor causeMPU wrong operation SOLUTION Changefuse same as theoldone PressRESET button on the panel by pen point, then, power on After ignition Wrong connectionbetween switchoff,setting ignitionline ACC and infonnation alllose Constant p Volt wire Remote controlno No enoughpower supply function from battery Poor perfonnance of radio station Improper lengthof antenna, poor connection of antenna grounding Cannot...
TROUBLE SHOOTING INSTRUCTIONS PROBLEM Cannot power on CAUSE Check whether power fuse blew ornot Some factor causeMPU wrong operation SOLUTION Changefuse same as theoldone PressRESET button on the panel by pen point, then, power on After ignition Wrong connectionbetween switchoff,setting ignitionline ACC and infonnation alllose Constant p Volt wire Remote controlno No enoughpower supply function from battery Poor perfonnance of radio station Improper lengthof antenna, poor connection of antenna grounding Cannot...
PLTS77DU Manual 1
Page 44
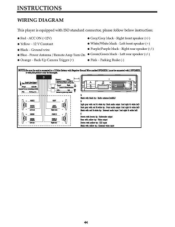
... - 12 VConstant • White/White black - Left front speaker (4-) • Black - Right rear speaker(+/-) • Blue - Left rear speaker(41-) • Orange - d•a12S Der w0blicontkardWanded4RATEICEStonsondnligffillIIL craksktopcd=1raybedentist ki- please follow below instruction: • Red - Parking Brake (-) NIITE2nundemiIsoar- Esal soak* CS Oa&Wet YU C awl IraSnag tarsier tali/ fMwer yaw fp: MSSpat braa SyIt% Ca bps Mika Ns' upg 44 Power Antenna / Remote AmpTurn on • Creel...
... - 12 VConstant • White/White black - Left front speaker (4-) • Black - Right rear speaker(+/-) • Blue - Left rear speaker(41-) • Orange - d•a12S Der w0blicontkardWanded4RATEICEStonsondnligffillIIL craksktopcd=1raybedentist ki- please follow below instruction: • Red - Parking Brake (-) NIITE2nundemiIsoar- Esal soak* CS Oa&Wet YU C awl IraSnag tarsier tali/ fMwer yaw fp: MSSpat braa SyIt% Ca bps Mika Ns' upg 44 Power Antenna / Remote AmpTurn on • Creel...


