Pyle PSBCG90PN Support and Manuals
Get Help and Manuals for this Pyle item
View All Support Options Below
Free Pyle PSBCG90PN manuals!
Problems with Pyle PSBCG90PN?
Ask a Question
Free Pyle PSBCG90PN manuals!
Problems with Pyle PSBCG90PN?
Ask a Question
Popular Pyle PSBCG90PN Manual Pages
Quick Start Guide - Page 4

Compass Page (Only applied for 2 seconds to do hardware reset if the system is on, quickly press this button for 10 seconds to turn on /off the backlight. When device is halted.
4 POWER/ESC
3
4
Description Press for model with such feature available)
Button Definition
1
2
Button 1. Press and hold this button will turn on /off device.
Quick Start Guide - Page 8
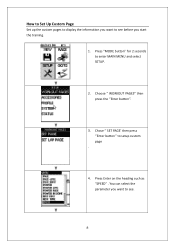
... the custom pages to display the information you want to see before you want to see.
8 Chose '' SET PAGE' then press ''Enter button'' to enter MAIN MENU and select SETUP.
2. You can select the parameter you start the training.
1. Press Enter on the heading such as "SPEED" . Press "MODE button'' for 2 seconds...
Quick Start Guide - Page 9

You may setup "SET LAP PAGE" to see this information on custom page.
6. The lap page will appear when the lap is completed, you want to edit the information you can select the parameter for LAP page.
8. You can see in training.
9 After the setup process is active in LAP page.
7. 5.
Quick Start Guide - Page 10
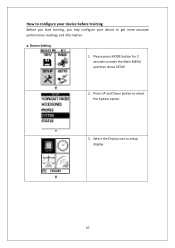
Device Setting
1. Press UP and Down button to enter the Main MENU and then chose SETUP
2. Please press MODE button for 2 seconds to select the System option.
3. How to configure your device before training
Before you start training, you may configure your device to setup display
10 Select the Display icon to get more accurate performance readings and information. a.
Quick Start Guide - Page 11

Here, you may setup the contrast, backlight and night mode as well as auto scrolling for rolling through the four training pages while in training.
5. You may setup units and coordination.
7. Go to select UNIT.
6. Here you can set the time zone.
11 4.
Quick Start Guide - Page 13

... and Down buttons to enter the Main MENU. Select between English and Chinese. Choose Setup then.
2. Here you may setup by following the below process.
1. User profile setting Personal profile is important for calories calculation, HRM zone reference, you may setup your sex, height, and age The condition is important for training preformation calculation...
Quick Start Guide - Page 14

Please press the MODE button for 2 seconds to select ACCESSORIES.
3. c. Press the UP and Down buttons to enter the Main MENU and then choose Setup.
2. Accessories and bike setting
1. SCANNING for paring.
When you select SENSOR, you may pair you accessories like HRM, CADENCE, SPEED, COMBO or POWER meter.
*Sensor functions are only...
Quick Start Guide - Page 15
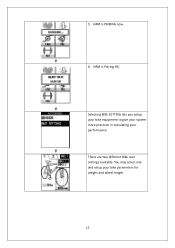
HRM is Pairing OK. HRM is PAIRING now.
6. Selecting BIKE SETTING lets you setup your bike equipment to give your system more precision in calculating your bike parameters for weight and wheel length.
15
5. There are two different Bike user settings available. You may select one and setup your performance.
Quick Start Guide - Page 16

... and Down buttons to enter the Main MENU and then choose RACE
2. AUTO PAUSE: System will alert you when in training. You may setup the AUTO PAUSE, AUTO LAP, ALARM, MAP MODE, and BAROMETER SETTING. ALRAM: Set the alarm and the system will calculate the data in / out and orientation.
16 Training options...
Quick Start Guide - Page 17
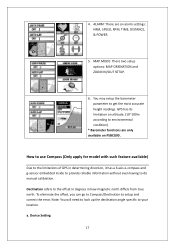
...: You will need to look up the declination angle specific to the offset in degrees in determining direction, it has a 6 axis e-compass and g-sensor embedded inside to provide reliable information without even having to setup and correct the error. Declination refers to your location. Device Setting
17 ALARM: There are only available on altitude...
Quick Start Guide - Page 19

... navigation, bearing means the angle between a line connecting us and another object, and a north-south line. Please press the Page button for navigation.
1. You can set the bearing angle given the direction for 2 seconds to select COMPASS.
19 To press UP and Down button to enter the Main MENU and then...
Quick Start Guide - Page 23

Press the UP and DOWN buttons to finish. b. Race with you.
3. DIST/ TIME: To set GHOST time and distance.
23 There are two types of GHOST settings:
a.
a. CHALLENGE: To use the recorded data to create a ghost to race with your performance. How ... for 2 seconds to enter the MAIN MENU. Select RACE
1. DIST/Time is used to set the target distance and time to select "GHOST."
2.
Quick Start Guide - Page 30

... your PC and then erase this device when upgrading the firmware NOTE: User's manual and PC Software is located in the "Manual" folder. Caution: Please don't unplug this folder to 80 hours of data. After few minutes, the firmware upgrade process will be done. Here, you
can install PC Software accordingly. The memory size of...
Quick Start Guide - Page 31
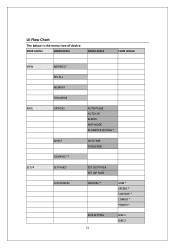
UI Flow Chart
The below is the menu tree of device
FOUR LEVEL1
FOUR LEVEL2
FOUR LEVEL3
FOUR LEVEL4
VIEW RACE SETUP
WORKOUT DEL ALL MEMORY TOD MODE OPTIONS
GHOST COMPASS ** SET PAGES ACCESSORIES
AUTO PAUSE AUTO LAP ALARM MAP MODE ALTIMETER SETTING *
DIST/TIME CHALLENGE
SET CUST PAGE SET LAP PAGE SENSORS *
BIKE SETTING 31
HRM * SPEEED * CADENCE * COMBO * POWER *
BIKE 1 BIKE 2
Quick Start Guide - Page 32

PROFILE
SYSTEM
DISPLAY TIME UNIT TONE LANGUAGE
STATUS
GPS BATTERY VERSION DEGAULT SET
GOTO
ROUTE
TRACK BACK
LOCATION
* Available for PSBCG90 **(Only available for model with such feature)
32
Pyle PSBCG90PN Reviews
We have not received any reviews for Pyle yet.