
Instruction Manual
Page 1
NTSC,ATSC Modelnr:PTVLED15 Modelnr:PTVLED21 Modelnr:PTVLED18 Modelnr:PTVLED23 POWER MUTE S.MODE P.MODE EPG TV MENU SOURCE ENTER MTS VOL AUTO DISPLAY CCD EXIT CH ZOOM SLEEP FAV FAV- FAV+ REPEAT Statement:This document is reference manual,please confirm with the specifically software if need translate or batch print
NTSC,ATSC Modelnr:PTVLED15 Modelnr:PTVLED21 Modelnr:PTVLED18 Modelnr:PTVLED23 POWER MUTE S.MODE P.MODE EPG TV MENU SOURCE ENTER MTS VOL AUTO DISPLAY CCD EXIT CH ZOOM SLEEP FAV FAV- FAV+ REPEAT Statement:This document is reference manual,please confirm with the specifically software if need translate or batch print
Instruction Manual
Page 2
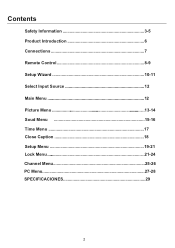
Contents SCafuettiyonIn.f.o..r..m...a..t.i.o..n 3-5 Product Introduction 6 CoTnenchencitciaol nSspe..c.i.f.ic..a..t.io..n...75 Remote Control 8-9 Setup Wizard 10-11 Select Input Source 12 Main Menu 12 Picture Menu 13-14 Soud Menu 15-16 Time Menu 17 Simple Troubleshooting 25 Close Caption 18 Setup Menu 19-21 Lock Menu 21-24 Channel Menu 25-26 PC Menu 27-28 SPECIFICACIONES 29 2
Contents SCafuettiyonIn.f.o..r..m...a..t.i.o..n 3-5 Product Introduction 6 CoTnenchencitciaol nSspe..c.i.f.ic..a..t.io..n...75 Remote Control 8-9 Setup Wizard 10-11 Select Input Source 12 Main Menu 12 Picture Menu 13-14 Soud Menu 15-16 Time Menu 17 Simple Troubleshooting 25 Close Caption 18 Setup Menu 19-21 Lock Menu 21-24 Channel Menu 25-26 PC Menu 27-28 SPECIFICACIONES 29 2
Instruction Manual
Page 7
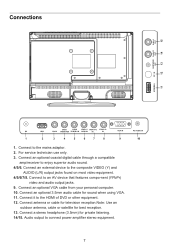
.../15. Audio output to the mains adaptor. 2. Connect to connect power amplifier stereo equipment. Connect a stereo headphone (3.5mm) for sound when using VGA. 11. PC AUDIO IN 10 7 Connect an optional coaxial digital cable through a compatible amp/receiver to the composite VIDEO (Y) and AUDIO (L/R) output jacks found on most video equipment. 4/5/6/7/8. Connect an optional VGA cable from your personal computer. 10. Connect an external device to enjoy superior audio sound. 4/5/6. For service technician use only. 3. Connect it...
.../15. Audio output to the mains adaptor. 2. Connect to connect power amplifier stereo equipment. Connect a stereo headphone (3.5mm) for sound when using VGA. 11. PC AUDIO IN 10 7 Connect an optional coaxial digital cable through a compatible amp/receiver to the composite VIDEO (Y) and AUDIO (L/R) output jacks found on most video equipment. 4/5/6/7/8. Connect an optional VGA cable from your personal computer. 10. Connect an external device to enjoy superior audio sound. 4/5/6. For service technician use only. 3. Connect it...
Instruction Manual
Page 8
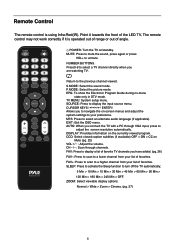
...-: Press to scan to the previous channel viewed. CCD: Select closed caption subtitles (if available) OFF > ON > CC on /standby. FAV+: Press to scan to display the input source menu. POWER MUTE S.MODE P.MODE EPG TV MENU SOURCE ENTER MTS EXIT AUTO DISPLAY VOL CH CCD FAV FAV- S.MODE: Select the sound mode. SOURCE: Press to a higher channel from your list of favorites. SLEEP: Press to activate the Sleep function to select an alternate audio language (if...
...-: Press to scan to the previous channel viewed. CCD: Select closed caption subtitles (if available) OFF > ON > CC on /standby. FAV+: Press to scan to display the input source menu. POWER MUTE S.MODE P.MODE EPG TV MENU SOURCE ENTER MTS EXIT AUTO DISPLAY VOL CH CCD FAV FAV- S.MODE: Select the sound mode. SOURCE: Press to a higher channel from your list of favorites. SLEEP: Press to activate the Sleep function to select an alternate audio language (if...
Instruction Manual
Page 9
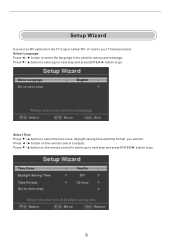
Select Time Press ▼ / ▲ button to select the time zone, daylight saving time and time format you want to adjust. Press ◄ / ► button on the remote control to select go to next step and press ENTER/► button to go . 9 Setup Wizard Connect an RF cable from the TV's input called "RF-In" and to be used for menus and message. Press ▼ / ▲ button to...
Select Time Press ▼ / ▲ button to select the time zone, daylight saving time and time format you want to adjust. Press ◄ / ► button on the remote control to select go to next step and press ENTER/► button to go . 9 Setup Wizard Connect an RF cable from the TV's input called "RF-In" and to be used for menus and message. Press ▼ / ▲ button to...
Instruction Manual
Page 12
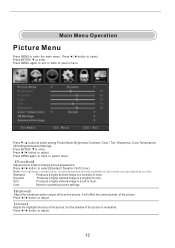
... to customize picture settings. 【Brightness】 Adjust the visual perception output of the entire picture, it will effect the iuminousness of the picture is invariable. User Select to parent menu. Dynamic Produces a highly defined image in a normally lit room. Press ◄ / ► button to select among Picture Mode /Brightness/ Contrast / Color / Tint / Sharpness / Color Temperature/ 3D Settings/Advanced Settings. Press ▼ / ▲ button to adjust. 【Contrast...
... to customize picture settings. 【Brightness】 Adjust the visual perception output of the entire picture, it will effect the iuminousness of the picture is invariable. User Select to parent menu. Dynamic Produces a highly defined image in a normally lit room. Press ◄ / ► button to select among Picture Mode /Brightness/ Contrast / Color / Tint / Sharpness / Color Temperature/ 3D Settings/Advanced Settings. Press ▼ / ▲ button to adjust. 【Contrast...
Instruction Manual
Page 13
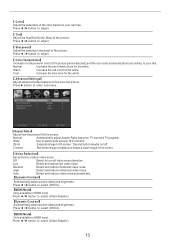
... Mode~ Only available in the center. } Noise Reduction~ Set options to adjust. } Tint~ Adjust the hue(Red,Green,Blue) of the picture. Cinema Stretches image at edges but keeps a clear image in HDMI input. Press ◄ / ► button to reduce video noise. Press ► button to your own like . 【 Color】 Adjust the saturation of the color based on TV size and TV program. Warm Increase the red color...
... Mode~ Only available in the center. } Noise Reduction~ Set options to adjust. } Tint~ Adjust the hue(Red,Green,Blue) of the picture. Cinema Stretches image at edges but keeps a clear image in HDMI input. Press ◄ / ► button to reduce video noise. Press ► button to your own like . 【 Color】 Adjust the saturation of the color based on TV size and TV program. Warm Increase the red color...
Instruction Manual
Page 15
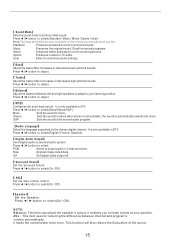
... available in User mode,you can adjust the speaker's output, it made the overall water to mono. Press ◄ / ► button to external audio system. Press ◄ / ► button to select(English / French / Spanish). } Digital Audio Output~ Send digital audio to adjust. } MTS~ Configures the multi-track sound. Press ◄ / ► button to select(On / Off). } AVL~ Set the auto volume control. Raw Original image coded date. Press ◄ / ► button to select...
... available in User mode,you can adjust the speaker's output, it made the overall water to mono. Press ◄ / ► button to external audio system. Press ◄ / ► button to select(English / French / Spanish). } Digital Audio Output~ Send digital audio to adjust. } MTS~ Configures the multi-track sound. Press ◄ / ► button to select(On / Off). } AVL~ Set the auto volume control. Raw Original image coded date. Press ◄ / ► button to select...
Instruction Manual
Page 16
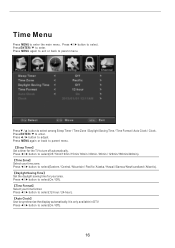
...; button to synchronize the display automatically.It is only available in DTV. Press ◄ / ► button to select(12-hour / 24-hour). 【Auto Clock】 Use to select. Press ◄ / ► button to select among Sleep Timer / Time Zone / Daylight Saving Time / Time Format / Auto Clock / Clock. Press ▼ / ▲ button to select(On / Off). 16 Press MENU again or back to parent menu. 【Sleep Timer】 Set a timer...
...; button to synchronize the display automatically.It is only available in DTV. Press ◄ / ► button to select(12-hour / 24-hour). 【Auto Clock】 Use to select. Press ◄ / ► button to select among Sleep Timer / Time Zone / Daylight Saving Time / Time Format / Auto Clock / Clock. Press ▼ / ▲ button to select(On / Off). 16 Press MENU again or back to parent menu. 【Sleep Timer】 Set a timer...
Instruction Manual
Page 17
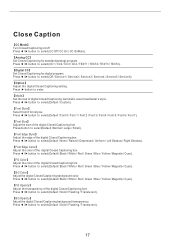
...; Set Closed Captioning for standard(analog) program. Press ◄ / ► button to select(Default/ Black / White / Red / Green / Blue / Yellow / Magenta / Cyan). 【BG Color】 Adjust the digital Closed Captioning background color. Press ► button to enter. 【Mode】 Set the look of the digital Closed Captioning box. Press ◄ / ► button to select(Default / Solid / Flashing / Translucent). 17 Press ◄ / ► button to select(Default/ Black / White / Red / Green / Blue / Yellow / Magenta / Cyan). 【FG Color】 Adjust the color...
...; Set Closed Captioning for standard(analog) program. Press ◄ / ► button to select(Default/ Black / White / Red / Green / Blue / Yellow / Magenta / Cyan). 【BG Color】 Adjust the digital Closed Captioning background color. Press ► button to enter. 【Mode】 Set the look of the digital Closed Captioning box. Press ◄ / ► button to select(Default / Solid / Flashing / Translucent). 17 Press ◄ / ► button to select(Default/ Black / White / Red / Green / Blue / Yellow / Magenta / Cyan). 【FG Color】 Adjust the color...
Instruction Manual
Page 18
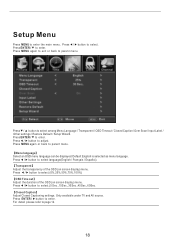
... Timeout / Closed Caption /Over Scan/ Input Label / Other settings / Restore Default / Setup Wizard. Press ◄ / ► button to select language(English / Français / Español). 【Transparent】 Adjust the transparency of the OSD (on screen display) menu. Press ▼ / ▲ button to parent menu. Press MENU again or back to enter. Only available under TV and AV source. Press ENTER / ► button to parent menu. 【Menu language...
... Timeout / Closed Caption /Over Scan/ Input Label / Other settings / Restore Default / Setup Wizard. Press ◄ / ► button to select language(English / Français / Español). 【Transparent】 Adjust the transparency of the OSD (on screen display) menu. Press ▼ / ▲ button to parent menu. Press MENU again or back to enter. Only available under TV and AV source. Press ENTER / ► button to parent menu. 【Menu language...
Instruction Manual
Page 19
... in DTV/Component/HDMI.Default is On. Press ENTER / ►button to enter. 【Blue Screen】 To select the transition type required while changing from one channel to another Press ◄ / ► button to enter. 【Other Settings】 Set the parameter of audio only, no signal power off and no operation power off . When you turn the Audio Only on and exit the OSD menu, the panel will...
... in DTV/Component/HDMI.Default is On. Press ENTER / ►button to enter. 【Blue Screen】 To select the transition type required while changing from one channel to another Press ◄ / ► button to enter. 【Other Settings】 Set the parameter of audio only, no signal power off and no operation power off . When you turn the Audio Only on and exit the OSD menu, the panel will...
Instruction Manual
Page 20
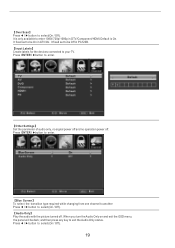
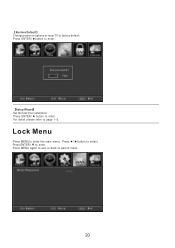
【Restore Default】 Change power on options or reset TV to select. Lock Menu Press MENU to enter the main menu, Press ◄ / ► button to factory default. For detail please refer to parent menu. 20 Press MENU again to exit or back to page 1~2. Press ENTER / ▼ to enter. Press ENTER / ► button to enter. Press ENTER / ►button to enter. }Setup Wizard~ Set the first time installation.
【Restore Default】 Change power on options or reset TV to select. Lock Menu Press MENU to enter the main menu, Press ◄ / ► button to factory default. For detail please refer to parent menu. 20 Press MENU again to exit or back to page 1~2. Press ENTER / ▼ to enter. Press ENTER / ► button to enter. Press ENTER / ►button to enter. }Setup Wizard~ Set the first time installation.
Instruction Manual
Page 21
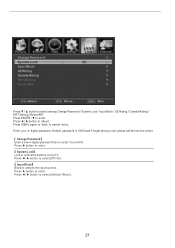
... / Block). 21 Press ▼ / ▲ button to parent menu. Enter your 4- Press MENU again or back to select among Change Password / System Lock / Input Block / US Rating / Canada Rating / RRT Setting / Reset RRT. Press ◄ / ► button to enter. } System Lock~ Lock or unlock the buttons on the TV. Press ► button to select(Off / On). } Input Block~ Block or unblock the input sources. digital password. Press ENTER / ▼ to enter.
... / Block). 21 Press ▼ / ▲ button to parent menu. Enter your 4- Press MENU again or back to select among Change Password / System Lock / Input Block / US Rating / Canada Rating / RRT Setting / Reset RRT. Press ◄ / ► button to enter. } System Lock~ Lock or unlock the buttons on the TV. Press ► button to select(Off / On). } Input Block~ Block or unblock the input sources. digital password. Press ENTER / ▼ to enter.
Instruction Manual
Page 22
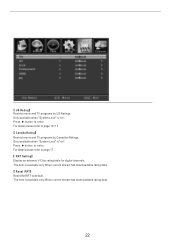
... Setting~ Display an advance V-Chip rating table for digital channels. For detail please refer to page 16~17. } Canada Rating~ Restrict movie and TV programs by US Ratings. The item is "on ". The item is "on ". Only available when "System Lock" is available only When current stream has downloadable rating data. 22 Press ► button to default. Press ► button to...
... Setting~ Display an advance V-Chip rating table for digital channels. For detail please refer to page 16~17. } Canada Rating~ Restrict movie and TV programs by US Ratings. The item is "on ". The item is "on ". Only available when "System Lock" is available only When current stream has downloadable rating data. 22 Press ► button to default. Press ► button to...
Instruction Manual
Page 23
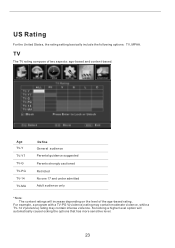
... General audience Parental guidance suggested Parents strongly cautioned Retricted No one 17 and under admitted Adult audience only *Note: The content ratings will automatically cause locking the options that has more sensitive level. 23 So locking a higher level option will increase depending on the level of two aspects: age-based and content-based. For example, a program with...
... General audience Parental guidance suggested Parents strongly cautioned Retricted No one 17 and under admitted Adult audience only *Note: The content ratings will automatically cause locking the options that has more sensitive level. 23 So locking a higher level option will increase depending on the level of two aspects: age-based and content-based. For example, a program with...

Instruction Manual
Page 24
.../Cable / Auto Scan / Favorite / Show/Hide / Channel Number / Channel Label . Press ▼ / ▲ button to parent menu. Press ENTER / ▼ to enter. 24 Press ENTER / ► button to enter. Press ◄ / ► button to enter. Press ENTER / ▼ to adjust. Press MENU again or back to select. Channel Menu Press MENU to enter the main menu, Press ◄ / ► button to parent menu. 【Air/Cable】 Select signal type. Press ◄ / ► button...
.../Cable / Auto Scan / Favorite / Show/Hide / Channel Number / Channel Label . Press ▼ / ▲ button to parent menu. Press ENTER / ▼ to enter. 24 Press ENTER / ► button to enter. Press ◄ / ► button to enter. Press ENTER / ▼ to adjust. Press MENU again or back to select. Channel Menu Press MENU to enter the main menu, Press ◄ / ► button to parent menu. 【Air/Cable】 Select signal type. Press ◄ / ► button...
Instruction Manual
Page 26
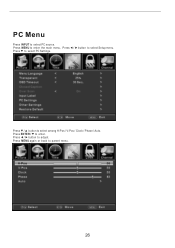
Press ▼ / ▲ button to enter. Press ENTER / ▼ to select among H-Pos / V-Pos / Clock / Phase / Auto. Press MENU to enter the main menu, Press ◄ / ► button to adjust. Press ◄ / ► button to select Setup menu. Press ▼ to parent menu. 26 Press MENU again or back to select PC Settings. PC Menu Press INPUT to select PC source.
Press ▼ / ▲ button to enter. Press ENTER / ▼ to select among H-Pos / V-Pos / Clock / Phase / Auto. Press MENU to enter the main menu, Press ◄ / ► button to adjust. Press ◄ / ► button to select Setup menu. Press ▼ to parent menu. 26 Press MENU again or back to select PC Settings. PC Menu Press INPUT to select PC source.
Instruction Manual
Page 27
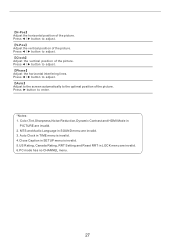
... picture. Auto Clock in TIME menu is invalid. 4.Close Caption in SETUP menu is invalid. 5.US Rating, Canada Rating, RRT Setting and Reset RRT in SOUND menu are invalid. 3. Press ◄ / ► button to the optimal position of the picture. Press ► button to adjust. 【Clock】 Adjust the vertical position of the picture. MTS and Audio Language in LOCK menu are invalid. 2. Color,Tint,Sharpness,Noise Reduction,Dynamic Contrast and HDMI Mode...
... picture. Auto Clock in TIME menu is invalid. 4.Close Caption in SETUP menu is invalid. 5.US Rating, Canada Rating, RRT Setting and Reset RRT in SOUND menu are invalid. 3. Press ◄ / ► button to the optimal position of the picture. Press ► button to adjust. 【Clock】 Adjust the vertical position of the picture. MTS and Audio Language in LOCK menu are invalid. 2. Color,Tint,Sharpness,Noise Reduction,Dynamic Contrast and HDMI Mode...
Instruction Manual
Page 28
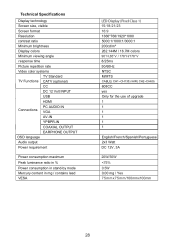
Technical Specifications Display technology Screen size, visible Screen format Resolution contrast ratio Minimum brightness Display colors Minimum viewing angle response time Picture repetition rate Video color systems TV Standard TV Functions CATV (optional) CC DC 12 Volt INPUT USB HDMI PC AUDIO IN Connections VGA AV-IN YPBPR-IN COAXIAL OUTPUT EARPHONE OUTPUT OSD language Audio output Power requirement Power consumption maximum Peak luminance ratio in % Power consumption in stand-by mode Mercury content in mg / contains lead VESA 15...
Technical Specifications Display technology Screen size, visible Screen format Resolution contrast ratio Minimum brightness Display colors Minimum viewing angle response time Picture repetition rate Video color systems TV Standard TV Functions CATV (optional) CC DC 12 Volt INPUT USB HDMI PC AUDIO IN Connections VGA AV-IN YPBPR-IN COAXIAL OUTPUT EARPHONE OUTPUT OSD language Audio output Power requirement Power consumption maximum Peak luminance ratio in % Power consumption in stand-by mode Mercury content in mg / contains lead VESA 15...


