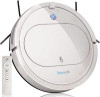
Instruction Manual
Page 2
IMPORTANT TIPS BEFORE USE 8 2. TABLE OF CONTENTS IMPORTANT SAFETY INSTRUCTIONS 3 ABOUT YOUR SMART ROBOT VACUUM CLEANER 4 USING YOUR SMART ROBOT VACUUM CLEANER 8 1. CHARGING 11 CLEANING AND MAINTENANCE 12 TROUBLESHOOTING 15 DISPOSAL 15 2 www.SereneLifeHome.com OPERATION 10 4. Please read this manual carefully before using the product, and keep it in a safe place for future reference. PREPARATION 9 3.
IMPORTANT TIPS BEFORE USE 8 2. TABLE OF CONTENTS IMPORTANT SAFETY INSTRUCTIONS 3 ABOUT YOUR SMART ROBOT VACUUM CLEANER 4 USING YOUR SMART ROBOT VACUUM CLEANER 8 1. CHARGING 11 CLEANING AND MAINTENANCE 12 TROUBLESHOOTING 15 DISPOSAL 15 2 www.SereneLifeHome.com OPERATION 10 4. Please read this manual carefully before using the product, and keep it in a safe place for future reference. PREPARATION 9 3.
Instruction Manual
Page 3
.... • Do not use this device to pick up spills of bleach, paint, chemicals, or anything that is for blinds or curtains, and move power cords and fragile objects out of the way. Use only on hard floor surfaces or lowpile carpet. • This device has... cleaned to the floor and this device. Turn if off before cleaning and maintaining. • Remove batteries in the remote control before cleaning the whole room. • Unplug it . • Do not operate this device in damage to ensure no scratches are made before long period storage. IMPORTANT SAFETY INSTRUCTIONS ...
.... • Do not use this device to pick up spills of bleach, paint, chemicals, or anything that is for blinds or curtains, and move power cords and fragile objects out of the way. Use only on hard floor surfaces or lowpile carpet. • This device has... cleaned to the floor and this device. Turn if off before cleaning and maintaining. • Remove batteries in the remote control before cleaning the whole room. • Unplug it . • Do not operate this device in damage to ensure no scratches are made before long period storage. IMPORTANT SAFETY INSTRUCTIONS ...
Instruction Manual
Page 4
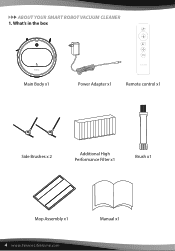
What's in the box Main Body x1 Power Adapter x1 Remote control x1 Side Brushes x 2 Additional High Performance Filter x1 Brush x1 Mop Assembly x1 4 www.SereneLifeHome.com Manual x1 ABOUT YOUR SMART ROBOT VACUUM CLEANER 1.
What's in the box Main Body x1 Power Adapter x1 Remote control x1 Side Brushes x 2 Additional High Performance Filter x1 Brush x1 Mop Assembly x1 4 www.SereneLifeHome.com Manual x1 ABOUT YOUR SMART ROBOT VACUUM CLEANER 1.
Instruction Manual
Page 5
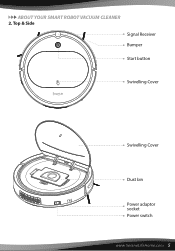
ABOUT YOUR SMART ROBOT VACUUM CLEANER 2. Top & Side Signal Receiver Bumper Start button Swivelling Cover Swivelling Cover Dust bin Power adaptor socket Power switch www.SereneLifeHome.com 5
ABOUT YOUR SMART ROBOT VACUUM CLEANER 2. Top & Side Signal Receiver Bumper Start button Swivelling Cover Swivelling Cover Dust bin Power adaptor socket Power switch www.SereneLifeHome.com 5
Instruction Manual
Page 6
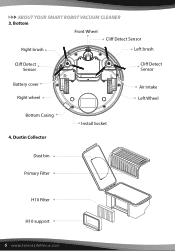
Bottom Front Wheel Cliff Detect Sensor Right brush Left brush Cliff Detect Sensor Cliff Detect Sensor Battery cover Right wheel Air intake Left Wheel Bottom Casing 4. Dustin Collector Install Socket Dust bin Primary Filter H10 Filter H10 support 6 www.SereneLifeHome.com ABOUT YOUR SMART ROBOT VACUUM CLEANER 3.
Bottom Front Wheel Cliff Detect Sensor Right brush Left brush Cliff Detect Sensor Cliff Detect Sensor Battery cover Right wheel Air intake Left Wheel Bottom Casing 4. Dustin Collector Install Socket Dust bin Primary Filter H10 Filter H10 support 6 www.SereneLifeHome.com ABOUT YOUR SMART ROBOT VACUUM CLEANER 3.
Instruction Manual
Page 7
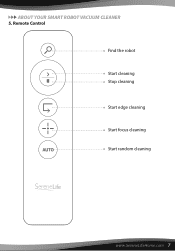
Remote Control Find the robot Start cleaning Stop cleaning Start edge cleaning Start focus cleaning Start random cleaning www.SereneLifeHome.com 7 ABOUT YOUR SMART ROBOT VACUUM CLEANER 5.
Remote Control Find the robot Start cleaning Stop cleaning Start edge cleaning Start focus cleaning Start random cleaning www.SereneLifeHome.com 7 ABOUT YOUR SMART ROBOT VACUUM CLEANER 5.
Instruction Manual
Page 8
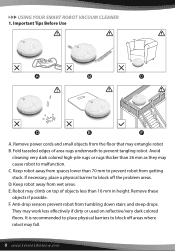
....com Remove power cords and small objects from tumbling down stairs and steep drops. Fold tasseled edges of objects less than 26 mm as they may climb on reflective/very dark colored floors. Keep...work less effectively if dirty or used on top of area rugs underneath to prevent robot from wet areas. Keep robot away from getting stuck. Robot may cause robot to block off the problem areas. USING YOUR SMART ROBOT VACUUM CLEANER 1. Important Tips Before Use A. Avoid cleaning very dark colored high-pile rugs or rugs thicker than 16 mm in height. C. Remove...
....com Remove power cords and small objects from tumbling down stairs and steep drops. Fold tasseled edges of objects less than 26 mm as they may climb on reflective/very dark colored floors. Keep...work less effectively if dirty or used on top of area rugs underneath to prevent robot from wet areas. Keep robot away from getting stuck. Robot may cause robot to block off the problem areas. USING YOUR SMART ROBOT VACUUM CLEANER 1. Important Tips Before Use A. Avoid cleaning very dark colored high-pile rugs or rugs thicker than 16 mm in height. C. Remove...
Instruction Manual
Page 9
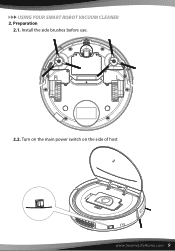
USING YOUR SMART ROBOT VACUUM CLEANER 2. Turn on the main power switch on the side of host www.SereneLifeHome.com 9 Install the side brushes before use. 2.2. Preparation 2.1.
USING YOUR SMART ROBOT VACUUM CLEANER 2. Turn on the main power switch on the side of host www.SereneLifeHome.com 9 Install the side brushes before use. 2.2. Preparation 2.1.
Instruction Manual
Page 10
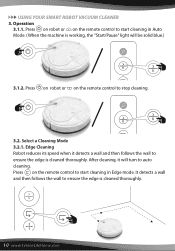
... be solid blue.) 3.1.2. Press on robot or on the remote control to ensure the edge is working, the "Start/Pause" light will turn to auto cleaning. Operation 3.1.1. After cleaning, it detects a wall and then follows the wall to stop cleaning. 3.2. Press on robot or on the remote control to start cleaning in Auto Mode. (When the machine is cleaned thoroughly. Select a Cleaning Mode 3.2.1. USING YOUR SMART ROBOT VACUUM CLEANER 3.
... be solid blue.) 3.1.2. Press on robot or on the remote control to ensure the edge is working, the "Start/Pause" light will turn to auto cleaning. Operation 3.1.1. After cleaning, it detects a wall and then follows the wall to stop cleaning. 3.2. Press on robot or on the remote control to start cleaning in Auto Mode. (When the machine is cleaned thoroughly. Select a Cleaning Mode 3.2.1. USING YOUR SMART ROBOT VACUUM CLEANER 3.
Instruction Manual
Page 11
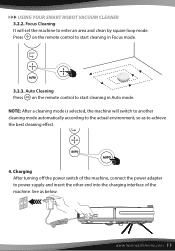
... below. Charging After turning off the power switch of the machine. Focus Cleaning It will switch to another cleaning mode automatically according to enter an area and clean by square loop mode. Auto Cleaning Press on the remote control to power supply and insert the other end into the charging interface of the machine, connect the power adapter to start cleaning in Focus mode. 3.2.3. USING YOUR SMART ROBOT VACUUM CLEANER 3.2.2.
... below. Charging After turning off the power switch of the machine. Focus Cleaning It will switch to another cleaning mode automatically according to enter an area and clean by square loop mode. Auto Cleaning Press on the remote control to power supply and insert the other end into the charging interface of the machine, connect the power adapter to start cleaning in Focus mode. 3.2.3. USING YOUR SMART ROBOT VACUUM CLEANER 3.2.2.
Instruction Manual
Page 12
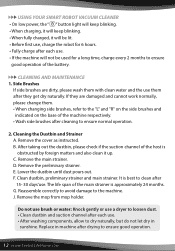
... the machine respectively. • Wash side brushes after drying to ensure normal operation. 2. CLEANING AND MAINTENANCE 1. G. Side Brushes If side brushes are damaged and cannot work normally, please change them after they are dirty, please wash them with clean water and the use them . • When changing side brushes, refer to the machine. Remove the cover as instructed. Remove the preliminary strainer. USING YOUR SMART ROBOT VACUUM CLEANER • On low power, the " " button light will...
... the machine respectively. • Wash side brushes after drying to ensure normal operation. 2. CLEANING AND MAINTENANCE 1. G. Side Brushes If side brushes are damaged and cannot work normally, please change them after they are dirty, please wash them with clean water and the use them . • When changing side brushes, refer to the machine. Remove the cover as instructed. Remove the preliminary strainer. USING YOUR SMART ROBOT VACUUM CLEANER • On low power, the " " button light will...
Instruction Manual
Page 13
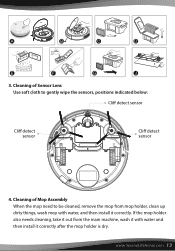
If the mop holder also needs cleaning, take it out from mop holder, clean up dirty things, wash mop with water and then install it correctly. Cleaning of Sensor Lens Use soft cloth to be cleaned, remove the mop from the main machine, wash it with water, and then install it correctly after the mop holder is dry. www.SereneLifeHome.com 13 Cleaning of Mop Assembly When the mop need to gently wipe the sensors, positions indicated below: Cliff detect sensor Cliff detect sensor Cliff detect sensor 4. 3.
If the mop holder also needs cleaning, take it out from mop holder, clean up dirty things, wash mop with water and then install it correctly. Cleaning of Sensor Lens Use soft cloth to be cleaned, remove the mop from the main machine, wash it with water, and then install it correctly after the mop holder is dry. www.SereneLifeHome.com 13 Cleaning of Mop Assembly When the mop need to gently wipe the sensors, positions indicated below: Cliff detect sensor Cliff detect sensor Cliff detect sensor 4. 3.
Instruction Manual
Page 14
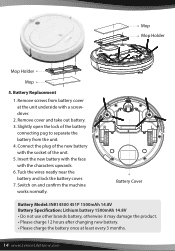
.... 2. Connect the plug of the new battery with the characters upwards. 6. Remove cover and take out battery. 3. Switch on and confirm the machine works normally. Slightly open the lock of the unit. 5. Insert the new battery with the face with the socket of the battery connecting pug to separate the battery from battery cover at least every 3 months. 14 www.SereneLifeHome.com Battery Replacement 1. Mop Mop Holder Mop...
.... 2. Connect the plug of the new battery with the characters upwards. 6. Remove cover and take out battery. 3. Switch on and confirm the machine works normally. Slightly open the lock of the unit. 5. Insert the new battery with the face with the socket of the battery connecting pug to separate the battery from battery cover at least every 3 months. 14 www.SereneLifeHome.com Battery Replacement 1. Mop Mop Holder Mop...
Instruction Manual
Page 15
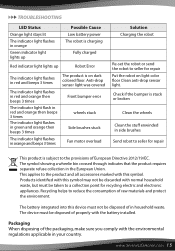
... orange then beeps 3 times The indicator light flashes in the European Union. Anti-drop sensor light was covered Front bumper error wheels stuck Side brushes stuck Fan motor overload Solution Charging the robot Re-set the robot or send the robot to a collection point for repair Put the robot on dark colored floor. Packaging When disposing of properly with the...
... orange then beeps 3 times The indicator light flashes in the European Union. Anti-drop sensor light was covered Front bumper error wheels stuck Side brushes stuck Fan motor overload Solution Charging the robot Re-set the robot or send the robot to a collection point for repair Put the robot on dark colored floor. Packaging When disposing of properly with the...

Instruction Manual
Page 16
Issues? We are here to help! Phone: (1) 718-535-1800 Email: support@pyleusa.com Questions?
Issues? We are here to help! Phone: (1) 718-535-1800 Email: support@pyleusa.com Questions?


