
PVNTT1R Manual 1
Page 1
Classic Retro USB Phonograph/Turntable With Aux-In Jack MODEL:PVNTT1 Operating Instructions Manual
Classic Retro USB Phonograph/Turntable With Aux-In Jack MODEL:PVNTT1 Operating Instructions Manual
PVNTT1R Manual 1
Page 2
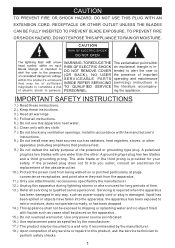
...power-supply cord or plug is in TO QUALIFIED SERVICE the literature accompany- IMPORTANT SAFETY INSTRUCTIONS 1.) Read these instructions. 2.) Keep these instructions. 3.) Heed all warnings. 4.) Follow all servicing to a wall only if recommended by the manufacturer. 12.) Unplug this product, ask the service technician to (OR BACK), NO USER...stoves, or other . Use only power source as indicated. 16.) Use replacement parts as vases shall be exposed to dripping or splashing water and no object filled with the manufacturer's instructions. 8.) Do not install near water. 6.) Clean only ...
...power-supply cord or plug is in TO QUALIFIED SERVICE the literature accompany- IMPORTANT SAFETY INSTRUCTIONS 1.) Read these instructions. 2.) Keep these instructions. 3.) Heed all warnings. 4.) Follow all servicing to a wall only if recommended by the manufacturer. 12.) Unplug this product, ask the service technician to (OR BACK), NO USER...stoves, or other . Use only power source as indicated. 16.) Use replacement parts as vases shall be exposed to dripping or splashing water and no object filled with the manufacturer's instructions. 8.) Do not install near water. 6.) Clean only ...
PVNTT1R Manual 1
Page 3
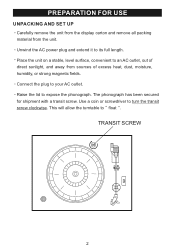
... AC outlet. Use a coin or screwdriver to its full length. Unwind the AC power plug and extend it to turn the transit screw clockwise. ,, PREPARATION FOR USE UNPACKING AND SET UP Carefully remove the unit from the display carton and remove all packing material from sources... of direct sunlight, and away from the unit. Place the unit on a stable, level surface, convenient to float ,,. This will allow the turntable...
... AC outlet. Use a coin or screwdriver to its full length. Unwind the AC power plug and extend it to turn the transit screw clockwise. ,, PREPARATION FOR USE UNPACKING AND SET UP Carefully remove the unit from the display carton and remove all packing material from sources... of direct sunlight, and away from the unit. Place the unit on a stable, level surface, convenient to float ,,. This will allow the turntable...
PVNTT1R Manual 1
Page 4
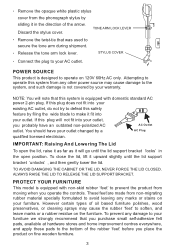
... when you purchase small self-adhesive felt pads, available at hardware stores and home improvement centres everywhere, and apply these pads to make it will go until the lid support bracket 'unlocks' , and then gently lower the lid. Release the tone arm...STYLUS COVER Connect the plug to operate on the furniture. POWER SOURCE This product is equipped with domestic standard AC power 2-pin plug. NOTE: You will not fit into your outlet changed by a AC Plug qualified licensed electrician. ALWAYS RAISE THE LID TO RELEASE THE LID SUPPORT BRACKET. PROTECT YOUR FURNITURE This model...
... when you purchase small self-adhesive felt pads, available at hardware stores and home improvement centres everywhere, and apply these pads to make it will go until the lid support bracket 'unlocks' , and then gently lower the lid. Release the tone arm...STYLUS COVER Connect the plug to operate on the furniture. POWER SOURCE This product is equipped with domestic standard AC power 2-pin plug. NOTE: You will not fit into your outlet changed by a AC Plug qualified licensed electrician. ALWAYS RAISE THE LID TO RELEASE THE LID SUPPORT BRACKET. PROTECT YOUR FURNITURE This model...
PVNTT1R Manual 1
Page 6
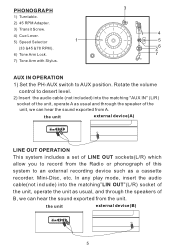
...L 5 Rotate the volume control to AUX position. In any play mode, insert the audio cable(not include) into the matching "AUX IN" (L/R) socket of the unit, operate A as usual and through the speakers of B, we can hear the sound exported from the unit. PHONOGRAPH 1) Turntable. 2) 45 RPM ...Adapter. 3) Transit Screw. 4) Cue Lever. 5) Speed Selector 1 (33 &45 &78 RPM). 6) Tone Arm Lock. 7) Tone Arm with Stylus. 3 4 5 26 7 AUX IN OPERATION 1) Set the PH-AUX ...
...L 5 Rotate the volume control to AUX position. In any play mode, insert the audio cable(not include) into the matching "AUX IN" (L/R) socket of the unit, operate A as usual and through the speakers of B, we can hear the sound exported from the unit. PHONOGRAPH 1) Turntable. 2) 45 RPM ...Adapter. 3) Transit Screw. 4) Cue Lever. 5) Speed Selector 1 (33 &45 &78 RPM). 6) Tone Arm Lock. 7) Tone Arm with Stylus. 3 4 5 26 7 AUX IN OPERATION 1) Set the PH-AUX ...
PVNTT1R Manual 1
Page 7
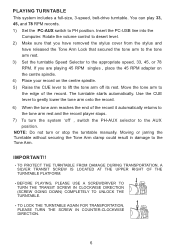
... rest and the record player stops. 7) To turn or stop the turntable manually. The turntable starts automatically. BEFORE PLAYING, PLEASE USE A SCREWDRIVER TO TURN THE TRANSIT SCREW IN CLOCKWISE DIRECTION (SCREW GOING DOWN) COMPLETELY TO UNLOCK THE TURNTABLE. Rotate the volume control to desert level. 2) Make sure that secured the tone arm to the tone arm rest. 3) Set the turntable Speed Selector to...
... rest and the record player stops. 7) To turn or stop the turntable manually. The turntable starts automatically. BEFORE PLAYING, PLEASE USE A SCREWDRIVER TO TURN THE TRANSIT SCREW IN CLOCKWISE DIRECTION (SCREW GOING DOWN) COMPLETELY TO UNLOCK THE TURNTABLE. Rotate the volume control to desert level. 2) Make sure that secured the tone arm to the tone arm rest. 3) Set the turntable Speed Selector to...
PVNTT1R Manual 1
Page 8
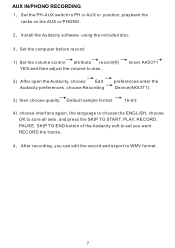
...PLAY, RECORD, PAUSE, SKIP TO END button of the Audacity soft to set you want RECORD the tracks. 4、 After recording, you can edit the record and export to max.. AUX IN/PHONO RECORDING 1、 Set the PH-AUX switch to PH or AUX in position, playback the tacks on the AUX or PHONO. 2、 Install... the Audacity software using the included disc. 3、Set the computer before record: 1) Set the volume control attribute record(R) YES and then adjust the volume to WMV format. 7 mixer:AK5371 2) After open the Audacity...
...PLAY, RECORD, PAUSE, SKIP TO END button of the Audacity soft to set you want RECORD the tracks. 4、 After recording, you can edit the record and export to max.. AUX IN/PHONO RECORDING 1、 Set the PH-AUX switch to PH or AUX in position, playback the tacks on the AUX or PHONO. 2、 Install... the Audacity software using the included disc. 3、Set the computer before record: 1) Set the volume control attribute record(R) YES and then adjust the volume to WMV format. 7 mixer:AK5371 2) After open the Audacity...
PVNTT1R Manual 1
Page 9
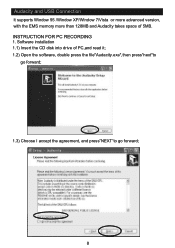
INSTRUCTION FOR PC RECORDING 1. Audacity and USB Connection It supports Window 95 /Window XP/Window 7/Vista or more advanced version, with the EMS memory more than 128MB and Audacity takes space of PC,and read it; 1.2) Open the software, double press the file"Audacity.exe",then press"next"to go forward; 1.3) Choose I accept the agreement, and press"NEXT"to go forward; 8 Software installation 1.1) Insert the CD disk into drive of 5MB.
INSTRUCTION FOR PC RECORDING 1. Audacity and USB Connection It supports Window 95 /Window XP/Window 7/Vista or more advanced version, with the EMS memory more than 128MB and Audacity takes space of PC,and read it; 1.2) Open the software, double press the file"Audacity.exe",then press"next"to go forward; 1.3) Choose I accept the agreement, and press"NEXT"to go forward; 8 Software installation 1.1) Insert the CD disk into drive of 5MB.
PVNTT1R Manual 1
Page 11
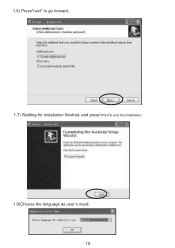
1.6) Press"next" to go forward; 1.7) Waitting for installation finished, and press"finish"to end the installation; 1.8)Choose the language as user's need; 10
1.6) Press"next" to go forward; 1.7) Waitting for installation finished, and press"finish"to end the installation; 1.8)Choose the language as user's need; 10

PVNTT1R Manual 1
Page 12
Recording: 2.1) Open the software; 2.2) Choose "Edit"menu,then choose"Preferences"; 2.3.Audacity Preferences 11 2.
Recording: 2.1) Open the software; 2.2) Choose "Edit"menu,then choose"Preferences"; 2.3.Audacity Preferences 11 2.
PVNTT1R Manual 1
Page 13
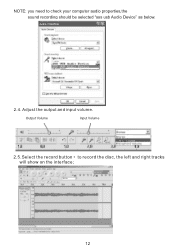
NOTE: you need to record the disc, the left and right tracks will show on the interface; 12 Adjust the output and input volume. Output Volume Input Volume 2.5.Select the record button • to check your computer audio properties,the sound recording should be selected "sss usb Audio Device" as below. 2.4.
NOTE: you need to record the disc, the left and right tracks will show on the interface; 12 Adjust the output and input volume. Output Volume Input Volume 2.5.Select the record button • to check your computer audio properties,the sound recording should be selected "sss usb Audio Device" as below. 2.4.
PVNTT1R Manual 1
Page 14
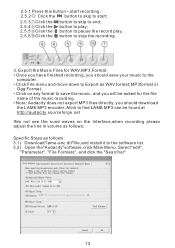
...play , button to the software list. 3.2) Open the"Audacity"software,click Main Menu. Select"edit", "Parameter", "File Formats", and dick the "Searcher" 13 Export the Music Files for the file name of the music recording. • Note: Audacity does not export MP3 files directly, you should save the music. Specific...or Ogg Format. • Click on the Interface,when recording please adjust the line in volume as follows: 3.1) Download"lame-enc.dll"file,and install it to stop the recording. 3. 2.5.1 Press this button •,start recording. 2.5.2 Click the button to skip to start; 2.5.3...
...play , button to the software list. 3.2) Open the"Audacity"software,click Main Menu. Select"edit", "Parameter", "File Formats", and dick the "Searcher" 13 Export the Music Files for the file name of the music recording. • Note: Audacity does not export MP3 files directly, you should save the music. Specific...or Ogg Format. • Click on the Interface,when recording please adjust the line in volume as follows: 3.1) Download"lame-enc.dll"file,and install it to stop the recording. 3. 2.5.1 Press this button •,start recording. 2.5.2 Click the button to skip to start; 2.5.3...
PVNTT1R Manual 1
Page 15
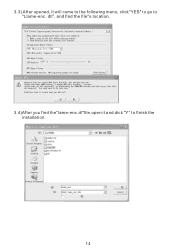
dll", and find the file"s Iocation. 3.4)After you find the"lame-enc.dl"file,open it will come to the following menu, click"YES" to go to finish the installation. 14 3.3) After opened, it and dick "Y" to "Llame-enc.
dll", and find the file"s Iocation. 3.4)After you find the"lame-enc.dl"file,open it will come to the following menu, click"YES" to go to finish the installation. 14 3.3) After opened, it and dick "Y" to "Llame-enc.
PVNTT1R Manual 1
Page 16
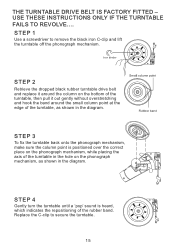
... repositioning of the rubber band. USE THESE INSTRUCTIONS ONLY IF THE TURNTABLE FAILS TO REVOLVE.... THE TURNTABLE DRIVE BELT IS FACTORY FITTED - STEP 1 Use a screwdriver to secure the turntable. 15 Replace the C-clip to remove the black iron C-clip and lift the turntable off the phonograph mechanism. STEP 4 Gently turn the turntable until a 'pop' sound is positioned over the...
... repositioning of the rubber band. USE THESE INSTRUCTIONS ONLY IF THE TURNTABLE FAILS TO REVOLVE.... THE TURNTABLE DRIVE BELT IS FACTORY FITTED - STEP 1 Use a screwdriver to secure the turntable. 15 Replace the C-clip to remove the black iron C-clip and lift the turntable off the phonograph mechanism. STEP 4 Gently turn the turntable until a 'pop' sound is positioned over the...


