

User Guide
Page 2
... voltage or other sources, refer to the instruction manual. 12. Servicing-Do not attempt to repair this product from battery power, or other hazards. Follow instructions-All operating and user instructions should be retained for this product from the type of power source indicated on the product and in installation. Damage requiring service-Unplug this product yourself as opening or removing...
... voltage or other sources, refer to the instruction manual. 12. Servicing-Do not attempt to repair this product from battery power, or other hazards. Follow instructions-All operating and user instructions should be retained for this product from the type of power source indicated on the product and in installation. Damage requiring service-Unplug this product yourself as opening or removing...

User Guide
Page 3
...power cord from heat sources such as radiators, heat registers, stoves or other products(including amplifiers)that produce heat. Replacement parts-If a part needs to be replaced, be sure to unplug the unit if you have the same characteristics as recommended by the manufacturer or have followed the manual for service and/or repair...of controls, adjustments and performance other hazards. 19. No user serviceable parts inside an equilateral triangle is intended to alert User to ...those specified herein may indicate a need for troubleshooting. If the product does not operate and ...
...power cord from heat sources such as radiators, heat registers, stoves or other products(including amplifiers)that produce heat. Replacement parts-If a part needs to be replaced, be sure to unplug the unit if you have the same characteristics as recommended by the manufacturer or have followed the manual for service and/or repair...of controls, adjustments and performance other hazards. 19. No user serviceable parts inside an equilateral triangle is intended to alert User to ...those specified herein may indicate a need for troubleshooting. If the product does not operate and ...

User Guide
Page 4
... the power plug from the wall outlet. 7. A clean, dry cloth is inserted accidentally contact your dealer. 4. TURNTABLE PARTS 1. 45RPM adapter 2. Speed selection 4. Auto stop control 6. USB jack to PC for future reference. Rotary volume control with liquids, such as vases, shall be placed on the apparatus. Do not open the cabinet as this manual for recording 15. Tone(Needle) arm...
... the power plug from the wall outlet. 7. A clean, dry cloth is inserted accidentally contact your dealer. 4. TURNTABLE PARTS 1. 45RPM adapter 2. Speed selection 4. Auto stop control 6. USB jack to PC for future reference. Rotary volume control with liquids, such as vases, shall be placed on the apparatus. Do not open the cabinet as this manual for recording 15. Tone(Needle) arm...

User Guide
Page 5
... the turntable and set the player speed to left the turntable platter will stop and automatically change to Line-in playback. Turn the manual stop control to right, the turntable platter will stop automatically when the finished. 6. PLAY LINE-IN Once you connect the external audio source with Adapter then to the desired position over the record. Remove the stylus by...
... the turntable and set the player speed to left the turntable platter will stop and automatically change to Line-in playback. Turn the manual stop control to right, the turntable platter will stop automatically when the finished. 6. PLAY LINE-IN Once you connect the external audio source with Adapter then to the desired position over the record. Remove the stylus by...

User Guide
Page 6
... on . Press the Record Button 2. go back to the USB turntable quick start instruction manual included before proceeding with any recording software that your USB turntable is free software, distributed under the General Public License(GPL), However you may prefer to record. 6 Play through " selected and the speaker volume up on the USB turntable. RECORD YOUR VINYL TO YOUR WINDOWS PC Audacity Recording Software Your USB turntable is recording.
... on . Press the Record Button 2. go back to the USB turntable quick start instruction manual included before proceeding with any recording software that your USB turntable is free software, distributed under the General Public License(GPL), However you may prefer to record. 6 Play through " selected and the speaker volume up on the USB turntable. RECORD YOUR VINYL TO YOUR WINDOWS PC Audacity Recording Software Your USB turntable is recording.
User Guide
Page 7
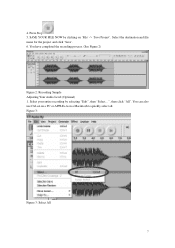
Figure 3: Figure 3: Select All 7 You have completed the recording process. (See Figure 2) Figure 2: Recording Sample Adjusting Your Audio Level (Optional) 1. You can also use Ctrl+A on a PC or APPLE+A on 'File' -> 'Save Project'. SAVE YOUR FILE NOW by selecting "Edit", then "Select...", then click "All". Select the destination and file name for the project and click 'Save'. 6. Press Stop 5. Select your entire recording by clicking on a Macintosh to quickly select all. 4.
Figure 3: Figure 3: Select All 7 You have completed the recording process. (See Figure 2) Figure 2: Recording Sample Adjusting Your Audio Level (Optional) 1. You can also use Ctrl+A on a PC or APPLE+A on 'File' -> 'Save Project'. SAVE YOUR FILE NOW by selecting "Edit", then "Select...", then click "All". Select the destination and file name for the project and click 'Save'. 6. Press Stop 5. Select your entire recording by clicking on a Macintosh to quickly select all. 4.
User Guide
Page 8
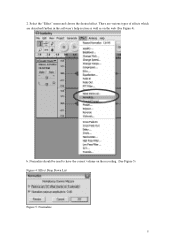
There are various types of effects which are described further in the software's help section as well as on the recording. (See Figure 5) Figure 4: Effect Drop Down List Figure 5: Normalize 8 Normalize should be used to have the correct volume on the web (See Figure 4). Select the "Effect" menu and choose the desired effect. b. 2.
There are various types of effects which are described further in the software's help section as well as on the recording. (See Figure 5) Figure 4: Effect Drop Down List Figure 5: Normalize 8 Normalize should be used to have the correct volume on the web (See Figure 4). Select the "Effect" menu and choose the desired effect. b. 2.

User Guide
Page 9
... optimum sound. The Noise Removal window will now close automatically. 4. Select the entire track of audio that you would like to bring up the entire recording, use "Select All" under the "Edit Menu" (See Figure 3) 5. If you wish to remove noise from the "Effect" drop down menu ... by moving the slider in the "Noise Removal" window. Select "Noise Removal" from . Adjust the amount of audio you wish to bring up the entire recording, use "Select All" under the "Edit Menu" (See Figure 3) 5. Drag the cursor over a portion of the audio track which contains noise. The...
... optimum sound. The Noise Removal window will now close automatically. 4. Select the entire track of audio that you would like to bring up the entire recording, use "Select All" under the "Edit Menu" (See Figure 3) 5. If you wish to remove noise from the "Effect" drop down menu ... by moving the slider in the "Noise Removal" window. Select "Noise Removal" from . Adjust the amount of audio you wish to bring up the entire recording, use "Select All" under the "Edit Menu" (See Figure 3) 5. Drag the cursor over a portion of the audio track which contains noise. The...

User Guide
Page 10
... chemicals or solvents to -front" motion only. 4. avoid bumping the needle against the turntable platter or record edge. 3. Frequently clean the needle tip-use very sparingly. 5. If you must use a needle cleaning fluid, use a soft brush in a "back-to any part of mild detergent to clean the turntable and dust cover. 6. Gently wipe the dust cover and...
... chemicals or solvents to -front" motion only. 4. avoid bumping the needle against the turntable platter or record edge. 3. Frequently clean the needle tip-use very sparingly. 5. If you must use a needle cleaning fluid, use a soft brush in a "back-to any part of mild detergent to clean the turntable and dust cover. 6. Gently wipe the dust cover and...


