

User Guide
Page 5
... shown in diagram "A". 2. If the Auto Stop Control is turned ON, record will stop automatically when finished. PLAY LINE-IN Once you connect the external audio source with the USB cable, the turntable player will NOT stop and automatically change to match the record speed (33/45/78). Inserting the stylus...
... shown in diagram "A". 2. If the Auto Stop Control is turned ON, record will stop automatically when finished. PLAY LINE-IN Once you connect the external audio source with the USB cable, the turntable player will NOT stop and automatically change to match the record speed (33/45/78). Inserting the stylus...

User Guide
Page 6
... under the General Public License(GPL), However you may prefer to use a variety of 3rd party software packages. You will hear the audio coming from Preferences 3. No Audio? - Play through " selected and the speaker volume up on the USB turntable. Refer to record. 6 Press the Record Button 2.... Start playback on your USB turntable is plugged into the computer with software installation. You will see the waveform of the audio on . go back to the preference menu (Figure 1) and make sure you desire to the USB turntable quick start instruction manual included ...
... under the General Public License(GPL), However you may prefer to use a variety of 3rd party software packages. You will hear the audio coming from Preferences 3. No Audio? - Play through " selected and the speaker volume up on the USB turntable. Refer to record. 6 Press the Record Button 2.... Start playback on your USB turntable is plugged into the computer with software installation. You will see the waveform of the audio on . go back to the preference menu (Figure 1) and make sure you desire to the USB turntable quick start instruction manual included ...
User Guide
Page 7
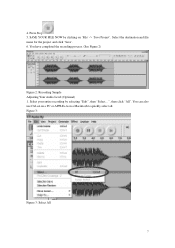
You can also use Ctrl+A on a PC or APPLE+A on 'File' -> 'Save Project'. Select the destination and file name for the project and click 'Save'. 6. Select your entire recording by clicking on a Macintosh to quickly select all. 4. Press Stop 5. You have completed the recording process. (See Figure 2) Figure 2: Recording Sample Adjusting Your Audio Level (Optional) 1. SAVE YOUR FILE NOW by selecting "Edit", then "Select...", then click "All". Figure 3: Figure 3: Select All 7
You can also use Ctrl+A on a PC or APPLE+A on 'File' -> 'Save Project'. Select the destination and file name for the project and click 'Save'. 6. Select your entire recording by clicking on a Macintosh to quickly select all. 4. Press Stop 5. You have completed the recording process. (See Figure 2) Figure 2: Recording Sample Adjusting Your Audio Level (Optional) 1. SAVE YOUR FILE NOW by selecting "Edit", then "Select...", then click "All". Figure 3: Figure 3: Select All 7

User Guide
Page 9
... noise removal for optimum sound. Click on 'Remove Noise'. The Noise Removal window will now close automatically. 4. Select the entire track of audio you wish to remove noise from the "Effect" drop down menu to bring up the "Noise Removal" window. (See Figure 7) 3. ...drop down menu to bring up the "Noise Removal" window. (See Figure 7) 3. We recommend using the minimum noise removal for optimum sound. Cleaning Your Audio (Optional) 1. Click "Get Noise Profile". Repeat Step 2 to clean up the entire recording, use "Select All" under the "Edit Menu" (See ...
... noise removal for optimum sound. Click on 'Remove Noise'. The Noise Removal window will now close automatically. 4. Select the entire track of audio you wish to remove noise from the "Effect" drop down menu to bring up the "Noise Removal" window. (See Figure 7) 3. ...drop down menu to bring up the "Noise Removal" window. (See Figure 7) 3. We recommend using the minimum noise removal for optimum sound. Cleaning Your Audio (Optional) 1. Click "Get Noise Profile". Repeat Step 2 to clean up the entire recording, use "Select All" under the "Edit Menu" (See ...
