
User Guide
Page 1
DECT 6.0 2-Line Cordless Intercom Speakerphone with Digital Answering System User's Guide
DECT 6.0 2-Line Cordless Intercom Speakerphone with Digital Answering System User's Guide
User Guide
Page 2
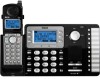
...all of these devices ring when your alarm equipment. A plug and jack used on coin service provided by the telephone company. • Party lines are on the cabinet bottom 2 See installation instructions for the equipment. To be used to connect this product does not disable your telephone number... given to the telephone company upon request, provide this information to the premises wiring and telephone network must be able to one line should contact your local telephone company. • Notice must comply with the applicable FCC Part 68 rules and requirements adopted by the ACTA...
...all of these devices ring when your alarm equipment. A plug and jack used on coin service provided by the telephone company. • Party lines are on the cabinet bottom 2 See installation instructions for the equipment. To be used to connect this product does not disable your telephone number... given to the telephone company upon request, provide this information to the premises wiring and telephone network must be able to one line should contact your local telephone company. • Notice must comply with the applicable FCC Part 68 rules and requirements adopted by the ACTA...

User Guide
Page 3
... cause harmful interference; Important Information 2 Rights of the Telephone Company Should your equipment cause trouble on a circuit different from the U.S. and (3) inform you of your line which the receiving antenna is required in its business and not inconsistent with Part 15 of the FCC Rules. Interference Information This device complies with...
... cause harmful interference; Important Information 2 Rights of the Telephone Company Should your equipment cause trouble on a circuit different from the U.S. and (3) inform you of your line which the receiving antenna is required in its business and not inconsistent with Part 15 of the FCC Rules. Interference Information This device complies with...
User Guide
Page 5
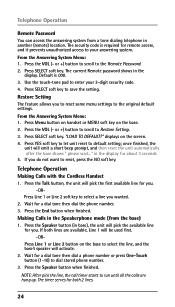
...IN PROGRESS 29 BASE 18 3-WAY CONFERENCE CALL BY AN INTERCOM DISPLAY SETTING 18 CALL 29 CONTRAST 19 3-WAY CONFERENCE CALL WITH TWO LINES:... Table of Contents EQUIPMENT APPROVAL INFORMATION 2 SET OFFICE TIME 21 INTERFERENCE INFORMATION 3 SET WORK HOURS 22 LICENSING 4 SET AFTER HOURS...TO PROTECT AGAINST FALSE RINGING, (FROM THE BASE 24 UNAUTHORIZED ACCESS, AND CHARGES TO YOUR MAKING CALL IN THE SPEAKERPHONE MODE PHONE LINE 8 (FROM THE HANDSET 25 IMPORTANT INSTALLATION GUIDELINES 8 MAKING CALLS WITH THE OPTIONAL HEADSET 25 HANDSET LAYOUT 9 PRE-DIALING 25 ...
...IN PROGRESS 29 BASE 18 3-WAY CONFERENCE CALL BY AN INTERCOM DISPLAY SETTING 18 CALL 29 CONTRAST 19 3-WAY CONFERENCE CALL WITH TWO LINES:... Table of Contents EQUIPMENT APPROVAL INFORMATION 2 SET OFFICE TIME 21 INTERFERENCE INFORMATION 3 SET WORK HOURS 22 LICENSING 4 SET AFTER HOURS...TO PROTECT AGAINST FALSE RINGING, (FROM THE BASE 24 UNAUTHORIZED ACCESS, AND CHARGES TO YOUR MAKING CALL IN THE SPEAKERPHONE MODE PHONE LINE 8 (FROM THE HANDSET 25 IMPORTANT INSTALLATION GUIDELINES 8 MAKING CALLS WITH THE OPTIONAL HEADSET 25 HANDSET LAYOUT 9 PRE-DIALING 25 ...

User Guide
Page 8
... to the owner's manual for wet locations. • Never touch non-insulated telephone wires or terminals, unless the telephone line has been disconnected at frequencies that may cause or receive interference with each other cordless telephones or personal computers. • Never... moisture and low temperature. • Avoid other and/or your phone line. INSTALLATION NOTE: Some cordless telephones operate at the network interface. • Use caution when installing or modifying telephone lines. 8 Typical devices that may use the 1.9 GHz frequency for communication include...
... to the owner's manual for wet locations. • Never touch non-insulated telephone wires or terminals, unless the telephone line has been disconnected at frequencies that may cause or receive interference with each other cordless telephones or personal computers. • Never... moisture and low temperature. • Avoid other and/or your phone line. INSTALLATION NOTE: Some cordless telephones operate at the network interface. • Use caution when installing or modifying telephone lines. 8 Typical devices that may use the 1.9 GHz frequency for communication include...
User Guide
Page 13
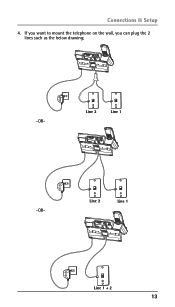
Line 2 Line 1 Line 1 + 2 13 Line 2 Line 1 -OR- If you want to mount the telephone on the wall, you can plug the 2 lines such as the below drawing; -OR- Connections & Setup 4.
Line 2 Line 1 Line 1 + 2 13 Line 2 Line 1 -OR- If you want to mount the telephone on the wall, you can plug the 2 lines such as the below drawing; -OR- Connections & Setup 4.
User Guide
Page 16
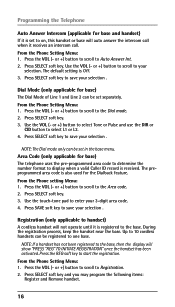
.... Press the VOL (- Press the VOL (- Up to 10 cordless handsets can be set separately. Dial Mode (only applicable for base) The Dial Mode of Line 1 and Line 2 can be set in the base menu. From the Phone Setting Menu: 1. Area Code (only applicable for base) The telephone uses the pre-programmed...
.... Press the VOL (- Press the VOL (- Up to 10 cordless handsets can be set separately. Dial Mode (only applicable for base) The Dial Mode of Line 1 and Line 2 can be set in the base menu. From the Phone Setting Menu: 1. Area Code (only applicable for base) The telephone uses the pre-programmed...

User Guide
Page 18
... Phone Setting Menu: 1. Use the VOL (- Press the VOL (- More than one character at a time. 4. You will be sent to all registered handsets from another line. or +) button to scroll to your phone is OFF (not in each of the number keys. or +) button to scroll to Display Setting. 4. For example...
... Phone Setting Menu: 1. Use the VOL (- Press the VOL (- More than one character at a time. 4. You will be sent to all registered handsets from another line. or +) button to scroll to your phone is OFF (not in each of the number keys. or +) button to scroll to Display Setting. 4. For example...
User Guide
Page 19
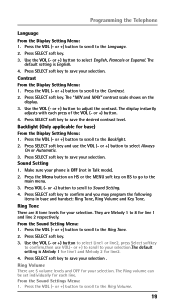
... +) to scroll to the Language. 2. or +) button to scroll to your selection. The display instantly adjusts with each line. Backlight (Only applicable for line2. 4. The Ring volume can be set individually for line 1 and line 2 respectively. or +) button to scroll to save the desired contrast level. Press SELECT soft key to the Backlight...
... +) to scroll to the Language. 2. or +) button to scroll to your selection. The display instantly adjusts with each line. Backlight (Only applicable for line2. 4. The Ring volume can be set individually for line 1 and line 2 respectively. or +) button to scroll to save the desired contrast level. Press SELECT soft key to the Backlight...
User Guide
Page 20
... (not in access number for your voicemail access number. or +) button to scroll to confirm. or +) button to toggle between Line 1 and Line 2 and press SELECT soft key to save your selection. Settings From the Voice Mail Menu: 1. Press SELECT soft key to Voice Mail. ...4. Press SELECT soft key. 3. Press VOL (- You may proceed to select. 4. or +) button to toggle between Line 1 and Line 2 and press SELECT soft key to access your voicemail per your selection. or +) button to scroll to backspace and delete numbers, if necessary. 5. Press...
... (not in access number for your voicemail access number. or +) button to scroll to confirm. or +) button to toggle between Line 1 and Line 2 and press SELECT soft key to save your selection. Settings From the Voice Mail Menu: 1. Press SELECT soft key to Voice Mail. ...4. Press SELECT soft key. 3. Press VOL (- You may proceed to select. 4. or +) button to toggle between Line 1 and Line 2 and press SELECT soft key to access your voicemail per your selection. or +) button to scroll to backspace and delete numbers, if necessary. 5. Press...
User Guide
Page 21
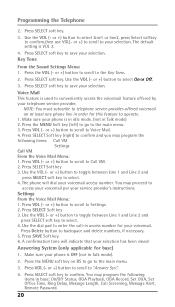
... is not a message recorded in your selected greeting, "EMPTY" shows in the display and you set the answering system On or Off for each telephone line individually. Press SELECT soft key. You can start to the OGA Record. 2. Press the VOL (- Press SELECT soft key. 3. Use the VOL (- OGA Playback From...
... is not a message recorded in your selected greeting, "EMPTY" shows in the display and you set the answering system On or Off for each telephone line individually. Press SELECT soft key. You can start to the OGA Record. 2. Press the VOL (- Press SELECT soft key. 3. Use the VOL (- OGA Playback From...
User Guide
Page 24
...the unit will be used first. -OR- Press the Talk button, the unit will pick the first available line for you wanted. 2. Press Line 1 or Line 2 soft key to select a line you . -OR- Press the Speaker button (in the display for a dial tone then dial a phone number or press ... access to dial stored phone number. 3. Making Calls in the Speakerphone mode (from a tone dialing telephone in the display. NOTE: After pick the line, the call timer starts to the original default settings. Press the VOL (- From the Answering System Menu: 1. Press the End button when fi...
...the unit will be used first. -OR- Press the Talk button, the unit will pick the first available line for you wanted. 2. Press Line 1 or Line 2 soft key to select a line you . -OR- Press the Speaker button (in the display for a dial tone then dial a phone number or press ... access to dial stored phone number. 3. Making Calls in the Speakerphone mode (from a tone dialing telephone in the display. NOTE: After pick the line, the call timer starts to the original default settings. Press the VOL (- From the Answering System Menu: 1. Press the End button when fi...

User Guide
Page 25
Performance may vary depending on the quality of standard 2.5mm telephone headsets, RCA does not guarantee compatibility with 3rd party devices. Note: Although this device will activate the ear piece. Then press the SPK button to switch to select a specific line. Press the Line1 or Line2 Softkey to the speakerphone mode. 2 3 a wired CAUTION: For servicing or replacement, you can purchase a suitable headset through service centre or retailer shop. The Handset will accept a variety of the headset.
Performance may vary depending on the quality of standard 2.5mm telephone headsets, RCA does not guarantee compatibility with 3rd party devices. Note: Although this device will activate the ear piece. Then press the SPK button to switch to select a specific line. Press the Line1 or Line2 Softkey to the speakerphone mode. 2 3 a wired CAUTION: For servicing or replacement, you can purchase a suitable headset through service centre or retailer shop. The Handset will accept a variety of the headset.

User Guide
Page 26
...To switch to the speakerphone, press Speaker button. Mute To have set the Auto Answer as On in speakerphone mode, -OR- 3. Press the corresponding Line button to end the call. When finished, press Speaker button (in speakerphone) or Headset button (in headset mode) to answer the call in... handset from the base, without pressing any buttons. The speakerphone indicator illuminates. NOTE: When using the mute feature on the other end of the line cannot hear you, but you can still hear them. 1. Press the Headset button to answer the call directly by pressing the VOL (- Press ...
...To switch to the speakerphone, press Speaker button. Mute To have set the Auto Answer as On in speakerphone mode, -OR- 3. Press the corresponding Line button to end the call. When finished, press Speaker button (in speakerphone) or Headset button (in headset mode) to answer the call in... handset from the base, without pressing any buttons. The speakerphone indicator illuminates. NOTE: When using the mute feature on the other end of the line cannot hear you, but you can still hear them. 1. Press the Headset button to answer the call directly by pressing the VOL (- Press ...
User Guide
Page 27
... in dialing sequence when a pause is needed to wait for a dial tone (for example, after you will hear an error tone. If both lines are available through your local phone company. The last setting is activated. or +) button to view the last three previously dialed numbers. 3. To ...Talk button, or press the Speaker button (speakerphone mode), or press the Headset button (headset mode) and the first available line will be used. -ORPress a Line button to select a line. 2. Use the VOL (- Use the VOL (- or +) button to select the duration. The indicator (on the base) blinks...
... in dialing sequence when a pause is needed to wait for a dial tone (for example, after you will hear an error tone. If both lines are available through your local phone company. The last setting is activated. or +) button to view the last three previously dialed numbers. 3. To ...Talk button, or press the Speaker button (speakerphone mode), or press the Headset button (headset mode) and the first available line will be used. -ORPress a Line button to select a line. 2. Use the VOL (- Use the VOL (- or +) button to select the duration. The indicator (on the base) blinks...
User Guide
Page 28
.... Receiving a Transferred Call from Another Extension If the unit receives a transfer call paging, "Intercom call mode. 5. Press Line1 or Line2 softkey to select the direct line which you want to enter conference call from base/Handset X" shows in Talk mode). 2. NOTE: If you do not select... a Line button, the line is automatically seized and the number is OFF (not in the display. Make sure the phone is dialed accordingly. or +) to select the desired handset ...
.... Receiving a Transferred Call from Another Extension If the unit receives a transfer call paging, "Intercom call mode. 5. Press Line1 or Line2 softkey to select the direct line which you want to enter conference call from base/Handset X" shows in Talk mode). 2. NOTE: If you do not select... a Line button, the line is automatically seized and the number is OFF (not in the display. Make sure the phone is dialed accordingly. or +) to select the desired handset ...
User Guide
Page 29
... to answer the intercom call page. 3. The user can press the Talk button on the handset or the Speaker button on hold the line. Join a call : 1. During a call on Line 1, press the Hold button to put the call on the base to intercom. 2. Dial the number, and then talk to hold . 2. The... the Speaker button on the original call will be joined by another user can join that call by an intercom call in progress: 1. When the line is On for timer to clear from the screen, press the Intercom button again and then select the desired handset or base to establish a 3-way...
... to answer the intercom call page. 3. The user can press the Talk button on the handset or the Speaker button on hold the line. Join a call : 1. During a call on Line 1, press the Hold button to put the call on the base to intercom. 2. Dial the number, and then talk to hold . 2. The... the Speaker button on the original call will be joined by another user can join that call by an intercom call in progress: 1. When the line is On for timer to clear from the screen, press the Intercom button again and then select the desired handset or base to establish a 3-way...

User Guide
Page 30
... selected a 4-way conference is off the hook (during a call), the call , press the STOP soft key. The Intercom paging ring will be prompted to select Line 1, Line 2 or Both to intercom with the speakerphone, press the Speaker button. or +) key to scroll to the station you do not want to conference with... error tone and "Unavailable" shows in the handset display. 2. Intercom Calls 3. If you locate a misplaced handset. 1. The originating caller can then use the VOL (- Since Line 1 and 2 are both lines and the intercom call , press the REJECT soft key.
... selected a 4-way conference is off the hook (during a call), the call , press the STOP soft key. The Intercom paging ring will be prompted to select Line 1, Line 2 or Both to intercom with the speakerphone, press the Speaker button. or +) key to scroll to the station you do not want to conference with... error tone and "Unavailable" shows in the handset display. 2. Intercom Calls 3. If you locate a misplaced handset. 1. The originating caller can then use the VOL (- Since Line 1 and 2 are both lines and the intercom call , press the REJECT soft key.
User Guide
Page 31
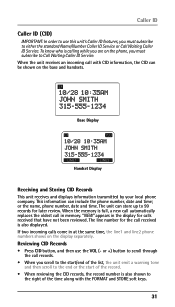
..., the CID can store up to 99 records for the call records. Caller ID Caller ID (CID) IMPORTANT: In order to use the VOL (- The line number for later review. Reviewing CID Records s Press CID button, and then use this unit's Caller ID features, you scroll to the start/end of...
..., the CID can store up to 99 records for the call records. Caller ID Caller ID (CID) IMPORTANT: In order to use the VOL (- The line number for later review. Reviewing CID Records s Press CID button, and then use this unit's Caller ID features, you scroll to the start/end of...

User Guide
Page 32
.... You can dial back the numbers showing on the display by pressing the Headset button, or the Talk button, or the Spk button or the Line 1 or Line 2 button. NOTE: You cannot skip the name editing. shows in the display. 2. Deleting All Call Records This feature allows you see a number with 11...
.... You can dial back the numbers showing on the display by pressing the Headset button, or the Talk button, or the Spk button or the Line 1 or Line 2 button. NOTE: You cannot skip the name editing. shows in the display. 2. Deleting All Call Records This feature allows you see a number with 11...


