
User Guide
Page 1
... radio frequency energy and, if not installed and used in accordance with part 15 of the following parts are designed to this equipment does cause harmful interference to radio or television reception, which can be plugged in this equipment. ENGLISH ANT702F Digital Amplified Indoor/Outdoor Antenna User's Guide FCC Statement This device complies with the instructions, may cause undesired operation. Please read the IMPORTANT SAFETY INFORMATION sheet...
... radio frequency energy and, if not installed and used in accordance with part 15 of the following parts are designed to this equipment does cause harmful interference to radio or television reception, which can be plugged in this equipment. ENGLISH ANT702F Digital Amplified Indoor/Outdoor Antenna User's Guide FCC Statement This device complies with the instructions, may cause undesired operation. Please read the IMPORTANT SAFETY INFORMATION sheet...
User Guide
Page 2
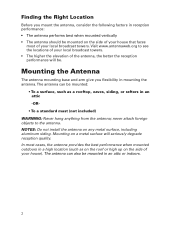
... cases, the antenna provides the best performance when mounted outdoors in a high location (such as a rooftop, eaves, siding, or rafters in an attic or indoors. 2 The antenna can be mounted on a metal surface will be mounted in an attic -OR- • To a standard mast (not included) WARNING: Never hang anything from the antenna; Mounting on the side of the antenna, the better the reception performance will seriously...
... cases, the antenna provides the best performance when mounted outdoors in a high location (such as a rooftop, eaves, siding, or rafters in an attic or indoors. 2 The antenna can be mounted on a metal surface will be mounted in an attic -OR- • To a standard mast (not included) WARNING: Never hang anything from the antenna; Mounting on the side of the antenna, the better the reception performance will seriously...
User Guide
Page 3
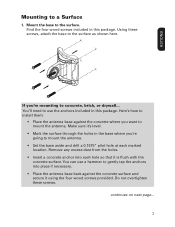
...mounting to install them: • Place the antenna base against the concrete surface and secure it using the four wood screws provided. continues on next page... 3 ENGLISH Mounting to the surface. Using these screws. Here's how to concrete, brick, or drywall... Find the four wood screws included in this package. You'll need to use... as shown here. You can use the anchors included in this package. Make sure it is flush with the concrete surface. Do not overtighten these screws, attach the base to mount the antenna. • Set the base aside and drill a...
...mounting to install them: • Place the antenna base against the concrete surface and secure it using the four wood screws provided. continues on next page... 3 ENGLISH Mounting to the surface. Using these screws. Here's how to concrete, brick, or drywall... Find the four wood screws included in this package. You'll need to use... as shown here. You can use the anchors included in this package. Make sure it is flush with the concrete surface. Do not overtighten these screws, attach the base to mount the antenna. • Set the base aside and drill a...

User Guide
Page 4
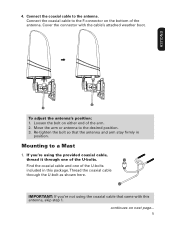
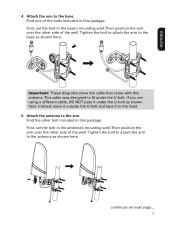
Then position the arm over the other side of the well. Tighten the bolt to attach the arm to the base. First, set the bolt in this package. Find the other side of the bolts included in the antenna's mounting well. Attach the arm to the antenna. 4 Find one of the well. First, set the bolt in this package. Attach the antenna to the base. 3. Then position the arm over the other bolt included in the base's mounting well. 2. Tighten the bolt to attach the arm to the arm.
Then position the arm over the other side of the well. Tighten the bolt to attach the arm to the base. First, set the bolt in this package. Find the other side of the bolts included in the antenna's mounting well. Attach the arm to the antenna. 4 Find one of the well. First, set the bolt in this package. Attach the antenna to the base. 3. Then position the arm over the other bolt included in the base's mounting well. 2. Tighten the bolt to attach the arm to the arm.
User Guide
Page 5
... it through the U-bolt as shown here. Find the coaxial cable and one of the antenna. Mounting to the antenna. IMPORTANT: If you 're using the coaxial cable that the antenna and arm stay firmly in this antenna, skip step 1. Connect the coaxial cable to a Mast 1. Connect the coaxial cable to the desired position. 3. Move the arm or antenna to the F-connector on the bottom of the U-bolts. Thread...
... it through the U-bolt as shown here. Find the coaxial cable and one of the antenna. Mounting to the antenna. IMPORTANT: If you 're using the coaxial cable that the antenna and arm stay firmly in this antenna, skip step 1. Connect the coaxial cable to a Mast 1. Connect the coaxial cable to the desired position. 3. Move the arm or antenna to the F-connector on the bottom of the U-bolts. Thread...
User Guide
Page 6
... on the mast. Slide the antenna clamp assembly over the mast, positioning the mast between the clamp and the antenna base. Note: If you used the provided coaxial cable, make sure to mount the base so that came with this package. 2. Find the other U-bolt, the four washer nuts, the two clamps, and the antenna base included in the direction you are using a different cable, DO NOT...
... on the mast. Slide the antenna clamp assembly over the mast, positioning the mast between the clamp and the antenna base. Note: If you used the provided coaxial cable, make sure to mount the base so that came with this package. 2. Find the other U-bolt, the four washer nuts, the two clamps, and the antenna base included in the direction you are using a different cable, DO NOT...
User Guide
Page 7
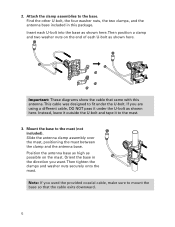
...set the bolt in this package. Important: These diagrams show the cable that came with this antenna.This cable was designed to the antenna as shown here. Tighten the bolt to attach the arm to fit under the U-bolt as shown here. Instead, leave it outside...mounting well. Tighten the bolt to attach the arm to the mast. 5. Then position the arm over the other side of the well. If you are using a different cable, DO NOT pass it to the base as shown here. ENGLISH 4. Then position the arm over the other side of the well. Attach the antenna to the base. First, set...
...set the bolt in this package. Important: These diagrams show the cable that came with this antenna.This cable was designed to the antenna as shown here. Tighten the bolt to attach the arm to fit under the U-bolt as shown here. Instead, leave it outside...mounting well. Tighten the bolt to attach the arm to the mast. 5. Then position the arm over the other side of the well. If you are using a different cable, DO NOT pass it to the base as shown here. ENGLISH 4. Then position the arm over the other side of the well. Attach the antenna to the base. First, set...

User Guide
Page 8
.... 2. Instead, leave it to the mast. Loosen the bolt on either vertically or horizontally. The antenna can be mounted either end of the antenna as shown here. If you 're using a different cable, DO NOT pass it horizontally, simply rotate the arm clockwise 90O. Move the arm or antenna to the antenna. Connect the coaxial cable to the desired position. 3. Re-tighten the bolt...
.... 2. Instead, leave it to the mast. Loosen the bolt on either vertically or horizontally. The antenna can be mounted either end of the antenna as shown here. If you 're using a different cable, DO NOT pass it horizontally, simply rotate the arm clockwise 90O. Move the arm or antenna to the antenna. Connect the coaxial cable to the desired position. 3. Re-tighten the bolt...
User Guide
Page 9
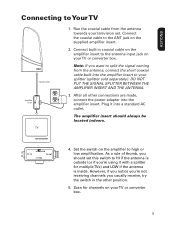
...;er insert to high or low amplification. DO NOT PUT THE SIGNAL SPLITTER BETWEEN THE AMPLIFIER INSERT AND THE ANTENNA. 3. Connect the coaxial cable to the ANT jack on the amplifier to the antenna input jack on your splitter (splitter sold separately). Scan for multiple TVs) and LOW if the antenna is outside (or if you're using it into a standard...
...;er insert to high or low amplification. DO NOT PUT THE SIGNAL SPLITTER BETWEEN THE AMPLIFIER INSERT AND THE ANTENNA. 3. Connect the coaxial cable to the ANT jack on the amplifier to the antenna input jack on your splitter (splitter sold separately). Scan for multiple TVs) and LOW if the antenna is outside (or if you're using it into a standard...

User Guide
Page 10
... an "F" connector wall plate at any local electronics or hardware store. 10 Run the coaxial cable approximately six inches below the wall entry point and then turn it upwards towards this spot. An "F" connector wall plate can be used inside the home to cover the inside portion of running down the coaxial cable and entering the house. Any moisture...
... an "F" connector wall plate at any local electronics or hardware store. 10 Run the coaxial cable approximately six inches below the wall entry point and then turn it upwards towards this spot. An "F" connector wall plate can be used inside the home to cover the inside portion of running down the coaxial cable and entering the house. Any moisture...
User Guide
Page 11
...WARRANTY IS LIMITED TO THE REPAIR OR REPLACEMENT PROVIDED ABOVE AND, IN NO EVENT, SHALL THE COMPANY'S LIABILITY EXCEED THE PURCHASE PRICE PAID BY PURCHASER FOR THE PRODUCT. This Warranty is not transferable and does not cover product purchased, serviced or used outside the United States or ... Road, Unit #3 Door 14, Mississauga Ontario L5T 3A5 ©2013 VOXX Accessories Corporation 3502 Woodview Trace, Suite 220, Indianapolis, IN 46268 ANT702F NA IB 01 11 ENGLISH 12 Month Limited Warranty VOXX Accessories Corporation (the "Company") warrants to the original retail purchaser of this product...
...WARRANTY IS LIMITED TO THE REPAIR OR REPLACEMENT PROVIDED ABOVE AND, IN NO EVENT, SHALL THE COMPANY'S LIABILITY EXCEED THE PURCHASE PRICE PAID BY PURCHASER FOR THE PRODUCT. This Warranty is not transferable and does not cover product purchased, serviced or used outside the United States or ... Road, Unit #3 Door 14, Mississauga Ontario L5T 3A5 ©2013 VOXX Accessories Corporation 3502 Woodview Trace, Suite 220, Indianapolis, IN 46268 ANT702F NA IB 01 11 ENGLISH 12 Month Limited Warranty VOXX Accessories Corporation (the "Company") warrants to the original retail purchaser of this product...


