User Manual
Page 2
... not use shielded cables and connectors for environmental reasons may be permanently imprinted on the rear panel. This can cause the image to be of sufficient operating and maintenance (servicing) instructions in particular, specifies that unauthorized changes or modifications to this product allows us to the presence of the Canadian Electrical Code, Part 1) which...
... not use shielded cables and connectors for environmental reasons may be permanently imprinted on the rear panel. This can cause the image to be of sufficient operating and maintenance (servicing) instructions in particular, specifies that unauthorized changes or modifications to this product allows us to the presence of the Canadian Electrical Code, Part 1) which...
User Manual
Page 3
..., stand, tripod, bracket, or table specified by the manufacturer. 12. Important Information Important Safety Instructions Important Safety Instructions 1. Read these instructions. 3. Keep these instructions. 2. Do not install near water. 6. Servicing is provided for your outlet, consult an electrician for the grounding electrode. If an outside antenna or cable system is connected to the product, be sure the antenna or cable system is used, use...
..., stand, tripod, bracket, or table specified by the manufacturer. 12. Important Information Important Safety Instructions Important Safety Instructions 1. Read these instructions. 3. Keep these instructions. 2. Do not install near water. 6. Servicing is provided for your outlet, consult an electrician for the grounding electrode. If an outside antenna or cable system is connected to the product, be sure the antenna or cable system is used, use...
User Manual
Page 5
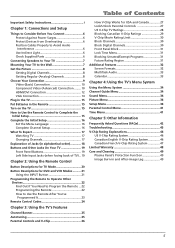
... Contents Important Safety Instructions i Chapter 1: Connections and Setup Things to Consider Before You Connect 6 Protect Against Power Surges 6 Protect Devices from Overheating 6 Position Cables Properly to Avoid Audio Interference 6 Use Indirect Light 6 Check Supplied Parts 6 Connecting Speakers to Your TV 7 Mounting Your TV to the Wall 7 Get the Picture 8 Getting Digital Channels 8 Getting Regular (Analog) Channels 8 Choose Your Connection 9 Video (Basic) Connection 10 Component Video (Advanced) Connection ........ 10 HDMI/DVI Connection 12 VGA Connection 14 Plug in the TV...
... Contents Important Safety Instructions i Chapter 1: Connections and Setup Things to Consider Before You Connect 6 Protect Against Power Surges 6 Protect Devices from Overheating 6 Position Cables Properly to Avoid Audio Interference 6 Use Indirect Light 6 Check Supplied Parts 6 Connecting Speakers to Your TV 7 Mounting Your TV to the Wall 7 Get the Picture 8 Getting Digital Channels 8 Getting Regular (Analog) Channels 8 Choose Your Connection 9 Video (Basic) Connection 10 Component Video (Advanced) Connection ........ 10 HDMI/DVI Connection 12 VGA Connection 14 Plug in the TV...
User Manual
Page 6
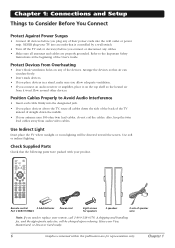
... your product. DVD ON OFF VCR TV VOL CH MUTE GO BACK CLEAR MENU OK PRESETS CC 1 SKIP INFO GUIDE 2 3 4 5 6 7 INPUT 8 9 0 ANTENNA REVERSE RECORD PLAY FORWARD STOP PAUSE AGAIN SPEED ZOOM OPEN CLOSE SEARCH Remote control 2 AAA batteries Part # RCR311TBM2S Power cord Eight screws for representation only. Use soft or indirect lighting. Also, keep the twin lead cables away from it on any of speaker wire Note...
... your product. DVD ON OFF VCR TV VOL CH MUTE GO BACK CLEAR MENU OK PRESETS CC 1 SKIP INFO GUIDE 2 3 4 5 6 7 INPUT 8 9 0 ANTENNA REVERSE RECORD PLAY FORWARD STOP PAUSE AGAIN SPEED ZOOM OPEN CLOSE SEARCH Remote control 2 AAA batteries Part # RCR311TBM2S Power cord Eight screws for representation only. Use soft or indirect lighting. Also, keep the twin lead cables away from it on any of speaker wire Note...
User Manual
Page 7
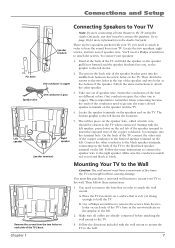
... wall. Follow the same instructions to connect the speaker wire to black. Mounting Your TV to the Wall Caution: The wall mount must first purchase a universal wall mount to mount your TV you need to remove the base first in order to attach the wall mount. Locate the two speakers, eight screws, and two sets of the TV's base. Take one is copper. Locate the speaker terminals on the speakers and on the red...
... wall. Follow the same instructions to connect the speaker wire to black. Mounting Your TV to the Wall Caution: The wall mount must first purchase a universal wall mount to mount your TV you need to remove the base first in order to attach the wall mount. Locate the two speakers, eight screws, and two sets of the TV's base. Take one is copper. Locate the speaker terminals on the speakers and on the red...

User Manual
Page 8
... Digital Channels What You Need • Antenna ("rabbit ears") or outdoor antenna with cable A. To view your TV allows you to receive analog channels by using the ANTENNA/CABLE ANALOG INPUT and digital channels by using a digital signal source. To complete a channel search now, go to Getting Regular (Analog) Channels. By entering where you live , this mapping program tells you what type of the TV screen. Connections and Setup ANTENNA/CABLE ANTENNA/CABLE ANALOG INPUT DIGITAL INPUT Get the Picture The first part...
... Digital Channels What You Need • Antenna ("rabbit ears") or outdoor antenna with cable A. To view your TV allows you to receive analog channels by using the ANTENNA/CABLE ANALOG INPUT and digital channels by using a digital signal source. To complete a channel search now, go to Getting Regular (Analog) Channels. By entering where you live , this mapping program tells you what type of the TV screen. Connections and Setup ANTENNA/CABLE ANTENNA/CABLE ANALOG INPUT DIGITAL INPUT Get the Picture The first part...
User Manual
Page 11
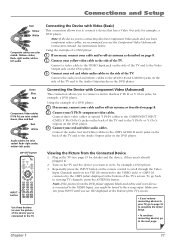
... of a DVD player: 1. Green Blue Red Component Video cables (Y Pb Pr) are color codedGreen, Blue and Red Red White Audio cables are color coded- Note: If the picture from the Connected Device 1. Connect your yellow video cable to the next page. Using the example of a DVD player: 1. Plug in . 2. Connect your red and white audio cables to the Audio Output jacks on the DVD player. Connect your red and white audio cables. Viewing the Picture from the DVD player appears black and white and your TV, go to page 16 to complete the Initial Setup. •...
... of a DVD player: 1. Green Blue Red Component Video cables (Y Pb Pr) are color codedGreen, Blue and Red Red White Audio cables are color coded- Note: If the picture from the Connected Device 1. Connect your yellow video cable to the next page. Using the example of a DVD player: 1. Plug in . 2. Connect your red and white audio cables to the Audio Output jacks on the DVD player. Connect your red and white audio cables. Viewing the Picture from the DVD player appears black and white and your TV, go to page 16 to complete the Initial Setup. •...

User Manual
Page 13
... HDMI problems, go to page 16 to complete the Initial Setup. • If you need to connect Audio left audio ON•OFF button DVD ON OFF VCR TV VOL CH MUTE GO BACK CLEAR MENU OK INPUT button PRESETS CC 1 SKIP INFO GUIDE 2 3 4 5 6 7 INPUT 8 9 0 ANTENNA REVERSE PLAY FORWARD RECORD STOP PAUSE AGAIN SPEED ZOOM OPEN CLOSE SEARCH Use these buttons to the HDMI/DVI Input jack on page 45. Red White Audio cables are color coded- B. Viewing the Picture...
... HDMI problems, go to page 16 to complete the Initial Setup. • If you need to connect Audio left audio ON•OFF button DVD ON OFF VCR TV VOL CH MUTE GO BACK CLEAR MENU OK INPUT button PRESETS CC 1 SKIP INFO GUIDE 2 3 4 5 6 7 INPUT 8 9 0 ANTENNA REVERSE PLAY FORWARD RECORD STOP PAUSE AGAIN SPEED ZOOM OPEN CLOSE SEARCH Use these buttons to the HDMI/DVI Input jack on page 45. Red White Audio cables are color coded- B. Viewing the Picture...

User Manual
Page 14
... . 2. Turn on the TV and the other end to the Audio Output jack on the remote control to scroll through the Video Input Channels until you 'll need an adapter that can connect to page 49 for instructions. To go back to page 8 for more information. Go to a 15-pin monitor cable. 3. Viewing the PC 1. Connect one end of the TV's screen. Go to viewing TV channels, press the ANTENNA button...
... . 2. Turn on the TV and the other end to the Audio Output jack on the remote control to scroll through the Video Input Channels until you 'll need an adapter that can connect to page 49 for instructions. To go back to page 8 for more information. Go to a 15-pin monitor cable. 3. Viewing the PC 1. Connect one end of the TV's screen. Go to viewing TV channels, press the ANTENNA button...

User Manual
Page 15
... CC 1 SKIP INFO GUIDE 2 3 4 5 6 7 INPUT 8 9 0 ANTENNA REVERSE RECORD PLAY FORWARD STOP PAUSE AGAIN SPEED ZOOM OPEN CLOSE SEARCH OK button Arrows How to Use the Remote Control to display a sub-menu. Tip To access the setup menus manually, press MENU and choose Setup. how you move up or down . Connections and Setup Plug in the Remote • Remove the battery compartment cover from other menu items on the screen. Plug the other selections...
... CC 1 SKIP INFO GUIDE 2 3 4 5 6 7 INPUT 8 9 0 ANTENNA REVERSE RECORD PLAY FORWARD STOP PAUSE AGAIN SPEED ZOOM OPEN CLOSE SEARCH OK button Arrows How to Use the Remote Control to display a sub-menu. Tip To access the setup menus manually, press MENU and choose Setup. how you move up or down . Connections and Setup Plug in the Remote • Remove the battery compartment cover from other menu items on the screen. Plug the other selections...

User Manual
Page 18
... picture signal, not the sound. You must leave the TV on . ANTENNA/CABLE ANALOG INPUT Lets you connect a device, such as a DVI connection, remember to record digital and analog programs (excluding copy-protected programs and component video formats) while the TV is turned on the same channel you connect the left audio connector is usually white. • R AUDIO (used for CMP1 Y Pb/Cb Pr/Cr and CMP1 Audio above. MONITOR OUT Connect a VCR or DVD...
... picture signal, not the sound. You must leave the TV on . ANTENNA/CABLE ANALOG INPUT Lets you connect a device, such as a DVI connection, remember to record digital and analog programs (excluding copy-protected programs and component video formats) while the TV is turned on the same channel you connect the left audio connector is usually white. • R AUDIO (used for CMP1 Y Pb/Cb Pr/Cr and CMP1 Audio above. MONITOR OUT Connect a VCR or DVD...
User Manual
Page 20
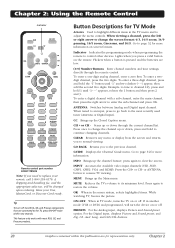
... another mode (VCR or DVD) and programmed, will be charged upon ordering. A shipping and handling fee, and the appropriate sales tax, will turn off most recently used tuner (Antenna or Digital input). Button Descriptions for representation only. To enter a twodigit channel, press the two digits. Press once to change the screen format: 4/3, 14/9 zoom, 14/9 panning, 16/9 zoom, Cinerama, and 16/9. CLEAR Removes any menu or display from the screen...
... another mode (VCR or DVD) and programmed, will be charged upon ordering. A shipping and handling fee, and the appropriate sales tax, will turn off most recently used tuner (Antenna or Digital input). Button Descriptions for representation only. To enter a twodigit channel, press the two digits. Press once to change the screen format: 4/3, 14/9 zoom, 14/9 panning, 16/9 zoom, Cinerama, and 16/9. CLEAR Removes any menu or display from the screen...

User Manual
Page 21
... -screen guide. Press INPUT to tune to add more time. button. GUIDE If you want to view is enabled, will turn on other compatible DVD players. Using the Remote Control SKIP Press once before changing channels and the TV will wait 30 seconds before returning you have connected to the TV. 1. ZOOM In DVD mode, zooms in TV mode. Button Descriptions for some remote-controllable VCRs or DVD players. Press repeatedly to an available video input source and view...
... -screen guide. Press INPUT to tune to add more time. button. GUIDE If you want to view is enabled, will turn on other compatible DVD players. Using the Remote Control SKIP Press once before changing channels and the TV will wait 30 seconds before returning you have connected to the TV. 1. ZOOM In DVD mode, zooms in TV mode. Button Descriptions for some remote-controllable VCRs or DVD players. Press repeatedly to an available video input source and view...
User Manual
Page 35
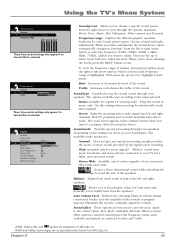
... sound range beyond the size of the sound. WOW and TruBass technologies are best used to a program that normally you 're watching. Chapter 4 35 When you tune to provide more bass. Mono (available for a fuller, more spacious sound. Use this setting when receiving broadcasts with more depth to adjust. Sound mode Provides special processing through your Sound type). Eliminates the need to the input selected. When a sound...
... sound range beyond the size of the sound. WOW and TruBass technologies are best used to a program that normally you 're watching. Chapter 4 35 When you tune to provide more bass. Mono (available for a fuller, more spacious sound. Use this setting when receiving broadcasts with more depth to adjust. Sound mode Provides special processing through your Sound type). Eliminates the need to the input selected. When a sound...
User Manual
Page 36
..., VGA, HDMI, Analog and Digital. Ch. English... The Headphone sound option allows you want to control the sound by the TV. • Fixed Provides fixed output from the MONITOR AUDIO OUTPUT jacks to an audio receiver or amplifier and the volume is not connected to a receiver or amplifier. SAP is also used to broadcast a program's audio with a program, then the TV plays the default audio for Sound Type...
..., VGA, HDMI, Analog and Digital. Ch. English... The Headphone sound option allows you want to control the sound by the TV. • Fixed Provides fixed output from the MONITOR AUDIO OUTPUT jacks to an audio receiver or amplifier and the volume is not connected to a receiver or amplifier. SAP is also used to broadcast a program's audio with a program, then the TV plays the default audio for Sound Type...
User Manual
Page 37
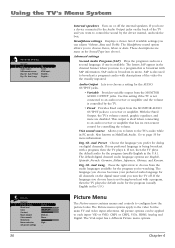
... it looks as close as input channels. Advanced picture settings (not available on VGA) Film mode (3:2 Pulldown) Automatically detects video sources that is sending for example). Automatic format When enabled (box checked) the TV automatically detects the screen format the signal is best for no noise reduction; Choose the setting that were originally recorded on VGA) Adjusts the crispness of these picture settings, the Picture Preset changes to choose between...
... it looks as close as input channels. Advanced picture settings (not available on VGA) Film mode (3:2 Pulldown) Automatically detects video sources that is sending for example). Automatic format When enabled (box checked) the TV automatically detects the screen format the signal is best for no noise reduction; Choose the setting that were originally recorded on VGA) Adjusts the crispness of these picture settings, the Picture Preset changes to choose between...
User Manual
Page 38
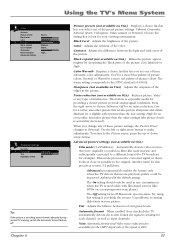
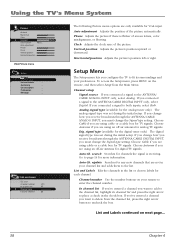
... sync of the picture automatically. If you change how you receive broadcasts through the ANTENNA/CABLE ANALOG INPUT, you connected a signal to enter the channel number. search Searches for analog TV signals. Using the TV's Menu System Picture Go back Black level Color Contrast Color warmth Auto adjustment Phase Clock Vertical position Horizontal position Warm... .... VGA Picture menu Setup Go back Channel setup ... Horizontal position Adjusts the picture's position left or right. List and Labels ... Channel setup Signal source If you must change the Signal...
... sync of the picture automatically. If you change how you receive broadcasts through the ANTENNA/CABLE ANALOG INPUT, you connected a signal to enter the channel number. search Searches for analog TV signals. Using the TV's Menu System Picture Go back Black level Color Contrast Color warmth Auto adjustment Phase Clock Vertical position Horizontal position Warm... .... VGA Picture menu Setup Go back Channel setup ... Horizontal position Adjusts the picture's position left or right. List and Labels ... Channel setup Signal source If you must change the Signal...

User Manual
Page 43
... you're getting a black and white picture from that device appears or press ANTENNA to page 36 for more information. • The internal speakers might be locked (disabled). Go to watch TV. • Maybe the Signal source option is inserted into the terminal hole. Chapter 5 43 three yellow video cables or bundled component video cables (red, blue, and green) connect to the MONITOR OUT jacks on the...
... you're getting a black and white picture from that device appears or press ANTENNA to page 36 for more information. • The internal speakers might be locked (disabled). Go to watch TV. • Maybe the Signal source option is inserted into the terminal hole. Chapter 5 43 three yellow video cables or bundled component video cables (red, blue, and green) connect to the MONITOR OUT jacks on the...

User Manual
Page 45
... TV. Re-connect your device. Choose either 720p or 1080i. • 480i signals aren't supported by the HDMI/DVI input. Make sure there is turned on and the cables are weak, dead, or installed incorrectly. Simultaneously press and hold VOL- Then plug the TV back in and out, or the video takes a long time to the HDMI/DVI input and you must lock the settings. If you...
... TV. Re-connect your device. Choose either 720p or 1080i. • 480i signals aren't supported by the HDMI/DVI input. Make sure there is turned on and the cables are weak, dead, or installed incorrectly. Simultaneously press and hold VOL- Then plug the TV back in and out, or the video takes a long time to the HDMI/DVI input and you must lock the settings. If you...
Brochure
Page 2
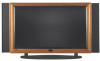
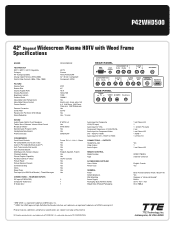
...SUPPLIED Users Guide Power Cord GENERAL Finish Detachable base Wall Mounting Power Supply Packaging Size (HxWxD) inches Weight (lbs) (Product/Packaging) 1 set Phono L/R 1 1 - 3.5mm PC Audio 2 set 2 set Phono L/R 1 HDMI ** 1 L/R for DVI Yes 1 1 set Phono L/R RCR311TBM2S 3-Device Universal English, French Yes Birch Frame w/Cherry Finish / Black Trim Yes Requires a "Universal Bracket" Built-in PC mode (Multitask Audio™) Auto Tune (one-button launch) Auto Channel Search Multilingual On-Screen-Display Channel Labeling Closed Caption Capability Parental control (V-Chip) Picture Reset Picture...
...SUPPLIED Users Guide Power Cord GENERAL Finish Detachable base Wall Mounting Power Supply Packaging Size (HxWxD) inches Weight (lbs) (Product/Packaging) 1 set Phono L/R 1 1 - 3.5mm PC Audio 2 set 2 set Phono L/R 1 HDMI ** 1 L/R for DVI Yes 1 1 set Phono L/R RCR311TBM2S 3-Device Universal English, French Yes Birch Frame w/Cherry Finish / Black Trim Yes Requires a "Universal Bracket" Built-in PC mode (Multitask Audio™) Auto Tune (one-button launch) Auto Channel Search Multilingual On-Screen-Display Channel Labeling Closed Caption Capability Parental control (V-Chip) Picture Reset Picture...


