
English Manual
Page 1
RNSM4025 Manufactured under license from Dolby Laboratories. Dolby,Dolby Audio, and the double-D symbol are trademarks of Dolby Laboratories. INSTRUCTION MANUAL Before using the TV, please read this manual thoroughly, and retain it for future reference.
RNSM4025 Manufactured under license from Dolby Laboratories. Dolby,Dolby Audio, and the double-D symbol are trademarks of Dolby Laboratories. INSTRUCTION MANUAL Before using the TV, please read this manual thoroughly, and retain it for future reference.

English Manual
Page 2
TABLE OF CONTENTS Preparations Guide Instructions 4-8 Install and Connect TV 9 9 10 12 TV Feet Installation Instructions 12 OPERATING INSTRUCTIONS OPERATING INSTRUCTIONS 13 HOME PAGE HOME PAGE 14 TV Main Menu 14 Picture 15 Sound 15 Setting 16 Lock 16 Program 16 Network 17 About 18 USB USB 19 USB FORMAT MODE 20 21 22 DISPLAY MODE 24 Limited Product Warranty 25
TABLE OF CONTENTS Preparations Guide Instructions 4-8 Install and Connect TV 9 9 10 12 TV Feet Installation Instructions 12 OPERATING INSTRUCTIONS OPERATING INSTRUCTIONS 13 HOME PAGE HOME PAGE 14 TV Main Menu 14 Picture 15 Sound 15 Setting 16 Lock 16 Program 16 Network 17 About 18 USB USB 19 USB FORMAT MODE 20 21 22 DISPLAY MODE 24 Limited Product Warranty 25

English Manual
Page 4
... undesired operation 3 Please help us ...flash with arrowhead symbol, within an equilateral triangle is intended to alert the user to the presence of un-insulated "dangerous voltage" within an equilateral triangle is intend to alert the user... to the presence of this Product W aste Electrical & Electronic Equipment (WEEE) Your product is designed and manufactured with Part 15 of electric shock to the persons. In the European Union there are separate collection systems for used electrical and electronic products. This device complies with high quality materials and components...
... undesired operation 3 Please help us ...flash with arrowhead symbol, within an equilateral triangle is intended to alert the user to the presence of un-insulated "dangerous voltage" within an equilateral triangle is intend to alert the user... to the presence of this Product W aste Electrical & Electronic Equipment (WEEE) Your product is designed and manufactured with Part 15 of electric shock to the persons. In the European Union there are separate collection systems for used electrical and electronic products. This device complies with high quality materials and components...

English Manual
Page 6
...connection to promote the sustainable reuse of this product should not be disposed with other household waste. Ins truc tion s EXAMPLE OF ANTENNA GROUNDING AS PER THE NATIONAL ELECTRICAL CODE GROUND CLAMP ELEC TRIC SERVICE EQUIPMENT NEC-NATIONAL ELECTRICAL CODE S2898A ANTENNALEADIN WIRE ANTENNA... DISCHAGRE UNIT (NEC SECTION 810-20) GROUNDING CONDUCTORS (NEC SECTION 810-21) GROUND CLAMPS POWER SERVICE GROUNDING ELECTRODE...
...connection to promote the sustainable reuse of this product should not be disposed with other household waste. Ins truc tion s EXAMPLE OF ANTENNA GROUNDING AS PER THE NATIONAL ELECTRICAL CODE GROUND CLAMP ELEC TRIC SERVICE EQUIPMENT NEC-NATIONAL ELECTRICAL CODE S2898A ANTENNALEADIN WIRE ANTENNA... DISCHAGRE UNIT (NEC SECTION 810-20) GROUNDING CONDUCTORS (NEC SECTION 810-21) GROUND CLAMPS POWER SERVICE GROUNDING ELECTRODE...

English Manual
Page 7
Ins truc tion s Warning: batteries(pack or batteries installed) should not be exposed to excessive heat such as sunshine, fire or other heat sources. 6
Ins truc tion s Warning: batteries(pack or batteries installed) should not be exposed to excessive heat such as sunshine, fire or other heat sources. 6

English Manual
Page 10
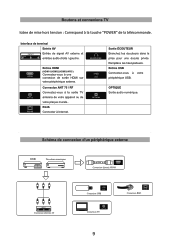
HEADPHONE JACK Plug earphones into jack for private listening. HDMI HDMI Input (HDMI1,HDMI2,HDMI3/ARC) Connect to the Internet. Overrides speakers. TV Buttons and Connections INPUT VIDEO R L AV input External AV Signal Input and Right/Left Audio Inputs. HEADPHONE OPTICAL RJ 45 RJ45 Connect to a HDMI output connection on your external device. RJ 45 RJ45 connection 9 OPTICAL Digital Audio Output. USB Input Connect to the antenna/cable TV output of your USB device. ANT 75/RF Connection Connect to your device or wall plate.
HEADPHONE JACK Plug earphones into jack for private listening. HDMI HDMI Input (HDMI1,HDMI2,HDMI3/ARC) Connect to the Internet. Overrides speakers. TV Buttons and Connections INPUT VIDEO R L AV input External AV Signal Input and Right/Left Audio Inputs. HEADPHONE OPTICAL RJ 45 RJ45 Connect to a HDMI output connection on your external device. RJ 45 RJ45 connection 9 OPTICAL Digital Audio Output. USB Input Connect to the antenna/cable TV output of your USB device. ANT 75/RF Connection Connect to your device or wall plate.
English Manual
Page 11
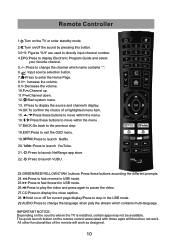
... or enter standby mode. 2. :Turn on/off the sound by pressing this button. 3.0~9: Figures "0-9" are used to directly input channel number. 4.EPG:Press to display Electronic Program Guide and select your favorite channel. 5.-/--:Press to change the channel which name contains ".". 6. : Input source selection button. 7. :Press to enter the Home Page. 8.V+: Increase the volume. 9.V-:Decrease the volume. 10.P :Channel up. 11.P :Channel down. 12. :Start system menu. 13. :Press to display the source and channel's display. 14.OK...
... or enter standby mode. 2. :Turn on/off the sound by pressing this button. 3.0~9: Figures "0-9" are used to directly input channel number. 4.EPG:Press to display Electronic Program Guide and select your favorite channel. 5.-/--:Press to change the channel which name contains ".". 6. : Input source selection button. 7. :Press to enter the Home Page. 8.V+: Increase the volume. 9.V-:Decrease the volume. 10.P :Channel up. 11.P :Channel down. 12. :Start system menu. 13. :Press to display the source and channel's display. 14.OK...

English Manual
Page 13
... standby mode (red light), press the power button of the TV (Front cabinet faces down on the TV(No light). Connect the antenna cable to the RF connection on the back or side of the TV, and/or the signal source HDMI cable to the TV with provided screws,or are attached to the HDMI input(s) on the rear or side of the TV. TV Feet Installation Instructions 1.Open...
... standby mode (red light), press the power button of the TV (Front cabinet faces down on the TV(No light). Connect the antenna cable to the RF connection on the back or side of the TV, and/or the signal source HDMI cable to the TV with provided screws,or are attached to the HDMI input(s) on the rear or side of the TV. TV Feet Installation Instructions 1.Open...

English Manual
Page 14
Press button to the "Skip" option. The User Interface defaults to select the input source. Press the【OK】button to continue. Press【OK】button to skip the DTV channel tuning then enter the ATV channel tuning. 13 Press【OK】button to select the language. OPERATING INSTRUCTIONS Press button to continue.
Press button to the "Skip" option. The User Interface defaults to select the input source. Press the【OK】button to continue. Press【OK】button to skip the DTV channel tuning then enter the ATV channel tuning. 13 Press【OK】button to select the language. OPERATING INSTRUCTIONS Press button to continue.

English Manual
Page 15
Press 【►】 button to continue to enter main menu. Main Menu Press button to sub menu. 14 Press button to select Apps,NETFLIX,Input source,and Settings options,Press button to select the corresponding sub-option and press the [OK] button to select Picture / Sound / Setting / Lock / PVR Option / Program / Network / About menus. Press button to confirm. HOME PAGE Press button to enter homepage.
Press 【►】 button to continue to enter main menu. Main Menu Press button to sub menu. 14 Press button to select Apps,NETFLIX,Input source,and Settings options,Press button to select the corresponding sub-option and press the [OK] button to select Picture / Sound / Setting / Lock / PVR Option / Program / Network / About menus. Press button to confirm. HOME PAGE Press button to enter homepage.

English Manual
Page 16
...; button to select Picture menu. 2.Press button to select Picture Mode / Contrast / Brightness / Color /Sharpness / Tint / Backlight / Color Temperature / Aspect Ratio / Noise Reduction.Tint feature only works in ATV and DTV mode when entered to Picture Mode 'User'. 3.Press button to enter main menu . Sound 1.Press button to adjust or select. Press【►】 button to select Sound menu. 2.Press button to select Sound Mode / Equalizer / Balance / Auto Volume Limit / Surround Sound / Digital output type / Audio Delay / Video Description / Audio Languages. 3.Press button...
...; button to select Picture menu. 2.Press button to select Picture Mode / Contrast / Brightness / Color /Sharpness / Tint / Backlight / Color Temperature / Aspect Ratio / Noise Reduction.Tint feature only works in ATV and DTV mode when entered to Picture Mode 'User'. 3.Press button to enter main menu . Sound 1.Press button to adjust or select. Press【►】 button to select Sound menu. 2.Press button to select Sound Mode / Equalizer / Balance / Auto Volume Limit / Surround Sound / Digital output type / Audio Delay / Video Description / Audio Languages. 3.Press button...
English Manual
Page 19
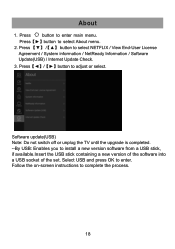
Follow the on-screen instructions to install a new version software from a USB stick, if available.Insert the USB stick containing a new version of the software into a USB socket of the set. About --By USB: Enables you to complete the process. 18 Select USB and press OK to enter.
Follow the on-screen instructions to install a new version software from a USB stick, if available.Insert the USB stick containing a new version of the software into a USB socket of the set. About --By USB: Enables you to complete the process. 18 Select USB and press OK to enter.

English Manual
Page 20
USB Insert a USB flash drive and press the [OK] button in the USB menu to enter the video file. 19 Select a file press the【OK】button to enter the Media menu. Press the 【OK】 button to make your selection. Select the "Return" icon and press 【OK】 to return to the USB directory to select the file type. Press the button Select the inserted USB flash device, then press the [OK] button to select ALL, Photo, Music, Video options. Press the buttons to access the started media on the USB device.
USB Insert a USB flash drive and press the [OK] button in the USB menu to enter the video file. 19 Select a file press the【OK】button to enter the Media menu. Press the 【OK】 button to make your selection. Select the "Return" icon and press 【OK】 to return to the USB directory to select the file type. Press the button Select the inserted USB flash device, then press the [OK] button to select ALL, Photo, Music, Video options. Press the buttons to access the started media on the USB device.

English Manual
Page 22
Consult the antenna instruction manual to improve the image. If you use an antenna, reception may be caused by obstructions of the external antenna. at the back of the antenna is not good. A double image or ghost could be difficult in some situations. Perhaps the location of the unit from 21 You can improve the quality of the external antenna. - Use of a taller antenna can attempt to adjust the antenna to change the direction of the images. - -
Consult the antenna instruction manual to improve the image. If you use an antenna, reception may be caused by obstructions of the external antenna. at the back of the antenna is not good. A double image or ghost could be difficult in some situations. Perhaps the location of the unit from 21 You can improve the quality of the external antenna. - Use of a taller antenna can attempt to adjust the antenna to change the direction of the images. - -

English Manual
Page 23
Specifications 24" 32" 40" 43" 50" 55" 58" 65" NTSC:AIR 2-69 CABLE 1-135 NTSC:AIR 2-69 CABLE 1-135 NTSC:AIR 2-69 CABLE 1-135 NTSC:AIR 2-69 CABLE 1-135 NTSC:AIR 2-69 CABLE 1-135 NTSC:AIR 2-69 CABLE 1-135 NTSC:AIR 2-69 CABLE 1-135 NTSC:AIR 2-69 CABLE 1-135 3W+3W 8W+8W 8W+8W 8W+8W 8W+8W 8W...+8W 8W+8W 8W+8W 24" 32" 40" 43" 50" 55" 58" 65" WiFi 36W 32W/40W 60W 65W 108W 118W 135W 159W Operation Frequency 2400~2483.5 Transmitting Power Less Than 100mW The terms HDMI and HDMI High-Definition Multimedia...
Specifications 24" 32" 40" 43" 50" 55" 58" 65" NTSC:AIR 2-69 CABLE 1-135 NTSC:AIR 2-69 CABLE 1-135 NTSC:AIR 2-69 CABLE 1-135 NTSC:AIR 2-69 CABLE 1-135 NTSC:AIR 2-69 CABLE 1-135 NTSC:AIR 2-69 CABLE 1-135 NTSC:AIR 2-69 CABLE 1-135 NTSC:AIR 2-69 CABLE 1-135 3W+3W 8W+8W 8W+8W 8W+8W 8W+8W 8W...+8W 8W+8W 8W+8W 24" 32" 40" 43" 50" 55" 58" 65" WiFi 36W 32W/40W 60W 65W 108W 118W 135W 159W Operation Frequency 2400~2483.5 Transmitting Power Less Than 100mW The terms HDMI and HDMI High-Definition Multimedia...

English Manual
Page 24
... 16.7M colors 60Hz Color System ATSC/NTSC Systems Sound System Audio System M MTS Sound Output RF Input L/R Speaker:10W+10W 75 ohm external terminal HDMI Input Video:480i,480p,576i,576p,720p,1080i,1080p,2160p. Audio:Two channel linear PCM32,441 and 48kHz,16,20 and 24bits Input/ Output Jacks Composite Video Input Digital Audio out 1.0 Vpp.75ohms RCA Optical USB Port Linear Network Inpu USB Media Player RJ45:10/100M auto-identification and DHCP Power Analog Audio Output Power Requirement Rated power consumption Earphone...
... 16.7M colors 60Hz Color System ATSC/NTSC Systems Sound System Audio System M MTS Sound Output RF Input L/R Speaker:10W+10W 75 ohm external terminal HDMI Input Video:480i,480p,576i,576p,720p,1080i,1080p,2160p. Audio:Two channel linear PCM32,441 and 48kHz,16,20 and 24bits Input/ Output Jacks Composite Video Input Digital Audio out 1.0 Vpp.75ohms RCA Optical USB Port Linear Network Inpu USB Media Player RJ45:10/100M auto-identification and DHCP Power Analog Audio Output Power Requirement Rated power consumption Earphone...

English Manual
Page 25
DISPLAY MODE VIDEO FORMATS SUPPORTED COMPONENT/HDMI INPUT MODE 720 x 480 720 x 480 1280 x 720 1280 x 720 1920 x1080 1920 x1080 1920 x1080 1920 x1080 1920 x1080 31.47 15.734 37.5 45 31.25 33.75 27 56.50 67.50 59.94 59.94 50 60 50 60 24 50 60 480 i 480 i 720 i 720 i 1080i 1080i 1080p 1080p 1080p 24
DISPLAY MODE VIDEO FORMATS SUPPORTED COMPONENT/HDMI INPUT MODE 720 x 480 720 x 480 1280 x 720 1280 x 720 1920 x1080 1920 x1080 1920 x1080 1920 x1080 1920 x1080 31.47 15.734 37.5 45 31.25 33.75 27 56.50 67.50 59.94 59.94 50 60 50 60 24 50 60 480 i 480 i 720 i 720 i 1080i 1080i 1080p 1080p 1080p 24

English Manual
Page 26
... do not return this written warranty. For faster service, locate the model, type, and serial numbers on your exclusive remedy is repair or replacement of original purchase. This warranty extends only to the duration of express or implied warranty. Keep the original sales receipt, as on the specified rating on where you specific legal rights. Every implied warranty, including any voltage and...
... do not return this written warranty. For faster service, locate the model, type, and serial numbers on your exclusive remedy is repair or replacement of original purchase. This warranty extends only to the duration of express or implied warranty. Keep the original sales receipt, as on the specified rating on where you specific legal rights. Every implied warranty, including any voltage and...
French Manual
Page 4
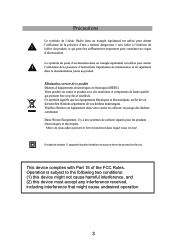
Operation is subject to the following two conditions: (1) this device might not cause harmful interference, and (2) this device must accept any interference received, including interference that might cause undesired operation Il s'agit de classe Ⅱ appareil double isolation et aucune terre de protection fourni. This device complies with Part 15 of the FCC Rules.
Operation is subject to the following two conditions: (1) this device might not cause harmful interference, and (2) this device must accept any interference received, including interference that might cause undesired operation Il s'agit de classe Ⅱ appareil double isolation et aucune terre de protection fourni. This device complies with Part 15 of the FCC Rules.
French Manual
Page 10
INPUT VIDEO R L HDMI (HDMI1,HDMI2,HDMI3/ARC) 75 RJ 45 HEADPHONE OPTICAL RJ 45 9
INPUT VIDEO R L HDMI (HDMI1,HDMI2,HDMI3/ARC) 75 RJ 45 HEADPHONE OPTICAL RJ 45 9


