User Guide
Page 3
...and Date ...Auto Clock Set ...Set Time Zone ...Set Daylight-Saving ...Auto Channel Search ...Add/Remove Channels ...Signal Type ...Cable Box Setup ...VCR Output Channel ...17 17 17 17 18 18 18 19 19 Channels ...18 1 Search ...15 Pro-Tect Plus Locking Feature ...15 Time ...Counter ...16 Info Display ...16 Chapter 3: On-Screen Menus ...17 Explanation of the Remote Control ...11 Using the Input Button ...12 Chapter 2: VCR Features ...13 Recording Features ...13 Express Recording (XPR) ...13 Timer Recording ...14 Stopping a Timer recording ...14 Reviewing and Clearing Programs ...14 Index...
...and Date ...Auto Clock Set ...Set Time Zone ...Set Daylight-Saving ...Auto Channel Search ...Add/Remove Channels ...Signal Type ...Cable Box Setup ...VCR Output Channel ...17 17 17 17 18 18 18 19 19 Channels ...18 1 Search ...15 Pro-Tect Plus Locking Feature ...15 Time ...Counter ...16 Info Display ...16 Chapter 3: On-Screen Menus ...17 Explanation of the Remote Control ...11 Using the Input Button ...12 Chapter 2: VCR Features ...13 Recording Features ...13 Express Recording (XPR) ...13 Timer Recording ...14 Stopping a Timer recording ...14 Reviewing and Clearing Programs ...14 Index...
User Guide
Page 4
Table of Contents Chapter 3: On-Screen Menus (Continued) Preferences ...19 Remote Control ...Auto Play ...Auto TV/VCR ...EnergySaver ...Front Panel ...Tape Speed ...Set Auto Repeat ...19 19 19 19 20 20 20 Audio ...20 Reception ...20 Tape Playback ...20 Language ...20 Chapter 4: Additional Information ...21 Troubleshooting ...21 Display Panel ...24 Glossary ...24 Limited Warranty ...25 How to Find Your TV's Video Input Channel ...27 Index ...28 2
Table of Contents Chapter 3: On-Screen Menus (Continued) Preferences ...19 Remote Control ...Auto Play ...Auto TV/VCR ...EnergySaver ...Front Panel ...Tape Speed ...Set Auto Repeat ...19 19 19 19 20 20 20 Audio ...20 Reception ...20 Tape Playback ...20 Language ...20 Chapter 4: Additional Information ...21 Troubleshooting ...21 Display Panel ...24 Glossary ...24 Limited Warranty ...25 How to Find Your TV's Video Input Channel ...27 Index ...28 2
User Guide
Page 5
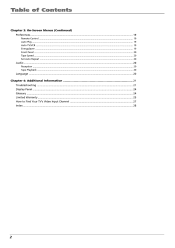
...an amplifier or satellite receiver on the top shelf of a stand so heated air rising from those on the front and back of the VCR are properly grounded. Place any power cords into their jacks. Chapter 1: Connections & Setup Things to Consider Before Connecting Components This Book ...Covers Two Models (VR546 and VR637HF) • • Model VR546 (mono) Model VR637 (hi-fi) The graphics in this user's guide show the VR637HF, so the jacks on the VR546. Protect Components From Power Surges • • Connect...
...an amplifier or satellite receiver on the top shelf of a stand so heated air rising from those on the front and back of the VCR are properly grounded. Place any power cords into their jacks. Chapter 1: Connections & Setup Things to Consider Before Connecting Components This Book ...Covers Two Models (VR546 and VR637HF) • • Model VR546 (mono) Model VR637 (hi-fi) The graphics in this user's guide show the VR637HF, so the jacks on the VR546. Protect Components From Power Surges • • Connect...
User Guide
Page 6
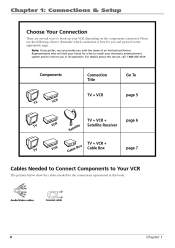
... home for a fee to install your VCR, depending on the components connected. For details about this book. Components Connection Title Go To TV + VCR TV VCR page 5 TV VCR lite tel a S TV + VCR + Satellite Receiver page 6 TV VCR Cab le x Bo TV + VCR + Cable Box page 7 Cables Needed ...to Connect Components to Your VCR The pictures below show the cables needed for you and...
... home for a fee to install your VCR, depending on the components connected. For details about this book. Components Connection Title Go To TV + VCR TV VCR page 5 TV VCR lite tel a S TV + VCR + Satellite Receiver page 6 TV VCR Cab le x Bo TV + VCR + Cable Box page 7 Cables Needed ...to Connect Components to Your VCR The pictures below show the cables needed for you and...
User Guide
Page 7
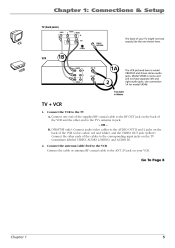
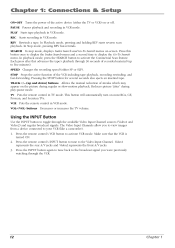
... A. Connect the other ends of the cables to the corresponding input jacks on the back of the VCR and the other end to the TV's antenna in jack. - Model VR546 is model VR637HF and shows stereo audio jacks. Connect one shown here. IN jack on the back of the...OUT jack (yellow). Go To Page 8 Chapter 1 5 OR - Use connection 1A for model VR546. B. (VR637HF only): Connect audio/video cables to the RF OUT jack on the TV (sometimes labeled VIDEO, AUDIO L/MONO, and AUDIO R). 2. TV + VCR 1. Chapter 1: Connections & Setup TV (back panel) VIDEO AUDIO R L / MONO IN L OUT TV ...
... A. Connect the other ends of the cables to the corresponding input jacks on the back of the VCR and the other end to the TV's antenna in jack. - Model VR546 is model VR637HF and shows stereo audio jacks. Connect one shown here. IN jack on the back of the...OUT jack (yellow). Go To Page 8 Chapter 1 5 OR - Use connection 1A for model VR546. B. (VR637HF only): Connect audio/video cables to the RF OUT jack on the TV (sometimes labeled VIDEO, AUDIO L/MONO, and AUDIO R). 2. TV + VCR 1. Chapter 1: Connections & Setup TV (back panel) VIDEO AUDIO R L / MONO IN L OUT TV ...
User Guide
Page 8
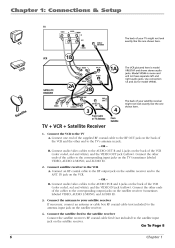
Model VR546 is model VR637HF and shows stereo audio jacks. Connect the VCR to the ANT. Connect an RF coaxial cable to the RF...of your satellite receiver might not look exactly like the one shown here. Connect the other end to the VCR A. Connect the satellite feed to the satellite receiver Connect the satellite receiver's RF coaxial cable feed (not ...on the satellite receiver (sometimes labeled VIDEO, AUDIO L/MONO, and AUDIO R). 3. IN 1A RF OUT VIDEO The VCR pictured here is mono and will not have separate left and right audio jacks. Connect satellite receiver to the TV's...
Model VR546 is model VR637HF and shows stereo audio jacks. Connect the VCR to the ANT. Connect an RF coaxial cable to the RF...of your satellite receiver might not look exactly like the one shown here. Connect the other end to the VCR A. Connect the satellite feed to the satellite receiver Connect the satellite receiver's RF coaxial cable feed (not ...on the satellite receiver (sometimes labeled VIDEO, AUDIO L/MONO, and AUDIO R). 3. IN 1A RF OUT VIDEO The VCR pictured here is mono and will not have separate left and right audio jacks. Connect satellite receiver to the TV's...
User Guide
Page 9
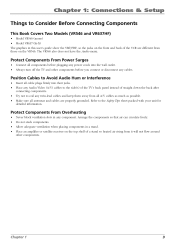
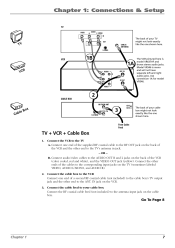
... audio/video cables to the TV's antenna in jack. - Use connection 1A for model VR546. From Cable Feed TV + VCR + Cable Box 1. IN jack on the cable box. Model VR546 is model VR637HF and shows stereo audio jacks. VIDEO 2 CABLE BOX IN FROM ANT CH3 CH4 Ca B b le ox S-VIDEO OUT TO... TV VIDEO AUDIO R L / MONO IN L TV OUT CABLE/ ANTENNA S-VIDEO The back of your TV might not look exactly like the one shown here. VCR 1B 1A AUDIO R L OUT IN VCR ANT. IN RF OUT The VCR pictured here is mono and will not have separate left and right audio jacks. Connect the...
... audio/video cables to the TV's antenna in jack. - Use connection 1A for model VR546. From Cable Feed TV + VCR + Cable Box 1. IN jack on the cable box. Model VR546 is model VR637HF and shows stereo audio jacks. VIDEO 2 CABLE BOX IN FROM ANT CH3 CH4 Ca B b le ox S-VIDEO OUT TO... TV VIDEO AUDIO R L / MONO IN L TV OUT CABLE/ ANTENNA S-VIDEO The back of your TV might not look exactly like the one shown here. VCR 1B 1A AUDIO R L OUT IN VCR ANT. IN RF OUT The VCR pictured here is mono and will not have separate left and right audio jacks. Connect the...
User Guide
Page 10
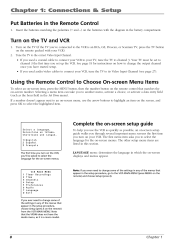
... to channel 3 the first time you 'll be set to another menu, activate a choice, or activate a data entry field (such as it is an RCA, GE, Proscan, or Scenium TV, press the TV button on the remote packed with the diagram in the battery compartment. LANGUAGE menu: determines the language... Input Channel (see page 27). Insert the batteries matching the polarities (+ and -) on -screen number. Note that matches the on the batteries with your VCR, tune the TV to Choose On-screen Menu Items To select an on-screen item, press the MENU button, then the number button on the...
... to channel 3 the first time you 'll be set to another menu, activate a choice, or activate a data entry field (such as it is an RCA, GE, Proscan, or Scenium TV, press the TV button on the remote packed with the diagram in the battery compartment. LANGUAGE menu: determines the language... Input Channel (see page 27). Insert the batteries matching the polarities (+ and -) on -screen number. Note that matches the on the batteries with your VCR, tune the TV to Choose On-screen Menu Items To select an on-screen item, press the MENU button, then the number button on the...
User Guide
Page 11
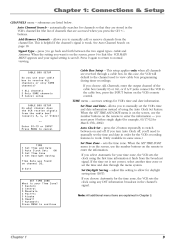
... Set Time and Date Auto Clock Set: ON Set Time Zone Set Daylight Saving Time Data was found on the screen, press 0 to Exit (the VCR MAIN MENU appears and your Time Zone? 1 Eastern 2 Central 3 Mountain 4 Pacific 5 Alaska 6 Hawaii 7 Automatic Press MENU to continue Note: All additional menu ...timer recordings. allows you press the CH +/- allows you choose ALL Channels, enter the output channel of using any DST information broadcast in order for VCR's time and date information. Auto Channel Search - When the setting you want is on channel 20. 0 Exit SET TIME ZONE What is your ...
... Set Time and Date Auto Clock Set: ON Set Time Zone Set Daylight Saving Time Data was found on the screen, press 0 to Exit (the VCR MAIN MENU appears and your Time Zone? 1 Eastern 2 Central 3 Mountain 4 Pacific 5 Alaska 6 Hawaii 7 Automatic Press MENU to continue Note: All additional menu ...timer recordings. allows you press the CH +/- allows you choose ALL Channels, enter the output channel of using any DST information broadcast in order for VCR's time and date information. Auto Channel Search - When the setting you want is on channel 20. 0 Exit SET TIME ZONE What is your ...
User Guide
Page 12
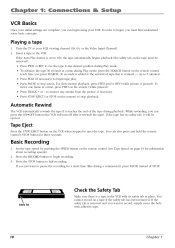
... if necessary. • Press STOP/EJECT (or STOP on the remote) to ON, the tape automatically begins playback (the safety tab on the VCR when stopped to halt recording. Tape Eject Press the STOP/EJECT button on the tape must first understand some basic concepts. Press the STOP button... to the desired position during Play mode, press the SEARCH button on the remote (while paused). • Press TRACK + or - Automatic Rewind The VCR automatically rewinds the tape if it rewinds the tape). While rewinding, you can begin tape play. • Press PAUSE to pause the recording for a ...
... if necessary. • Press STOP/EJECT (or STOP on the remote) to ON, the tape automatically begins playback (the safety tab on the VCR when stopped to halt recording. Tape Eject Press the STOP/EJECT button on the tape must first understand some basic concepts. Press the STOP button... to the desired position during Play mode, press the SEARCH button on the remote (while paused). • Press TRACK + or - Automatic Rewind The VCR automatically rewinds the tape if it rewinds the tape). While rewinding, you can begin tape play. • Press PAUSE to pause the recording for a ...
User Guide
Page 13
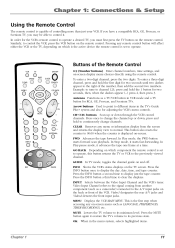
... jacks. This is the first step when accessing any remote control button will affect either the VCR or the TV, depending on -screen. Example: to tune to channel 123, press and hold the first digit for RCA, GE, Proscan, and Scenium TVs. In Play mode, the FWD button starts forward scan playback.... In Stop mode, it advances the tape one frame at a time. INFO Shows the VCR's status displays on -screen display menu choices directly using the...
... jacks. This is the first step when accessing any remote control button will affect either the VCR or the TV, depending on -screen. Example: to tune to channel 123, press and hold the first digit for RCA, GE, Proscan, and Scenium TVs. In Play mode, the FWD button starts forward scan playback.... In Stop mode, it advances the tape one frame at a time. INFO Shows the VCR's status displays on -screen display menu choices directly using the...
User Guide
Page 14
... of streaks which may appear on or off. In playback mode, press the SEARCH button to the Video Input Channel. Each press after that the VCR is turned ON. Pressing the STOP button for several seconds also ejects an inserted tape. VOL+/VOL- Press the INPUT button again to tune back... SLP). SEARCH In stop mode, displays Index Search and Go-To Search menus on most RCA, GE, Proscan, and Scenium TVs. Press this button once to display the Index Search menu and a second time to activate VCR mode. buttons Using the INPUT Button Use the INPUT button to five minutes). TRACK +/- (up...
... of streaks which may appear on or off. In playback mode, press the SEARCH button to the Video Input Channel. Each press after that the VCR is turned ON. Pressing the STOP button for several seconds also ejects an inserted tape. VOL+/VOL- Press the INPUT button again to tune back... SLP). SEARCH In stop mode, displays Index Search and Go-To Search menus on most RCA, GE, Proscan, and Scenium TVs. Press this button once to display the Index Search menu and a second time to activate VCR mode. buttons Using the INPUT Button Use the INPUT button to five minutes). TRACK +/- (up...
User Guide
Page 15
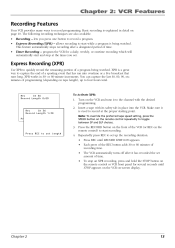
... recording to toggle between SP and SLP choices. Turn on tape length), up the recording duration Press REC until STOP appears on the VCR on the remote control repeatedly to start recording. Each press of the REC button adds 30 or 60 minutes of time. This feature automatically... daily, weekly, or onetime recording which will automatically start and stop an XPR recording, press and hold the STOP button on the remote control or VCR front panel for several seconds until RECORD TIME 0:00 appears. XPR is a great way to record a program. or 60-minute increments. Make sure...
... recording to toggle between SP and SLP choices. Turn on tape length), up the recording duration Press REC until STOP appears on the VCR on the remote control repeatedly to start recording. Each press of the REC button adds 30 or 60 minutes of time. This feature automatically... daily, weekly, or onetime recording which will automatically start and stop an XPR recording, press and hold the STOP button on the remote control or VCR front panel for several seconds until RECORD TIME 0:00 appears. XPR is a great way to record a program. or 60-minute increments. Make sure...
User Guide
Page 16
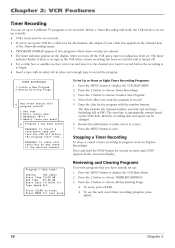
... the channel item of the Timer Recordings menu. Remember to leave your cable box appears in the display when you have already set up correctly VCR's clock must be recorded. Stopping a Timer Recording To stop or cancel a timer recording in progress (even an Express Recording): Press and hold the ... MENU. Review the information to make sure it to the channel you want to record before the program start time. Press CLEAR to display the VCR Main Menu. Press the MENU button to erase Press MENU for next prog 14 Chapter 2 If you've set . Before a Timer Recording will work...
... the channel item of the Timer Recordings menu. Remember to leave your cable box appears in the display when you have already set up correctly VCR's clock must be recorded. Stopping a Timer Recording To stop or cancel a timer recording in progress (even an Express Recording): Press and hold the ... MENU. Review the information to make sure it to the channel you want to record before the program start time. Press CLEAR to display the VCR Main Menu. Press the MENU button to erase Press MENU for next prog 14 Chapter 2 If you've set . Before a Timer Recording will work...
User Guide
Page 17
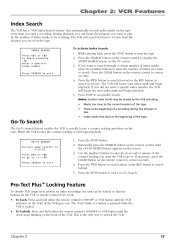
...INDEX SEARCH screen on the TV screen. If you did not enter a specific index number, the VCR will locate your index mark and begin playback. Repeatedly press the SEARCH button on the remote control... until the clock stops blinking on the front of the VCR. Press STOP to search behind. Those at on the tape. Press the FWD button to search...number buttons to enter the hour and/or minute of the counter reading you want to search. The VCR will begin scanning OR enter a specific index number _ _ Press SEARCH to the current location of the...
...INDEX SEARCH screen on the TV screen. If you did not enter a specific index number, the VCR will locate your index mark and begin playback. Repeatedly press the SEARCH button on the remote control... until the clock stops blinking on the front of the VCR. Press STOP to search behind. Those at on the tape. Press the FWD button to search...number buttons to enter the hour and/or minute of the counter reading you want to search. The VCR will begin scanning OR enter a specific index number _ _ Press SEARCH to the current location of the...
User Guide
Page 18
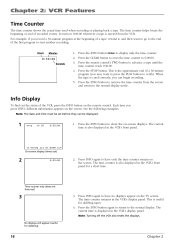
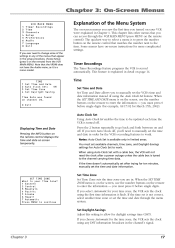
... the time counter to the normal display. Press the remote control's FWD button to display only the time counter. This is also displayed in the VCR's front panel. 11/18/00 Sat 01:30PM SLP On-screen display (times out) 2 0:30:00 2. The time counter is useful for a short time.... before they can begin recording. Press the INFO button twice to advance a tape until the time counter reads 0:30:00. This is displayed in the VCR's display panel. Press the INFO button to show the on the remote control. Time counter only (does not time out) 3 3. The time counter remains...
... the time counter to the normal display. Press the remote control's FWD button to display only the time counter. This is also displayed in the VCR's front panel. 11/18/00 Sat 01:30PM SLP On-screen display (times out) 2 0:30:00 2. The time counter is useful for a short time.... before they can begin recording. Press the INFO button twice to advance a tape until the time counter reads 0:30:00. This is displayed in the VCR's display panel. Press the INFO button to show the on the remote control. Time counter only (does not time out) 3 3. The time counter remains...
User Guide
Page 19
... the time and date in order for ten minutes, manually set the time and date through the VCR MAIN MENU (press MENU on the remote control). The quickest way to select a menu is tuned... zone you must press 0 before single digits (for example, 03/17/02 for the time zone, the VCR sets the clock using the first time information it is on the screen, use the number buttons on page 14... other menus that matches the number next to work . Timer Recordings The Timer Recordings feature programs the VCR to go back and forth between on the remote to work . You must press 0 before single ...
... the time and date in order for ten minutes, manually set the time and date through the VCR MAIN MENU (press MENU on the remote control). The quickest way to select a menu is tuned... zone you must press 0 before single digits (for example, 03/17/02 for the time zone, the VCR sets the clock using the first time information it is on the screen, use the number buttons on page 14... other menus that matches the number next to work . Timer Recordings The Timer Recordings feature programs the VCR to go back and forth between on the remote to work . You must press 0 before single ...
User Guide
Page 20
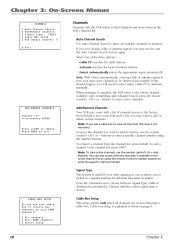
...a channel to find channels and stores them in the active channel list by pressing the 3 button until the correct signal type is complete, the VCR tunes to place all channels are received through a cable box. Note: If you use the remote control's CH + and buttons. You can also... access channels that aren't available in the VCR's channel list. From the Channels menu, choose between Signal Type: Cable or Antenna by using the number buttons. Auto Channel Search Use Auto Channel ...
...a channel to find channels and stores them in the active channel list by pressing the 3 button until the correct signal type is complete, the VCR tunes to place all channels are received through a cable box. Note: If you use the remote control's CH + and buttons. You can also... access channels that aren't available in the VCR's channel list. From the Channels menu, choose between Signal Type: Cable or Antenna by using the number buttons. Auto Channel Search Use Auto Channel ...
User Guide
Page 21
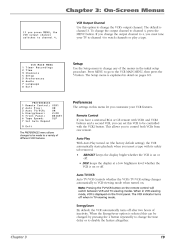
... Auto TV/VCR: EnergySaver: Front Panel: Tape Speed: Set Auto Repeat Preferences VCR1 ON ON 2:00 BRIGHT SLP The settings in the initial setup procedure. If you customize your TV to channel 4 to watch channels or play a tape. Remote Control If you have a universal RCA or GE remote... with its safety tab removed. • BRIGHT keeps the display bright whether the VCR is on or off after two hours of different VCR features. The Setup menu is channel 3. Auto TV/VCR Auto TV/VCR Controls whether the VCR's TV/VCR setting changes automatically to VCR-viewing mode...
... Auto TV/VCR: EnergySaver: Front Panel: Tape Speed: Set Auto Repeat Preferences VCR1 ON ON 2:00 BRIGHT SLP The settings in the initial setup procedure. If you customize your TV to channel 4 to watch channels or play a tape. Remote Control If you have a universal RCA or GE remote... with its safety tab removed. • BRIGHT keeps the display bright whether the VCR is on or off after two hours of different VCR features. The Setup menu is channel 3. Auto TV/VCR Auto TV/VCR Controls whether the VCR's TV/VCR setting changes automatically to VCR-viewing mode...

User Guide
Page 22
... Long Play) Gives three times the recording time of tapes recorded in detail on page 8. 20 Chapter 3 Audio (VR637HF only) AUDIO 1 Reception: STEREO 2 Tape Playback: HI-FI Your VCR's audio features can choose a preferred tape speed for normal playback. Reception You can change the brightness level of the... or off. • DIM keeps the display at a low brightness level whether the VCR is used for a loop end time to be specified. Set Auto Repeat You can be customized and affect both the Hi-Fi and linear tracks. 0 Exit LANGUAGE Select a language. 1 English 2 Español...
... Long Play) Gives three times the recording time of tapes recorded in detail on page 8. 20 Chapter 3 Audio (VR637HF only) AUDIO 1 Reception: STEREO 2 Tape Playback: HI-FI Your VCR's audio features can choose a preferred tape speed for normal playback. Reception You can change the brightness level of the... or off. • DIM keeps the display at a low brightness level whether the VCR is used for a loop end time to be specified. Set Auto Repeat You can be customized and affect both the Hi-Fi and linear tracks. 0 Exit LANGUAGE Select a language. 1 English 2 Español...


