User Guide
Page 2
... 2 HEADSET SAFETY Follow these instructions completely before installing or removing batteries. 4. The headphones should not be used in accordance with the instructions contained in contact with batteries. Read through these precautions for safe usage of excessive heat (e.g., fireplace or radiator). 9. Keep the manual on . you must utilize the unit out of liquid). 14.The maximum ambient humidity that the device supports is...
... 2 HEADSET SAFETY Follow these instructions completely before installing or removing batteries. 4. The headphones should not be used in accordance with the instructions contained in contact with batteries. Read through these precautions for safe usage of excessive heat (e.g., fireplace or radiator). 9. Keep the manual on . you must utilize the unit out of liquid). 14.The maximum ambient humidity that the device supports is...
User Guide
Page 3
...These numbers are unsure if the detergent is alcohol-based, test the cleaning product on the product. Model No Serial No Purchase Date Dealer/Address/Phone TABLE OF CONTENTS Introduction 4 Features 4 Headphone Set Description 5 Recharging the Headset 6 Recharging Cradle/Transmitter Description 6 Supplied Accessories 7 Battery Installation and Information Installing the Rechargeable Batteries 7 Charging the Rechargeable Batteries 8 NiMH Rechargeable Battery Memory Effect 8 NiMH Natural Power Discharge 8 NiMH Battery Warning 8 Connecting the Recharging Cradle/Transmitter...
...These numbers are unsure if the detergent is alcohol-based, test the cleaning product on the product. Model No Serial No Purchase Date Dealer/Address/Phone TABLE OF CONTENTS Introduction 4 Features 4 Headphone Set Description 5 Recharging the Headset 6 Recharging Cradle/Transmitter Description 6 Supplied Accessories 7 Battery Installation and Information Installing the Rechargeable Batteries 7 Charging the Rechargeable Batteries 8 NiMH Rechargeable Battery Memory Effect 8 NiMH Natural Power Discharge 8 NiMH Battery Warning 8 Connecting the Recharging Cradle/Transmitter...
User Guide
Page 4
... TV sound just about anywhere inside or outside your home. WHP170_US_IB_REV.qxd 12/24/03 11:22 AM Page 4 INTRODUCTION Congratulations on your purchase of this system to 150 feet/45 meters from cradle/transmitter* No line-of-sight limitations Convenient power, volume and tuning controls located on headphones * Range may vary by environment. 4 The WHP170/WHP175 utilizes wireless, radio frequency transmission...
... TV sound just about anywhere inside or outside your home. WHP170_US_IB_REV.qxd 12/24/03 11:22 AM Page 4 INTRODUCTION Congratulations on your purchase of this system to 150 feet/45 meters from cradle/transmitter* No line-of-sight limitations Convenient power, volume and tuning controls located on headphones * Range may vary by environment. 4 The WHP170/WHP175 utilizes wireless, radio frequency transmission...
User Guide
Page 5
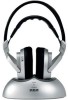
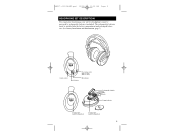
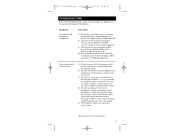
Volume control On/off button Fine tuning control (WHP170: knob) (WHP175: button) On indicator Rechargeable batteries Charge indicator Rechargeable battery compartment Rechargeable battery compartment 5 WHP170_US_IB_REV.qxd 12/24/03 11:22 AM Page 5 HEADPHONE SET DESCRIPTION For stand-alone functioning, your wireless headphones must be powered by rechargeable batteries (included). The rechargeable batteries must be installed into the battery compartment and recharged before use. (See Battery Installation and Information, page 7).
Volume control On/off button Fine tuning control (WHP170: knob) (WHP175: button) On indicator Rechargeable batteries Charge indicator Rechargeable battery compartment Rechargeable battery compartment 5 WHP170_US_IB_REV.qxd 12/24/03 11:22 AM Page 5 HEADPHONE SET DESCRIPTION For stand-alone functioning, your wireless headphones must be powered by rechargeable batteries (included). The rechargeable batteries must be installed into the battery compartment and recharged before use. (See Battery Installation and Information, page 7).
User Guide
Page 6
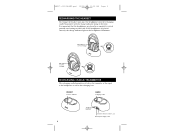
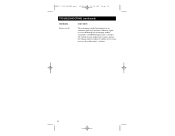
.... FRONT Power on the headphones illuminates. It is important that the headphones are placed correctly, the charge indicator light on indicator BACK Charging contact AUDIO IN input jack Channel selection control 1, 2, 3 DC IN power supply socket 6 WHP170_US_IB_REV.qxd 12/24/03 11:22 AM Page 6 RECHARGING THE HEADSET To recharge the headset unit, place the headphones into the recharging cradle/transmitter with the charge indicator...
.... FRONT Power on the headphones illuminates. It is important that the headphones are placed correctly, the charge indicator light on indicator BACK Charging contact AUDIO IN input jack Channel selection control 1, 2, 3 DC IN power supply socket 6 WHP170_US_IB_REV.qxd 12/24/03 11:22 AM Page 6 RECHARGING THE HEADSET To recharge the headset unit, place the headphones into the recharging cradle/transmitter with the charge indicator...
User Guide
Page 7
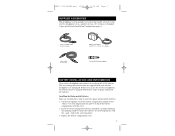
... and Alternate Installation Configuration, page 9). Replace the battery compartment cover. 7 On the left earphone, locate the battery compartment and the word "Open." WHP170_US_IB_REV.qxd 12/24/03 11:22 AM Page 7 SUPPLIED ACCESSORIES This headphone system includes accessories that are supplied with your wireless headphones are inserted properly, with the + and - ends in the correct positions. 3. Stereo Y adapter cable (RCA/3.5 mm jack) Stereo cable (3.5 mm jacks) Main power adapter (AC/DC...
... and Alternate Installation Configuration, page 9). Replace the battery compartment cover. 7 On the left earphone, locate the battery compartment and the word "Open." WHP170_US_IB_REV.qxd 12/24/03 11:22 AM Page 7 SUPPLIED ACCESSORIES This headphone system includes accessories that are supplied with your wireless headphones are inserted properly, with the + and - ends in the correct positions. 3. Stereo Y adapter cable (RCA/3.5 mm jack) Stereo cable (3.5 mm jacks) Main power adapter (AC/DC...
User Guide
Page 8
... can be performed in use. Subsequent charging must be used , it is completely discharged, it to discharge three times in the future. Connect the AC/DC main power adapter to the DC IN power supply socket, located on the battery's type, size, design, internal resistance and, most especially, the temperature. Then, plug the adapter into recharging cradle/transmitter, with the charge indicator facing to...
... can be performed in use. Subsequent charging must be used , it is completely discharged, it to discharge three times in the future. Connect the AC/DC main power adapter to the DC IN power supply socket, located on the battery's type, size, design, internal resistance and, most especially, the temperature. Then, plug the adapter into recharging cradle/transmitter, with the charge indicator facing to...
User Guide
Page 9
... quick setup guide to set the audio source volume at approximately 50 percent capacity. To ensure that reduces the amount of radio emissions in place of your headphones. Push the POWER ON/OFF button, located on the front of the recharging cradle/transmitter. 3. The LED light turns on how to ensure trouble-free installation of the recharging cradle/transmitter. Plug the stereo audio cable into the headphone jack of a headphone jack, use the supplied Y cable to connect your audio...
... quick setup guide to set the audio source volume at approximately 50 percent capacity. To ensure that reduces the amount of radio emissions in place of your headphones. Push the POWER ON/OFF button, located on the front of the recharging cradle/transmitter. 3. The LED light turns on how to ensure trouble-free installation of the recharging cradle/transmitter. Plug the stereo audio cable into the headphone jack of a headphone jack, use the supplied Y cable to connect your audio...
User Guide
Page 10
... the stereo audio cable to the AUDIO IN input jack at all times, place them off the speakers. Alternate Installation Configuration The accessories included with no sound loss. 7. That person can use . Use the supplied Y cable to connect your home and you want the speakers to music in use the Y adapter instead of the recharging cradle/transmitter. After selecting a channel, use at the back of the headphone jack. If you are charged...
... the stereo audio cable to the AUDIO IN input jack at all times, place them off the speakers. Alternate Installation Configuration The accessories included with no sound loss. 7. That person can use . Use the supplied Y cable to connect your home and you want the speakers to music in use the Y adapter instead of the recharging cradle/transmitter. After selecting a channel, use at the back of the headphone jack. If you are charged...
User Guide
Page 11
... the sound provided by environment. 11 Poor sound quality or interference A) Check to ensure that the rechargeable batteries are connected, supplied properly and turned on the unit is loud enough and of this troubleshooting section if you have sufficient power. If necessary, try another channel, remembering to finetune the reception using your audio source, recharging cradle/transmitter and headphones are installed in setting up...
... the sound provided by environment. 11 Poor sound quality or interference A) Check to ensure that the rechargeable batteries are connected, supplied properly and turned on the unit is loud enough and of this troubleshooting section if you have sufficient power. If necessary, try another channel, remembering to finetune the reception using your audio source, recharging cradle/transmitter and headphones are installed in setting up...
User Guide
Page 12
When no signal is received through the recharging cradle/ transmitter's AUDIO IN input jack, it switches off function. Switch on your audio source again, and use the tuning control to adjust reception. If necessary, increase the audio source's volume. 12 WHP170_US_IB_REV.qxd 12/24/03 11:22 AM Page 12 TROUBLESHOOTING (continued) PROBLEM Power cut off SOLUTION The recharging cradle/transmitter has an automatic power off .
When no signal is received through the recharging cradle/ transmitter's AUDIO IN input jack, it switches off function. Switch on your audio source again, and use the tuning control to adjust reception. If necessary, increase the audio source's volume. 12 WHP170_US_IB_REV.qxd 12/24/03 11:22 AM Page 12 TROUBLESHOOTING (continued) PROBLEM Power cut off SOLUTION The recharging cradle/transmitter has an automatic power off .
User Guide
Page 13
WHP170_US_IB_REV.qxd 12/24/03 11:22 AM Page 13 SPECIFICATIONS Models Description Transmitter Carrier Frequency Effective Range Power Supply Transmission Frequency Headset Power Supply WHP170 WHP175 Radio Frequency Wireless Headphones System 900 MHz Up to 150 feet/45 meters* 12 V (DC) via a 120V-60 Hz (AC) main power supply adapter UHF - 900 MHz/three channels: 911.9 MHz (1), 912.6 MHz (2) and 913.3 MHz (3) Two AAA 1.2V rechargeable batteries * Range may vary by environment. 13
WHP170_US_IB_REV.qxd 12/24/03 11:22 AM Page 13 SPECIFICATIONS Models Description Transmitter Carrier Frequency Effective Range Power Supply Transmission Frequency Headset Power Supply WHP170 WHP175 Radio Frequency Wireless Headphones System 900 MHz Up to 150 feet/45 meters* 12 V (DC) via a 120V-60 Hz (AC) main power supply adapter UHF - 900 MHz/three channels: 911.9 MHz (1), 912.6 MHz (2) and 913.3 MHz (3) Two AAA 1.2V rechargeable batteries * Range may vary by environment. 13
User Guide
Page 14
.... This warranty gives you specific legal rights, and you . For a prompt, no charge replacement of purchase, it will not be defective in materials or workmanship. This warranty excludes defects or damage due to the appropriate address. will replace this product if found to use or inability to be responsible for any loss arising in connection with the use this warranty. THOMSON...
.... This warranty gives you specific legal rights, and you . For a prompt, no charge replacement of purchase, it will not be defective in materials or workmanship. This warranty excludes defects or damage due to the appropriate address. will replace this product if found to use or inability to be responsible for any loss arising in connection with the use this warranty. THOMSON...

User Guide
Page 44
WHP170_US_IB_REV.qxd 12/24/03 11:22 AM Page 44 © 2004 THOMSON INC. 10330 North Meridian Street Indianapolis, IN 46290 USA WHP170/WHP175 NA IB REVA Trademark(s) Registered Marque(s) déposées Marcas registradas Made in China Fabriqué en Chine Hecho en China
WHP170_US_IB_REV.qxd 12/24/03 11:22 AM Page 44 © 2004 THOMSON INC. 10330 North Meridian Street Indianapolis, IN 46290 USA WHP170/WHP175 NA IB REVA Trademark(s) Registered Marque(s) déposées Marcas registradas Made in China Fabriqué en Chine Hecho en China


