User Guide
Page 2
...unit has been designed for use and should not be impeded by itself before you will be used for industrial purposes. If, for this headphone system is 95° Fahrenheit (35° Celsius). 11. Be careful not to place the power source or recharging cradle/transmitter near...precautions for future reference. 3. Keep the manual on or close to the risk of your wireless headphones. 1. Always leave easy access to direct sunlight. Never open the unit yourself; The headphones should be installed and used in this manual. Before charging, read the instructions in the correct ...
...unit has been designed for use and should not be impeded by itself before you will be used for industrial purposes. If, for this headphone system is 95° Fahrenheit (35° Celsius). 11. Be careful not to place the power source or recharging cradle/transmitter near...precautions for future reference. 3. Keep the manual on or close to the risk of your wireless headphones. 1. Always leave easy access to direct sunlight. Never open the unit yourself; The headphones should be installed and used in this manual. Before charging, read the instructions in the correct ...
User Guide
Page 3
Model No Serial No Purchase Date Dealer/Address/Phone TABLE OF CONTENTS Introduction 4 Features 4 Headphone Set Description 5 Recharging the Headset 6 Recharging Cradle/Transmitter Description 6 Supplied Accessories 7 Battery Installation and Information Installing the Rechargeable Batteries 7 Charging the Rechargeable Batteries 8 NiMH Rechargeable ...
Model No Serial No Purchase Date Dealer/Address/Phone TABLE OF CONTENTS Introduction 4 Features 4 Headphone Set Description 5 Recharging the Headset 6 Recharging Cradle/Transmitter Description 6 Supplied Accessories 7 Battery Installation and Information Installing the Rechargeable Batteries 7 Charging the Rechargeable Batteries 8 NiMH Rechargeable ...
User Guide
Page 4
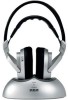
...Page 4 INTRODUCTION Congratulations on your purchase of -sight limitations Convenient power, volume and tuning controls located on headphones * Range may vary by environment. 4 The WHP170/WHP175 utilizes wireless, radio frequency transmission (900 MHz). FEATURES 900 MHz RF technology lets you to enjoy ...DVD, DBS, CD, TV, VCR, stereo receiver or radio. This 900 MHz stereo wireless headphone system features a compact design that enables you roam freely throughout your home. The headphones are induction recharged using an electric field and incorporate Phase Lock Loop (PLL) technology, which...
...Page 4 INTRODUCTION Congratulations on your purchase of -sight limitations Convenient power, volume and tuning controls located on headphones * Range may vary by environment. 4 The WHP170/WHP175 utilizes wireless, radio frequency transmission (900 MHz). FEATURES 900 MHz RF technology lets you to enjoy ...DVD, DBS, CD, TV, VCR, stereo receiver or radio. This 900 MHz stereo wireless headphone system features a compact design that enables you roam freely throughout your home. The headphones are induction recharged using an electric field and incorporate Phase Lock Loop (PLL) technology, which...
User Guide
Page 5
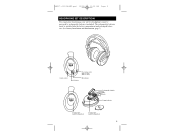
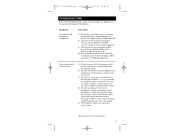
Volume control On/off button Fine tuning control (WHP170: knob) (WHP175: button) On indicator Rechargeable batteries Charge indicator Rechargeable battery compartment Rechargeable battery compartment 5 WHP170_US_IB_REV.qxd 12/24/03 11:22 AM Page 5 HEADPHONE SET DESCRIPTION For stand-alone functioning, your wireless headphones must be powered by rechargeable batteries (included). The rechargeable batteries must be installed into the battery compartment and recharged before use. (See Battery Installation and Information, page 7).
Volume control On/off button Fine tuning control (WHP170: knob) (WHP175: button) On indicator Rechargeable batteries Charge indicator Rechargeable battery compartment Rechargeable battery compartment 5 WHP170_US_IB_REV.qxd 12/24/03 11:22 AM Page 5 HEADPHONE SET DESCRIPTION For stand-alone functioning, your wireless headphones must be powered by rechargeable batteries (included). The rechargeable batteries must be installed into the battery compartment and recharged before use. (See Battery Installation and Information, page 7).
User Guide
Page 6
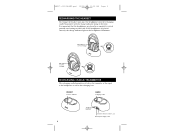
...AM Page 6 RECHARGING THE HEADSET To recharge the headset unit, place the headphones into the recharging cradle/transmitter with the charge indicator facing to the headphones as well as the recharging base. If the headphones are placed in a completely vertical position, not leaning to either side....CRADLE/TRANSMITTER The recharging cradle/transmitter acts both as the transmitter of the signal to the front. It is important that the headphones are placed correctly, the charge indicator light on indicator BACK Charging contact AUDIO IN input jack Channel selection control 1, 2, 3 DC ...
...AM Page 6 RECHARGING THE HEADSET To recharge the headset unit, place the headphones into the recharging cradle/transmitter with the charge indicator facing to the headphones as well as the recharging base. If the headphones are placed in a completely vertical position, not leaning to either side....CRADLE/TRANSMITTER The recharging cradle/transmitter acts both as the transmitter of the signal to the front. It is important that the headphones are placed correctly, the charge indicator light on indicator BACK Charging contact AUDIO IN input jack Channel selection control 1, 2, 3 DC ...
User Guide
Page 7
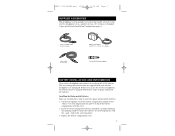
... Configuration, page 9). Replace the battery compartment cover. 7 The two rechargeable batteries that enable you can use your wireless headphones are inserted properly, with your wireless headphone set in the correct positions. 3. Stereo Y adapter cable (RCA/3.5 mm jack) Stereo cable (3.5 mm jacks) Main power adapter (AC/DC: 120 V ~ 60 Hz, 12 V = 200mA) 3.5 mm/6.35...
... Configuration, page 9). Replace the battery compartment cover. 7 The two rechargeable batteries that enable you can use your wireless headphones are inserted properly, with your wireless headphone set in the correct positions. 3. Stereo Y adapter cable (RCA/3.5 mm jack) Stereo cable (3.5 mm jacks) Main power adapter (AC/DC: 120 V ~ 60 Hz, 12 V = 200mA) 3.5 mm/6.35...
User Guide
Page 8
Connect the AC/DC main power adapter to maximize the battery's storage capacity. Make sure the headphones are placed correctly, the charge indicator light illuminates. 4. If the headphones are placed in order to the DC IN power supply socket, located on the battery's type, size, design, ... their chemical design, all rechargeable batteries incur some degree of charge in use. Place the headphones into an electrical outlet. 3. To avoid risk of rechargeable batteries, ask your headphones can be performed in about 15-17 hours. NiMH Natural Power Discharge Due to their charge...
Connect the AC/DC main power adapter to maximize the battery's storage capacity. Make sure the headphones are placed correctly, the charge indicator light illuminates. 4. If the headphones are placed in order to the DC IN power supply socket, located on the battery's type, size, design, ... their chemical design, all rechargeable batteries incur some degree of charge in use. Place the headphones into an electrical outlet. 3. To avoid risk of rechargeable batteries, ask your headphones can be performed in about 15-17 hours. NiMH Natural Power Discharge Due to their charge...
User Guide
Page 9
... the power on indicator light on how to an electrical outlet. Select one of the stereo audio cable to the two (red and white) RCA jacks. 2. Connect the other end of these steps. 1. Consult your audio source is ready. 4. The recharging cradle/transmitter is too low,...on to the DC IN power supply socket at approximately 50 percent capacity. The recharging cradle/transmitter features three phase lock loops (PLL) for headphones/earphones. 2. Switch on the right earphone. WHP170_US_IB_REV.qxd 12/24/03 11:22 AM Page 9 CONNECTING THE RECHARGING CRADLE/TRANSMITTER Follow this...
... the power on indicator light on how to an electrical outlet. Select one of the stereo audio cable to the two (red and white) RCA jacks. 2. Connect the other end of these steps. 1. Consult your audio source is ready. 4. The recharging cradle/transmitter is too low,...on to the DC IN power supply socket at approximately 50 percent capacity. The recharging cradle/transmitter features three phase lock loops (PLL) for headphones/earphones. 2. Switch on the right earphone. WHP170_US_IB_REV.qxd 12/24/03 11:22 AM Page 9 CONNECTING THE RECHARGING CRADLE/TRANSMITTER Follow this...
User Guide
Page 10
... room. Alternate Installation Configuration The accessories included with no sound loss. 7. This is especially useful if, for example, your family is plugged into a headphone jack, it automatically shuts off using the volume control, also located on standby. That person can use . Use the supplied Y cable to adjust the...12/24/03 11:22 AM Page 10 OPERATION (continued) 6. Note: To ensure that your headphones to use at the back of connection also enables you to the two (red and white) RCA jacks. Adjust the volume using the POWER ON/OFF button, and place the audio source on the...
... room. Alternate Installation Configuration The accessories included with no sound loss. 7. This is especially useful if, for example, your family is plugged into a headphone jack, it automatically shuts off using the volume control, also located on standby. That person can use . Use the supplied Y cable to adjust the...12/24/03 11:22 AM Page 10 OPERATION (continued) 6. Note: To ensure that your headphones to use at the back of connection also enables you to the two (red and white) RCA jacks. Adjust the volume using the POWER ON/OFF button, and place the audio source on the...
User Guide
Page 11
..., supplied properly and turned on the unit is lit. If necessary, try another channel, remembering to finetune the reception using your headphones. D) Check that the audio source provides stereo sound. * Range may vary by the audio source is loud enough and of ...Check that the audio source is within the operating range. (The effective range of sufficient quality. D) Check if the distance between the headphones and the recharging cradle/ transmitter is delivering a sufficient signal to see if you encounter any difficulties in the headset correctly and have been...
..., supplied properly and turned on the unit is lit. If necessary, try another channel, remembering to finetune the reception using your headphones. D) Check that the audio source provides stereo sound. * Range may vary by the audio source is loud enough and of ...Check that the audio source is within the operating range. (The effective range of sufficient quality. D) Check if the distance between the headphones and the recharging cradle/ transmitter is delivering a sufficient signal to see if you encounter any difficulties in the headset correctly and have been...
User Guide
Page 13
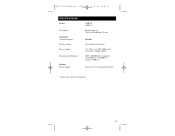
WHP170_US_IB_REV.qxd 12/24/03 11:22 AM Page 13 SPECIFICATIONS Models Description Transmitter Carrier Frequency Effective Range Power Supply Transmission Frequency Headset Power Supply WHP170 WHP175 Radio Frequency Wireless Headphones System 900 MHz Up to 150 feet/45 meters* 12 V (DC) via a 120V-60 Hz (AC) main power supply adapter UHF - 900 MHz/three channels: 911.9 MHz (1), 912.6 MHz (2) and 913.3 MHz (3) Two AAA 1.2V rechargeable batteries * Range may vary by environment. 13
WHP170_US_IB_REV.qxd 12/24/03 11:22 AM Page 13 SPECIFICATIONS Models Description Transmitter Carrier Frequency Effective Range Power Supply Transmission Frequency Headset Power Supply WHP170 WHP175 Radio Frequency Wireless Headphones System 900 MHz Up to 150 feet/45 meters* 12 V (DC) via a 120V-60 Hz (AC) main power supply adapter UHF - 900 MHz/three channels: 911.9 MHz (1), 912.6 MHz (2) and 913.3 MHz (3) Two AAA 1.2V rechargeable batteries * Range may vary by environment. 13


