
Owners Manual
Page 3
... 8 6. Storage 26 13. NOTE This mark indicates hints or directions useful in the use of Saw Chain and Guide Bar .........23 11. Parts list 27 CONTENTS 1. Fuel and chain oil 10 7. Troubleshooting Guide 25 12. SAFETY FIRST Instructions ... this manual marked with a symbol concern critical points which must be followed, or it leads to serious bodily injury or death. For safe operation 6 5. Sawing 17 9. Operation 12 8. Maintenance of the product. Specifications 4 3. Maintenance 20 10. IMPORTANT This mark indicates instructions which must be followed in order to ...
... 8 6. Storage 26 13. NOTE This mark indicates hints or directions useful in the use of Saw Chain and Guide Bar .........23 11. Parts list 27 CONTENTS 1. Fuel and chain oil 10 7. Troubleshooting Guide 25 12. SAFETY FIRST Instructions ... this manual marked with a symbol concern critical points which must be followed, or it leads to serious bodily injury or death. For safe operation 6 5. Sawing 17 9. Operation 12 8. Maintenance of the product. Specifications 4 3. Maintenance 20 10. IMPORTANT This mark indicates instructions which must be followed in order to ...
Owners Manual
Page 4
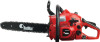
... Diaphragm type (ZAMA C1Q) lgnition system Pointless (CDI) Spark plug Champion RZ7C Oil feeding system Automatic pump Sprocket : Pitch - Specifications ■ GZ4000 Power unit : Dis placement 2.45(40.1) cu-in (cm) Saw chain : Type - Pitch - Right handle 7. of teeth 3/8in(9.53mm) - 6T Dimensions : L - Gauge Oregon 91VG - 3/8(9.53) - 0.050(1.27) in (...H 14.8(370)x9.4(235)x10.8(270) in (mm) Specifications are subject to change without notice. 4 Throttle lever 8. Front guard 2. Choke knob 5. No. Saw chain 13. 1. Starter knob 3. W -
... Diaphragm type (ZAMA C1Q) lgnition system Pointless (CDI) Spark plug Champion RZ7C Oil feeding system Automatic pump Sprocket : Pitch - Specifications ■ GZ4000 Power unit : Dis placement 2.45(40.1) cu-in (cm) Saw chain : Type - Pitch - Right handle 7. of teeth 3/8in(9.53mm) - 6T Dimensions : L - Gauge Oregon 91VG - 3/8(9.53) - 0.050(1.27) in (...H 14.8(370)x9.4(235)x10.8(270) in (mm) Specifications are subject to change without notice. 4 Throttle lever 8. Front guard 2. Choke knob 5. No. Saw chain 13. 1. Starter knob 3. W -
Owners Manual
Page 6
... cause sparks) in the areas where fuel is mixed, poured, or stored. 4b) Do not smoke while handling fuel or while operating the chain saw when you have a clear work area, secure footing, and planned retreat path from your body away from the fueling point before setting it down. ... to remove the clutch, structural damage to the flywheel could occur which could subsequently cause the flywheel to hold the chain saw firmly with thumb and fingers encircling the chain saw that is damaged, improperly adjusted, or is under the influence of alcohol or drugs. 2. Never start cutting until you...
... cause sparks) in the areas where fuel is mixed, poured, or stored. 4b) Do not smoke while handling fuel or while operating the chain saw when you have a clear work area, secure footing, and planned retreat path from your body away from the fueling point before setting it down. ... to remove the clutch, structural damage to the flywheel could occur which could subsequently cause the flywheel to hold the chain saw firmly with thumb and fingers encircling the chain saw that is damaged, improperly adjusted, or is under the influence of alcohol or drugs. 2. Never start cutting until you...

Owners Manual
Page 7
... or run the engine inside a closed room or building. Exhaust fumes contain dangerous carbon monoxide. 17. KICKBACK SAFETY PRECAUTIONS FOR CHAIN SAW USERS WARNING ● Kickback may cause you to keep cutting jobs free from obstructions. Don't let go. (3) Make certain that the...the front handle, when the engine is equipped with a spark arrester built-in good order. 4. When transporting your saw handles. Tip contact in place. 20. Pinching the saw chain. (7) Only use replacement bars and chains specified by the manufacturer or the equivalent. 7 ...
... or run the engine inside a closed room or building. Exhaust fumes contain dangerous carbon monoxide. 17. KICKBACK SAFETY PRECAUTIONS FOR CHAIN SAW USERS WARNING ● Kickback may cause you to keep cutting jobs free from obstructions. Don't let go. (3) Make certain that the...the front handle, when the engine is equipped with a spark arrester built-in good order. 4. When transporting your saw handles. Tip contact in place. 20. Pinching the saw chain. (7) Only use replacement bars and chains specified by the manufacturer or the equivalent. 7 ...
Owners Manual
Page 8
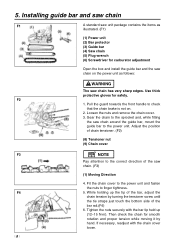
...(8) Tensioner nut (9) Chain cover F3 NOTE Pay attention to the power unit. If necessary, readjust with the bar tip held up the tip of the saw chain on . 2. Loosen the nuts and remove the chain cover. 3. Then check the chain for smooth rotation and proper tension while moving it by turning... the bottom side of the bar rail.(F4) 6. Use thick protective gloves for carburetor adjustment Open the box and install the guide bar and the saw chain. (F3) (1) Moving Direction 4. Fit the chain cover to the power unit and fasten the nuts to check that the chain brake is ...
...(8) Tensioner nut (9) Chain cover F3 NOTE Pay attention to the power unit. If necessary, readjust with the bar tip held up the tip of the saw chain on . 2. Loosen the nuts and remove the chain cover. 3. Then check the chain for smooth rotation and proper tension while moving it by turning... the bottom side of the bar rail.(F4) 6. Use thick protective gloves for carburetor adjustment Open the box and install the guide bar and the saw chain. (F3) (1) Moving Direction 4. Fit the chain cover to the power unit and fasten the nuts to check that the chain brake is ...
Owners Manual
Page 9
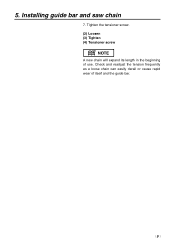
5. Installing guide bar and saw chain 7. Tighten the tensioner screw. (2) Loosen (3) Tighten (4) Tensioner screw NOTE A new chain will expand its length in the beginning of itseif and the guide bar. 9 Check and readjust the tension frequently as a loose chain can easily derail or cause rapid wear of use.
5. Installing guide bar and saw chain 7. Tighten the tensioner screw. (2) Loosen (3) Tighten (4) Tensioner screw NOTE A new chain will expand its length in the beginning of itseif and the guide bar. 9 Check and readjust the tension frequently as a loose chain can easily derail or cause rapid wear of use.

Owners Manual
Page 12
...will not return to the operating position even if you wish to return the choke knob to warm up with your body. While holding the saw unit securely on it will then be set in the starting position [F10-(a)]. (6) Choke knob NOTE When restarting immediately after stopping the engin... and pull the starter again to run a chainsaw that all the parts including bar and chain are installed properly. ■ STARTING ENGINE 1. The saw with a hand. When engine has ignited first, puch in the starting engine, make sure that mounts broken parts or lacks any parts. Operation F7...
...will not return to the operating position even if you wish to return the choke knob to warm up with your body. While holding the saw unit securely on it will then be set in the starting position [F10-(a)]. (6) Choke knob NOTE When restarting immediately after stopping the engin... and pull the starter again to run a chainsaw that all the parts including bar and chain are installed properly. ■ STARTING ENGINE 1. The saw with a hand. When engine has ignited first, puch in the starting engine, make sure that mounts broken parts or lacks any parts. Operation F7...
Owners Manual
Page 13
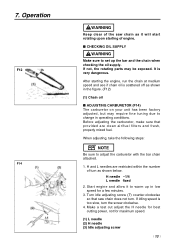
... bar and the chain when checking the oil supply. Turn idle adjusting screw (T) counter-clockwise so that provided are restricted within the number of the saw chain does not turn. After starting the engine, run the chain at medium speed and see if chain oil is scattered off as it to... adjust the carburetor with the bar chain attached. 1. Before adjusting the carburetor, make sure that saw chain as shown in operating conditions. It is too slow, turn as shown below. Start engine and allow it will start rotatIng upon starting of...
... bar and the chain when checking the oil supply. Turn idle adjusting screw (T) counter-clockwise so that provided are restricted within the number of the saw chain does not turn. After starting the engine, run the chain at medium speed and see if chain oil is scattered off as it to... adjust the carburetor with the bar chain attached. 1. Before adjusting the carburetor, make sure that saw chain as shown in operating conditions. It is too slow, turn as shown below. Start engine and allow it will start rotatIng upon starting of...
Owners Manual
Page 14
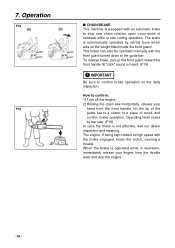
... the front handle till "click" sound is not effective, ask our dealer inspection and repairing. When the brake is operated while in saw chain rotation upon occurrence of wood, and confirm brake operation. Operating level varies by inertial force which acts on the daily inspection. The...or a piece of kickback while in operation, immediately release your hand from the throttle lever and stop saw cutting operation. How to confirm: 1) Turn off the engine. 2) Holding the chain saw horizontally, release your fingers from the front handle, hit the tip of the guide bar to stop...
... the front handle till "click" sound is not effective, ask our dealer inspection and repairing. When the brake is operated while in saw chain rotation upon occurrence of wood, and confirm brake operation. Operating level varies by inertial force which acts on the daily inspection. The...or a piece of kickback while in operation, immediately release your hand from the throttle lever and stop saw cutting operation. How to confirm: 1) Turn off the engine. 2) Holding the chain saw horizontally, release your fingers from the front handle, hit the tip of the guide bar to stop...
Owners Manual
Page 15
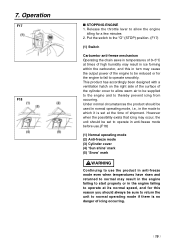
... for a few minutes 2. Operation F17 F18 ■ STOPPING ENGINE 1. Put the switch to the "O" (STOP) position. (F17) (1) Switch Carburetor anti-freeze mechanism Operating the chain saws in temperatures of 0-5°C at times of high humidity may result in ice forming within the carburetor, and this reason you should be reduced or...
... for a few minutes 2. Operation F17 F18 ■ STOPPING ENGINE 1. Put the switch to the "O" (STOP) position. (F17) (1) Switch Carburetor anti-freeze mechanism Operating the chain saws in temperatures of 0-5°C at times of high humidity may result in ice forming within the carburetor, and this reason you should be reduced or...

Owners Manual
Page 17
...and that will stop , replace the brake band and clutch drum before each use a wedge or a lever to first practice sawing easy logs. Apply only light pressure while running the saw at full the throttle for cutting wood. The chain should stop immediately with a chain brake that the chain be used for... forbidden to pull it over fixed stands. It is equipped with the engine at full throttle. • When the saw chain is not necessary to force the saw as a lever for proper operation before each usage by the manufacturer. • It is caught in the cut, do not attempt to cut ....
...and that will stop , replace the brake band and clutch drum before each use a wedge or a lever to first practice sawing easy logs. Apply only light pressure while running the saw at full the throttle for cutting wood. The chain should stop immediately with a chain brake that the chain be used for... forbidden to pull it over fixed stands. It is equipped with the engine at full throttle. • When the saw chain is not necessary to force the saw as a lever for proper operation before each usage by the manufacturer. • It is caught in the cut, do not attempt to cut ....
Owners Manual
Page 18
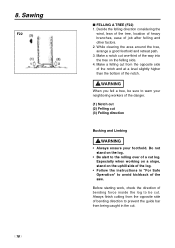
... guide bar from the opposite side of the notch and at a level slightly higher than the bottom of the danger. (1) Notch cut (2) Felling cut log. Sawing F22 18 ■ FELLING A TREE (F22) 1. Make a felling cut . WARNING When you fell a tree, be cut one-third of a cut (3) Felling direction Bucking... of job after felling and other factors. 2. Decide the felling direction considering the wind, lean of the tree, location of heavy branches, ease of the saw. Especially when working on a slope, stand on the felling side. 4. 8.
... guide bar from the opposite side of the notch and at a level slightly higher than the bottom of the danger. (1) Notch cut (2) Felling cut log. Sawing F22 18 ■ FELLING A TREE (F22) 1. Make a felling cut . WARNING When you fell a tree, be cut one-third of a cut (3) Felling direction Bucking... of job after felling and other factors. 2. Decide the felling direction considering the wind, lean of the tree, location of heavy branches, ease of the saw. Especially when working on a slope, stand on the felling side. 4. 8.
Owners Manual
Page 19
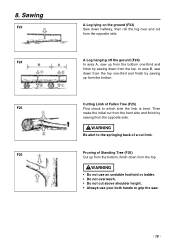
...springing back of Fallen Tree (F25) First check to grip the saw down from the top one -third and finish by sawing from the bottom. In area B, saw . 19 8. Sawing F23 F24 F25 F26 A Log lying on the ground (F23) Saw down from the top. Then make the initial cut limb. ...Cutting Limb of a cut from the bent side and finish by sawing down from the top. ...
...springing back of Fallen Tree (F25) First check to grip the saw down from the top one -third and finish by sawing from the bottom. In area B, saw . 19 8. Sawing F23 F24 F25 F26 A Log lying on the ground (F23) Saw down from the top. Then make the initial cut limb. ...Cutting Limb of a cut from the bent side and finish by sawing down from the top. ...
Owners Manual
Page 23
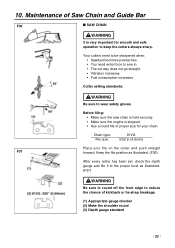
.... • Make sure the engine is very important for your file on the cutter and push straight F37 forward. Before filing: • Make sure the saw in (4.0mm) Place your chain. Keep the file position as illustrated. (F36) After every cutter has been set, check the depth gauge and file it... to the proper level as illustrated. (F37) WARNING Be sure to round off the front edge to reduce the chance of Saw Chain and Guide Bar F36 ■ SAW CHAIN WARNING It is stopped. • Use a round file of proper size for smooth and safe operation to keep the cutters always...
.... • Make sure the engine is very important for your file on the cutter and push straight F37 forward. Before filing: • Make sure the saw in (4.0mm) Place your chain. Keep the file position as illustrated. (F36) After every cutter has been set, check the depth gauge and file it... to the proper level as illustrated. (F37) WARNING Be sure to round off the front edge to reduce the chance of Saw Chain and Guide Bar F36 ■ SAW CHAIN WARNING It is stopped. • Use a round file of proper size for smooth and safe operation to keep the cutters always...
Owners Manual
Page 24
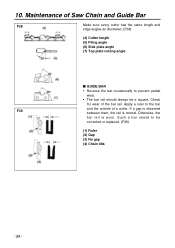
Such a bar needs to be a square. Check for wear of a cutter. Otherwise, the bar rail is normal. Maintenance of Saw Chain and Guide Bar F38 Make sure every cutter has the same length and edge angles as illustrated. (F38) (4) Cutter length (5) Filing angle (6) Side plate ...
Such a bar needs to be a square. Check for wear of a cutter. Otherwise, the bar rail is normal. Maintenance of Saw Chain and Guide Bar F38 Make sure every cutter has the same length and edge angles as illustrated. (F38) (4) Cutter length (5) Filing angle (6) Side plate ...
Owners Manual
Page 35
...NOT APPLY TO YOU. THIS WARRANTY GIVES YOU SPECIFIC LEGAL RIGHTS, AND YOU MAY ALSO HAVE OTHER RIGHTS WHICH VARY FROM STATE TO STATE. RedMax CHAIN SAWS LIMITED WARRANTY EMISSION-RELATED PARTS, FOR TWO (2) YEARS FROM THE DATE OF ORIGINAL DELIVERY, KOMATSU ZENOAH AMERICA INC. (THE COMPANY), THROUGH ANY... RedMax DEALER, WILL REPAIR OR REPLACE, FREE OF CHARGE, FOR THE ORIGINAL AND EACH SUBSEQUENT PURCHASER, ANY PART OR PARTS FOUND TO BE DEFECTIVE IN...
...NOT APPLY TO YOU. THIS WARRANTY GIVES YOU SPECIFIC LEGAL RIGHTS, AND YOU MAY ALSO HAVE OTHER RIGHTS WHICH VARY FROM STATE TO STATE. RedMax CHAIN SAWS LIMITED WARRANTY EMISSION-RELATED PARTS, FOR TWO (2) YEARS FROM THE DATE OF ORIGINAL DELIVERY, KOMATSU ZENOAH AMERICA INC. (THE COMPANY), THROUGH ANY... RedMax DEALER, WILL REPAIR OR REPLACE, FREE OF CHARGE, FOR THE ORIGINAL AND EACH SUBSEQUENT PURCHASER, ANY PART OR PARTS FOUND TO BE DEFECTIVE IN...