
General Settings Guide
Page 2
... operation and notes about power source, see P.16 "Machine Types".) • Type 1: Aficio 2051 • Type 2: Aficio 2060 • Type 3: Aficio 2075 Certain types might not be available in some countries. To get maximum versatility from the use genuine Ricoh toner. Direct (or indirect reflected ) eye contact with the requisite equipment. Check the type of the machine. Introduction This manual describes detailed instructions on the back side of your Ricoh office products. Ricoh...
... operation and notes about power source, see P.16 "Machine Types".) • Type 1: Aficio 2051 • Type 2: Aficio 2060 • Type 3: Aficio 2075 Certain types might not be available in some countries. To get maximum versatility from the use genuine Ricoh toner. Direct (or indirect reflected ) eye contact with the requisite equipment. Check the type of the machine. Introduction This manual describes detailed instructions on the back side of your Ricoh office products. Ricoh...
General Settings Guide
Page 3
... System Settings (such as setting user and administrator authentication. ❖ Network Guide (PDF file - For particular functions, see the relevant parts of this machine. i Also refer to this manual for the procedures for the machine's scanner function. CD-ROM1) Describes operations, functions, and troubleshooting for registering administrators, as well as Tray Paper Settings), Document Server functions, and troubleshooting. ❖ Security Reference This manual is necessary to view the manuals as a PDF file. ❒ Two CD-ROMs are specific to protect data from...
... System Settings (such as setting user and administrator authentication. ❖ Network Guide (PDF file - For particular functions, see the relevant parts of this machine. i Also refer to this manual for the procedures for the machine's scanner function. CD-ROM1) Describes operations, functions, and troubleshooting for registering administrators, as well as Tray Paper Settings), Document Server functions, and troubleshooting. ❖ Security Reference This manual is necessary to view the manuals as a PDF file. ❒ Two CD-ROMs are specific to protect data from...

General Settings Guide
Page 7
...Administrating the Machine/ Protecting Documents (Security Functions) Monitoring the Machine Via Computer ADH020S • You can prevent unauthorized access via the network. See Network Guide. • You can use a Web browser to make network settings. See the Web browser's Help. ADH021S You can use of the machine, as well as user codes, e-mail addresses, and folders in the Address Book. See Network Guide. • You can monitor machine status and change settings using a computer. • Using SmartDeviceMonitor for Admin, SmartDeviceMonitor for the DataOverWriteSecurity unit...
...Administrating the Machine/ Protecting Documents (Security Functions) Monitoring the Machine Via Computer ADH020S • You can prevent unauthorized access via the network. See Network Guide. • You can use a Web browser to make network settings. See the Web browser's Help. ADH021S You can use of the machine, as well as user codes, e-mail addresses, and folders in the Address Book. See Network Guide. • You can monitor machine status and change settings using a computer. • Using SmartDeviceMonitor for Admin, SmartDeviceMonitor for the DataOverWriteSecurity unit...

General Settings Guide
Page 9
... Deleting a User Code 72 Displaying the Counter for Each User Code 73 Printing the Counter for the Document Server 46 4. Document Server Relationship between Document Server and Other Functions 35 Document Server Display 35 Using the Document Server 36 Storing Data ...36 Changing a Stored Document's File Name, User Name, or Password 39 Selecting a Document 39 Searching for Stored Documents 40 Printing Stored Documents 41 Deleting Stored Documents 43 Viewing Stored Documents Using a Web Browser 44 Downloading Stored Documents 44 Settings for Each User Code 73 Clearing the Number...
... Deleting a User Code 72 Displaying the Counter for Each User Code 73 Printing the Counter for the Document Server 46 4. Document Server Relationship between Document Server and Other Functions 35 Document Server Display 35 Using the Document Server 36 Storing Data ...36 Changing a Stored Document's File Name, User Name, or Password 39 Selecting a Document 39 Searching for Stored Documents 40 Printing Stored Documents 41 Deleting Stored Documents 43 Viewing Stored Documents Using a Web Browser 44 Downloading Stored Documents 44 Settings for Each User Code 73 Clearing the Number...
General Settings Guide
Page 33
... the hard disk. 21 Control Panel Control Panel 1 1. Screen contrast knob Adjusts the brightness of the machine and indicate errors. M: Open Cover indicator d: Add Staple indicator. Display panel Shows the operation status, error messages, and function menus. 6. {Check Modes} key Press this key to check settings. 7. {Program} key (Copier mode) Press to register frequently used settings, or to recall registered settings. 8. {Clear Modes} key Press to clear previously entered copy job settings. 9. {Energy Saver} key Press to shift to and from Low Power mode. 10. {Interrupt} key (Copy mode...
... the hard disk. 21 Control Panel Control Panel 1 1. Screen contrast knob Adjusts the brightness of the machine and indicate errors. M: Open Cover indicator d: Add Staple indicator. Display panel Shows the operation status, error messages, and function menus. 6. {Check Modes} key Press this key to check settings. 7. {Program} key (Copier mode) Press to register frequently used settings, or to recall registered settings. 8. {Clear Modes} key Press to clear previously entered copy job settings. 9. {Energy Saver} key Press to shift to and from Low Power mode. 10. {Interrupt} key (Copy mode...
General Settings Guide
Page 34
... print documents stored on . 22 Function Status indicator 15. {Clear/Stop} key • Clear Press to delete a number entered. • Stop Press to make a single set of the above functions: • Yellow: the function is selected. • Green: the function is highlighted like . Display Panel The display panel shows machine status, error messages and function menus. The function items displayed serve as OK cannot be used. You can select or specify an item by lightly pressing them. By default the copying screen is displayed...
... print documents stored on . 22 Function Status indicator 15. {Clear/Stop} key • Clear Press to delete a number entered. • Stop Press to make a single set of the above functions: • Yellow: the function is selected. • Green: the function is highlighted like . Display Panel The display panel shows machine status, error messages and function menus. The function items displayed serve as OK cannot be used. You can select or specify an item by lightly pressing them. By default the copying screen is displayed...

General Settings Guide
Page 48
... documents. ument Server is set a password for the respective modes. When a password is deleted after operations are easy to identify the document creator and type. Keep any damage that stored the documents. It is to guess, so using the scanner function, make sure all other users. See p.64 "Auto Delete File". ❒ Before scanning documents using them . A Press the {Document Server} key. ister, you can either enter a name or use it . Important ❒ Data stored in a mode other than Document Server...
... documents. ument Server is set a password for the respective modes. When a password is deleted after operations are easy to identify the document creator and type. Keep any damage that stored the documents. It is to guess, so using the scanner function, make sure all other users. See p.64 "Auto Delete File". ❒ Before scanning documents using them . A Press the {Document Server} key. ister, you can either enter a name or use it . Important ❒ Data stored in a mode other than Document Server...

General Settings Guide
Page 49
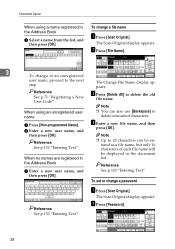
... to Print display 3 appears when all the originals have already been registered, the Change User Name display appears. To delete stored images and cancel the job, press [Stop]. ❒ When a password has been set or change a password". To use an unregistered user name, press [Non-programmed Name]. Reference See p.69 "Registering Names". 37 Reference Note ❒ To stop scanning, press the {Clear/Stop} key. To resume a paused scanning job, press [Continue] in the Address Book, the User...
... to Print display 3 appears when all the originals have already been registered, the Change User Name display appears. To delete stored images and cancel the job, press [Stop]. ❒ When a password has been set or change a password". To use an unregistered user name, press [Non-programmed Name]. Reference See p.69 "Registering Names". 37 Reference Note ❒ To stop scanning, press the {Clear/Stop} key. To resume a paused scanning job, press [Continue] in the Address Book, the User...
General Settings Guide
Page 50
... Scan Original display appears. B Press [File Name]. 3 To change to an unregistered user name, proceed to delete the old file name. Note When using a name registered in the Address Book A Select a name from the list, and then press [OK]. D Enter a new file name, and then press [OK]. B Press [Password]. 38 The Change File Name display appears. A Press [Scan Original]. the Address Book Reference A Enter a new user name, and then press [OK]. Document Server When using an unregistered user...
... Scan Original display appears. B Press [File Name]. 3 To change to an unregistered user name, proceed to delete the old file name. Note When using a name registered in the Address Book A Select a name from the list, and then press [OK]. D Enter a new file name, and then press [OK]. B Press [Password]. 38 The Change File Name display appears. A Press [Scan Original]. the Address Book Reference A Enter a new user name, and then press [OK]. Document Server When using an unregistered user...
General Settings Guide
Page 55
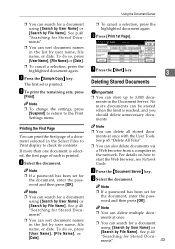
... a password has been set is reached, and you should delete unnecessary documents. Note ❒ You can search for Stored Documents". ❒ You can sort document names in the list by File Name]. A Press the {Document Server} key. See p.65 "Delete All Files". ❒ You can also delete documents via a Web browser from a computer in the Select Files to Print display to start the Web browser, see Network Guide. Note ❒ You can delete multiple documents at...
... a password has been set is reached, and you should delete unnecessary documents. Note ❒ You can search for Stored Documents". ❒ You can sort document names in the list by File Name]. A Press the {Document Server} key. See p.65 "Delete All Files". ❒ You can also delete documents via a Web browser from a computer in the Select Files to Print display to start the Web browser, see Network Guide. Note ❒ You can delete multiple documents at...
General Settings Guide
Page 59
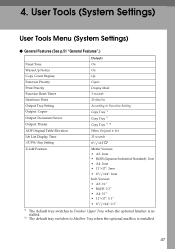
... Tools (System Settings) User Tools Menu (System Settings) ❖ General Features (See p.51 "General Features".) Default Panel Tone On Warm Up Notice On Copy Count Display Up Function Priority Copier Print Priority Display Mode Function Reset Timer 3 seconds Interleave Print 10 sheet(s) Output Tray Setting According to Function Setting Output: Copier Copy Tray *1 Output: Document Server Copy Tray *1 Output: Printer Copy Tray *1 *2 ADF Original Table Elevation When Original is Set Job List Display Time 15 seconds Size Setting 81/2"×13"L Z-fold Position...
... Tools (System Settings) User Tools Menu (System Settings) ❖ General Features (See p.51 "General Features".) Default Panel Tone On Warm Up Notice On Copy Count Display Up Function Priority Copier Print Priority Display Mode Function Reset Timer 3 seconds Interleave Print 10 sheet(s) Output Tray Setting According to Function Setting Output: Copier Copy Tray *1 Output: Document Server Copy Tray *1 Output: Printer Copy Tray *1 *2 ADF Original Table Elevation When Original is Set Job List Display Time 15 seconds Size Setting 81/2"×13"L Z-fold Position...
General Settings Guide
Page 64
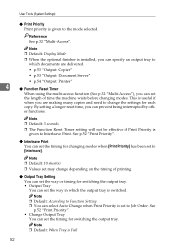
... "Output: Copier" • p.53 "Output: Document Server" • p.54 "Output: Printer" 4 ❖ Function Reset Timer When using the multi-access function (See p.32 "Multi-Access"), you can set the length of printing. ❖ Output Tray Setting You can set the way or timing for switching the output tray. • Output Tray You can set the timing for switching the output tray. er functions. User Tools (System Settings) ❖ Print Priority Print priority is given to which the output tray is Full 52 Note ❒ Default: Display Mode ❒ When the optional...
... "Output: Copier" • p.53 "Output: Document Server" • p.54 "Output: Printer" 4 ❖ Function Reset Timer When using the multi-access function (See p.32 "Multi-Access"), you can set the length of printing. ❖ Output Tray Setting You can set the way or timing for switching the output tray. • Output Tray You can set the timing for switching the output tray. er functions. User Tools (System Settings) ❖ Print Priority Print priority is given to which the output tray is Full 52 Note ❒ Default: Display Mode ❒ When the optional...
General Settings Guide
Page 69
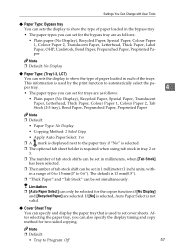
... be set for two-sided copying. After selecting the paper tray, you can set cover sheets. The default is used to set for the copier function if [No Display] and [Recycled Paper] are as follows: • Plain paper (No Display), Recycled Paper, Special Paper, Colour Paper 1, Colour Paper 2, Translucent Paper, Letterhead, Thick Paper, Label Paper, OHP, Cardstock, Bond Paper, Prepunched Paper, Preprinted Paper Note ❒ Default: No Display ❖ Paper Type: (Tray1-3, LCT) You can sets the display to show the type of paper loaded in...
... be set for two-sided copying. After selecting the paper tray, you can set cover sheets. The default is used to set for the copier function if [No Display] and [Recycled Paper] are as follows: • Plain paper (No Display), Recycled Paper, Special Paper, Colour Paper 1, Colour Paper 2, Translucent Paper, Letterhead, Thick Paper, Label Paper, OHP, Cardstock, Bond Paper, Prepunched Paper, Preprinted Paper Note ❒ Default: No Display ❖ Paper Type: (Tray1-3, LCT) You can sets the display to show the type of paper loaded in...
General Settings Guide
Page 70
User Tools (System Settings) ❒ Functions using the Cover Sheet Tray setting are front cover function and front/back cover function. ❒ When [At Mode Selected] is selected, the cover sheet tray settings are only displayed when the cover function or slip sheet function is selected. Reference "Slip Sheets", Copy Reference ❖ Printer Bypass Paper Size You can be copied when using the number keys. Note ❒ Default: 1 minute(s) ❒ When in "Off mode" or "Sleep mode", the machine is ready for two-sided copying. 4 Note ❒ Default: •...
User Tools (System Settings) ❒ Functions using the Cover Sheet Tray setting are front cover function and front/back cover function. ❒ When [At Mode Selected] is selected, the cover sheet tray settings are only displayed when the cover function or slip sheet function is selected. Reference "Slip Sheets", Copy Reference ❖ Printer Bypass Paper Size You can be copied when using the number keys. Note ❒ Default: 1 minute(s) ❒ When in "Off mode" or "Sleep mode", the machine is ready for two-sided copying. 4 Note ❒ Default: •...
General Settings Guide
Page 85
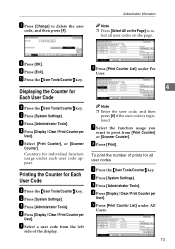
... Counters for all user codes on the Page] to delete the user code, and then press [#]. B Press [System Settings]. E Select [Print Counter], or [Scanner Counter]. Printing the Counter for Each User Code A Press the {User Tools/Counter} key. I Press [Exit]. D Press [Display / Clear / Print Counter per User]. C Press [Administrator Tools]. G Select the function usage you want to print from the left side of prints for individual function usage under All Users. 73 E Press [Print Counter List] under each user code appear. lect all user codes A Press the {User Tools/Counter...
... Counters for all user codes on the Page] to delete the user code, and then press [#]. B Press [System Settings]. E Select [Print Counter], or [Scanner Counter]. Printing the Counter for Each User Code A Press the {User Tools/Counter} key. I Press [Exit]. D Press [Display / Clear / Print Counter per User]. C Press [Administrator Tools]. G Select the function usage you want to print from the left side of prints for individual function usage under All Users. 73 E Press [Print Counter List] under each user code appear. lect all user codes A Press the {User Tools/Counter...
General Settings Guide
Page 91
... already specified your user name and password in Default User Name/Password (Send) of File Transfer settings applies. N Confirm that you can ei- Note ❒ If the format of Folder Authentication. Press [Exit], and then enter the path again. word. I Enter the login user name, and then press [OK]. Note ❒ If you have specified in steps F to L, the Browse Network display only lists client computers you...
... already specified your user name and password in Default User Name/Password (Send) of File Transfer settings applies. N Confirm that you can ei- Note ❒ If the format of Folder Authentication. Press [Exit], and then enter the path again. word. I Enter the login user name, and then press [OK]. Note ❒ If you have specified in steps F to L, the Browse Network display only lists client computers you...
General Settings Guide
Page 93
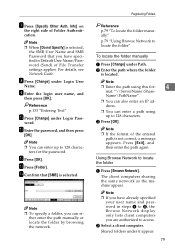
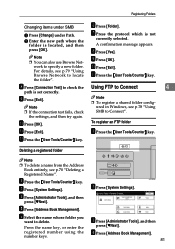
... also use Browse Network to Connect 4 path is set correctly. I Press [Exit]. H Press [Connection Test] to check the Using FTP to specify a new folder. I Press [OK]. Note ❒ If the connection test fails, check the settings, and then try again. J Press [OK]. A Press the {User Tools/Counter} key. L Press the {User Tools/Counter} key. Deleting a registered folder Note ❒ To delete a name from the Address Book entirely, see p.78 "Using SMB to locate the folder". A Press the {User Tools/Counter} key. E Select...
... also use Browse Network to Connect 4 path is set correctly. I Press [Exit]. H Press [Connection Test] to check the Using FTP to specify a new folder. I Press [OK]. Note ❒ If the connection test fails, check the settings, and then try again. J Press [OK]. A Press the {User Tools/Counter} key. L Press the {User Tools/Counter} key. Deleting a registered folder Note ❒ To delete a name from the Address Book entirely, see p.78 "Using SMB to locate the folder". A Press the {User Tools/Counter} key. E Select...

General Settings Guide
Page 94
... Network Guide. G Press [Specify Other Auth. For details, see p.69 "Registering a Name". F Press [Auth. Info] on the right side of Authentication. 4 Note ❒ When [Do not Specify] is assumed to be the current working directory. ❒ You can also enter an IP address. ❒ You can enter an absolute path, using up to locate the folder" O Press [Change] under Login Pass- K Enter the password...
... Network Guide. G Press [Specify Other Auth. For details, see p.69 "Registering a Name". F Press [Auth. Info] on the right side of Authentication. 4 Note ❒ When [Do not Specify] is assumed to be the current working directory. ❒ You can also enter an IP address. ❒ You can enter an absolute path, using up to locate the folder" O Press [Change] under Login Pass- K Enter the password...
General Settings Guide
Page 106
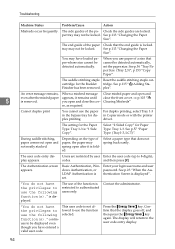
... use the paper in Copier mode or with the printer driver. Check the side guides are restricted by user Enter the user code (up to be displayed even though you open and not neatly stacked. The saddle stitching staple Reset the saddle stitching staple carcartridge for Paper Type: Tray 1-3. Clear misfed paper and open and close the cover, as required. During saddle stitching, paper comes out open and close the front cover. ⇒ p.103 "x Clearing Misfeeds" Cannot duplex print...
... use the paper in Copier mode or with the printer driver. Check the side guides are restricted by user Enter the user code (up to be displayed even though you open and not neatly stacked. The saddle stitching staple Reset the saddle stitching staple carcartridge for Paper Type: Tray 1-3. Clear misfed paper and open and close the cover, as required. During saddle stitching, paper comes out open and close the front cover. ⇒ p.103 "x Clearing Misfeeds" Cannot duplex print...
General Settings Guide
Page 171
..., 156 Paper tray, 18 Paper Tray Priority Copier, 56 Printer, 56 Paper Type Bypass tray, 57 LCT, 57 Tray 1, 57 Tray 2, 57 Tray 3, 57 Password Changing, 39 Setting or changing, 38 Power Turning Off, 26 Turning On, 25 Power Connection, 128 Print Address Book Destination List, 64 Printer Bypass Paper Size, 58 Printing the Counter for each user code, 73 Printing the First Page, 43 Print Priority, 52 Program/ Change Administrator, 61 Program/ Change LDAP Server, 65 {Program} key, 21 Protection code, 89, 90 destination, 89 Punch Unit, 148 Punch Waste Removing, 121 R Recommended Paper Sizes and Types...
..., 156 Paper tray, 18 Paper Tray Priority Copier, 56 Printer, 56 Paper Type Bypass tray, 57 LCT, 57 Tray 1, 57 Tray 2, 57 Tray 3, 57 Password Changing, 39 Setting or changing, 38 Power Turning Off, 26 Turning On, 25 Power Connection, 128 Print Address Book Destination List, 64 Printer Bypass Paper Size, 58 Printing the Counter for each user code, 73 Printing the First Page, 43 Print Priority, 52 Program/ Change Administrator, 61 Program/ Change LDAP Server, 65 {Program} key, 21 Protection code, 89, 90 destination, 89 Punch Unit, 148 Punch Waste Removing, 121 R Recommended Paper Sizes and Types...


