
Setup Guide
Page 1
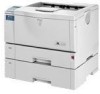
For safe and correct use, please be sure to the Printer 2 Setting Up 3 Installing Options 4 Connecting the Printer 5 Configuration 6 Installing the Printer Driver Read this product and keep it handy for future reference. Setup Guide 1 Guide to read the Safety Information in this manual before you use this manual carefully before using the machine.
For safe and correct use, please be sure to the Printer 2 Setting Up 3 Installing Options 4 Connecting the Printer 5 Configuration 6 Installing the Printer Driver Read this product and keep it handy for future reference. Setup Guide 1 Guide to read the Safety Information in this manual before you use this manual carefully before using the machine.
Setup Guide
Page 2
..., left side, front facing. The machine contains 7 milliwatt, 645 - 660 nanometer wavelength, A1GaInp Laser Diode. Important Contents of this manual in this manual carefully before using the machine. For details, please contact your safety and benefit, read this manual. Introduction This manual contains detailed instructions and notes on the operation and use of this machine...
..., left side, front facing. The machine contains 7 milliwatt, 645 - 660 nanometer wavelength, A1GaInp Laser Diode. Important Contents of this manual in this manual carefully before using the machine. For details, please contact your safety and benefit, read this manual. Introduction This manual contains detailed instructions and notes on the operation and use of this machine...

Setup Guide
Page 3
... Checking the Contents of RWARNING and RCAUTION labels 6 ENERGY STAR Program 7 Manuals for This Printer 8 How to Read This Manual 9 1. Setting Up Where to the Printer Exterior ...11 Inside...13 Control Panel...14 2. Connecting the Printer Network Connection 55 USB Connection 57 Parallel Connection 58 IEEE 1394 Connection 59 i TABLE OF CONTENTS Trademarks...1 Safety Information...
... Checking the Contents of RWARNING and RCAUTION labels 6 ENERGY STAR Program 7 Manuals for This Printer 8 How to Read This Manual 9 1. Setting Up Where to the Printer Exterior ...11 Inside...13 Control Panel...14 2. Connecting the Printer Network Connection 55 USB Connection 57 Parallel Connection 58 IEEE 1394 Connection 59 i TABLE OF CONTENTS Trademarks...1 Safety Information...

Setup Guide
Page 6
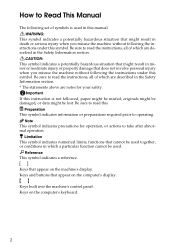
Indicates a potentially hazardous situation which , if instructions are not followed, may result in death or serious injury. In this manual, the following safety precautions should always be followed. Safety Information When using your printer, the following important symbols are used: Indicates a potentially hazardous situation which , if instructions are not followed, could result in minor or moderate injury or damage to property. 2
Indicates a potentially hazardous situation which , if instructions are not followed, may result in death or serious injury. In this manual, the following safety precautions should always be followed. Safety Information When using your printer, the following important symbols are used: Indicates a potentially hazardous situation which , if instructions are not followed, could result in minor or moderate injury or damage to property. 2

Setup Guide
Page 7
...to an open flame. These actions could give you dispose of the used toner cartridges yourself, dispose of them according to this manual. Also, if the machine has laser systems, direct (or indirect) reflected eye contact with wet hands. • Do not remove any modifications to local regulations. &#...8226; Do not store toner, used toner. There is a risk of serious eye damage. • Be sure to turn off the power switch and wait for the printer...
...to an open flame. These actions could give you dispose of the used toner cartridges yourself, dispose of them according to this manual. Also, if the machine has laser systems, direct (or indirect) reflected eye contact with wet hands. • Do not remove any modifications to local regulations. &#...8226; Do not store toner, used toner. There is a risk of serious eye damage. • Be sure to turn off the power switch and wait for the printer...
Setup Guide
Page 12
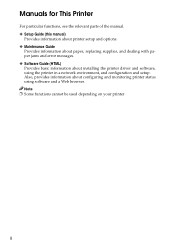
Note ❒ Some functions cannot be used depending on your printer. 8 Manuals for This Printer For particular functions, see the relevant parts of the manual. ❖ Setup Guide (this manual) Provides information about printer setup and options. ❖ Maintenance Guide Provides information about paper, replacing supplies, and dealing with paper jams and error messages. ❖ Software Guide...
Note ❒ Some functions cannot be used depending on your printer. 8 Manuals for This Printer For particular functions, see the relevant parts of the manual. ❖ Setup Guide (this manual) Provides information about printer setup and options. ❖ Maintenance Guide Provides information about paper, replacing supplies, and dealing with paper jams and error messages. ❖ Software Guide...
Setup Guide
Page 13
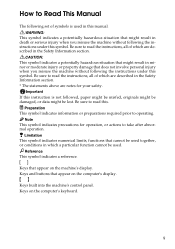
...Safety Information section. * The statements above are described in death or serious injury when you misuse the machine without following the instructions under this manual. If this instruction is used . Keys on the machine's display. This symbol indicates a reference. Keys and buttons that appear on the ...paper might be misfed, originals might be damaged, or data might result in the Safety Information section. Be sure to Read This Manual The following the instructions under this . How to read the instructions, all of which are notes for operation, or actions to read...
...Safety Information section. * The statements above are described in death or serious injury when you misuse the machine without following the instructions under this manual. If this instruction is used . Keys on the machine's display. This symbol indicates a reference. Keys and buttons that appear on the ...paper might be misfed, originals might be damaged, or data might result in the Safety Information section. Be sure to Read This Manual The following the instructions under this . How to read the instructions, all of which are notes for operation, or actions to read...

Setup Guide
Page 24
Important 20 ❒ Lower the machine slowly and carefully to prevent trapping your computer. ❖ Manuals and CD-ROMs Setup Guide (This manual) Maintenance Guide CD-ROM "Printer Drivers and Utilities" CD-ROM "Display-Version Manuals (HTML)" CD-ROM "Print-Version Manuals (PDF)" ❖ Parts Power Cable Paper Tray Cover AGN100S Additional Documentation B Remove the plastic...
Important 20 ❒ Lower the machine slowly and carefully to prevent trapping your computer. ❖ Manuals and CD-ROMs Setup Guide (This manual) Maintenance Guide CD-ROM "Printer Drivers and Utilities" CD-ROM "Display-Version Manuals (HTML)" CD-ROM "Print-Version Manuals (PDF)" ❖ Parts Power Cable Paper Tray Cover AGN100S Additional Documentation B Remove the plastic...

Setup Guide
Page 77
Install the Operating Instructions Install the Operating Instructions The CD-ROM provided with the printer contains an HTML Operating Instructions Manual in the [Start] menu, select your printer driver, and then click [Uninstall]. Follow the above instructions to complete the installation. B Insert the CD-ROM into the CD-ROM drive. 6 The installer starts. ...
Install the Operating Instructions Install the Operating Instructions The CD-ROM provided with the printer contains an HTML Operating Instructions Manual in the [Start] menu, select your printer driver, and then click [Uninstall]. Follow the above instructions to complete the installation. B Insert the CD-ROM into the CD-ROM drive. 6 The installer starts. ...
Maintenance Manual
Page 1
Maintenance Guide 1 Paper and Other Media 2 Replacing Consumables and Maintenance Kit 3 Cleaning the Printer 4 Adjusting the Printer 5 Troubleshooting 6 Removing Misfed Paper 7 Appendix Read this product and keep it handy for future reference. For safe and correct use, please be sure to read the Safety Information in the "Setup Guide" before you use this manual carefully before using the machine.
Maintenance Guide 1 Paper and Other Media 2 Replacing Consumables and Maintenance Kit 3 Cleaning the Printer 4 Adjusting the Printer 5 Troubleshooting 6 Removing Misfed Paper 7 Appendix Read this product and keep it handy for future reference. For safe and correct use, please be sure to read the Safety Information in the "Setup Guide" before you use this manual carefully before using the machine.

Maintenance Manual
Page 2
Keep this machine. Introduction This manual contains detailed instructions and notes on the operation and use of this manual in a handy place for quick reference. For your safety and benefit, read this manual carefully before using the machine.
Keep this machine. Introduction This manual contains detailed instructions and notes on the operation and use of this manual in a handy place for quick reference. For your safety and benefit, read this manual carefully before using the machine.

Maintenance Manual
Page 3
... the Paper Feed Rollers 37 Replacing the Fusing Unit 39 3. Adjusting the Printer Adjusting the Image Density 49 Adjusting Tray Registration 50 5. Troubleshooting Error & Status Messages on the Control Panel 53 Printer Does Not Print 59 Checking the port connection 61 Other Printing Problems 63... 9 Paper not supported by this printer 11 Print Area ...12 Loading Paper ...13 Loading Paper in Tray 1 and the optional paper feed unit 13 Loading Paper in the Bypass Tray 19 Loading Envelopes 24 Switching between Paper Trays 28 2. Cleaning the Printer Cautions to Read This Manual 2 1.
... the Paper Feed Rollers 37 Replacing the Fusing Unit 39 3. Adjusting the Printer Adjusting the Image Density 49 Adjusting Tray Registration 50 5. Troubleshooting Error & Status Messages on the Control Panel 53 Printer Does Not Print 59 Checking the port connection 61 Other Printing Problems 63... 9 Paper not supported by this printer 11 Print Area ...12 Loading Paper ...13 Loading Paper in Tray 1 and the optional paper feed unit 13 Loading Paper in the Bypass Tray 19 Loading Envelopes 24 Switching between Paper Trays 28 2. Cleaning the Printer Cautions to Read This Manual 2 1.
Maintenance Manual
Page 6
How to Read This Manual The following set of which are notes for operation, or actions to take after abnormal operation. Be sure to read this. Be sure to read ... computer's display. This symbol indicates a potentially hazardous situation that does not involve personal injury when you misuse the machine without following the instructions under this manual. Keys and buttons that cannot be lost. This symbol indicates precautions for your safety. Be sure to operating. Keys on the computer's keyboard. 2 This symbol...
How to Read This Manual The following set of which are notes for operation, or actions to take after abnormal operation. Be sure to read this. Be sure to read ... computer's display. This symbol indicates a potentially hazardous situation that does not involve personal injury when you misuse the machine without following the instructions under this manual. Keys and buttons that cannot be lost. This symbol indicates precautions for your safety. Be sure to operating. Keys on the computer's keyboard. 2 This symbol...
Maintenance Manual
Page 7
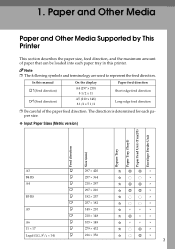
...216 × 356 × × × × × × × × × × × × × × × × 3 In this printer. Note ❒ The following symbols and terminology are used to represent the feed direction. The direction is determined for each paper tray in this... manual K↑(Feed direction) L↑(Feed direction) On the display A4 (297 x 210) 8 1/2 x 11 A5 (210 x 148) 8 1/2 x 5 1/2 Paper ...
...216 × 356 × × × × × × × × × × × × × × × × 3 In this printer. Note ❒ The following symbols and terminology are used to represent the feed direction. The direction is determined for each paper tray in this... manual K↑(Feed direction) L↑(Feed direction) On the display A4 (297 x 210) 8 1/2 x 11 A5 (210 x 148) 8 1/2 x 5 1/2 Paper ...
Maintenance Manual
Page 47
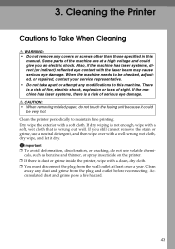
.... If you an electric shock. Some parts of sight. If the machine has laser systems, there is a risk of fire, electric shock, explosion or loss of the machine are at least once a year. Clean the printer periodically to this manual. Clean away any dust and grime from the wall outlet at a high voltage...
.... If you an electric shock. Some parts of sight. If the machine has laser systems, there is a risk of fire, electric shock, explosion or loss of the machine are at least once a year. Clean the printer periodically to this manual. Clean away any dust and grime from the wall outlet at a high voltage...

Maintenance Manual
Page 93
...Adjusting Tray Registration, 50 Appendix, 79 B Bluetooth Interface Unit Type C, 88 C Cleaning the Friction Pad, 44 Cleaning the Paper Feed Roller, 45 Cleaning the Printer, 43 Cleaning the Registration Roller, 47 Consumables, 81 D Display panel, messages, 53 Duplex Unit AD610, 86 E Envelope Feeder Type 610, 86 Envelope Feeder... 25 Envelopes, 10 Error, 53 F Friction Pad, 33, 44, 82 Fusing Unit, 39, 82 H Hard Disk Drive Type 2600, 86 How to Read This Manual, 2 L Loading Envelopes, 24 Bypass Tray, 24 Envelope Feeder Unit, 25 Loading Paper, 8 Bypass Tray, 20 Optional Paper Feed Unit, 13 Tray 1, 13 M...
...Adjusting Tray Registration, 50 Appendix, 79 B Bluetooth Interface Unit Type C, 88 C Cleaning the Friction Pad, 44 Cleaning the Paper Feed Roller, 45 Cleaning the Printer, 43 Cleaning the Registration Roller, 47 Consumables, 81 D Display panel, messages, 53 Duplex Unit AD610, 86 E Envelope Feeder Type 610, 86 Envelope Feeder... 25 Envelopes, 10 Error, 53 F Friction Pad, 33, 44, 82 Fusing Unit, 39, 82 H Hard Disk Drive Type 2600, 86 How to Read This Manual, 2 L Loading Envelopes, 24 Bypass Tray, 24 Envelope Feeder Unit, 25 Loading Paper, 8 Bypass Tray, 20 Optional Paper Feed Unit, 13 Tray 1, 13 M...


