
Setup Guide
Page 3
... Interface Unit Type C 47 Attaching Hard Disk Drive Type 2600 51 Attaching Network Data Protection Unit Type B 52 Attaching Duplex Unit AD610 53 4. Connecting the Printer Network Connection 55 USB Connection 57 Parallel Connection 58 IEEE 1394 Connection 59 i Guide to Put the... Printer 17 Unpacking the Printer and Checking the Contents of RWARNING and RCAUTION labels 6 ENERGY STAR Program 7 Manuals for This Printer 8 How to Read This Manual 9 1. Setting Up Where to the Printer Exterior ...11 Inside...13 Control Panel...14 2. ...
... Interface Unit Type C 47 Attaching Hard Disk Drive Type 2600 51 Attaching Network Data Protection Unit Type B 52 Attaching Duplex Unit AD610 53 4. Connecting the Printer Network Connection 55 USB Connection 57 Parallel Connection 58 IEEE 1394 Connection 59 i Guide to Put the... Printer 17 Unpacking the Printer and Checking the Contents of RWARNING and RCAUTION labels 6 ENERGY STAR Program 7 Manuals for This Printer 8 How to Read This Manual 9 1. Setting Up Where to the Printer Exterior ...11 Inside...13 Control Panel...14 2. ...
Setup Guide
Page 16
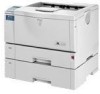
A malfunction may occur due to overheating. 17. Remove to install the optional duplex unit or to the board. 12 A malfunction may occur the other end of plain paper (80 g/m2, 20 lb.) into the printer. Front Cover Release Button Use this tray for printing. Paper Tray (Tray 1) Loads up... "Tray 1" on and off. 16. Important ❒ Do not block or obstruct the ventilators. Guide to overheating. 15. due to the Printer 8. Paper Tray Cover Attach it out to open the front cover. Friction Pad This is fed into this button to install some options. Clean the...
A malfunction may occur due to overheating. 17. Remove to install the optional duplex unit or to the board. 12 A malfunction may occur the other end of plain paper (80 g/m2, 20 lb.) into the printer. Front Cover Release Button Use this tray for printing. Paper Tray (Tray 1) Loads up... "Tray 1" on and off. 16. Important ❒ Do not block or obstruct the ventilators. Guide to overheating. 15. due to the Printer 8. Paper Tray Cover Attach it out to open the front cover. Friction Pad This is fed into this button to install some options. Clean the...

Setup Guide
Page 34
Up to two paper feed unit. Install the module to the bottom of the printer. The 1394 interface unit, IEEE 802.11b interface unit or Bluetooth interface unit cannot be loaded. G Attach the duplex unit (Duplex Unit AD610). D Install the 1394 interface unit, 802.11b interface unit or Bluetooth ...the paper feed unit to the SDRAM module slot on the controller board. F Install the Network Data Protection Unit Type B. One of the printer. 30 B Attach the envelope feeder (Envelope Feeder Type 610). 3 Replace the paper tray of paper can be used at the same time....
Up to two paper feed unit. Install the module to the bottom of the printer. The 1394 interface unit, IEEE 802.11b interface unit or Bluetooth interface unit cannot be loaded. G Attach the duplex unit (Duplex Unit AD610). D Install the 1394 interface unit, 802.11b interface unit or Bluetooth ...the paper feed unit to the SDRAM module slot on the controller board. F Install the Network Data Protection Unit Type B. One of the printer. 30 B Attach the envelope feeder (Envelope Feeder Type 610). 3 Replace the paper tray of paper can be used at the same time....
Setup Guide
Page 35
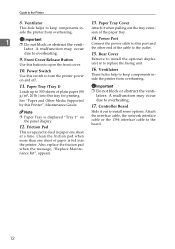
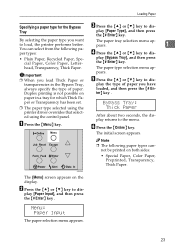
...Unit Type 610 (Tray 2 or Tray 3) You can accommodate two optional paper feed units. The envelope Feeder unit can be used. ❒ Your printer can load up to 500 sheets (60-105 g/m2, 16-28 lb.) of plain paper into the optional paper feed unit. See p.33 "...can print on the display. 2. Note ❒ The envelope feeder is displayed "Tray 3" on both sides of the printer. Installing Options Install options in the positions shown in "Tray 2". Duplex Unit AD610 (duplex unit) You can be attached. ❒ Top-most optional paper feed unit is displayed "Tray 2" and bottommost is ...
...Unit Type 610 (Tray 2 or Tray 3) You can accommodate two optional paper feed units. The envelope Feeder unit can be used. ❒ Your printer can load up to 500 sheets (60-105 g/m2, 16-28 lb.) of plain paper into the optional paper feed unit. See p.33 "...can print on the display. 2. Note ❒ The envelope feeder is displayed "Tray 3" on both sides of the printer. Installing Options Install options in the positions shown in "Tray 2". Duplex Unit AD610 (duplex unit) You can be attached. ❒ Top-most optional paper feed unit is displayed "Tray 2" and bottommost is ...

Setup Guide
Page 40
... not subject the memory unit to physical shocks. ❒ If a printer hard disk is attached, push down the lever on right side ( ) and pull out the duplex unit until it and insert the memory unit. ZKGX370E ZKGX320E If the duplex unit is not attached, go to discharge ler board. ler board. ...C Remove the two screws holding the controller board in the printer driver. Note tion or a burn. ❒ Use a coin or similar object if the 3 Important ...
... not subject the memory unit to physical shocks. ❒ If a printer hard disk is attached, push down the lever on right side ( ) and pull out the duplex unit until it and insert the memory unit. ZKGX370E ZKGX320E If the duplex unit is not attached, go to discharge ler board. ler board. ...C Remove the two screws holding the controller board in the printer driver. Note tion or a burn. ❒ Use a coin or similar object if the 3 Important ...

Setup Guide
Page 42
...256 MB). Note ❒ Be sure to return the provided screwdriver to its original position on the inside of the duplex unit, and then slide the duplex unit in until it properly even after reinstallation, contact your sales or service representative. Installing Options L Fasten the controller... board to the printer with the two screws. 3 ZKGX270E M Align the power cable to the printer. ZKGX243E If the duplex unit is not attached, this step is connected to the left side groove of the front...
...256 MB). Note ❒ Be sure to return the provided screwdriver to its original position on the inside of the duplex unit, and then slide the duplex unit in until it properly even after reinstallation, contact your sales or service representative. Installing Options L Fasten the controller... board to the printer with the two screws. 3 ZKGX270E M Align the power cable to the printer. ZKGX243E If the duplex unit is not attached, this step is connected to the left side groove of the front...

Setup Guide
Page 44
... board out. E Pull out the handle of the control- ZKGX260E G Place the controller board on right side ( ) and pull out the duplex Unit until it stops ( ). Installing Options C If the duplex unit is not attached, go to the following steps. D Remove the two screws holding the controller board in fastening the controller...
... board out. E Pull out the handle of the control- ZKGX260E G Place the controller board on right side ( ) and pull out the duplex Unit until it stops ( ). Installing Options C If the duplex unit is not attached, go to the following steps. D Remove the two screws holding the controller board in fastening the controller...

Setup Guide
Page 46
..."List/Test Print" menu. Installing Options M Fasten the controller board to the printer with the two screws. 3 ZKGX272E N Align the power cable to the left side groove of the duplex unit, and then slide the duplex unit in until it is installed properly, you will see "IEEE1394" for "...Controller Option". ❒ You need to the printer. Reference For printing the configuration page, see p.28 "Test Printing"....
..."List/Test Print" menu. Installing Options M Fasten the controller board to the printer with the two screws. 3 ZKGX272E N Align the power cable to the left side groove of the duplex unit, and then slide the duplex unit in until it is installed properly, you will see "IEEE1394" for "...Controller Option". ❒ You need to the printer. Reference For printing the configuration page, see p.28 "Test Printing"....

Setup Guide
Page 47
...physical shocks. power cable and the interface cable. C ❒ Do not subject the 802.11b interface If the duplex unit is not attached, go to the following : ( ) and pull out the duplex unit until it stops ( ). ❖ 802.11b Interface Unit Type F • Interface Unit • ...Card ZKGX320E If the duplex unit is attached, unit to B Turn off the power of the controller board compartment. and then unplug the printer's Static electricity can damage the 802.11b interface unit. push down the lever on right side...
...physical shocks. power cable and the interface cable. C ❒ Do not subject the 802.11b interface If the duplex unit is not attached, go to the following : ( ) and pull out the duplex unit until it stops ( ). ❖ 802.11b Interface Unit Type F • Interface Unit • ...Card ZKGX320E If the duplex unit is attached, unit to B Turn off the power of the controller board compartment. and then unplug the printer's Static electricity can damage the 802.11b interface unit. push down the lever on right side...

Setup Guide
Page 50
... in until it properly even after reinstallation, contact your sales or service representative. ❒ You need to the printer. 3 ZKGX243E If the duplex unit is not attached, this step is not necessary. Note ❒ After finishing installation, you cannot install it is connected to make settings with the ...
... in until it properly even after reinstallation, contact your sales or service representative. ❒ You need to the printer. 3 ZKGX243E If the duplex unit is not attached, this step is not necessary. Note ❒ After finishing installation, you cannot install it is connected to make settings with the ...

Setup Guide
Page 51
... or a burn. • Card Important ❒ When using the printer with the Bluetooth interface unit installed, Bluetooth needs to be installed on right side ( ) and then pull out the duplex unit until it stops ( ). C If the duplex unit is not attached, go to the following : ❖ Bluetooth ...Interface Unit Type C • Interface Unit B Turn off the power of the printer, and then unplug the printer's power cable and the interface cable. ...
... or a burn. • Card Important ❒ When using the printer with the Bluetooth interface unit installed, Bluetooth needs to be installed on right side ( ) and then pull out the duplex unit until it stops ( ). C If the duplex unit is not attached, go to the following : ❖ Bluetooth ...Interface Unit Type C • Interface Unit B Turn off the power of the printer, and then unplug the printer's power cable and the interface cable. ...

Setup Guide
Page 54
... the card with the two screws. Installing Options N Fasten the controller board to the printer with the side that has both corners of the duplex unit, and then slide the duplex unit in until it is not installed properly, repeat the procedure from the "List/Test... Bluetooth interface unit is connected to the printer. 3 ZKGX602E O Press the antenna to extend it properly even after reinstallation, contact your sales or service representative. Note ❒ After finishing installation, you cannot install it . ZKGX604E ZKGX240E If the duplex unit is not attached, this step is...
... the card with the two screws. Installing Options N Fasten the controller board to the printer with the side that has both corners of the duplex unit, and then slide the duplex unit in until it is not installed properly, repeat the procedure from the "List/Test... Bluetooth interface unit is connected to the printer. 3 ZKGX602E O Press the antenna to extend it properly even after reinstallation, contact your sales or service representative. Note ❒ After finishing installation, you cannot install it . ZKGX604E ZKGX240E If the duplex unit is not attached, this step is...
Setup Guide
Page 57
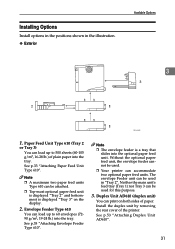
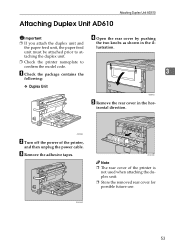
ZKGX310E 53 lustration. ❒ Check the printer nameplate to attaching the duplex unit. A Check the package contains the 3 following: ❖ Duplex Unit AGN004S E Remove the rear cover in the il- izontal direction. AGN036S B Turn off the power of the printer is not used when attaching the duplex unit. ❒ Store the removed rear cover for possible...
ZKGX310E 53 lustration. ❒ Check the printer nameplate to attaching the duplex unit. A Check the package contains the 3 following: ❖ Duplex Unit AGN004S E Remove the rear cover in the il- izontal direction. AGN036S B Turn off the power of the printer is not used when attaching the duplex unit. ❒ Store the removed rear cover for possible...

Setup Guide
Page 58
... Options F Align the power cable to the left side groove of the duplex unit, and then slide the duplex unit in the column of configuration options, then it has been properly installed. ❒ If the duplex unit is not installed properly, repeat the procedure from the "List/Test ...Print" menu. Reference For printing the configuration page, see "Adjusting Tray Registration", Maintenance Guide. If the new device is listed in until it is connected to the printer. 3 ZKGX231E ZKGX240E Note ...
... Options F Align the power cable to the left side groove of the duplex unit, and then slide the duplex unit in the column of configuration options, then it has been properly installed. ❒ If the duplex unit is not installed properly, repeat the procedure from the "List/Test ...Print" menu. Reference For printing the configuration page, see "Adjusting Tray Registration", Maintenance Guide. If the new device is listed in until it is connected to the printer. 3 ZKGX231E ZKGX240E Note ...
Setup Guide
Page 78
... 1394 Configuration, 68 IEEE 802.11b (Wireless LAN) Configuration, 64 Configuration Page, 28 Connecting the Printer IEEE 1394 Connection, 59 Network Connection, 55 Parallel Connection, 58 USB Connection, 57 D Display Language, 27 Duplex Unit AD610, 53 E Energy Star, 7 Envelope Feeder Type 610, 35 Ethernet, 55, 61... Ethernet Port, 55 G Guide to the Printer Control Panel, 14 Exterior, 11 Inside, 13 H Hard Disk Drive, 51 I ...
... 1394 Configuration, 68 IEEE 802.11b (Wireless LAN) Configuration, 64 Configuration Page, 28 Connecting the Printer IEEE 1394 Connection, 59 Network Connection, 55 Parallel Connection, 58 USB Connection, 57 D Display Language, 27 Duplex Unit AD610, 53 E Energy Star, 7 Envelope Feeder Type 610, 35 Ethernet, 55, 61... Ethernet Port, 55 G Guide to the Printer Control Panel, 14 Exterior, 11 Inside, 13 H Hard Disk Drive, 51 I ...

Maintenance Manual
Page 4
6. Removing Misfed Paper Removing Misfed Paper 69 When "Remove Misfeed Paper Tray" Appears 70 When "Remove Misfeed Internal Path" Appears 71 When "Remove Misfeed Paper Exit Cover" Appears 73 When "Remove Misfeed Duplex Unit" Appears 76 7. Appendix Moving and Transporting the Printer 79 Moving the Printer ...80 Consumables ...81 Toner Cartridge ...81 Maintenance Kit ...82 Specifications...83 Mainframe ...83 Options ...86 INDEX...89 ii
6. Removing Misfed Paper Removing Misfed Paper 69 When "Remove Misfeed Paper Tray" Appears 70 When "Remove Misfeed Internal Path" Appears 71 When "Remove Misfeed Paper Exit Cover" Appears 73 When "Remove Misfeed Duplex Unit" Appears 76 7. Appendix Moving and Transporting the Printer 79 Moving the Printer ...80 Consumables ...81 Toner Cartridge ...81 Maintenance Kit ...82 Specifications...83 Mainframe ...83 Options ...86 INDEX...89 ii
Maintenance Manual
Page 27
...Plain Paper, Recycled Paper, Special Paper, Color Paper, Letter- F Press the {Online} key. AGN503S The [Menu] screen appears on ter} key . Duplex printing is not possible on the display. Note ❒ The following paper types: D Press the {U} or {T} key to dis- The paper tray selection ...Important ❒ When you have always specify the type of paper. Bypass Tray: ❒ The paper type selected using the Thick Paper printer driver overrides that selected using the control panel. B Press the {U} or {T} key to the menu. The paper type selection menu ap...
...Plain Paper, Recycled Paper, Special Paper, Color Paper, Letter- F Press the {Online} key. AGN503S The [Menu] screen appears on ter} key . Duplex printing is not possible on the display. Note ❒ The following paper types: D Press the {U} or {T} key to dis- The paper tray selection ...Important ❒ When you have always specify the type of paper. Bypass Tray: ❒ The paper type selected using the Thick Paper printer driver overrides that selected using the control panel. B Press the {U} or {T} key to the menu. The paper type selection menu ap...
Maintenance Manual
Page 41
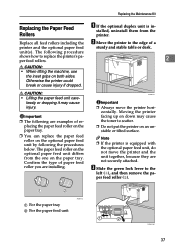
... ❒ Do not put the printer on down may cause injury. Moving the printer facing up on an unstable or tilted... paper tray. AGN021S Important ❒ Always move the printer and the unit together, because they are not securely ...of a printer and the optional paper feed sturdy and stable table or desk. Note ❒ If the printer is in...feed unit differs from the printer. lessly or dropping it may cause the toner to replace the printer's paper feed rollers. 2...B Replace all feed rollers including the Move the printer to the left ( ), and then remove the paper feed roller ( ...
... ❒ Do not put the printer on down may cause injury. Moving the printer facing up on an unstable or tilted... paper tray. AGN021S Important ❒ Always move the printer and the unit together, because they are not securely ...of a printer and the optional paper feed sturdy and stable table or desk. Note ❒ If the printer is in...feed unit differs from the printer. lessly or dropping it may cause the toner to replace the printer's paper feed rollers. 2...B Replace all feed rollers including the Move the printer to the left ( ), and then remove the paper feed roller ( ...
Maintenance Manual
Page 42
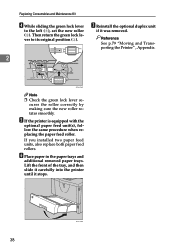
...also replace both paper feed rollers. F Place paper in the paper trays and additional removed paper trays. Reference See p.79 "Moving and Transporting the Printer" , Appendix. 2 ZKGM130E Note ❒ Check the green lock lever se- Then return the green lock le- cures the roller correctly by making... sure the new roller rotates smoothly. G Reinstall the optional duplex unit if it stops. 38 ZKGY150E Lift the front of the tray, and then slide it carefully into the printer until it was removed. E If the printer is equipped with the optional paper feed unit(s), follow the ...
...also replace both paper feed rollers. F Place paper in the paper trays and additional removed paper trays. Reference See p.79 "Moving and Transporting the Printer" , Appendix. 2 ZKGM130E Note ❒ Check the green lock lever se- Then return the green lock le- cures the roller correctly by making... sure the new roller rotates smoothly. G Reinstall the optional duplex unit if it stops. 38 ZKGY150E Lift the front of the tray, and then slide it carefully into the printer until it was removed. E If the printer is equipped with the optional paper feed unit(s), follow the ...
Maintenance Manual
Page 44
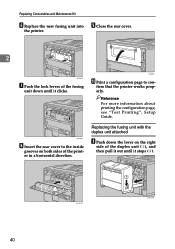
... page to the inside grooves on the right side of the printer in a horizontal direction. AGN009S H Insert the rear cover to con- firm that the printer works properly. Replacing the fusing unit with the duplex unit attached A Push down until it clicks. Replacing Consumables and... Maintenance Kit F Replace the new fusing unit into the printer. Reference For more information about printing the ...
... page to the inside grooves on the right side of the printer in a horizontal direction. AGN009S H Insert the rear cover to con- firm that the printer works properly. Replacing the fusing unit with the duplex unit attached A Push down until it clicks. Replacing Consumables and... Maintenance Kit F Replace the new fusing unit into the printer. Reference For more information about printing the ...


