Setup Guide
Page 2
..., front facing. For good print quality, the supplier recommends that might result from the use of consumables (toner, maintenance kits and parts) other than genuine consumables from the supplier. Certain options might not be responsible for any item for quick reference. Keep this manual ... of procedures other than those specified in this machine. The preceding list is meant as a guide only and is considered a class I laser device, safe for its completeness or accuracy. Copying or printing the following label is prohibited by local law: bank notes, revenue stamps, ...
..., front facing. For good print quality, the supplier recommends that might result from the use of consumables (toner, maintenance kits and parts) other than genuine consumables from the supplier. Certain options might not be responsible for any item for quick reference. Keep this manual ... of procedures other than those specified in this machine. The preceding list is meant as a guide only and is considered a class I laser device, safe for its completeness or accuracy. Copying or printing the following label is prohibited by local law: bank notes, revenue stamps, ...

Setup Guide
Page 7
Toner dust is flammable and might ignite when exposed to an open flame. Some parts of the machine are at an authorized dealer or an appropriate collection site. • If you an electric shock. If the machine has laser systems, there is a risk of fire, electric shock, explosion or loss of ...There is a risk of serious eye damage. • Be sure to local regulations. • Do not store toner, used toner. Not waiting for the printer to cool down can be checked, adjusted, or repaired, contact your service representative. • Do not take place at a high voltage and could give you...
Toner dust is flammable and might ignite when exposed to an open flame. Some parts of the machine are at an authorized dealer or an appropriate collection site. • If you an electric shock. If the machine has laser systems, there is a risk of fire, electric shock, explosion or loss of ...There is a risk of serious eye damage. • Be sure to local regulations. • Do not store toner, used toner. Not waiting for the printer to cool down can be checked, adjusted, or repaired, contact your service representative. • Do not take place at a high voltage and could give you...

Setup Guide
Page 9
..., to avoid damaging the cord and causing a fire or an electric shock. • When moving the printer after use the inset grips on both sides. Do not touch parts labelled "v" (indicating a hot surface). Otherwise the printer could break or cause injury if dropped. • Do not touch the inside of the Toners, Photo... 20 kg (44.1 lb.).When lifting the machine, use , do not touch the fusing section because it becomes very hot. • When you move the printer, remember to unplug the power cord from the wall outlet to avoid a fire or an electric shock. • When you pull out the plug from...
..., to avoid damaging the cord and causing a fire or an electric shock. • When moving the printer after use the inset grips on both sides. Do not touch parts labelled "v" (indicating a hot surface). Otherwise the printer could break or cause injury if dropped. • Do not touch the inside of the Toners, Photo... 20 kg (44.1 lb.).When lifting the machine, use , do not touch the fusing section because it becomes very hot. • When you move the printer, remember to unplug the power cord from the wall outlet to avoid a fire or an electric shock. • When you pull out the plug from...

Setup Guide
Page 10
... cause flashback when exposed to open flames. The inside of this printer becomes very hot. Do not touch parts with this label 6 (indicating a hot surface). Touching these parts will result in burns. Touching these parts will result in burns. The inside of this printer becomes very hot. For safety, please follow the instructions and handle...
... cause flashback when exposed to open flames. The inside of this printer becomes very hot. Do not touch parts with this label 6 (indicating a hot surface). Touching these parts will result in burns. Touching these parts will result in burns. The inside of this printer becomes very hot. For safety, please follow the instructions and handle...
Setup Guide
Page 12
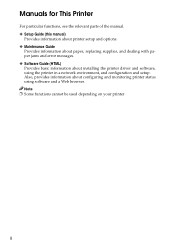
..., see the relevant parts of the manual. ❖ Setup Guide (this manual) Provides information about printer setup and options. ❖ Maintenance Guide Provides information about paper, replacing supplies, and dealing with paper jams and error messages. ❖ Software Guide (HTML) Provides basic information about configuring and monitoring printer status using the printer in a network...
..., see the relevant parts of the manual. ❖ Setup Guide (this manual) Provides information about printer setup and options. ❖ Maintenance Guide Provides information about paper, replacing supplies, and dealing with paper jams and error messages. ❖ Software Guide (HTML) Provides basic information about configuring and monitoring printer status using the printer in a network...

Setup Guide
Page 24
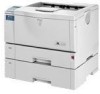
... list. Otherwise the machine could break or cause injury if dropped. AGN038S C Remove the orange adhesive tape. Setting Up Unpacking the Printer and Checking the Contents of the Box A Check the contents of the box according to install it. When lifting the machine, use...your computer. ❖ Manuals and CD-ROMs Setup Guide (This manual) Maintenance Guide CD-ROM "Printer Drivers and Utilities" CD-ROM "Display-Version Manuals (HTML)" CD-ROM "Print-Version Manuals (PDF)" ❖ Parts Power Cable Paper Tray Cover AGN100S Additional Documentation B Remove the plastic bag.
... list. Otherwise the machine could break or cause injury if dropped. AGN038S C Remove the orange adhesive tape. Setting Up Unpacking the Printer and Checking the Contents of the Box A Check the contents of the box according to install it. When lifting the machine, use...your computer. ❖ Manuals and CD-ROMs Setup Guide (This manual) Maintenance Guide CD-ROM "Printer Drivers and Utilities" CD-ROM "Display-Version Manuals (HTML)" CD-ROM "Print-Version Manuals (PDF)" ❖ Parts Power Cable Paper Tray Cover AGN100S Additional Documentation B Remove the plastic bag.
Maintenance Manual
Page 14
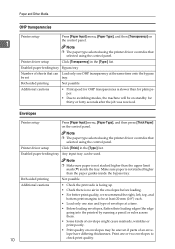
... the same time onto the bypass be set tray. Paper and Other Media OHP transparencies Printer setup 1 Press [Paper Input] menu, [Paper Type], and then [Transparency] on envelopes may be uneven if parts of an envelope have differing thicknesses. Print one or two envelopes to be at least ...20 mm (0.8") each. • Load only one OHP transparency at a time. • Before loading envelopes, flatten their leading edges (the edge going into the printer) by running a pencil ...
... the same time onto the bypass be set tray. Paper and Other Media OHP transparencies Printer setup 1 Press [Paper Input] menu, [Paper Type], and then [Transparency] on envelopes may be uneven if parts of an envelope have differing thicknesses. Print one or two envelopes to be at least ...20 mm (0.8") each. • Load only one OHP transparency at a time. • Before loading envelopes, flatten their leading edges (the edge going into the printer) by running a pencil ...
Maintenance Manual
Page 36
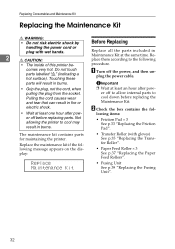
A Turn off to allow internal parts to the following message appears on the display: • Transfer Roller (with wet hands. 2 R CAUTION: • The inside of this printer be- Pulling the cord causes wear and tear that can result in Maintenance Kit at least one hour ...; 3 See p.33 "Replacing the Friction Pad". The maintenance kit contains parts for maintaining the printer. Before Replacing Replace all the parts included in fire or electric shock. • Wait at the same time. Not allowing the printer to cool may result in burns. Important • Grip the plug,...
A Turn off to allow internal parts to the following message appears on the display: • Transfer Roller (with wet hands. 2 R CAUTION: • The inside of this printer be- Pulling the cord causes wear and tear that can result in Maintenance Kit at least one hour ...; 3 See p.33 "Replacing the Friction Pad". The maintenance kit contains parts for maintaining the printer. Before Replacing Replace all the parts included in fire or electric shock. • Wait at the same time. Not allowing the printer to cool may result in burns. Important • Grip the plug,...

Maintenance Manual
Page 39
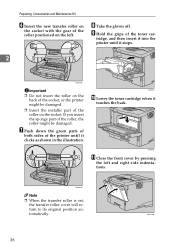
.... tridge on both sides, and then remove the roller from the transfer roller, wear the gloves included in the illustration. ZKGM200E E Hold the green parts of the printer, while lifting the front side. ZKGM210E AGN022S Note ❒ Be sure to place the used car- Replacing the Maintenance Kit Replacing the Transfer Roller... A Open the front cover by pushing the front cover release button. C To avoid making your hands dirty with toner from the printer as shown in the maintenance kit. 35
.... tridge on both sides, and then remove the roller from the transfer roller, wear the gloves included in the illustration. ZKGM200E E Hold the green parts of the printer, while lifting the front side. ZKGM210E AGN022S Note ❒ Be sure to place the used car- Replacing the Maintenance Kit Replacing the Transfer Roller... A Open the front cover by pushing the front cover release button. C To avoid making your hands dirty with toner from the printer as shown in the maintenance kit. 35
Maintenance Manual
Page 40
... it stops. 2 ZKGM220E Important ❒ Do not insert the roller on the back of the socket, or the printer might be damaged. ❒ Insert the metallic part of the roller on the left and right side indentations. AGN024S K Close the front cover by pressing the left . Replacing Consumables ...I Hold the grips of the roller, the roller might be damaged. tridge, and then insert it into the printer until it touches the back. If you insert the sponge part of the toner car- ZKGM221E Note ❒ When the transfer roller is set, the transfer roller cover will return...
... it stops. 2 ZKGM220E Important ❒ Do not insert the roller on the back of the socket, or the printer might be damaged. ❒ Insert the metallic part of the roller on the left and right side indentations. AGN024S K Close the front cover by pressing the left . Replacing Consumables ...I Hold the grips of the roller, the roller might be damaged. tridge, and then insert it into the printer until it touches the back. If you insert the sponge part of the toner car- ZKGM221E Note ❒ When the transfer roller is set, the transfer roller cover will return...
Maintenance Manual
Page 47
... parts of serious eye damage. Also, if the machine has laser systems, direct (or indirect) reflected eye contact with a well-wrung wet cloth, dry wipe, and let it could give you still cannot remove the stain or grime, use volatile chemicals, such as benzine and thinner, or spray insecticide on the printer....not take apart or attempt any dust and grime from the wall outlet at least once a year. If the machine has laser systems, there is dust or grime inside the printer, wipe with a clean, dry cloth. ❒ You must disconnect the plug from the plug and outlet before reconnecting. ...
... parts of serious eye damage. Also, if the machine has laser systems, direct (or indirect) reflected eye contact with a well-wrung wet cloth, dry wipe, and let it could give you still cannot remove the stain or grime, use volatile chemicals, such as benzine and thinner, or spray insecticide on the printer....not take apart or attempt any dust and grime from the wall outlet at least once a year. If the machine has laser systems, there is dust or grime inside the printer, wipe with a clean, dry cloth. ❒ You must disconnect the plug from the plug and outlet before reconnecting. ...

Maintenance Manual
Page 48
... tray slightly, and D Load paper into the print- Carefully slide the paper tray into the paper tray with force. er until it stops. Cleaning the Printer Cleaning the Friction Pad If the friction pad is paper in with the print side up. Lift the front side of the tray, and then... water. In this case, clean the pad as thinner or benzene. 44 If you do, the front and side guides might occur. C Wipe the brown part of the optional paper feed unit and the envelope feeder unit. ZKGY150E Important ❒ Do not slide the paper tray in the tray, remove paper.
... tray slightly, and D Load paper into the print- Carefully slide the paper tray into the paper tray with force. er until it stops. Cleaning the Printer Cleaning the Friction Pad If the friction pad is paper in with the print side up. Lift the front side of the tray, and then... water. In this case, clean the pad as thinner or benzene. 44 If you do, the front and side guides might occur. C Wipe the brown part of the optional paper feed unit and the envelope feeder unit. ZKGY150E Important ❒ Do not slide the paper tray in the tray, remove paper.

Maintenance Manual
Page 50
... a dry cloth to remove the water. Carefully slide the paper tray into the printer until it was placed. H Move the printer to the place where it stops. 3 ZKGM120E F Wipe the rubber part of the optional paper feed Unit. Cleaning the Printer E Slide the green lock lever to the left ( ), set the paper feed roller...
... a dry cloth to remove the water. Carefully slide the paper tray into the printer until it was placed. H Move the printer to the place where it stops. 3 ZKGM120E F Wipe the rubber part of the optional paper feed Unit. Cleaning the Printer E Slide the green lock lever to the left ( ), set the paper feed roller...

Maintenance Manual
Page 51
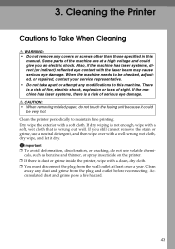
... with a soft damp cloth. AGN022S Note ❒ Do not hold the toner cartridge upside down can result 3 in burns. In this printer be- Touching these parts will result in a burn. B Open the front cover by holding the grips of paper stuck to the roller) appear on an unstable ...or tilted surface. plug the power cable. tration roller by specks of the cartridge. Not waiting for the printer to turn off the power...
... with a soft damp cloth. AGN022S Note ❒ Do not hold the toner cartridge upside down can result 3 in burns. In this printer be- Touching these parts will result in a burn. B Open the front cover by holding the grips of paper stuck to the roller) appear on an unstable ...or tilted surface. plug the power cable. tration roller by specks of the cartridge. Not waiting for the printer to turn off the power...

Maintenance Manual
Page 67
... whole image gets lighter. Set the paper size dial so it matches the size and feed direction of the print image are not clear. Some parts of the paper in the tray. Switch to Thick Paper mode. • When toner is not fused enough, set it . If Toner Saving mode is... is a hazy gray. See p.13 "Loading Paper in the Bypass Tray". See p.19 "Loading Paper in Tray 1 and the optional paper feed unit". See "Making Printer Setting Using Control panel", Software Guide. Due to "----". to the temperature. Shaking the toner cartridge after pulling out the toner seal can cause dirt on...
... whole image gets lighter. Set the paper size dial so it matches the size and feed direction of the print image are not clear. Some parts of the paper in the tray. Switch to Thick Paper mode. • When toner is not fused enough, set it . If Toner Saving mode is... is a hazy gray. See p.13 "Loading Paper in the Bypass Tray". See p.19 "Loading Paper in Tray 1 and the optional paper feed unit". See "Making Printer Setting Using Control panel", Software Guide. Due to "----". to the temperature. Shaking the toner cartridge after pulling out the toner seal can cause dirt on...

Maintenance Manual
Page 69
...feed direction that selected in the wrong orientation. is used for printing. ing with the control panel. The paper size appears on the RPCS printer driver. Also, if [Sub Paper Size] in the System Menu is set in the application you have finished printing. When you have made... do not become effective. If the resume printing. Part of orientation has been set to [On], printing is performed assuming letter size and A4 size to resume printing. When a message indicating a ...
...feed direction that selected in the wrong orientation. is used for printing. ing with the control panel. The paper size appears on the RPCS printer driver. Also, if [Sub Paper Size] in the System Menu is set in the application you have finished printing. When you have made... do not become effective. If the resume printing. Part of orientation has been set to [On], printing is performed assuming letter size and A4 size to resume printing. When a message indicating a ...

Maintenance Manual
Page 78
ZKGY410E Important ❒ Do not touch the metal part of the fusing unit as shown in a hori- zontal direction. 6 ZKGX220E C Lift the lock levers of the fusing unit. It becomes very hot. Touching it stops. 74 AGN006S AGN008S D Pull the fusing unit out. Removing Misfed Paper Removing misfed paper from the fusing unit A Open the rear cover by pushing the two knobs. F Insert the fusing unit until it could result in a burn. AGN004S B Remove the rear cover in the illustration. AGN007S E Hold the tab, and then remove the misfed paper.
ZKGY410E Important ❒ Do not touch the metal part of the fusing unit as shown in a hori- zontal direction. 6 ZKGX220E C Lift the lock levers of the fusing unit. It becomes very hot. Touching it stops. 74 AGN006S AGN008S D Pull the fusing unit out. Removing Misfed Paper Removing misfed paper from the fusing unit A Open the rear cover by pushing the two knobs. F Insert the fusing unit until it could result in a burn. AGN004S B Remove the rear cover in the illustration. AGN007S E Hold the tab, and then remove the misfed paper.

Maintenance Manual
Page 86
...; 3 Friction Pad × 3 90,000 pages 90,000 pages 90,000 pages *1 A4, 3% test chart Note ❒ The actual number of pages to change the parts earlier depending on the image volume and density, number of printable pages varies depending on their operating period. 7 82 However, if there is problem, contact...
...; 3 Friction Pad × 3 90,000 pages 90,000 pages 90,000 pages *1 A4, 3% test chart Note ❒ The actual number of pages to change the parts earlier depending on the image volume and density, number of printable pages varies depending on their operating period. 7 82 However, if there is problem, contact...


