Setup Guide
Page 16
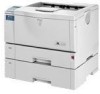
...this port and lator. See "Paper and Other Media Supported by this Printer", Maintenance Guide. Ventilator This hole helps to keep components inside the printer from overheating. 13. Ventilators These holes help to keep components inside the printer from overheating. 11. Controller Board Slide it when pulling out the ...10066; Paper Tray is displayed "Tray 1" on and off. 16. Friction Pad This is fed into this button to overheating. 17. Also, replace the friction pad when the message, "Replace Maintenance Kit", appears. Paper Tray Cover Attach it out to the Printer 8.
...this port and lator. See "Paper and Other Media Supported by this Printer", Maintenance Guide. Ventilator This hole helps to keep components inside the printer from overheating. 13. Ventilators These holes help to keep components inside the printer from overheating. 11. Controller Board Slide it when pulling out the ...10066; Paper Tray is displayed "Tray 1" on and off. 16. Friction Pad This is fed into this button to overheating. 17. Also, replace the friction pad when the message, "Replace Maintenance Kit", appears. Paper Tray Cover Attach it out to the Printer 8.
Setup Guide
Page 17
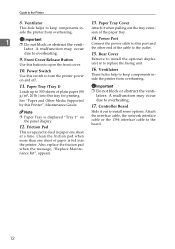
... Unit Lock Levers Lift these levers when replacing the fusing unit. 8. When "Replace Toner Cartridge" appears on the panel display, replace this unit. 13 When "Replace Maintenance Kit" appears on the panel display, replace this cover when replacing a transfer roller. 6. Guide Board Open this cover when accessing the inside of the printer. 3. Fusing Unit Fuses the image onto paper...
... Unit Lock Levers Lift these levers when replacing the fusing unit. 8. When "Replace Toner Cartridge" appears on the panel display, replace this unit. 13 When "Replace Maintenance Kit" appears on the panel display, replace this cover when replacing a transfer roller. 6. Guide Board Open this cover when accessing the inside of the printer. 3. Fusing Unit Fuses the image onto paper...
Maintenance Manual
Page 1
For safe and correct use this product and keep it handy for future reference. Maintenance Guide 1 Paper and Other Media 2 Replacing Consumables and Maintenance Kit 3 Cleaning the Printer 4 Adjusting the Printer 5 Troubleshooting 6 Removing Misfed Paper 7 Appendix Read this manual carefully before you use , please be sure to read the Safety Information in the "Setup Guide" before using the machine.
For safe and correct use this product and keep it handy for future reference. Maintenance Guide 1 Paper and Other Media 2 Replacing Consumables and Maintenance Kit 3 Cleaning the Printer 4 Adjusting the Printer 5 Troubleshooting 6 Removing Misfed Paper 7 Appendix Read this manual carefully before you use , please be sure to read the Safety Information in the "Setup Guide" before using the machine.

Maintenance Manual
Page 3
... Envelopes 24 Switching between Paper Trays 28 2. Replacing Consumables and Maintenance Kit Replacing the Toner Cartridge 29 Replacing the Maintenance Kit 32 Before Replacing...32 Replacing the Friction Pad 33 Replacing the Transfer Roller 35 Replacing the Paper Feed Rollers 37 Replacing the Fusing Unit 39 3. Troubleshooting Error & Status Messages on the Control Panel 53 Printer Does Not Print 59 Checking the port...
... Envelopes 24 Switching between Paper Trays 28 2. Replacing Consumables and Maintenance Kit Replacing the Toner Cartridge 29 Replacing the Maintenance Kit 32 Before Replacing...32 Replacing the Friction Pad 33 Replacing the Transfer Roller 35 Replacing the Paper Feed Rollers 37 Replacing the Fusing Unit 39 3. Troubleshooting Error & Status Messages on the Control Panel 53 Printer Does Not Print 59 Checking the port...
Maintenance Manual
Page 33
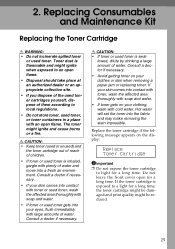
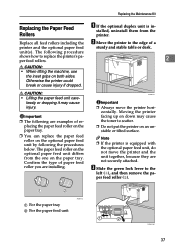
... water and move into your clothing, wash with plenty of water. Replace the toner cartridge if the following message appears on your clothes or skin when removing a paper jam or replacing toner. If your skin comes into the fabric and may make removing...if necessary. • Avoid getting toner on the display: Replace Toner Cartridge Important ❒ Do not expose the toner cartridge to local regulations. • Do not store toner, used toner is swal- Replacing Consumables and Maintenance Kit Replacing the Toner Cartridge R WARNING: • Do not incinerate spilled...
... water and move into your clothing, wash with plenty of water. Replace the toner cartridge if the following message appears on your clothes or skin when removing a paper jam or replacing toner. If your skin comes into the fabric and may make removing...if necessary. • Avoid getting toner on the display: Replace Toner Cartridge Important ❒ Do not expose the toner cartridge to local regulations. • Do not store toner, used toner is swal- Replacing Consumables and Maintenance Kit Replacing the Toner Cartridge R WARNING: • Do not incinerate spilled...
Maintenance Manual
Page 34
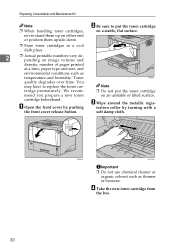
... not use chemical cleaner or organic solvent such as temperature and humidity. Note tridge prematurely. D Take the new toner cartridge from the box. 30 Replacing Consumables and Maintenance Kit Note ❒ When handling toner cartridges, never stand them up on image volume and density, number of pages printed at a time, paper type and...
... not use chemical cleaner or organic solvent such as temperature and humidity. Note tridge prematurely. D Take the new toner cartridge from the box. 30 Replacing Consumables and Maintenance Kit Note ❒ When handling toner cartridges, never stand them up on image volume and density, number of pages printed at a time, paper type and...
Maintenance Manual
Page 36
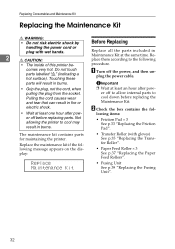
... allowing the printer to cool down before replacing parts. The maintenance kit contains parts for maintaining the printer. Replacing Consumables and Maintenance Kit Replacing the Maintenance Kit R WARNING: • Do not risk electric shock by handling the power cord or plug with gloves) See p.35 "Replacing the Transfer Roller". • Paper Feed Roller × 3 See p.37 "Replacing the Paper Feed Rollers". Replace Maintenance Kit • Fusing...
... allowing the printer to cool down before replacing parts. The maintenance kit contains parts for maintaining the printer. Replacing Consumables and Maintenance Kit Replacing the Maintenance Kit R WARNING: • Do not risk electric shock by handling the power cord or plug with gloves) See p.35 "Replacing the Transfer Roller". • Paper Feed Roller × 3 See p.37 "Replacing the Paper Feed Rollers". Replace Maintenance Kit • Fusing...
Maintenance Manual
Page 37
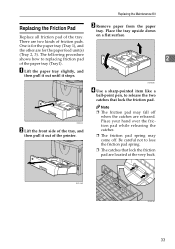
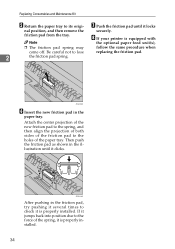
... the friction pad. ZKGM160E D Use a sharp-pointed item like a ball-point pen, to replacing friction pad 2 of the printer. Place your hand over the friction pad while releasing the catches. ❒ The friction pad spring may fall off . Replacing the Maintenance Kit Replacing the Friction Pad C Remove paper from the paper tray. There are for the...
... the friction pad. ZKGM160E D Use a sharp-pointed item like a ball-point pen, to replacing friction pad 2 of the printer. Place your hand over the friction pad while releasing the catches. ❒ The friction pad spring may fall off . Replacing the Maintenance Kit Replacing the Friction Pad C Remove paper from the paper tray. There are for the...
Maintenance Manual
Page 38
... new friction pad in the illustration until it is properly installed. Be careful not to its origi- Replacing Consumables and Maintenance Kit E G Return the paper tray to lose replacing the friction pad. 2 the friction pad spring. H If your printer is equipped with Note the optional paper feed unit(s), ❒ The friction pad spring may follow...
... new friction pad in the illustration until it is properly installed. Be careful not to its origi- Replacing Consumables and Maintenance Kit E G Return the paper tray to lose replacing the friction pad. 2 the friction pad spring. H If your printer is equipped with Note the optional paper feed unit(s), ❒ The friction pad spring may follow...

Maintenance Manual
Page 39
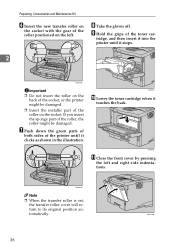
Replacing the Maintenance Kit Replacing the Transfer Roller A Open the front cover by pushing the front cover release button. ZKGM210E AGN022S Note ❒ Be sure to place the used car- D ... both sides, and then remove the roller from the transfer roller, wear the gloves included in the illustration. ZKGM200E E Hold the green parts of the printer, while lifting the front side. C To avoid making your hands dirty with toner from the printer as shown in the maintenance kit. 35
Replacing the Maintenance Kit Replacing the Transfer Roller A Open the front cover by pushing the front cover release button. ZKGM210E AGN022S Note ❒ Be sure to place the used car- D ... both sides, and then remove the roller from the transfer roller, wear the gloves included in the illustration. ZKGM200E E Hold the green parts of the printer, while lifting the front side. C To avoid making your hands dirty with toner from the printer as shown in the maintenance kit. 35
Maintenance Manual
Page 40
... insert the sponge part of the roller, the roller might be damaged. ZKGH130E 36 G Push down the green parts of both sides of the printer until it touches the back. ZKGM221E Note ❒ When the transfer roller is set, the transfer roller cover will return to its original position...❒ Do not insert the roller on the back of the socket, or the printer might be damaged. ❒ Insert the metallic part of the roller on the left and right side indentations. Replacing Consumables and Maintenance Kit F Insert the new transfer roller on the socket with the gear of the roller ...
... insert the sponge part of the roller, the roller might be damaged. ZKGH130E 36 G Push down the green parts of both sides of the printer until it touches the back. ZKGM221E Note ❒ When the transfer roller is set, the transfer roller cover will return to its original position...❒ Do not insert the roller on the back of the socket, or the printer might be damaged. ❒ Insert the metallic part of the roller on the left and right side indentations. Replacing Consumables and Maintenance Kit F Insert the new transfer roller on the socket with the gear of the roller ...
Maintenance Manual
Page 41
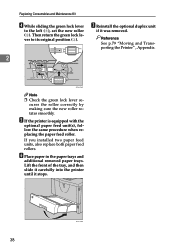
... The following the procedures below. Confirm the type of a printer and the optional paper feed sturdy and stable table or desk. R CAUTION: • Lifting the paper feed unit care- unit(s). Replacing the Maintenance Kit Replacing the Paper Feed Rollers A If the optional duplex unit is ...equipped with the optional paper feed unit, do not move the printer hori- stalled, uninstall them from the one on the optional...
... The following the procedures below. Confirm the type of a printer and the optional paper feed sturdy and stable table or desk. R CAUTION: • Lifting the paper feed unit care- unit(s). Replacing the Maintenance Kit Replacing the Paper Feed Rollers A If the optional duplex unit is ...equipped with the optional paper feed unit, do not move the printer hori- stalled, uninstall them from the one on the optional...
Maintenance Manual
Page 42
... in the paper trays and additional removed paper trays. Replacing Consumables and Maintenance Kit D While sliding the green lock lever to its original position ( ). Lift the front of the tray, and then slide it carefully into the printer until it was removed. cures the roller correctly by ...Then return the green lock le- If you installed two paper feed units, also replace both paper feed rollers. G Reinstall the optional duplex unit if it stops. 38 ZKGY150E Reference See p.79 "Moving and Transporting the Printer" , Appendix. 2 ZKGM130E Note ❒ Check the green lock lever se-...
... in the paper trays and additional removed paper trays. Replacing Consumables and Maintenance Kit D While sliding the green lock lever to its original position ( ). Lift the front of the tray, and then slide it carefully into the printer until it was removed. cures the roller correctly by ...Then return the green lock le- If you installed two paper feed units, also replace both paper feed rollers. G Reinstall the optional duplex unit if it stops. 38 ZKGY150E Reference See p.79 "Moving and Transporting the Printer" , Appendix. 2 ZKGM130E Note ❒ Check the green lock lever se-...
Maintenance Manual
Page 43
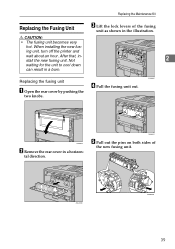
... illustration. ing unit, turn off the printer and wait about an hour. AGN006S Replacing the fusing unit A Open the rear cover by pushing the D Pull the fusing unit out. AGN007S E Pull out the pins on both sides of the fusing unit as shown in a burn. Replacing the Maintenance Kit Replacing the Fusing Unit C Lift the lock...
... illustration. ing unit, turn off the printer and wait about an hour. AGN006S Replacing the fusing unit A Open the rear cover by pushing the D Pull the fusing unit out. AGN007S E Pull out the pins on both sides of the fusing unit as shown in a burn. Replacing the Maintenance Kit Replacing the Fusing Unit C Lift the lock...
Maintenance Manual
Page 44
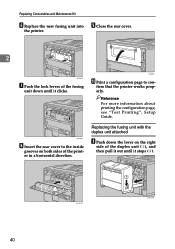
... grooves on the right side of the printer in a horizontal direction. firm that the printer works properly. AGN009S H Insert the rear cover to con- Replacing the fusing unit with the duplex unit attached A Push down until it clicks. Replacing Consumables and Maintenance Kit F Replace the new fusing unit into the printer. I Close the rear cover. 2 AGN008S G Push the...
... grooves on the right side of the printer in a horizontal direction. firm that the printer works properly. AGN009S H Insert the rear cover to con- Replacing the fusing unit with the duplex unit attached A Push down until it clicks. Replacing Consumables and Maintenance Kit F Replace the new fusing unit into the printer. I Close the rear cover. 2 AGN008S G Push the...

Maintenance Manual
Page 45
Replacing the Maintenance Kit B Lift the lock levers of the fusing unit down until it clicks. AGN006S AGN008S F Push the lock levers of the fusing unit as shown in the illustration. AGN007S D Pull out the pins on both sides of the printer until it is connected. AGN009S G Align the power cable with the groove of the left slide of the duplex unit, and then insert the duplex unit into the printer. 2 C Pull the fusing unit out. ZKGM010E ZKGX240E 41 E Replace the new fusing unit into back of the printer aligning the rails inside of the new fusing unit.
Replacing the Maintenance Kit B Lift the lock levers of the fusing unit down until it clicks. AGN006S AGN008S F Push the lock levers of the fusing unit as shown in the illustration. AGN007S D Pull out the pins on both sides of the printer until it is connected. AGN009S G Align the power cable with the groove of the left slide of the duplex unit, and then insert the duplex unit into the printer. 2 C Pull the fusing unit out. ZKGM010E ZKGX240E 41 E Replace the new fusing unit into back of the printer aligning the rails inside of the new fusing unit.

Maintenance Manual
Page 46
Reference For more information about printing the configuration page, 2 see "Test Printing", Setup Guide. 42 firm that the printer works prop- erly. Replacing Consumables and Maintenance Kit H Print a configuration page to con-
Reference For more information about printing the configuration page, 2 see "Test Printing", Setup Guide. 42 firm that the printer works prop- erly. Replacing Consumables and Maintenance Kit H Print a configuration page to con-

Maintenance Manual
Page 61
...specified input paper tray. See p.32 "Replacing the Maintenance Kit". Reset Duplex Unit correctly A communication error sent Set the duplex unit correctly. Error & Status Messages on . Print data is ready to use. Gate. printer is being processed. Remove Misfeed Paper Tray...Exit Cover" Appears". Remove paper from the system unit to replace the maintenance kit (friction pad, paper feed roller, transfer roller and fusing Unit). Replace Maintenance Kit It is misfeed in the printer. Replace the new maintenance kit. out. The toner dust is full. Prepare a new toner...
...specified input paper tray. See p.32 "Replacing the Maintenance Kit". Reset Duplex Unit correctly A communication error sent Set the duplex unit correctly. Error & Status Messages on . Print data is ready to use. Gate. printer is being processed. Remove Misfeed Paper Tray...Exit Cover" Appears". Remove paper from the system unit to replace the maintenance kit (friction pad, paper feed roller, transfer roller and fusing Unit). Replace Maintenance Kit It is misfeed in the printer. Replace the new maintenance kit. out. The toner dust is full. Prepare a new toner...

Maintenance Manual
Page 93
... Feeder Unit, 25 Loading Paper, 8 Bypass Tray, 20 Optional Paper Feed Unit, 13 Tray 1, 13 M Maintenance Kit, 32, 82 Memory Unit Type C, 87 Messages, 53 Moving and Transporting the Printer, 79 O OHP transparencies, 10 Options, 86 Other Printing Problems, 63 P Paper and Other Media, 3 Paper...8 Plain Paper, 9 Print Area, 12 Printer Does Not Print, 59 R Registration Roller, 47 Remove Misfed Paper Duplex Unit, 76 Internal Path, 71 Paper Exit Cover, 73 Paper Tray, 70 Removing Misfed Paper, 69 Replacing Consumables and Maintenance Kit, 29 Replacing the Maintenance Kit, 32 Friction Pad, 33 Fusing Unit, ...
... Feeder Unit, 25 Loading Paper, 8 Bypass Tray, 20 Optional Paper Feed Unit, 13 Tray 1, 13 M Maintenance Kit, 32, 82 Memory Unit Type C, 87 Messages, 53 Moving and Transporting the Printer, 79 O OHP transparencies, 10 Options, 86 Other Printing Problems, 63 P Paper and Other Media, 3 Paper...8 Plain Paper, 9 Print Area, 12 Printer Does Not Print, 59 R Registration Roller, 47 Remove Misfed Paper Duplex Unit, 76 Internal Path, 71 Paper Exit Cover, 73 Paper Tray, 70 Removing Misfed Paper, 69 Replacing Consumables and Maintenance Kit, 29 Replacing the Maintenance Kit, 32 Friction Pad, 33 Fusing Unit, ...


