Setup Guide
Page 2
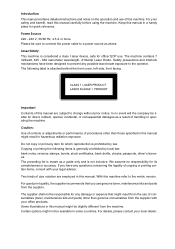
... version. In no responsibility for direct, indirect, special, incidental, or consequential damages as a result of consumables (toner, maintenance kits and parts) other than genuine consumables from the supplier with your safety and benefit, read this machine. With this machine... - 660 nanometer wavelength, A1GaInp Laser Diode. Certain options might result from the use genuine toner, maintenance kits and parts from the machine. Do not copy or print any possible laser beam exposure to change without prior notice. Laser Safety: This machine is generally ...
... version. In no responsibility for direct, indirect, special, incidental, or consequential damages as a result of consumables (toner, maintenance kits and parts) other than genuine consumables from the supplier with your safety and benefit, read this machine. With this machine... - 660 nanometer wavelength, A1GaInp Laser Diode. Certain options might result from the use genuine toner, maintenance kits and parts from the machine. Do not copy or print any possible laser beam exposure to change without prior notice. Laser Safety: This machine is generally ...
Setup Guide
Page 16
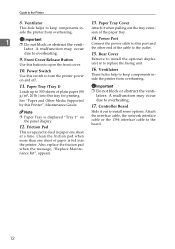
... overheating. 11. Power Port Connect the power cable to keep components inside the printer from overheating. 13. Ventilators These holes help to this Printer", Maintenance Guide. Friction Pad This is required to feed in paper one sheet of the cable to 500 sheets of the paper... printer power on the panel display. 12. Front Cover Release Button Use this switch to open the front cover. Paper Tray Cover Attach it out to overheating. 17. A malfunction may occur due to install some options. Also, replace the friction pad when the message, "Replace Maintenance Kit",...
... overheating. 11. Power Port Connect the power cable to keep components inside the printer from overheating. 13. Ventilators These holes help to this Printer", Maintenance Guide. Friction Pad This is required to feed in paper one sheet of the cable to 500 sheets of the paper... printer power on the panel display. 12. Front Cover Release Button Use this switch to open the front cover. Paper Tray Cover Attach it out to overheating. 17. A malfunction may occur due to install some options. Also, replace the friction pad when the message, "Replace Maintenance Kit",...
Setup Guide
Page 17
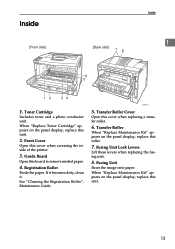
... Cover Open this cover when replacing a transfer roller. 6. Transfer Roller Cover Open this cover when accessing the inside of the printer. 3. When "Replace Maintenance Kit" appears on the panel display, replace this unit. 13 Fusing Unit Lock Levers Lift these levers when replacing the fusing unit.... 8. Guide Board Open this unit. 2. Transfer Roller When "Replace Maintenance Kit" appears on the panel display, replace this roller. 7. Toner Cartridge Includes toner and a photo conductor unit. If it becomes dirty...
... Cover Open this cover when replacing a transfer roller. 6. Transfer Roller Cover Open this cover when accessing the inside of the printer. 3. When "Replace Maintenance Kit" appears on the panel display, replace this unit. 13 Fusing Unit Lock Levers Lift these levers when replacing the fusing unit.... 8. Guide Board Open this unit. 2. Transfer Roller When "Replace Maintenance Kit" appears on the panel display, replace this roller. 7. Toner Cartridge Includes toner and a photo conductor unit. If it becomes dirty...
Maintenance Manual
Page 1
For safe and correct use this manual carefully before you use , please be sure to read the Safety Information in the "Setup Guide" before using the machine. Maintenance Guide 1 Paper and Other Media 2 Replacing Consumables and Maintenance Kit 3 Cleaning the Printer 4 Adjusting the Printer 5 Troubleshooting 6 Removing Misfed Paper 7 Appendix Read this product and keep it handy for future reference.
For safe and correct use this manual carefully before you use , please be sure to read the Safety Information in the "Setup Guide" before using the machine. Maintenance Guide 1 Paper and Other Media 2 Replacing Consumables and Maintenance Kit 3 Cleaning the Printer 4 Adjusting the Printer 5 Troubleshooting 6 Removing Misfed Paper 7 Appendix Read this product and keep it handy for future reference.

Maintenance Manual
Page 3
...Maintenance Kit Replacing the Toner Cartridge 29 Replacing the Maintenance Kit 32 Before Replacing...32 Replacing the Friction Pad 33 Replacing the Transfer Roller 35 Replacing the Paper Feed Rollers 37 Replacing the Fusing Unit 39 3. Troubleshooting Error & Status Messages on the Control Panel 53 Printer... the port connection 61 Other Printing Problems 63 Additional Troubleshooting 66 i Adjusting the Printer Adjusting the Image Density 49 Adjusting Tray Registration 50 5. Cleaning the Printer Cautions to Read This Manual 2 1. TABLE OF CONTENTS Trademarks...1 How to Take...
...Maintenance Kit Replacing the Toner Cartridge 29 Replacing the Maintenance Kit 32 Before Replacing...32 Replacing the Friction Pad 33 Replacing the Transfer Roller 35 Replacing the Paper Feed Rollers 37 Replacing the Fusing Unit 39 3. Troubleshooting Error & Status Messages on the Control Panel 53 Printer... the port connection 61 Other Printing Problems 63 Additional Troubleshooting 66 i Adjusting the Printer Adjusting the Image Density 49 Adjusting Tray Registration 50 5. Cleaning the Printer Cautions to Read This Manual 2 1. TABLE OF CONTENTS Trademarks...1 How to Take...

Maintenance Manual
Page 4
6. Appendix Moving and Transporting the Printer 79 Moving the Printer ...80 Consumables ...81 Toner Cartridge ...81 Maintenance Kit ...82 Specifications...83 Mainframe ...83 Options ...86 INDEX...89 ii Removing Misfed Paper Removing Misfed Paper 69 When "Remove Misfeed Paper Tray" Appears 70 When "Remove Misfeed Internal Path" Appears 71 When "Remove Misfeed Paper Exit Cover" Appears 73 When "Remove Misfeed Duplex Unit" Appears 76 7.
6. Appendix Moving and Transporting the Printer 79 Moving the Printer ...80 Consumables ...81 Toner Cartridge ...81 Maintenance Kit ...82 Specifications...83 Mainframe ...83 Options ...86 INDEX...89 ii Removing Misfed Paper Removing Misfed Paper 69 When "Remove Misfeed Paper Tray" Appears 70 When "Remove Misfeed Internal Path" Appears 71 When "Remove Misfeed Paper Exit Cover" Appears 73 When "Remove Misfeed Duplex Unit" Appears 76 7.
Maintenance Manual
Page 33
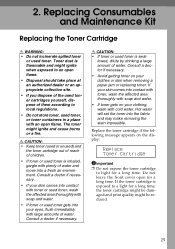
..., dispose of water. If your skin comes into contact with toner or used toner, wash the affected area thoroughly with cold water. Replacing Consumables and Maintenance Kit Replacing the Toner Cartridge R WARNING: • Do not incinerate spilled toner or used toner is swal- If the toner cartridge is flammable and might ignite...
..., dispose of water. If your skin comes into contact with toner or used toner, wash the affected area thoroughly with cold water. Replacing Consumables and Maintenance Kit Replacing the Toner Cartridge R WARNING: • Do not incinerate spilled toner or used toner is swal- If the toner cartridge is flammable and might ignite...
Maintenance Manual
Page 34
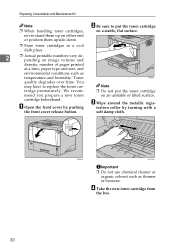
... beforehand. A Open the front cover by turning with a the front cover release button. tration roller by pushing C Wipe around the metallic regis- Replacing Consumables and Maintenance Kit Note ❒ When handling toner cartridges, never stand them upside down. B Be sure to replace the toner car- We recom- ❒ Do not put the...
... beforehand. A Open the front cover by turning with a the front cover release button. tration roller by pushing C Wipe around the metallic regis- Replacing Consumables and Maintenance Kit Note ❒ When handling toner cartridges, never stand them upside down. B Be sure to replace the toner car- We recom- ❒ Do not put the...
Maintenance Manual
Page 36
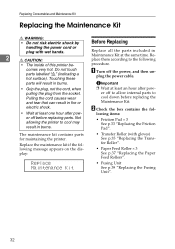
...the cord causes wear and tear that can result in Maintenance Kit at the same time. Replace Maintenance Kit • Fusing Unit See p.39 "Replacing the Fusing Unit". 32 The maintenance kit contains parts for maintaining the printer. Before Replacing Replace all the parts included in fire or... on the display: • Transfer Roller (with wet hands. 2 R CAUTION: • The inside of this printer be- Replacing Consumables and Maintenance Kit Replacing the Maintenance Kit R WARNING: • Do not risk electric shock by handling the power cord or plug with gloves) See p.35...
...the cord causes wear and tear that can result in Maintenance Kit at the same time. Replace Maintenance Kit • Fusing Unit See p.39 "Replacing the Fusing Unit". 32 The maintenance kit contains parts for maintaining the printer. Before Replacing Replace all the parts included in fire or... on the display: • Transfer Roller (with wet hands. 2 R CAUTION: • The inside of this printer be- Replacing Consumables and Maintenance Kit Replacing the Maintenance Kit R WARNING: • Do not risk electric shock by handling the power cord or plug with gloves) See p.35...
Maintenance Manual
Page 37
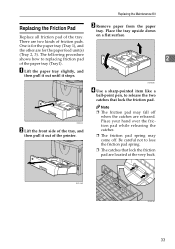
...-pointed item like a ball-point pen, to release the two catches that lock the friction pad are released. AGN029S B Lift the front side of the printer. Be careful not to replacing friction pad 2 of the tray. on a flat surface. Replacing the Maintenance Kit Replacing the Friction Pad C Remove paper from the paper tray.
...-pointed item like a ball-point pen, to release the two catches that lock the friction pad are released. AGN029S B Lift the front side of the printer. Be careful not to replacing friction pad 2 of the tray. on a flat surface. Replacing the Maintenance Kit Replacing the Friction Pad C Remove paper from the paper tray.
Maintenance Manual
Page 38
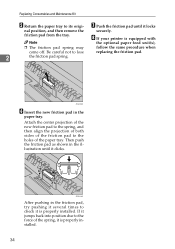
... feed unit(s), ❒ The friction pad spring may follow the same procedure when come off. H If your printer is properly installed. Then push the friction pad as shown in the paper tray. Replacing Consumables and Maintenance Kit E G Return the paper tray to its origi- friction pad from the tray. ZKGM180E F Insert the new...
... feed unit(s), ❒ The friction pad spring may follow the same procedure when come off. H If your printer is properly installed. Then push the friction pad as shown in the paper tray. Replacing Consumables and Maintenance Kit E G Return the paper tray to its origi- friction pad from the tray. ZKGM180E F Insert the new...

Maintenance Manual
Page 39
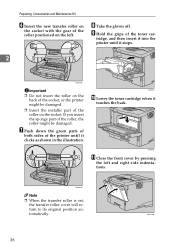
ZKGM200E E Hold the green parts of the printer, while lifting the front side. ZKGM210E AGN022S Note ❒ Be sure to place the used car- Replacing the Maintenance Kit Replacing the Transfer Roller A Open the front cover by pushing the front cover release button. tridge on both sides, and...the roller from the transfer roller, wear the gloves included in the illustration. C To avoid making your hands dirty with toner from the printer as shown in the maintenance kit. 35 D Hold the lock levers (" " parts), and then pull them. 2 AGN020S B Pull the toner cartridge out of the...
ZKGM200E E Hold the green parts of the printer, while lifting the front side. ZKGM210E AGN022S Note ❒ Be sure to place the used car- Replacing the Maintenance Kit Replacing the Transfer Roller A Open the front cover by pushing the front cover release button. tridge on both sides, and...the roller from the transfer roller, wear the gloves included in the illustration. C To avoid making your hands dirty with toner from the printer as shown in the maintenance kit. 35 D Hold the lock levers (" " parts), and then pull them. 2 AGN020S B Pull the toner cartridge out of the...
Maintenance Manual
Page 40
...parts of both sides of the printer until it clicks as shown in the illustration. ZKGM221E Note ❒ When the transfer roller is set, the transfer roller cover will return to its original position automatically. ZKGH130E 36 Replacing Consumables and Maintenance Kit F Insert the new transfer ...roller on the socket with the gear of the toner car- I Hold the grips of the roller positioned on the left and right side indentations. tridge, and then insert it into the printer until it stops. 2 ZKGM220E...
...parts of both sides of the printer until it clicks as shown in the illustration. ZKGM221E Note ❒ When the transfer roller is set, the transfer roller cover will return to its original position automatically. ZKGH130E 36 Replacing Consumables and Maintenance Kit F Insert the new transfer ...roller on the socket with the gear of the toner car- I Hold the grips of the roller positioned on the left and right side indentations. tridge, and then insert it into the printer until it stops. 2 ZKGM220E...
Maintenance Manual
Page 41
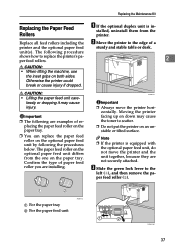
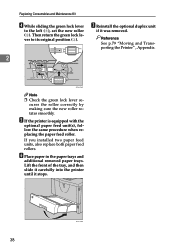
... tray. ❒ You can replace the paper feed roller on both sides. unit(s). Moving the printer facing up on the optional paper feed unit differs from the printer. Replacing the Maintenance Kit Replacing the Paper Feed Rollers A If the optional duplex unit is equipped with the optional paper feed... unit, do not move the printer hori- The paper feed roller on down may cause injury. B ...
... tray. ❒ You can replace the paper feed roller on both sides. unit(s). Moving the printer facing up on the optional paper feed unit differs from the printer. Replacing the Maintenance Kit Replacing the Paper Feed Rollers A If the optional duplex unit is equipped with the optional paper feed... unit, do not move the printer hori- The paper feed roller on down may cause injury. B ...
Maintenance Manual
Page 42
... feed unit(s), follow the same procedure when replacing the paper feed roller. Lift the front of the tray, and then slide it carefully into the printer until it was removed. cures the roller correctly by making sure the new roller rotates smoothly. If you installed two paper feed units, also replace... rollers. F Place paper in the paper trays and additional removed paper trays. G Reinstall the optional duplex unit if it stops. 38 ZKGY150E Replacing Consumables and Maintenance Kit D While sliding the green lock lever to its original position ( ). Then return the green lock le-
... feed unit(s), follow the same procedure when replacing the paper feed roller. Lift the front of the tray, and then slide it carefully into the printer until it was removed. cures the roller correctly by making sure the new roller rotates smoothly. If you installed two paper feed units, also replace... rollers. F Place paper in the paper trays and additional removed paper trays. G Reinstall the optional duplex unit if it stops. 38 ZKGY150E Replacing Consumables and Maintenance Kit D While sliding the green lock lever to its original position ( ). Then return the green lock le-
Maintenance Manual
Page 43
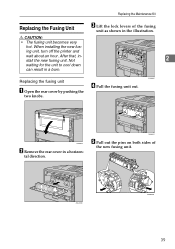
... 39 R CAUTION: • The fusing unit becomes very hot. When installing the new fus- Replacing the Maintenance Kit Replacing the Fusing Unit C Lift the lock levers of the new fusing unit. ing unit, turn off the printer and wait about an hour. Not 2 waiting for the unit to cool down can result in...
... 39 R CAUTION: • The fusing unit becomes very hot. When installing the new fus- Replacing the Maintenance Kit Replacing the Fusing Unit C Lift the lock levers of the new fusing unit. ing unit, turn off the printer and wait about an hour. Not 2 waiting for the unit to cool down can result in...
Maintenance Manual
Page 44
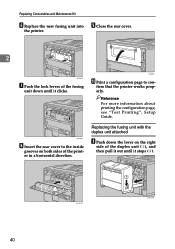
... on both sides of the duplex unit ( ), and then pull it out until it stops ( ). 40 ZKGX221E ZKGX320E firm that the printer works properly. AGN005S J Print a configuration page to the inside grooves on the right side of the printer in a horizontal direction. Replacing Consumables and Maintenance Kit F Replace the new fusing unit into the...
... on both sides of the duplex unit ( ), and then pull it out until it stops ( ). 40 ZKGX221E ZKGX320E firm that the printer works properly. AGN005S J Print a configuration page to the inside grooves on the right side of the printer in a horizontal direction. Replacing Consumables and Maintenance Kit F Replace the new fusing unit into the...

Maintenance Manual
Page 45
AGN006S AGN008S F Push the lock levers of the fusing unit down until it clicks. AGN009S G Align the power cable with the groove of the left slide of the printer until it is connected. ZKGM010E ZKGX240E 41 AGN007S D Pull out the pins on both sides of the fusing unit as shown in the illustration. E Replace the new fusing unit into back of the printer aligning the rails inside of the duplex unit, and then insert the duplex unit into the printer. 2 C Pull the fusing unit out. Replacing the Maintenance Kit B Lift the lock levers of the new fusing unit.
AGN006S AGN008S F Push the lock levers of the fusing unit down until it clicks. AGN009S G Align the power cable with the groove of the left slide of the printer until it is connected. ZKGM010E ZKGX240E 41 AGN007S D Pull out the pins on both sides of the fusing unit as shown in the illustration. E Replace the new fusing unit into back of the printer aligning the rails inside of the duplex unit, and then insert the duplex unit into the printer. 2 C Pull the fusing unit out. Replacing the Maintenance Kit B Lift the lock levers of the new fusing unit.

Maintenance Manual
Page 46
Replacing Consumables and Maintenance Kit H Print a configuration page to con- erly. Reference For more information about printing the configuration page, 2 see "Test Printing", Setup Guide. 42 firm that the printer works prop-
Replacing Consumables and Maintenance Kit H Print a configuration page to con- erly. Reference For more information about printing the configuration page, 2 see "Test Printing", Setup Guide. 42 firm that the printer works prop-

Maintenance Manual
Page 61
... Unit / Open Duplex Unit Cover There is misfeed in the paper Remove the misfed paper. Remove the misfed paper. exit cover. Replace Maintenance Kit It is a misfeed in the Duplex Remove the misfed paper. Prepare a new toner cartridge. provider. 5 57 If the message appears again,...unit correctly. work connection. The No action required. Replace Toner Cartridge The toner cartridge is full. See p.29 "Replacing the Toner Cartridge". printer is almost run See p.29 "Replacing the Toner Car- Remove the misfed paper. Error & Status Messages on . The SC Power Off...
... Unit / Open Duplex Unit Cover There is misfeed in the paper Remove the misfed paper. Remove the misfed paper. exit cover. Replace Maintenance Kit It is a misfeed in the Duplex Remove the misfed paper. Prepare a new toner cartridge. provider. 5 57 If the message appears again,...unit correctly. work connection. The No action required. Replace Toner Cartridge The toner cartridge is full. See p.29 "Replacing the Toner Cartridge". printer is almost run See p.29 "Replacing the Toner Car- Remove the misfed paper. Error & Status Messages on . The SC Power Off...


