Setup Guide
Page 2
...34 Option Installation Flow Chart 34 Installing Options...35 Attaching Paper Feed Unit Type 610 38 Attaching Envelope Feeder Type 610 41 Attaching Memory Unit Type C 256MB (SDRAM Module 43 Attaching 1394 Interface Unit Type 4510 48 Attaching 802.11b Interface Unit Type F 54 Attaching Bluetooth Interface Unit Type C 61 Attaching Hard Disk Drive Type 2600 68 Attaching Network Data Protection Unit Type B 70 Attaching Duplex Unit AD610 72 Connecting the Printer Network Connection 75 USB Connection 77 Parallel Connection 78 IEEE 1394 Connection 79 Configuration Ethernet Configuration...
...34 Option Installation Flow Chart 34 Installing Options...35 Attaching Paper Feed Unit Type 610 38 Attaching Envelope Feeder Type 610 41 Attaching Memory Unit Type C 256MB (SDRAM Module 43 Attaching 1394 Interface Unit Type 4510 48 Attaching 802.11b Interface Unit Type F 54 Attaching Bluetooth Interface Unit Type C 61 Attaching Hard Disk Drive Type 2600 68 Attaching Network Data Protection Unit Type B 70 Attaching Duplex Unit AD610 72 Connecting the Printer Network Connection 75 USB Connection 77 Parallel Connection 78 IEEE 1394 Connection 79 Configuration Ethernet Configuration...
Setup Guide
Page 5
... manual. A fire or an electric shock might ignite when exposed to turn off the power switch and wait for the printer to local regulations. • Do not store toner, used toner, or toner containers in a place with the laser beam may cause serious eye damage. Toner dust is flammable and might occur. 5 Not waiting for about 15 minutes before cleaning the Registration roller...
... manual. A fire or an electric shock might ignite when exposed to turn off the power switch and wait for the printer to local regulations. • Do not store toner, used toner, or toner containers in a place with the laser beam may cause serious eye damage. Toner dust is flammable and might occur. 5 Not waiting for about 15 minutes before cleaning the Registration roller...
Setup Guide
Page 10
... the relevant parts of the manual. ❖ Setup Guide (this manual) Provides information about printer setup and options. ❖ Maintenance Guide Provides information about paper, replacing supplies, and dealing with paper jams and error messages. ❖ Software Guide (HTML) Provides basic information about configuring and monitoring printer status using the printer in a network environment, and configuration and setup. Also, provides information about installing the printer driver and software, using software and a Web browser. ❒ Some functions cannot be used depending on...
... the relevant parts of the manual. ❖ Setup Guide (this manual) Provides information about printer setup and options. ❖ Maintenance Guide Provides information about paper, replacing supplies, and dealing with paper jams and error messages. ❖ Software Guide (HTML) Provides basic information about configuring and monitoring printer status using the printer in a network environment, and configuration and setup. Also, provides information about installing the printer driver and software, using software and a Web browser. ❒ Some functions cannot be used depending on...
Setup Guide
Page 12
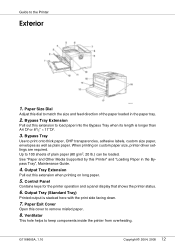
Bypass Tray Use to keep components inside the printer from overheating. Paper Exit Cover Open this Printer" and "Loading Paper in the paper tray. 2. Control Panel Contains keys for the printer operation and a panel display that shows the printer status. 6. Output Tray (Standard Tray) Printed output is longer than A4 L or 81/2" × 11"L. 3. See "Paper and Other Media Supported by this cover to remove misfed paper. 8. Paper Size Dial Adjust this extension to match the size and feed direction of plain paper (80 g/m2, 20 lb.) can...
Bypass Tray Use to keep components inside the printer from overheating. Paper Exit Cover Open this Printer" and "Loading Paper in the paper tray. 2. Control Panel Contains keys for the printer operation and a panel display that shows the printer status. 6. Output Tray (Standard Tray) Printed output is longer than A4 L or 81/2" × 11"L. 3. See "Paper and Other Media Supported by this cover to remove misfed paper. 8. Paper Size Dial Adjust this extension to match the size and feed direction of plain paper (80 g/m2, 20 lb.) can...
Setup Guide
Page 13
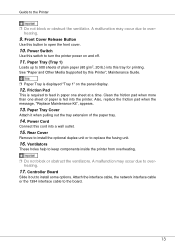
... to feed in paper one sheet at a time. Power Cord Connect this tray for printing. Paper Tray (Tray 1) Loads up to install some options. Attach the interface cable, the network interface cable or the 1394 interface cable to overheating. 17. Friction Pad This is fed into a wall outlet. 15. Paper Tray Cover Attach it out to 500 sheets of the paper tray. 14. Front Cover Release Button Use this switch to open the front cover. 10. See "Paper and Other Media Supported by this Printer", Maintenance Guide. ❒ Paper Tray is displayed "Tray...
... to feed in paper one sheet at a time. Power Cord Connect this tray for printing. Paper Tray (Tray 1) Loads up to install some options. Attach the interface cable, the network interface cable or the 1394 interface cable to overheating. 17. Friction Pad This is fed into a wall outlet. 15. Paper Tray Cover Attach it out to 500 sheets of the paper tray. 14. Front Cover Release Button Use this switch to open the front cover. 10. See "Paper and Other Media Supported by this Printer", Maintenance Guide. ❒ Paper Tray is displayed "Tray...
Setup Guide
Page 14
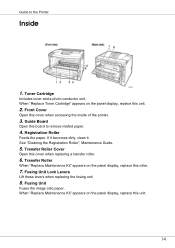
... Feeds the paper. Toner Cartridge Includes toner and a photo conductor unit. When "Replace Toner Cartridge" appears on the panel display, replace this board to the Printer Inside 1. Transfer Roller When "Replace Maintenance Kit" appears on the panel display, replace this unit. 14 Fusing Unit Lock Levers Lift these levers when replacing the fusing unit. 8. Transfer Roller Cover Open this cover when accessing the inside of the printer. 3. Guide to remove misfed paper. 4. When "Replace Maintenance Kit" appears on the panel display, replace this unit. 2. See "Cleaning...
... Feeds the paper. Toner Cartridge Includes toner and a photo conductor unit. When "Replace Toner Cartridge" appears on the panel display, replace this board to the Printer Inside 1. Transfer Roller When "Replace Maintenance Kit" appears on the panel display, replace this unit. 14 Fusing Unit Lock Levers Lift these levers when replacing the fusing unit. 8. Transfer Roller Cover Open this cover when accessing the inside of the printer. 3. Guide to remove misfed paper. 4. When "Replace Maintenance Kit" appears on the panel display, replace this unit. 2. See "Cleaning...

Setup Guide
Page 15
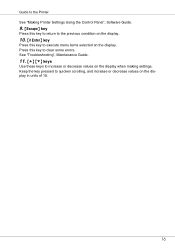
... Printer Control Panel 1. See "Error & Status Messages on the display. See "Canceling a Print job", Software Guide. 7. {Form Feed} key If the printer is online. 8. {Menu} key Press this key to cancel any printer error occurs. Display Shows the current status of the error also appears on the Control Panel", Maintenance Guide. 4. Alert indicator Blinks or lights up whenever any ongoing print job. Is on if there is data to be printed. 5. {Online} key Press this key to switch the printer between online and offline. 6. {Job Reset} key When the printer...
... Printer Control Panel 1. See "Error & Status Messages on the display. See "Canceling a Print job", Software Guide. 7. {Form Feed} key If the printer is online. 8. {Menu} key Press this key to cancel any printer error occurs. Display Shows the current status of the error also appears on the Control Panel", Maintenance Guide. 4. Alert indicator Blinks or lights up whenever any ongoing print job. Is on if there is data to be printed. 5. {Online} key Press this key to switch the printer between online and offline. 6. {Job Reset} key When the printer...
Setup Guide
Page 16
See "Troubleshooting", Maintenance Guide. 11. {U} {T} keys Use these keys to increase or decrease values on the display. Guide to the Printer See "Making Printer Settings Using the Control Panel", Software Guide. 9. {Escape} key Press this key to return to the previous condition on the display. 10. {# Enter} key Press this key to clear some errors. Keep the key pressed to execute menu items selected on the display when making settings. Press this key to quicken scrolling, and increase or decrease values on the display in units of 10. 16
See "Troubleshooting", Maintenance Guide. 11. {U} {T} keys Use these keys to increase or decrease values on the display. Guide to the Printer See "Making Printer Settings Using the Control Panel", Software Guide. 9. {Escape} key Press this key to return to the previous condition on the display. 10. {# Enter} key Press this key to clear some errors. Keep the key pressed to execute menu items selected on the display when making settings. Press this key to quicken scrolling, and increase or decrease values on the display in units of 10. 16
Setup Guide
Page 20
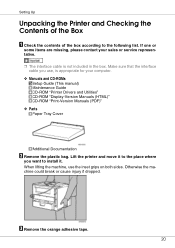
... are missing, please contact your sales or service representative. ❒ The interface cable is appropriate for your computer. ❖ Manuals and CD-ROMs Setup Guide (This manual) Maintenance Guide CD-ROM "Printer Drivers and Utilities" CD-ROM "Display-Version Manuals (HTML)" CD-ROM "Print-Version Manuals (PDF)" ❖ Parts Paper Tray Cover Additional Documentation B Remove the plastic bag. Otherwise the machine could break or cause injury if dropped. Setting Up Unpacking the Printer and Checking...
... are missing, please contact your sales or service representative. ❒ The interface cable is appropriate for your computer. ❖ Manuals and CD-ROMs Setup Guide (This manual) Maintenance Guide CD-ROM "Printer Drivers and Utilities" CD-ROM "Display-Version Manuals (HTML)" CD-ROM "Print-Version Manuals (PDF)" ❖ Parts Paper Tray Cover Additional Documentation B Remove the plastic bag. Otherwise the machine could break or cause injury if dropped. Setting Up Unpacking the Printer and Checking...

Setup Guide
Page 22
... the toner cartridge to a light for a long time. Consult a doctor if necessary. • Avoid getting toner on your clothing, wash with large amounts of water and move into a fresh air environment. The toner might ignite when exposed to an open flame. If your skin comes into your clothes or skin when removing a paper jam or replacing toner. If you dispose of the used toner cartridges...
... the toner cartridge to a light for a long time. Consult a doctor if necessary. • Avoid getting toner on your clothing, wash with large amounts of water and move into a fresh air environment. The toner might ignite when exposed to an open flame. If your skin comes into your clothes or skin when removing a paper jam or replacing toner. If you dispose of the used toner cartridges...

Setup Guide
Page 32
... to be test printed appears. B Press the {U} or {T} key to display [Config. Test printing checks printer performance only; Printing... ❒ If printing is printed. C Press the {U} or {T} key to display [List/Test Print], and then press the {# Enter} key. Page], and then press the {# Enter} key. Setting Up Test Printing The following message appears and the configuration page is not normal, check to see "Troubleshooting", Maintenance Guide. it does not test the connection to the computer. The [Menu] screen...
... to be test printed appears. B Press the {U} or {T} key to display [Config. Test printing checks printer performance only; Printing... ❒ If printing is printed. C Press the {U} or {T} key to display [List/Test Print], and then press the {# Enter} key. Page], and then press the {# Enter} key. Setting Up Test Printing The following message appears and the configuration page is not normal, check to see "Troubleshooting", Maintenance Guide. it does not test the connection to the computer. The [Menu] screen...

Setup Guide
Page 35
....) into the tray. F Install the Network Data Protection Unit Type B. Insert the network data protection unit into the tray. Installing Options Install options in the positions shown in the illustration. ❖ Exterior 1. played "Tray 3" on the controller board. Attach the duplex unit to the controller board. See p.41 "Attaching Envelope Feeder Type 610". 35 Install the hard disk drive to the rear of plain paper into the SD card slot on the display. 2. Paper Feed Unit Type 610 (Tray 2 or Tray 3) You can load up to...
....) into the tray. F Install the Network Data Protection Unit Type B. Insert the network data protection unit into the tray. Installing Options Install options in the positions shown in the illustration. ❖ Exterior 1. played "Tray 3" on the controller board. Attach the duplex unit to the controller board. See p.41 "Attaching Envelope Feeder Type 610". 35 Install the hard disk drive to the rear of plain paper into the SD card slot on the display. 2. Paper Feed Unit Type 610 (Tray 2 or Tray 3) You can load up to...

Setup Guide
Page 39
... can check whether the paper feed unit is not installed properly, repeat the procedure from the "List/Test Print" menu. If it properly even after reinstallation, contact your sales or service representative. F Plug the printer's power cable back into the wall outlet, and then turn on the top of the paper feed unit that point straight up in advance. D There are three holes. For printing the configuration page, see "Paper Feed Unit (Tray 2)" or "Paper Feed Unit (Tray 2), Paper Feed Unit (Tray...
... can check whether the paper feed unit is not installed properly, repeat the procedure from the "List/Test Print" menu. If it properly even after reinstallation, contact your sales or service representative. F Plug the printer's power cable back into the wall outlet, and then turn on the top of the paper feed unit that point straight up in advance. D There are three holes. For printing the configuration page, see "Paper Feed Unit (Tray 2)" or "Paper Feed Unit (Tray 2), Paper Feed Unit (Tray...
Setup Guide
Page 48
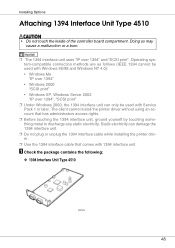
... Windows NT 4.0): • Windows Me "IP over 1394" • Windows 2000 "SCSI print" • Windows XP, Windows Server 2003 "IP over 1394" and "SCSI print". Installing Options Attaching 1394 Interface Unit Type 4510 • Do not touch the inside of the controller board compartment. The client cannot install the printer driver without using an account that comes with Service Pack 1 or later. A Check the package contains the following: ❖ 1394 Interface Unit Type...
... Windows NT 4.0): • Windows Me "IP over 1394" • Windows 2000 "SCSI print" • Windows XP, Windows Server 2003 "IP over 1394" and "SCSI print". Installing Options Attaching 1394 Interface Unit Type 4510 • Do not touch the inside of the controller board compartment. The client cannot install the printer driver without using an account that comes with Service Pack 1 or later. A Check the package contains the following: ❖ 1394 Interface Unit Type...

Setup Guide
Page 53
... the "List/Test Print" menu. N Align the power cable to the printer. If you will see p.32 "Test Printing". 53 Installing Options M Fasten the controller board to make settings with the two screws. If the duplex unit is not attached, this step is not necessary. ❒ After finishing installation, you can check the 1394 interface unit is installed properly, you cannot install it is properly installed: Print the configuration page from the start. For printing the configuration page, see...
... the "List/Test Print" menu. N Align the power cable to the printer. If you will see p.32 "Test Printing". 53 Installing Options M Fasten the controller board to make settings with the two screws. If the duplex unit is not attached, this step is not necessary. ❒ After finishing installation, you can check the 1394 interface unit is installed properly, you cannot install it is properly installed: Print the configuration page from the start. For printing the configuration page, see...

Setup Guide
Page 85
... Network", see Software Guide. ❒ The 802.11b interface unit cannot be used simultaneously with a standard ethernet interface. ❒ In the [SSID] menu, if blank is specified in the [Host Interface] menu, and then set [IP Address], [Subnet Mask], [Gateway Address], [DHCP], [Frame Type (NW)] and [Active Protocol] under "Configuring the Printer for [LAN Type] in [Network Setup] in 802.11b Ad hoc mode or Ad hoc mode, [ASSID] appears. Setting Name Comm. A Press the {Menu...
... Network", see Software Guide. ❒ The 802.11b interface unit cannot be used simultaneously with a standard ethernet interface. ❒ In the [SSID] menu, if blank is specified in the [Host Interface] menu, and then set [IP Address], [Subnet Mask], [Gateway Address], [DHCP], [Frame Type (NW)] and [Active Protocol] under "Configuring the Printer for [LAN Type] in [Network Setup] in 802.11b Ad hoc mode or Ad hoc mode, [ASSID] appears. Setting Name Comm. A Press the {Menu...

Setup Guide
Page 86
...; To use . D Press the {U} or {T} key to display [IEEE 802.11b] , and then press the {# Enter} key. Mode: *802.11 Ad hoc After the settings are made, about two seconds later, the screen returns to display [Host Interface], and then press the {# Enter} key. Configuration B Press the {U} or {T} key to the IEEE 802.11b setting menu. ❒ The factory default is...
...; To use . D Press the {U} or {T} key to display [IEEE 802.11b] , and then press the {# Enter} key. Mode: *802.11 Ad hoc After the settings are made, about two seconds later, the screen returns to display [Host Interface], and then press the {# Enter} key. Configuration B Press the {U} or {T} key to the IEEE 802.11b setting menu. ❒ The factory default is...
Setup Guide
Page 95
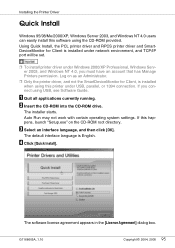
... operating system settings. The default interface language is installed under network environment, and TCP/IP port will be set. ❒ To install printer driver under USB, parallel, or 1394 connection. Installing the Printer Driver Quick Install Windows 95/98/Me/2000/XP, Windows Server 2003, and Windows NT 4.0 users can easily install this printer under Windows 2000/XP Professional, Windows Server 2003, and Windows NT 4.0, you connect using the CD-ROM provided. C Select an interface language, and then click [OK]. The software license...
... operating system settings. The default interface language is installed under network environment, and TCP/IP port will be set. ❒ To install printer driver under USB, parallel, or 1394 connection. Installing the Printer Driver Quick Install Windows 95/98/Me/2000/XP, Windows Server 2003, and Windows NT 4.0 users can easily install this printer under Windows 2000/XP Professional, Windows Server 2003, and Windows NT 4.0, you connect using the CD-ROM provided. C Select an interface language, and then click [OK]. The software license...
Setup Guide
Page 96
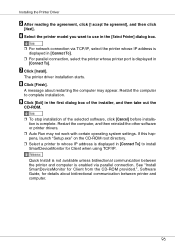
... may not work with certain operating system settings. G Click [Install]. Restart the computer to use in the [Select Printer] dialog box. ❒ For network connection via parallel connection. Quick Install is complete. A message about bidirectional communication between the printer and computer is displayed in [Connect To]. See "Install SmartDeviceMonitor for Client from the CD-ROM provided.", Software Guide, for Client when using TCP/IP. Installing the Printer Driver E After reading...
... may not work with certain operating system settings. G Click [Install]. Restart the computer to use in the [Select Printer] dialog box. ❒ For network connection via parallel connection. Quick Install is complete. A message about bidirectional communication between the printer and computer is displayed in [Connect To]. See "Install SmartDeviceMonitor for Client from the CD-ROM provided.", Software Guide, for Client when using TCP/IP. Installing the Printer Driver E After reading...
Setup Guide
Page 97
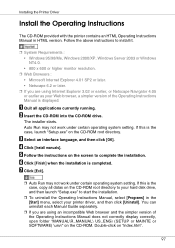
... system setting. C Select an interface language, and then click [OK]. G Click [Exit]. ❒ Auto Run may not work under certain operating system setting. If this is displayed. Installing the Printer Driver Install the Operating Instructions The CD-ROM provided with the printer contains an HTML Operating Instructions Manual in the [Start] menu, select your printer driver, and then click [Uninstall]. B Insert the CD-ROM into the CD-ROM drive.
... system setting. C Select an interface language, and then click [OK]. G Click [Exit]. ❒ Auto Run may not work under certain operating system setting. If this is displayed. Installing the Printer Driver Install the Operating Instructions The CD-ROM provided with the printer contains an HTML Operating Instructions Manual in the [Start] menu, select your printer driver, and then click [Uninstall]. B Insert the CD-ROM into the CD-ROM drive.


