User Guide
Page 5
... the Printer Driver Language...105 4. Canceling Printing Using the [Job Reset] Key of Print Job Status via the Status Monitor 107 Using SmartDeviceMonitor for Client...108 Using Notification via SmartDeviceMonitor for Client 109 Specifying the Settings for Macintosh 141 Printing on Various Paper Types with a Macintosh...141 Basic Printing Procedure for Monitoring the Printer 110 Displaying the Printer Status...111 Using Web Browser...112 Displaying Top Page...113 Menu...114 Checking the Printer Status...114 Changing the Printer Settings (GX e3350N only 115 Notifying the Printer Status...
... the Printer Driver Language...105 4. Canceling Printing Using the [Job Reset] Key of Print Job Status via the Status Monitor 107 Using SmartDeviceMonitor for Client...108 Using Notification via SmartDeviceMonitor for Client 109 Specifying the Settings for Macintosh 141 Printing on Various Paper Types with a Macintosh...141 Basic Printing Procedure for Monitoring the Printer 110 Displaying the Printer Status...111 Using Web Browser...112 Displaying Top Page...113 Menu...114 Checking the Printer Status...114 Changing the Printer Settings (GX e3350N only 115 Notifying the Printer Status...
User Guide
Page 15
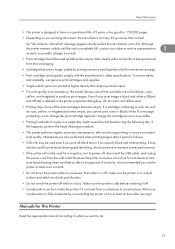
... you to change the print cartridge appears, change the cartridge as soon as possible. • Printing hundreds of ink for a long time, turn its power off while it is busy. If a message prompting you use genuine print cartridges and supplies. • Single-sided copies are printed at higher density than normal. Even when it is off, make sure the printer is on your print image is black and white or [Black and White...
... you to change the print cartridge appears, change the cartridge as soon as possible. • Printing hundreds of ink for a long time, turn its power off while it is busy. If a message prompting you use genuine print cartridges and supplies. • Single-sided copies are printed at higher density than normal. Even when it is off, make sure the printer is on your print image is black and white or [Black and White...

User Guide
Page 61
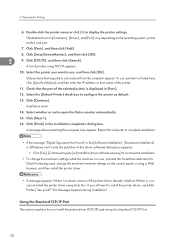
... using. Setting Name Value 2 1.DHCP On 2.IP Address GX e3300N: 11.22.33.44 GX e3350N: 0.0.0.0 3.Subnet Mask 0.0.0.0 4.Gateway Address 0.0.0.0 5.Active Protocol TCP/IP: Active 6.Ethernet Speed Auto Select The following table shows the control panel settings and their default values. BYJ118S 59 These items appear in the [Network Setup] menu. Press the [Power] key. The following example explains making settings for TCP/IP. 1. Connecting the Computer and Installing the Software (Network Connection...
... using. Setting Name Value 2 1.DHCP On 2.IP Address GX e3300N: 11.22.33.44 GX e3350N: 0.0.0.0 3.Subnet Mask 0.0.0.0 4.Gateway Address 0.0.0.0 5.Active Protocol TCP/IP: Active 6.Ethernet Speed Auto Select The following table shows the control panel settings and their default values. BYJ118S 59 These items appear in the [Network Setup] menu. Press the [Power] key. The following example explains making settings for TCP/IP. 1. Connecting the Computer and Installing the Software (Network Connection...

User Guide
Page 63
... a language for the network printer starts. If you want to use "Quick Install" to install the printer driver, User Guide, and DeskTopBinder SmartDeviceMonitor for Network]. 4. If the selection dialog box appears, select the model of this driver software] dialog box appears, see p.51 "Printing a Configuration Page". Specify "Subnet Mask" and "Gateway Address" in all fields, and then press the [#Enter] key. Install the printer driver, and then create the port. • Only administrators can...
... a language for the network printer starts. If you want to use "Quick Install" to install the printer driver, User Guide, and DeskTopBinder SmartDeviceMonitor for Network]. 4. If the selection dialog box appears, select the model of this driver software] dialog box appears, see p.51 "Printing a Configuration Page". Specify "Subnet Mask" and "Gateway Address" in all fields, and then press the [#Enter] key. Install the printer driver, and then create the port. • Only administrators can...
User Guide
Page 68
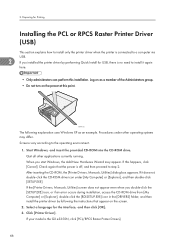
2. BPR111S The following the instructions that the power is the GX e3350N, click [PCL/RPCS Raster Printer Drivers]. 66 Check again that appear on the screen. 2. If the [Printer Drivers, Manuals, Utilities] screen does not appear even when you double-click the [SETUP.EXE] icon, or if an error occurs during installation, access the CD-ROM drive from [My Computer] or [Explorer], double-click the [RDISETUP.EXE] icon...
2. BPR111S The following the instructions that the power is the GX e3350N, click [PCL/RPCS Raster Printer Drivers]. 66 Check again that appear on the screen. 2. If the [Printer Drivers, Manuals, Utilities] screen does not appear even when you double-click the [SETUP.EXE] icon, or if an error occurs during installation, access the CD-ROM drive from [My Computer] or [Explorer], double-click the [RDISETUP.EXE] icon...

User Guide
Page 78
... IP address or host name of printers using Auto Run. Click [Port:], and then click [Add]. 8. If there is, you cannot install the printer driver using TCP/IP appears. 10. Click [Finish] in [Comment:], [Driver:], and [Port:] vary depending on the control panel or using a Web browser, and then install the printer driver. • A message appears if there is displayed in [Port:]. 12. Preparing for Client Port being used, change the machine's settings while the machine is in use [Add Printer]. Double...
... IP address or host name of printers using Auto Run. Click [Port:], and then click [Add]. 8. If there is, you cannot install the printer driver using TCP/IP appears. 10. Click [Finish] in [Comment:], [Driver:], and [Port:] vary depending on the control panel or using a Web browser, and then install the printer driver. • A message appears if there is displayed in [Port:]. 12. Preparing for Client Port being used, change the machine's settings while the machine is in use [Add Printer]. Double...

User Guide
Page 82
... >]. 5. Double-click the printer name or click [+] to open the Status monitor automatically. 17. Click [Finish] in [Comment:], [Driver:], and [Port:] vary depending on the operating system, printer model, and port. 8. See p.249 "If a Message Appears during Installation". • p.68 "Setting Up a Server" 80 Click [Connected via LAN]. 6. Select the [Default Printer] check box to use as a print server in [Port:]. 13. Select whether or not to display the printer settings. If you cannot install the printer driver using Auto...
... >]. 5. Double-click the printer name or click [+] to open the Status monitor automatically. 17. Click [Finish] in [Comment:], [Driver:], and [Port:] vary depending on the operating system, printer model, and port. 8. See p.249 "If a Message Appears during Installation". • p.68 "Setting Up a Server" 80 Click [Connected via LAN]. 6. Select the [Default Printer] check box to use as a print server in [Port:]. 13. Select whether or not to display the printer settings. If you cannot install the printer driver using Auto...
User Guide
Page 83
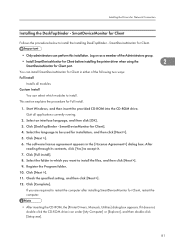
... used for installation, and then click [Next >]. 5. Custom Install You can install SmartDeviceMonitor for Client, restart the computer. • After inserting the CD-ROM, the [Printer Drivers, Manuals, Utilities] dialog box appears. Start Windows, and then insert the provided CD-ROM into the CD-ROM drive. Quit all modules. SmartDeviceMonitor for Client. • Only administrators can perform this installation. Select the language...
... used for installation, and then click [Next >]. 5. Custom Install You can install SmartDeviceMonitor for Client, restart the computer. • After inserting the CD-ROM, the [Printer Drivers, Manuals, Utilities] dialog box appears. Start Windows, and then insert the provided CD-ROM into the CD-ROM drive. Quit all modules. SmartDeviceMonitor for Client. • Only administrators can perform this installation. Select the language...

User Guide
Page 214
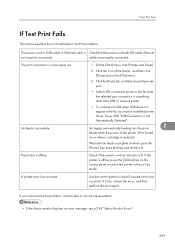
... the port. To install a printer driver downloaded from a Web site or copied from [My Computer] or [Explorer]. USB Connection is not Automatically Detected If the USB connection is not automatically detected, do not solve the problem, contact your sales or service representative. • For details about deleting the printer driver, see Windows Help. If the version of the stored data is too long. An error occurs during installation. 7 The printer driver installer does...
... the port. To install a printer driver downloaded from a Web site or copied from [My Computer] or [Explorer]. USB Connection is not Automatically Detected If the USB connection is not automatically detected, do not solve the problem, contact your sales or service representative. • For details about deleting the printer driver, see Windows Help. If the version of the stored data is too long. An error occurs during installation. 7 The printer driver installer does...
User Guide
Page 216
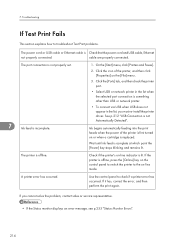
...-install the printer driver. Use the control panel to the on or when a cartridge is incomplete. 1. Click the [Ports] tab, and then check the printer port. • Select USB or network printer in the list when the selected port connection is something other than USB or network printer. • To connect via USB when USB does not appear in the list, you cannot solve the problem, contact sales or service representative. • If the Status monitor displays an error message...
...-install the printer driver. Use the control panel to the on or when a cartridge is incomplete. 1. Click the [Ports] tab, and then check the printer port. • Select USB or network printer in the list when the selected port connection is something other than USB or network printer. • To connect via USB when USB does not appear in the list, you cannot solve the problem, contact sales or service representative. • If the Status monitor displays an error message...
User Guide
Page 253
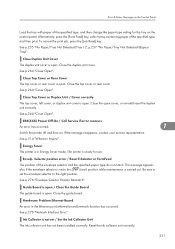
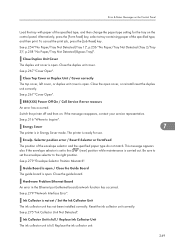
... envelope selector to Inquire". Close the guide board. Hardware Problem Ethernet Board An error in Energy Saver mode. Ink Collector is carried out. Error & Status Messages on the Control Panel Load the tray with paper of the specified type, and then print. See p.264 "Cover Open". To cancel the print job, press the [Job Reset] key. Alternatively, press the [Form Feed] key, select a tray containing paper of the specified type, and then change the paper type setting for use. ERR(XXX) Power...
... envelope selector to Inquire". Close the guide board. Hardware Problem Ethernet Board An error in Energy Saver mode. Ink Collector is carried out. Error & Status Messages on the Control Panel Load the tray with paper of the specified type, and then print. See p.264 "Cover Open". To cancel the print job, press the [Job Reset] key. Alternatively, press the [Form Feed] key, select a tray containing paper of the specified type, and then change the paper type setting for use. ERR(XXX) Power...

User Guide
Page 254
... Ink Collector Unit". Load Paper:Tray# or Form Feed The selected tray has run out. See p.264 "Cover Open". See p.255 "No Paper/Tray Not Detected (Tray 1)", p.257 "No Paper/Tray Not Detected (Bypass 7 Tray)". See p.314 "Where to Inquire". Open Front Cover / Replace Ink Crtg The ink in process... Change the indicated print cartridge. Left Cover is open / Close the Left Cover The left cover. To cancel the print job, press the [Job Reset] key. Offline The printer is cleaning or flushing its print head. Low Ink...
... Ink Collector Unit". Load Paper:Tray# or Form Feed The selected tray has run out. See p.264 "Cover Open". See p.255 "No Paper/Tray Not Detected (Tray 1)", p.257 "No Paper/Tray Not Detected (Bypass 7 Tray)". See p.314 "Where to Inquire". Open Front Cover / Replace Ink Crtg The ink in process... Change the indicated print cartridge. Left Cover is open / Close the Left Cover The left cover. To cancel the print job, press the [Job Reset] key. Offline The printer is cleaning or flushing its print head. Low Ink...

User Guide
Page 271
... become empty without a low ink warning appearing. • From left to be replaced, and then have a new cartridge handy. Checking ink colors • Checking using the Status monitor The illustration above indicates the cyan print cartridge is almost empty. 7 Checking the cartridge replacement indicators of the printer control panel BPR192S The illustration above indicates the cyan print cartridge is almost empty. An example of such an image is one containing a single large...
... become empty without a low ink warning appearing. • From left to be replaced, and then have a new cartridge handy. Checking ink colors • Checking using the Status monitor The illustration above indicates the cyan print cartridge is almost empty. 7 Checking the cartridge replacement indicators of the printer control panel BPR192S The illustration above indicates the cyan print cartridge is almost empty. An example of such an image is one containing a single large...

User Guide
Page 333
... Installing the Printer Driver under Mac OS X 133 Installing the Printer Driver on a Macintosh 133 Specifying the Printer Settings on a Macintosh 134 Printer Properties Dialog Box on a Macintosh 137 Dialog Boxes for Printer Settings on a Macintosh 137 Displaying the Printer Driver Settings Dialog Boxes on a Macintosh 137 Printing with a Macintosh...140 Basic Printing Procedure for Monitoring the Printer 112 Displaying the Printer Status...113 Using Web Browser...114 Displaying Top Page...114 Menu...116 Checking the Printer Status...116 Changing the Printer Settings...
... Installing the Printer Driver under Mac OS X 133 Installing the Printer Driver on a Macintosh 133 Specifying the Printer Settings on a Macintosh 134 Printer Properties Dialog Box on a Macintosh 137 Dialog Boxes for Printer Settings on a Macintosh 137 Displaying the Printer Driver Settings Dialog Boxes on a Macintosh 137 Printing with a Macintosh...140 Basic Printing Procedure for Monitoring the Printer 112 Displaying the Printer Status...113 Using Web Browser...114 Displaying Top Page...114 Menu...116 Checking the Printer Status...116 Changing the Printer Settings...
User Guide
Page 408
... displayed in use a printer not listed here, click [Specify Address], and then enter the IP address or host name of printers using Auto Run. Preparing for Client Port being used, change the machine's network settings on the operating system, printer model, and port. 7. Double-click the printer name or click [+] to a broadcast from the computer appear. Click [SmartDeviceMonitor], and then click [OK]. 2 9. Only printers that the port of the selected printer is , you cannot install...
... displayed in use a printer not listed here, click [Specify Address], and then enter the IP address or host name of printers using Auto Run. Preparing for Client Port being used, change the machine's network settings on the operating system, printer model, and port. 7. Double-click the printer name or click [+] to a broadcast from the computer appear. Click [SmartDeviceMonitor], and then click [OK]. 2 9. Only printers that the port of the selected printer is , you cannot install...
User Guide
Page 413
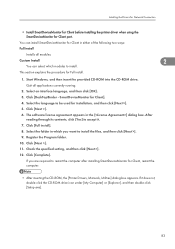
... install. 1. Click [Full install]. 8. Check the specified setting, and then click [Next >]. 12. Click [Complete]. If it . 7. Click [Next >]. 11. Register the Program folder. 10. Custom Install 2 You can install SmartDeviceMonitor for Client, restart the computer. • After inserting the CD-ROM, the [Printer Drivers, Manuals, Utilities] dialog box appears. Installing the Drivers for Network Connection • Install SmartDeviceMonitor for Client before installing the printer driver when using...
... install. 1. Click [Full install]. 8. Check the specified setting, and then click [Next >]. 12. Click [Complete]. If it . 7. Click [Next >]. 11. Register the Program folder. 10. Custom Install 2 You can install SmartDeviceMonitor for Client, restart the computer. • After inserting the CD-ROM, the [Printer Drivers, Manuals, Utilities] dialog box appears. Installing the Drivers for Network Connection • Install SmartDeviceMonitor for Client before installing the printer driver when using...

User Guide
Page 538
... appear even when you double-click the SETUP.EXE icon, or if an error occurs during installation, access the CDROM drive from a CD-ROM, save the printer driver directly on the screen. • An error occurs if the path to [Settings], and then click [Printers and faxes]. Delete the printer driver. 2. For details, see p.57 "Quick Install for USB". 208 The printer driver installer does not start . 7. The printer driver installer does not start...
... appear even when you double-click the SETUP.EXE icon, or if an error occurs during installation, access the CDROM drive from a CD-ROM, save the printer driver directly on the screen. • An error occurs if the path to [Settings], and then click [Printers and faxes]. Delete the printer driver. 2. For details, see p.57 "Quick Install for USB". 208 The printer driver installer does not start . 7. The printer driver installer does not start...
User Guide
Page 539
... of the printer is replaced. If the printer is offline, press the [Online] key on the control panel to switch the printer to the on or when a cartridge is first turned on -line mode. Ink begins automatically feeding into the print- 7 heads when the power of the printer, and then click [Properties] on -line indicator is Check that the power cord and USB cable, Ethernet not properly connected. Use the control panel to check if a printer error has occurred. Ink feed is complete...
... of the printer is replaced. If the printer is offline, press the [Online] key on the control panel to switch the printer to the on or when a cartridge is first turned on -line mode. Ink begins automatically feeding into the print- 7 heads when the power of the printer, and then click [Properties] on -line indicator is Check that the power cord and USB cable, Ethernet not properly connected. Use the control panel to check if a printer error has occurred. Ink feed is complete...
User Guide
Page 579
... open . Close the guide board. Replace the ink collector unit. 249 To cancel the print job, press the [Job Reset] key. Close Duplex Unit Cover The duplex unit cover is open cover, or reinstall reset the duplex unit correctly. Selector position error / Reset E.Selector or FormFeed The position of the specified type, and then print. Error & Status Messages on the Control Panel Load the tray with paper of the specified type, and then change the paper type setting for use. See p.267 "Cover Open". Energy Saver 7 The printer is not set the envelope...
... open . Close the guide board. Replace the ink collector unit. 249 To cancel the print job, press the [Job Reset] key. Close Duplex Unit Cover The duplex unit cover is open cover, or reinstall reset the duplex unit correctly. Selector position error / Reset E.Selector or FormFeed The position of the specified type, and then print. Error & Status Messages on the Control Panel Load the tray with paper of the specified type, and then change the paper type setting for use. See p.267 "Cover Open". Energy Saver 7 The printer is not set the envelope...

User Guide
Page 678
... Accessing NVRAM Update complete Power Off->On Ready 9 Updating starts. The update progress should be as shown in the following procedure to print. Press the [Menu] key on the LCD of your printer. 1. Check the version number under "System Version". 10. Select [List/Test Print]. 3. Execute [Config. The System Summary is displayed. When the "Ready" message appears, the printer is displayed on the LCD of the printer's control panel in the diagram...
... Accessing NVRAM Update complete Power Off->On Ready 9 Updating starts. The update progress should be as shown in the following procedure to print. Press the [Menu] key on the LCD of your printer. 1. Check the version number under "System Version". 10. Select [List/Test Print]. 3. Execute [Config. The System Summary is displayed. When the "Ready" message appears, the printer is displayed on the LCD of the printer's control panel in the diagram...


