
User Guide
Page 29
... cartridge: "Replace (Color) Print Cartridge" 2. Transfer unit Remove this unit when replacing the waste toner bottle, intermediate transfer unit. If the following message appears on the control panel, replace the waste toner bottle: "Replace Waste Toner" 5. Intermediate Transfer Unit If the following message appears on the control panel, replace the intermediate transfer unit: "Replace Transfer Belt" 4.
... cartridge: "Replace (Color) Print Cartridge" 2. Transfer unit Remove this unit when replacing the waste toner bottle, intermediate transfer unit. If the following message appears on the control panel, replace the waste toner bottle: "Replace Waste Toner" 5. Intermediate Transfer Unit If the following message appears on the control panel, replace the intermediate transfer unit: "Replace Transfer Belt" 4.
User Guide
Page 107
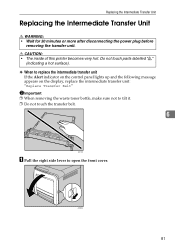
... up and the following message appears on the display, replace the intermediate transfer unit: "Replace Transfer Belt" Important ❒ When removing the waste toner bottle, make sure not to tilt it. ❒ Do not touch the transfer belt. 6 ASI118S A Pull the right side lever to open the front cover.... Replacing the Intermediate Transfer Unit Replacing the Intermediate Transfer Unit R WARNING: • Wait for 30 minutes or more after disconnecting the ...
... up and the following message appears on the display, replace the intermediate transfer unit: "Replace Transfer Belt" Important ❒ When removing the waste toner bottle, make sure not to tilt it. ❒ Do not touch the transfer belt. 6 ASI118S A Pull the right side lever to open the front cover.... Replacing the Intermediate Transfer Unit Replacing the Intermediate Transfer Unit R WARNING: • Wait for 30 minutes or more after disconnecting the ...
User Guide
Page 111
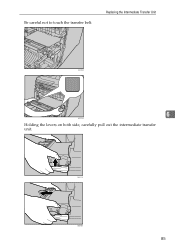
ASI111S ASI040S 85 Replacing the Intermediate Transfer Unit ASI109S 6 ASI110S Holding the levers on both side, carefully pull out the intermediate transfer unit. Be careful not to touch the transfer belt.
ASI111S ASI040S 85 Replacing the Intermediate Transfer Unit ASI109S 6 ASI110S Holding the levers on both side, carefully pull out the intermediate transfer unit. Be careful not to touch the transfer belt.

User Guide
Page 112
ea, lift the new intermediate transfer unit from its box using the grips on both sides. 6 ASI114S 86 Then, while taking care not to touch the belt ar- Replacing Consumables I Open the box containing the new intermediate transfer unit and remove the top cover. ASI113S J Remove the covering sheet.
ea, lift the new intermediate transfer unit from its box using the grips on both sides. 6 ASI114S 86 Then, while taking care not to touch the belt ar- Replacing Consumables I Open the box containing the new intermediate transfer unit and remove the top cover. ASI113S J Remove the covering sheet.
User Guide
Page 114
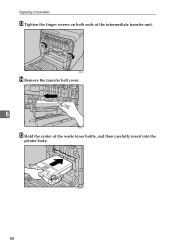
ASI032S 88 Replacing Consumables M Tighten the finger screws on both ends of the waste toner bottle, and then carefully insert into the printer body. ASI042S N Remove the transfer belt cover. 6 ASI091S O Hold the center of the intermediate transfer unit.
ASI032S 88 Replacing Consumables M Tighten the finger screws on both ends of the waste toner bottle, and then carefully insert into the printer body. ASI042S N Remove the transfer belt cover. 6 ASI091S O Hold the center of the intermediate transfer unit.

User Guide
Page 137
... tray # (1 or 2) is not in- Call service people to repair it on again. See p.81 "Replacing the Intermediate Transfer Unit". the transfer belt is not installed input tray correctly. Turn off on There is time to replace the Fusing unit. Replace (color) Print Cartridge...correctly There is almost out of toner. See, p.69 "Replacing the Print Cartridge". See p.74 "Replacing the Waste Toner Bottle". Replace Transfer Belt It is out of Prepare a new print car- Error & Status Messages on the Control Panel Message Explanation Recommended Action Replace (color)...
... tray # (1 or 2) is not in- Call service people to repair it on again. See p.81 "Replacing the Intermediate Transfer Unit". the transfer belt is not installed input tray correctly. Turn off on There is time to replace the Fusing unit. Replace (color) Print Cartridge...correctly There is almost out of toner. See, p.69 "Replacing the Print Cartridge". See p.74 "Replacing the Waste Toner Bottle". Replace Transfer Belt It is out of Prepare a new print car- Error & Status Messages on the Control Panel Message Explanation Recommended Action Replace (color)...
User Guide
Page 145
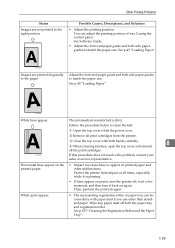
ASH103S White lines appear. ASH104S The intermediate transfer belt is on. Protect the printer from the printer. See p.45 "Loading Paper". You can become dirty with both side paper guides to match the paper ..., and Solutions • Adjust the printing position. Remove all print cartridges from impact at all the print cartridges. Follow the procedure below to clean the belt: Open the top cover while the power is dirty. Horizontal lines appear on the printed paper. • Impact can cause lines to appear on again...
ASH103S White lines appear. ASH104S The intermediate transfer belt is on. Protect the printer from the printer. See p.45 "Loading Paper". You can become dirty with both side paper guides to match the paper ..., and Solutions • Adjust the printing position. Remove all print cartridges from impact at all the print cartridges. Follow the procedure below to clean the belt: Open the top cover while the power is dirty. Horizontal lines appear on the printed paper. • Impact can cause lines to appear on again...

User Guide
Page 266
... nearly full • Paper has jammed • Open door is detected • Paper tray is empty • Fusing unit needs replacing soon • Transfer belt needs replacing soon • Transfer belt needs replacing immediately Also you receive an e-mail message. B Click [Login]. D In the menu area, click [Configuration]. E Click [Network]. Monitoring and Configuring the...
... nearly full • Paper has jammed • Open door is detected • Paper tray is empty • Fusing unit needs replacing soon • Transfer belt needs replacing soon • Transfer belt needs replacing immediately Also you receive an e-mail message. B Click [Login]. D In the menu area, click [Configuration]. E Click [Network]. Monitoring and Configuring the...


