
Operating Instructions
Page 14
... 7.7 Replacing the Toner Cartridge 7.8 Setting the Notify Toner Option 7.10 Cleaning the Drum 7.10 Setting the machine to be Checked by Phone ......... 7.11 Chapter 8: TROUBLESHOOTING Clearing Document Jams 8.2 Input Misfeed 8.2 Exit Misfeed 8.3 Roller Misfeed 8.3 Clearing Paper Jams 8.4 In the Paper Feed Area 8.4 In the Paper Exit Area 8.5 In the Fuser Area or Around the Toner Cartridge . 8.7 In the Bypass Tray 8.8 Tips for Avoiding Paper Jams When Printing on the A5-sized Paper 8.9 Tips for Avoiding Paper Jams 8.10 Clearing LCD Error Messages 8.11 Solving Problems 8.14 Paper...
... 7.7 Replacing the Toner Cartridge 7.8 Setting the Notify Toner Option 7.10 Cleaning the Drum 7.10 Setting the machine to be Checked by Phone ......... 7.11 Chapter 8: TROUBLESHOOTING Clearing Document Jams 8.2 Input Misfeed 8.2 Exit Misfeed 8.3 Roller Misfeed 8.3 Clearing Paper Jams 8.4 In the Paper Feed Area 8.4 In the Paper Exit Area 8.5 In the Fuser Area or Around the Toner Cartridge . 8.7 In the Bypass Tray 8.8 Tips for Avoiding Paper Jams When Printing on the A5-sized Paper 8.9 Tips for Avoiding Paper Jams 8.10 Clearing LCD Error Messages 8.11 Solving Problems 8.14 Paper...
Operating Instructions
Page 16
1 GETTING STARTED Thank you step-by-step instructions for purchasing this multifunctional product. Your machine provides printing, copying, scanning, and faxing functions! This chapter includes: • Unpacking • Understanding the Component Location • Installing the Toner Cartridge • Loading Paper • Making Connections • Turning the Machine On • Changing the Display Language • Setting the Paper Type and Size • Using the Save Modes This chapter gives you for setting up your machine.
1 GETTING STARTED Thank you step-by-step instructions for purchasing this multifunctional product. Your machine provides printing, copying, scanning, and faxing functions! This chapter includes: • Unpacking • Understanding the Component Location • Installing the Toner Cartridge • Loading Paper • Making Connections • Turning the Machine On • Changing the Display Language • Setting the Paper Type and Size • Using the Save Modes This chapter gives you for setting up your machine.

Operating Instructions
Page 22
... A the current fax job. C S Allows you to enter fax number, and shows memory status and fax reception mode. 1 F Adjusts the resolution of the documents for the current 2 copy job. Makes a copy smaller or larger than the original. GETTING STARTED 1.7 M I destinations. Control Panel Functions 1 2 3 4 5 Facsimile Resolution Phone Book Broadcasting Copy Lighten Normal Darken Text Mixed Photo Special Reduce/Enlarge Enter Redial/Pause Menu Upper Level On Hook Dial 6 Symbols 7 Clear/Stop Start 1 Allows you to send a fax to multiple I • Allows...
... A the current fax job. C S Allows you to enter fax number, and shows memory status and fax reception mode. 1 F Adjusts the resolution of the documents for the current 2 copy job. Makes a copy smaller or larger than the original. GETTING STARTED 1.7 M I destinations. Control Panel Functions 1 2 3 4 5 Facsimile Resolution Phone Book Broadcasting Copy Lighten Normal Darken Text Mixed Photo Special Reduce/Enlarge Enter Redial/Pause Menu Upper Level On Hook Dial 6 Symbols 7 Clear/Stop Start 1 Allows you to send a fax to multiple I • Allows...

Operating Instructions
Page 23
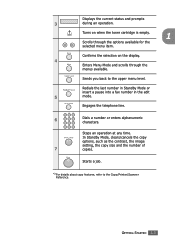
..., the image setting, the copy size and the number of 7 copies. Scrolls through the menus available. Engages the telephone line. 6 Dials a number or enters alphanumeric characters. Stops an operation at any time. Confirms the selection on the display. 4 Enters Menu Mode and scrolls through the options available for the selected menu item. Redials the last number in Standby Mode or inserts a pause into a fax number in edit 5 mode. Sends you back to the upper menu level. Starts a job. 1.8 GETTING STARTED
..., the image setting, the copy size and the number of 7 copies. Scrolls through the menus available. Engages the telephone line. 6 Dials a number or enters alphanumeric characters. Stops an operation at any time. Confirms the selection on the display. 4 Enters Menu Mode and scrolls through the options available for the selected menu item. Redials the last number in Standby Mode or inserts a pause into a fax number in edit 5 mode. Sends you back to the upper menu level. Starts a job. 1.8 GETTING STARTED

Operating Instructions
Page 64
... button while the Auto Fit copying is detected on the ADF, the Clone copying feature does not work. 1 Load the document to be applied when you load document only using the Reduce/ Enlarge button while making a clone copy. 6 Press Start to begin copying. If a document is enabled. 6 Press Start to save the selection. 5 If necessary, customise the copy settings including number of copies, contrast, image by using the control panel buttons. See "Setting Copy Options" on page 4.6. COPYING 4.9 NOTE: You cannot adjust the copy size using the document glass...
... button while the Auto Fit copying is detected on the ADF, the Clone copying feature does not work. 1 Load the document to be applied when you load document only using the Reduce/ Enlarge button while making a clone copy. 6 Press Start to begin copying. If a document is enabled. 6 Press Start to save the selection. 5 If necessary, customise the copy settings including number of copies, contrast, image by using the control panel buttons. See "Setting Copy Options" on page 4.6. COPYING 4.9 NOTE: You cannot adjust the copy size using the document glass...

Operating Instructions
Page 70
5 PRINTING This chapter explains how to print your documents in Windows and how to a Selected Paper Size • Printing Posters • Using Watermarks • Using Overlays • Setting Graphic Properties • Setting Up the Locally Shared Printer This chapter includes: • Printing a Document • Setting Paper Properties • Printing Multiple Pages on One Sheet of Paper (N-Up Printing) • Printing a Reduced or Enlarged Document • Fitting Your Document to use the print settings.
5 PRINTING This chapter explains how to print your documents in Windows and how to a Selected Paper Size • Printing Posters • Using Watermarks • Using Overlays • Setting Graphic Properties • Setting Up the Locally Shared Printer This chapter includes: • Printing a Document • Setting Paper Properties • Printing Multiple Pages on One Sheet of Paper (N-Up Printing) • Printing a Reduced or Enlarged Document • Fitting Your Document to use the print settings.
Operating Instructions
Page 73
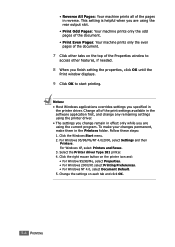
... Print window displays. 9 Click OK to start printing. Click the Windows Start menu. 2. Click the right mouse button on the top of the document. 7 Click other features, if needed. 8 When you specified in the Printers folder. This setting is helpful when you are using the current program. • Reverse All Pages: Your machine prints all of the pages in reverse. To make your changes permanent, make them in the printer driver. For Windows XP, select Printers and Faxes...
... Print window displays. 9 Click OK to start printing. Click the Windows Start menu. 2. Click the right mouse button on the top of the document. 7 Click other features, if needed. 8 When you specified in the Printers folder. This setting is helpful when you are using the current program. • Reverse All Pages: Your machine prints all of the pages in reverse. To make your changes permanent, make them in the printer driver. For Windows XP, select Printers and Faxes...

Operating Instructions
Page 75
... restore the printer driver's default settings by the printer driver. Using a Favorite Setting The Favorites option, which is visible on each tab, as needed. 2 Enter a name for future use a saved setting, select it from the Favorites drop-down list. To delete a favorite setting item, select it from the list and click Delete. To save a Favorites item: 1 Change the settings on any setting. 5.6 PRINTING These help screen that can also click from the list. Using Help Your machine has a help screens give...
... restore the printer driver's default settings by the printer driver. Using a Favorite Setting The Favorites option, which is visible on each tab, as needed. 2 Enter a name for future use a saved setting, select it from the Favorites drop-down list. To delete a favorite setting item, select it from the list and click Delete. To save a Favorites item: 1 Change the settings on any setting. 5.6 PRINTING These help screen that can also click from the list. Using Help Your machine has a help screens give...
Operating Instructions
Page 122
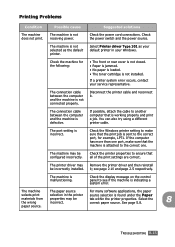
... display message on the control panel to make sure that all of the print settings are correct. The machine The paper source For many software applications, the paper selects print selection in your service representative. Select Printer driver Type 101 as the default printer. The connection cable between the computer and the machine is found under the Paper materials from the wrong properties may be configured incorrectly. TROUBLESHOOTING 8.15 If a printer system error occurs, contact your Windows...
... display message on the control panel to make sure that all of the print settings are correct. The machine The paper source For many software applications, the paper selects print selection in your service representative. Select Printer driver Type 101 as the default printer. The connection cable between the computer and the machine is found under the Paper materials from the wrong properties may be configured incorrectly. TROUBLESHOOTING 8.15 If a printer system error occurs, contact your Windows...
Operating Instructions
Page 123
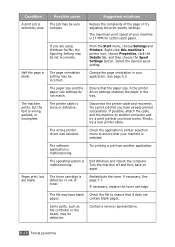
... Settings button. Check the application's printer selection menu to ensure that you know works. Exit Windows and reboot the computer. Turn the machine off and then back on again. Some parts, such as the controller or the board, may be incorrect. See page 5.3. Try printing a job from another computer and try a print job that your application. See page 7.7. Change the page orientation in the tray. Try a print job that you are blank. The software...
... Settings button. Check the application's printer selection menu to ensure that you know works. Exit Windows and reboot the computer. Turn the machine off and then back on again. Some parts, such as the controller or the board, may be incorrect. See page 5.3. Try printing a job from another computer and try a print job that your application. See page 7.7. Change the page orientation in the tray. Try a print job that you are blank. The software...

Operating Instructions
Page 128
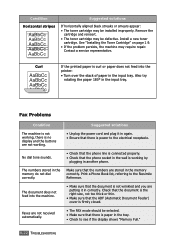
... the paper tray. See page 7.3. • Check the paper type and quality. Black pages A • The toner cartridge may require repair. Contact a service representative. Character Voids Character voids are white areas within the parts of the machine. Clean the inside of characters that the paper is loaded properly. • Check the paper type and quality. Because of the composition of the machine. See "Installing the Toner Cartridge" on page 1.9. • The machine may be defective and need replacing. TROUBLESHOOTING...
... the paper tray. See page 7.3. • Check the paper type and quality. Black pages A • The toner cartridge may require repair. Contact a service representative. Character Voids Character voids are white areas within the parts of the machine. Clean the inside of characters that the paper is loaded properly. • Check the paper type and quality. Because of the composition of the machine. See "Installing the Toner Cartridge" on page 1.9. • The machine may be defective and need replacing. TROUBLESHOOTING...
Operating Instructions
Page 129
See "Installing the Toner Cartridge" on page 1.9. • If the problem persists, the machine may require repair. Faxes are not received automatically. • The FAX mode should be selected. • Make sure that the ADF (Automatic Document Feeder) cover is paper in the memory correctly. Also try rotating the paper 180° in the memory do not dial correctly. The numbers stored in the input tray. Contact a service representative. Check that the document is the right size, not...
See "Installing the Toner Cartridge" on page 1.9. • If the problem persists, the machine may require repair. Faxes are not received automatically. • The FAX mode should be selected. • Make sure that the ADF (Automatic Document Feeder) cover is paper in the memory correctly. Also try rotating the paper 180° in the memory do not dial correctly. The numbers stored in the input tray. Contact a service representative. Check that the document is the right size, not...

Operating Instructions
Page 130
... in the user option setting. See page 1.18 for the paper tray and page 3.10 for marks and clean it can cause line errors. • Check your scan glass for the Bypass tray. 8 TROUBLESHOOTING 8.23 There are lines on a incoming fax are sending to, to sort out the problem. If the display shows a "Memory Full" message, delete any documents you the fax had a temporary document jam. The incoming fax has blank spaces or is loaded in the ADF or on...
... in the user option setting. See page 1.18 for the paper tray and page 3.10 for marks and clean it can cause line errors. • Check your scan glass for the Bypass tray. 8 TROUBLESHOOTING 8.23 There are lines on a incoming fax are sending to, to sort out the problem. If the display shows a "Memory Full" message, delete any documents you the fax had a temporary document jam. The incoming fax has blank spaces or is loaded in the ADF or on...
Operating Instructions
Page 132
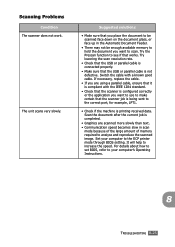
...; Make sure that works. Try lowering the scan resolution rate. • Check that the USB or parallel cable is connected properly. • Make sure that the scanner job is being sent to the correct port, for example, LPT1. • Check if the machine is printing received data. Set your computer's Operating Instructions. 8 TROUBLESHOOTING 8.25 Try the Prescan function to see if that you place the document to be scanned face down on the document...
...; Make sure that works. Try lowering the scan resolution rate. • Check that the USB or parallel cable is connected properly. • Make sure that the scanner job is being sent to the correct port, for example, LPT1. • Check if the machine is printing received data. Set your computer's Operating Instructions. 8 TROUBLESHOOTING 8.25 Try the Prescan function to see if that you place the document to be scanned face down on the document...

Operating Instructions
Page 138
.../4800/2400 bps with fall back Approx. 3 seconds/page * Transmission time applies to memory transmission of text data with ECM compression using only ITU-T No.1 Chart. Facsimile Specifications Item Compatibility Applicable line Data coding Modem speed Transmission speed Scanning speed Maximum document length Paper size Resolution User Memory Halftone Auto dialer Description ITU-T Group 3, ECM Public Switched Telephone Network (PSTN) or behind PABX MH/MR/MMR (ECM Mode) and JPEG for 100 numbers) A SPECIFICATIONS A.5
.../4800/2400 bps with fall back Approx. 3 seconds/page * Transmission time applies to memory transmission of text data with ECM compression using only ITU-T No.1 Chart. Facsimile Specifications Item Compatibility Applicable line Data coding Modem speed Transmission speed Scanning speed Maximum document length Paper size Resolution User Memory Halftone Auto dialer Description ITU-T Group 3, ECM Public Switched Telephone Network (PSTN) or behind PABX MH/MR/MMR (ECM Mode) and JPEG for 100 numbers) A SPECIFICATIONS A.5
Operating Instructions
Page 144
... paper tray 1.18 print 5.7 paper source, set 5.8 paper type 3.2 paper type, set bypass tray 3.10 paper tray 1.18 print 5.8 parallel, connect 1.16 poster copy 4.12 print 5.12 power save mode, use 1.19 print order, set 5.3 print resolution 5.20 printer driver install in Windows 2.5 printing fitting to a selected paper size 5.11 from Windows 5.2 multiple pages on one sheet 5.8 posters 5.12 reduced or enlarged document 5.10 using overlays 5.16 watermarks 5.13 problem, solve copying 8.24 error messages 8.11 fax 8.22 paper feeding 8.14 printing 8.15 printing quality 8.18 scanning 8.25 R rear output...
... paper tray 1.18 print 5.7 paper source, set 5.8 paper type 3.2 paper type, set bypass tray 3.10 paper tray 1.18 print 5.8 parallel, connect 1.16 poster copy 4.12 print 5.12 power save mode, use 1.19 print order, set 5.3 print resolution 5.20 printer driver install in Windows 2.5 printing fitting to a selected paper size 5.11 from Windows 5.2 multiple pages on one sheet 5.8 posters 5.12 reduced or enlarged document 5.10 using overlays 5.16 watermarks 5.13 problem, solve copying 8.24 error messages 8.11 fax 8.22 paper feeding 8.14 printing 8.15 printing quality 8.18 scanning 8.25 R rear output...
Operating Instructions
Page 150
... operation. Sends you back to the Copy/Printer/Scanner Reference. Engages the telephone line. 6 Dials a number or enters alphanumeric characters. GETTING STARTED 1.3 Confirms the selection on when the toner cartridge is empty. 1 Scrolls through the menus available. In Standby Mode, clears/cancels the copy options, such as the contrast, the image setting, the copy size and the number of 7 copies. Starts a job. *3 For details about copy features, refer to the upper menu level. Stops an operation at any time. Turns on the display. 4 Enters Menu Mode...
... operation. Sends you back to the Copy/Printer/Scanner Reference. Engages the telephone line. 6 Dials a number or enters alphanumeric characters. GETTING STARTED 1.3 Confirms the selection on when the toner cartridge is empty. 1 Scrolls through the menus available. In Standby Mode, clears/cancels the copy options, such as the contrast, the image setting, the copy size and the number of 7 copies. Starts a job. *3 For details about copy features, refer to the upper menu level. Stops an operation at any time. Turns on the display. 4 Enters Menu Mode...
Operating Instructions
Page 169
... the Copy/Printer/Scanner Reference. For details about loading paper and setting the paper size in the tray, refer to adjust the ringer volume, see "Available Fax Setup Options" on page 1.12. To change the number of your machine. The machine begins receiving a fax and returns to the fax mode at the factory. Receiving Automatically in the Fax Mode Your machine is preset to Standby Mode when the reception is completed. 2.8 GENERAL FAX FUNCTIONS or Legal-sized paper. Loading Paper for Receiving Faxes The instructions for loading paper in the paper tray...
... the Copy/Printer/Scanner Reference. For details about loading paper and setting the paper size in the tray, refer to adjust the ringer volume, see "Available Fax Setup Options" on page 1.12. To change the number of your machine. The machine begins receiving a fax and returns to the fax mode at the factory. Receiving Automatically in the Fax Mode Your machine is preset to Standby Mode when the reception is completed. 2.8 GENERAL FAX FUNCTIONS or Legal-sized paper. Loading Paper for Receiving Faxes The instructions for loading paper in the paper tray...

Operating Instructions
Page 184
... Start. OTHER WAYS TO FAX 4.3 For details about loading a document, see page 2.2. 2 Adjust the document resolution to suit your machine to send a fax at a later time when you will not be present. 4 1 Load the document(s) face up to change the contrast, see page 2.4). You can add up into the memory before transmission. Select "1.Yes" to confirm the number. You must wait until the current broadcast is scanned into the ADF. The display...
... Start. OTHER WAYS TO FAX 4.3 For details about loading a document, see page 2.2. 2 Adjust the document resolution to suit your machine to send a fax at a later time when you will not be present. 4 1 Load the document(s) face up to change the contrast, see page 2.4). You can add up into the memory before transmission. Select "1.Yes" to confirm the number. You must wait until the current broadcast is scanned into the ADF. The display...
Operating Instructions
Page 200
INDEX A add documents 4.7 ADF, load 2.2 automatic dialling group 3.4 speed 3.2 automatic redialling 2.7 B broadcasting faxes 4.2 C cancelling fax 2.6 scheduled faxes 4.8 characters, enter 1.5 contrast, set 1.12 control panel 1.2 D date and time, set 1.7 delayed fax 4.3 document load ADF 2.2 document glass 2.3 prepare 2.2 document glass, load 2.3 F fax system, set advanced settings 5.5 options 1.12 G group dial dialling 3.6 editing 3.5 setting 3.4 M machine ID, set 1.4 P paper, load 2.8 print Phone Book list 3.8 reports 5.3 priority fax 4.5 R receive a fax in Ans/Fax mode 2.9 in fax mode 2.8 ...
INDEX A add documents 4.7 ADF, load 2.2 automatic dialling group 3.4 speed 3.2 automatic redialling 2.7 B broadcasting faxes 4.2 C cancelling fax 2.6 scheduled faxes 4.8 characters, enter 1.5 contrast, set 1.12 control panel 1.2 D date and time, set 1.7 delayed fax 4.3 document load ADF 2.2 document glass 2.3 prepare 2.2 document glass, load 2.3 F fax system, set advanced settings 5.5 options 1.12 G group dial dialling 3.6 editing 3.5 setting 3.4 M machine ID, set 1.4 P paper, load 2.8 print Phone Book list 3.8 reports 5.3 priority fax 4.5 R receive a fax in Ans/Fax mode 2.9 in fax mode 2.8 ...


