
User Guide
Page 1
User Guide Selected Version About This Manual Getting Started Copy Fax Print Scan Document Server Web Image Monitor Adding Paper and Toner Troubleshooting Specifications for The Machine Legal and Contact Information For information not found in this manual, see the online manuals available on our web site (https://www.ricoh.com/). For safe and correct use, be sure to read Safety Information before using the machine.
User Guide Selected Version About This Manual Getting Started Copy Fax Print Scan Document Server Web Image Monitor Adding Paper and Toner Troubleshooting Specifications for The Machine Legal and Contact Information For information not found in this manual, see the online manuals available on our web site (https://www.ricoh.com/). For safe and correct use, be sure to read Safety Information before using the machine.

User Guide
Page 7
......165 What You Can Do on the Web Image Monitor 166 Web Image Monitor Screen...168 Specifying Web Image Monitor Help...168 9. Adding Paper and Toner Loading Paper into the Paper Tray...171 Fanning the Paper...172 Loading Paper into Tray 1...173 Loading Paper into the A3/11 × 17 Tray...
......165 What You Can Do on the Web Image Monitor 166 Web Image Monitor Screen...168 Specifying Web Image Monitor Help...168 9. Adding Paper and Toner Loading Paper into the Paper Tray...171 Fanning the Paper...172 Loading Paper into Tray 1...173 Loading Paper into the A3/11 × 17 Tray...
User Guide
Page 8
... Printing onto Letterhead Paper Using the Printer Driver 203 Recommended Original Size and Weight 204 Replacing the Toner...206 Precautions When Storing Toner...207 Precautions When Replacing the Toner 207 Disposing Exhausted Toners...208 Replenishing the Staples...210 Replacing the Waste Toner Bottle...211 Precautions When Replacing the Waste Toner Bottle 211 Disposing the Used Waste...
... Printing onto Letterhead Paper Using the Printer Driver 203 Recommended Original Size and Weight 204 Replacing the Toner...206 Precautions When Storing Toner...207 Precautions When Replacing the Toner 207 Disposing Exhausted Toners...208 Replenishing the Staples...210 Replacing the Waste Toner Bottle...211 Precautions When Replacing the Waste Toner Bottle 211 Disposing the Used Waste...
User Guide
Page 20
... active • When the service call message appears • When the ADF, machine's cover, or ADF cover are opened • When the "Add Toner" message appears • When toner is being replenished • When one of the following screens is displayed: • System Settings • Counter • Inquiry • Address Book •...
... active • When the service call message appears • When the ADF, machine's cover, or ADF cover are opened • When the "Add Toner" message appears • When toner is being replenished • When one of the following screens is displayed: • System Settings • Counter • Inquiry • Address Book •...
User Guide
Page 22
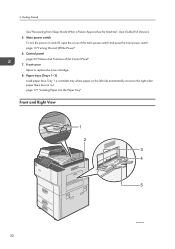
... and off, open the cover of the Control Panel" 7. Main power switch To turn the power on the left side automatically moves to replace the toner cartridge. 8. Getting Started See "Recovering from Sleep Mode When a Person Approaches the Machine", User Guide (Full Version). 5.
... and off, open the cover of the Control Panel" 7. Main power switch To turn the power on the left side automatically moves to replace the toner cartridge. 8. Getting Started See "Recovering from Sleep Mode When a Person Approaches the Machine", User Guide (Full Version). 5.
User Guide
Page 27
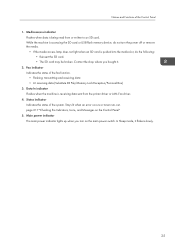
... Functions of the system. While the machine is being read from the printer driver or LAN-Fax driver. 4. Stays lit when an error occurs or toner runs out. Main power indicator The main power indicator lights up when you bought it flickers slowly. 25 Contact the shop where you turn the...
... Functions of the system. While the machine is being read from the printer driver or LAN-Fax driver. 4. Stays lit when an error occurs or toner runs out. Main power indicator The main power indicator lights up when you bought it flickers slowly. 25 Contact the shop where you turn the...
User Guide
Page 30
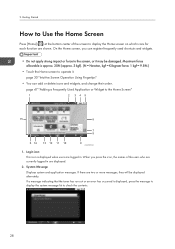
... frequently used shortcuts and widgets. • Do not apply strong impact or force to operate it may be displayed alternately. If a message indicating that the toner has run out or an error has occurred is displayed, press the message to display the system message list to the Home Screen" 1 2 345 15...
... frequently used shortcuts and widgets. • Do not apply strong impact or force to operate it may be displayed alternately. If a message indicating that the toner has run out or an error has occurred is displayed, press the message to display the system message list to the Home Screen" 1 2 345 15...
User Guide
Page 32
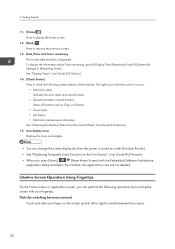
...Input", User Guide (Full Version). 14. [Check Status] Press to switch between screens) Touch and slide your fingertips. Date/Time and Toner remaining The current date and time is turned on under [Function Priority]. • See "Displaying Frequently Used Functions on the screen quickly...icons and widgets. • You can perform the following system statuses of the machine. 2. To display the information about Toner remaining, specify [Display Time/Remaining Toner] of functions such as Copy or Scanner • Current jobs • Job history • Machine's maintenance information See ...
...Input", User Guide (Full Version). 14. [Check Status] Press to switch between screens) Touch and slide your fingertips. Date/Time and Toner remaining The current date and time is turned on under [Function Priority]. • See "Displaying Frequently Used Functions on the screen quickly...icons and widgets. • You can perform the following system statuses of the machine. 2. To display the information about Toner remaining, specify [Display Time/Remaining Toner] of functions such as Copy or Scanner • Current jobs • Job history • Machine's maintenance information See ...
User Guide
Page 173
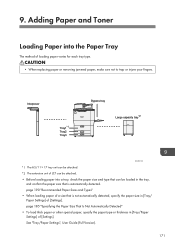
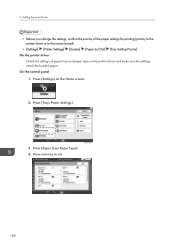
... special paper, specify the paper type or thickness in [Tray/ Paper Settings] of LCT can be attached. *2 The extension unit of [Settings]. Adding Paper and Toner Loading Paper into a tray, check the paper size and type that can be loaded in the tray, and confirm the paper size that is automatically...
... special paper, specify the paper type or thickness in [Tray/ Paper Settings] of LCT can be attached. *2 The extension unit of [Settings]. Adding Paper and Toner Loading Paper into a tray, check the paper size and type that can be loaded in the tray, and confirm the paper size that is automatically...
User Guide
Page 174
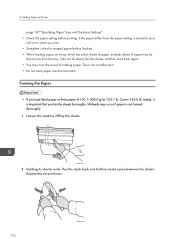
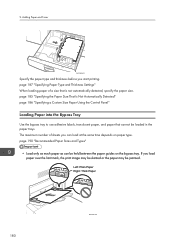
This is not fanned thoroughly. 1. Loosen the stack by riffling the sheets. Adding Paper and Toner page 187 "Specifying Paper Type and Thickness Settings" • Check the paper setting before loading. • When loading paper on a tray which has a few sheets ...
This is not fanned thoroughly. 1. Loosen the stack by riffling the sheets. Adding Paper and Toner page 187 "Specifying Paper Type and Thickness Settings" • Check the paper setting before loading. • When loading paper on a tray which has a few sheets ...
User Guide
Page 176
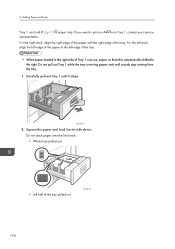
... of the tray. • When paper loaded in the right side of Tray 1 runs out, paper on the left is moving paper; Adding Paper and Toner Tray 1 can hold 81/2 × 11 paper only. Do not stack paper over the limit mark. • Whole tray pulled out • Left half of...
... of the tray. • When paper loaded in the right side of Tray 1 runs out, paper on the left is moving paper; Adding Paper and Toner Tray 1 can hold 81/2 × 11 paper only. Do not stack paper over the limit mark. • Whole tray pulled out • Left half of...
User Guide
Page 178
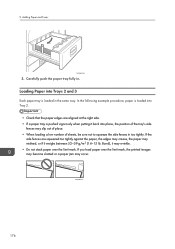
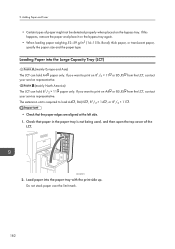
... Tray 2. • Check that the paper edges are squeezed too tightly against the paper, the edges may crease, the paper may occur. Adding Paper and Toner D0CZIM1308 3.
... Tray 2. • Check that the paper edges are squeezed too tightly against the paper, the edges may crease, the paper may occur. Adding Paper and Toner D0CZIM1308 3.
User Guide
Page 180
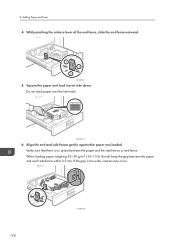
Make sure that there is too wide, creases may occur. 178 D0CZIM1314 Adding Paper and Toner 4. When loading paper weighing 52-59 g/m2 (14-15 lb. Align the end and side fences gently against the paper you loaded. If the gap is no space between the paper and each side fence within 0.5 mm. 9. While pinching the release lever of the end fence, slide the end fence outward. 1 1 2 D0CZIM1312 5. D0CZIM1313 6. Bond), keep the gap between the paper and the side fences or end fence. Square the paper and load it print side down. Do not stack paper over the limit mark.
Make sure that there is too wide, creases may occur. 178 D0CZIM1314 Adding Paper and Toner 4. When loading paper weighing 52-59 g/m2 (14-15 lb. Align the end and side fences gently against the paper you loaded. If the gap is no space between the paper and each side fence within 0.5 mm. 9. While pinching the release lever of the end fence, slide the end fence outward. 1 1 2 D0CZIM1312 5. D0CZIM1313 6. Bond), keep the gap between the paper and the side fences or end fence. Square the paper and load it print side down. Do not stack paper over the limit mark.
User Guide
Page 182
... the limit mark, the print image may be slanted or the paper may be held between the paper guides on paper type. Adding Paper and Toner D0CZIM0070 Specify the paper type and thickness before you can be jammed. The maximum number of a size that cannot be loaded in the paper trays...
... the limit mark, the print image may be slanted or the paper may be held between the paper guides on paper type. Adding Paper and Toner D0CZIM0070 Specify the paper type and thickness before you can be jammed. The maximum number of a size that cannot be loaded in the paper trays...
User Guide
Page 184
Adding Paper and Toner • Certain types of the LCT. The extension unit is not being used, and then open the top cover of paper might not be detected ...
Adding Paper and Toner • Certain types of the LCT. The extension unit is not being used, and then open the top cover of paper might not be detected ...
User Guide
Page 186
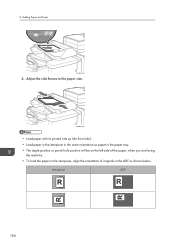
D0CMIC1296 • Load paper with its printed side up (the front side). • Load paper in the interposer in the same orientation as paper in the paper tray. • The staple position or punch hole position will be on the left side of the paper, when you are facing the machine. • To load the paper in the interposer, align the orientation of originals in the ADF as shown below. Interposer ADF 184 Adjust the side fences to the paper size. Adding Paper and Toner D0CMIC1295 2. 9.
D0CMIC1296 • Load paper with its printed side up (the front side). • Load paper in the interposer in the same orientation as paper in the paper tray. • The staple position or punch hole position will be on the left side of the paper, when you are facing the machine. • To load the paper in the interposer, align the orientation of originals in the ADF as shown below. Interposer ADF 184 Adjust the side fences to the paper size. Adding Paper and Toner D0CMIC1295 2. 9.
User Guide
Page 188
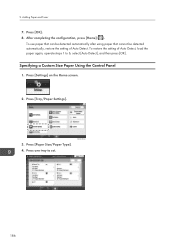
To use paper that can be detected automatically after using paper that cannot be detected automatically, restore the setting of Auto Detect, load the paper again, operate steps 1 to set. Adding Paper and Toner 7. Press [Settings] on the Home screen. 2. Press [Tray/Paper Settings]. 3. D0C9PA5323 186 After completing the configuration, press [Home] ( ). Specifying a Custom Size Paper Using the Control Panel 1. Press [OK]. 8. To restore the setting of Auto Detect. Press [Paper Size/Paper Type]. 4. Press one tray to 6, select [Auto Detect], and then press [OK]. 9.
To use paper that can be detected automatically after using paper that cannot be detected automatically, restore the setting of Auto Detect, load the paper again, operate steps 1 to set. Adding Paper and Toner 7. Press [Settings] on the Home screen. 2. Press [Tray/Paper Settings]. 3. D0C9PA5323 186 After completing the configuration, press [Home] ( ). Specifying a Custom Size Paper Using the Control Panel 1. Press [OK]. 8. To restore the setting of Auto Detect. Press [Paper Size/Paper Type]. 4. Press one tray to 6, select [Auto Detect], and then press [OK]. 9.
User Guide
Page 190
Press [Tray/Paper Settings]. 3. Adding Paper and Toner • Before you change the settings, confirm the priority of the paper settings for printing (priority to the printer driver or to set. 9. On the control panel 1. Press one tray to the control panel). • [Settings] [Printer Settings] [System] [Paper In/Out] [Tray Setting Priority] On the printer driver Check the settings of paper tray and paper type on the Home screen. 2. Press [Paper Size/Paper Type]. 4. Press [Settings] on the printer driver and make sure the settings match the loaded paper. D0C9PA5323 188
Press [Tray/Paper Settings]. 3. Adding Paper and Toner • Before you change the settings, confirm the priority of the paper settings for printing (priority to the printer driver or to set. 9. On the control panel 1. Press one tray to the control panel). • [Settings] [Printer Settings] [System] [Paper In/Out] [Tray Setting Priority] On the printer driver Check the settings of paper tray and paper type on the Home screen. 2. Press [Paper Size/Paper Type]. 4. Press [Settings] on the printer driver and make sure the settings match the loaded paper. D0C9PA5323 188
User Guide
Page 192
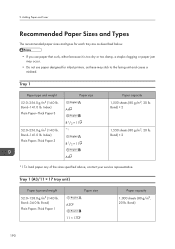
.... Bond-141.0 lb. Bond) Plain Paper-Thick Paper 1 Paper size A3 11 × 17 Paper capacity 1,000 sheets (80 g/m2, 20 lb. 9. Adding Paper and Toner Recommended Paper Sizes and Types The recommended paper sizes and types for each tray are as described below. • If you use paper that curls...
.... Bond-141.0 lb. Bond) Plain Paper-Thick Paper 1 Paper size A3 11 × 17 Paper capacity 1,000 sheets (80 g/m2, 20 lb. 9. Adding Paper and Toner Recommended Paper Sizes and Types The recommended paper sizes and types for each tray are as described below. • If you use paper that curls...
User Guide
Page 194
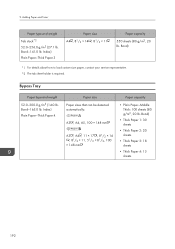
Bond-165.0 lb. Adding Paper and Toner Paper type and weight Tab stock*2 52.0-256.0 g/m2 (27.1 lb. Bypass Tray Paper type and weight 52.0-300.0 g/m2 (14.0 lb. Index) Plain Paper-...
Bond-165.0 lb. Adding Paper and Toner Paper type and weight Tab stock*2 52.0-256.0 g/m2 (27.1 lb. Bypass Tray Paper type and weight 52.0-300.0 g/m2 (14.0 lb. Index) Plain Paper-...


