Manuals
Page 3
... and Setting the Machine Using a Computer 24 Preventing Unauthorized Copying...25 2. TABLE OF CONTENTS How to Read the Manuals...6 Symbols Used in the Manuals...6 Model-Specific Information...7 Names of Programs...46 1
... and Setting the Machine Using a Computer 24 Preventing Unauthorized Copying...25 2. TABLE OF CONTENTS How to Read the Manuals...6 Symbols Used in the Manuals...6 Model-Specific Information...7 Names of Programs...46 1

Manuals
Page 5
... After the Original Is Scanned (While a Transmission Is in Progress)...........85 Canceling a Transmission After the Original Is Scanned (Before a Transmission Is Started 85 Sending at a Specific Time (Send Later)...87 Storing a Document...88 Sending Stored Documents...89 Printing the Journal Manually...91 5. Print Quick Install...93 Displaying the Printer Driver Properties...
... After the Original Is Scanned (While a Transmission Is in Progress)...........85 Canceling a Transmission After the Original Is Scanned (Before a Transmission Is Started 85 Sending at a Specific Time (Send Later)...87 Storing a Document...88 Sending Stored Documents...89 Printing the Journal Manually...91 5. Print Quick Install...93 Displaying the Printer Driver Properties...
Manuals
Page 8
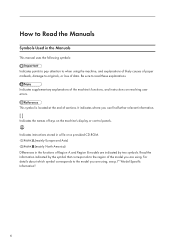
... information indicated by two symbols. It indicates where you can find further relevant information. [ ] Indicates the names of the model you are using, see p.7 "Model-Specific Information". 6 Indicates instructions stored in a file on a provided CD-ROM. (mainly Europe and Asia) (mainly North America) Differences in the Manuals This manual uses the...
... information indicated by two symbols. It indicates where you can find further relevant information. [ ] Indicates the names of the model you are using, see p.7 "Model-Specific Information". 6 Indicates instructions stored in a file on a provided CD-ROM. (mainly Europe and Asia) (mainly North America) Differences in the Manuals This manual uses the...
Manuals
Page 9
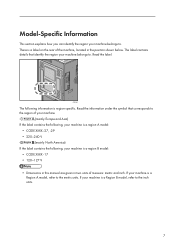
... XXXX -27, -29 • 220-240 V (mainly North America) If the label contains the following information is a Region A model, refer to the metric units. Model-Specific Information This section explains how you can identify the region your machine belongs to. CSL001 The following , your machine is a Region B model, refer to the... XXXX -17 • 120-127 V • Dimensions in this manual are given in the position shown below. Read the label. If your machine is region-specific.
... XXXX -27, -29 • 220-240 V (mainly North America) If the label contains the following information is a Region A model, refer to the metric units. Model-Specific Information This section explains how you can identify the region your machine belongs to. CSL001 The following , your machine is a Region B model, refer to the... XXXX -17 • 120-127 V • Dimensions in this manual are given in the position shown below. Read the label. If your machine is region-specific.

Manuals
Page 37
...the default settings to meet your requirements. Main power indicator The main power indicator goes on when you turn on . See "Counter", Maintenance and Specifications . Guide to the Names and Functions of the Initial Screen", Convenient Functions . 6. When the machine is turned on the main power switch. ...can find out where to order expendable supplies and where to and from Sleep mode. See "Checking Inquiry Using the User Tools", Maintenance and Specifications . 10. [Simple Screen] key Press to switch to check or print the counter value. You can also print these details. Fax ...
...the default settings to meet your requirements. Main power indicator The main power indicator goes on when you turn on . See "Counter", Maintenance and Specifications . Guide to the Names and Functions of the Initial Screen", Convenient Functions . 6. When the machine is turned on the main power switch. ...can find out where to order expendable supplies and where to and from Sleep mode. See "Checking Inquiry Using the User Tools", Maintenance and Specifications . 10. [Simple Screen] key Press to switch to check or print the counter value. You can also print these details. Fax ...

Manuals
Page 89
... (Send Later) Sending at a Specific Time (Send Later) Using this function, you to take advantage of Power Failure", Troubleshooting . 1. Use Memory Transmission for this reason, a Power Failure Report is automatically ...
... (Send Later) Sending at a Specific Time (Send Later) Using this function, you to take advantage of Power Failure", Troubleshooting . 1. Use Memory Transmission for this reason, a Power Failure Report is automatically ...

Manuals
Page 107
... then click [Properties]. 2. On the [Security] tab, select [Edit...]. 3. From the list of results, select the groups and users you give access rights only to specific users. Click [Add...]. 4. Right-click the folder, and then click [Properties]. In the [Groups or user names:] list, select a group or user, and then, in...
... then click [Properties]. 2. On the [Security] tab, select [Edit...]. 3. From the list of results, select the groups and users you give access rights only to specific users. Click [Add...]. 4. Right-click the folder, and then click [Properties]. In the [Groups or user names:] list, select a group or user, and then, in...

Manuals
Page 130
CSN010 5. For details, see "Changing the Paper Size in the paper trays by adjusting the positions of side fences and end fence. 9. Adding Paper and Toner 3. Carefully slide the paper tray fully in. • Various sizes of paper can be loaded in the Paper Trays", Paper Specifications and Adding Paper . 128 Square the paper and load it print side up. CSN009 4. Do not stack paper over the limit mark. Align the end fence gently against the paper you loaded.
CSN010 5. For details, see "Changing the Paper Size in the paper trays by adjusting the positions of side fences and end fence. 9. Adding Paper and Toner 3. Carefully slide the paper tray fully in. • Various sizes of paper can be loaded in the Paper Trays", Paper Specifications and Adding Paper . 128 Square the paper and load it print side up. CSN009 4. Do not stack paper over the limit mark. Align the end fence gently against the paper you loaded.

Manuals
Page 132
Envelopes must be loaded in a specific orientation. For details, see p.145 "Envelopes". • Specify the sizes of the Printer Features menu, the settings made using the control panel have priority over ... tray. For details, see "Copying from the bypass tray, see p.135 "Loading Orientation-fixed Paper or Two-sided Paper". • You can be loaded in a specific orientation. Adding Paper and Toner • When loading thick paper or OHP transparencies, specify the paper size and the paper type. • Letterhead paper must...
Envelopes must be loaded in a specific orientation. For details, see p.145 "Envelopes". • Specify the sizes of the Printer Features menu, the settings made using the control panel have priority over ... tray. For details, see "Copying from the bypass tray, see p.135 "Loading Orientation-fixed Paper or Two-sided Paper". • You can be loaded in a specific orientation. Adding Paper and Toner • When loading thick paper or OHP transparencies, specify the paper size and the paper type. • Letterhead paper must...

Manuals
Page 152
... skin. If toner comes into the fabric and make about how to prevent poor output quality. • You can order supplies, see "Inquiry", Maintenance and Specifications . 150 If you can check the name of toner, follow the toner replacement instructions that appear on the screen: Pull out the cartridge, and then...
... skin. If toner comes into the fabric and make about how to prevent poor output quality. • You can order supplies, see "Inquiry", Maintenance and Specifications . 150 If you can check the name of toner, follow the toner replacement instructions that appear on the screen: Pull out the cartridge, and then...

Manuals
Page 155
...Paper", Troubleshooting . Appears when the machine is full. For details about removing jammed paper, see "Loading Paper", Paper Specifications and Adding Paper . Contact your sales or service representative. Troubleshooting This chapter describes basic troubleshooting procedures. Appears when toner ... one or more covers of the machine are open. 153 For details about removing jammed paper, see "Adding Toner", Maintenance and Specifications . Indicator : Paper Misfeed indicator : Original Misfeed indicator : Load Paper indicator : Add Toner indicator : Waste Toner Full indicator ...
...Paper", Troubleshooting . Appears when the machine is full. For details about removing jammed paper, see "Loading Paper", Paper Specifications and Adding Paper . Contact your sales or service representative. Troubleshooting This chapter describes basic troubleshooting procedures. Appears when toner ... one or more covers of the machine are open. 153 For details about removing jammed paper, see "Adding Toner", Maintenance and Specifications . Indicator : Paper Misfeed indicator : Original Misfeed indicator : Load Paper indicator : Add Toner indicator : Waste Toner Full indicator ...

Manuals
Page 157
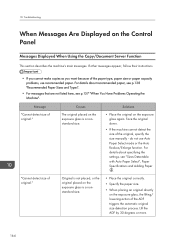
... to connect the network, see "Interface Settings", Connecting the Machine/ System Settings . • For details about error messages and their solutions, see "Loading Paper", Paper Specifications and Adding Paper . An error has occurred. For details about loading paper, see p.164 "When Messages Are Displayed on the Control Panel". • Check that...
... to connect the network, see "Interface Settings", Connecting the Machine/ System Settings . • For details about error messages and their solutions, see "Loading Paper", Paper Specifications and Adding Paper . An error has occurred. For details about loading paper, see p.164 "When Messages Are Displayed on the Control Panel". • Check that...

Manuals
Page 160
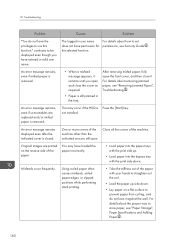
... the main power switch on again. Troubleshooting Problem "Please wait." appears. Wait for the machine, see "Optimum Environmental Conditions After Moving the Machine", Maintenance and Specifications . 158 Causes Solutions This message appears when you press the [Energy Saver] key. The current environmental condition is still not ready in five minutes, contact...
... the main power switch on again. Troubleshooting Problem "Please wait." appears. Wait for the machine, see "Optimum Environmental Conditions After Moving the Machine", Maintenance and Specifications . 158 Causes Solutions This message appears when you press the [Energy Saver] key. The current environmental condition is still not ready in five minutes, contact...
Manuals
Page 162
..., even if consumables are replaced and/or misfed paper is still jammed in user name For details about removing jammed paper, see "Paper Storage", Paper Specifications and Adding Paper . 160 Using curled paper often causes misfeeds, soiled paper edges, or slipped positions while performing stack printing. • Take the stiffness out...
..., even if consumables are replaced and/or misfed paper is still jammed in user name For details about removing jammed paper, see "Paper Storage", Paper Specifications and Adding Paper . 160 Using curled paper often causes misfeeds, soiled paper edges, or slipped positions while performing stack printing. • Take the stiffness out...

Manuals
Page 163
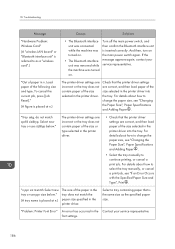
... frequently. Cannot print in duplex mode. For details about setting "Apply 2 sided", see "Changing the Paper Size", Paper Specifications and Adding Paper . When using duplex printing, make settings to specify the paper size with the control panel. Causes Solutions ... Cannot print in duplex mode. Duplex printing cannot be set in [System Settings] to a Size That Is Not Automatically Detected", Paper Specifications and Adding Paper . When You Have Problems Operating the Machine Problem Misfeeds occur frequently. Change the setting for the paper tray. Also, ...
... frequently. Cannot print in duplex mode. For details about setting "Apply 2 sided", see "Changing the Paper Size", Paper Specifications and Adding Paper . When using duplex printing, make settings to specify the paper size with the control panel. Causes Solutions ... Cannot print in duplex mode. Duplex printing cannot be set in [System Settings] to a Size That Is Not Automatically Detected", Paper Specifications and Adding Paper . When You Have Problems Operating the Machine Problem Misfeeds occur frequently. Change the setting for the paper tray. Also, ...
Manuals
Page 166
... recommended paper, see p.138 "Recommended Paper Sizes and Types". • For messages that are not listed here, see "Sizes Detectable with Auto Paper Select", Paper Specifications and Adding Paper . • Place the original correctly. • Specify the paper size. • When placing an original directly on the exposure glass, the lifting...
... recommended paper, see p.138 "Recommended Paper Sizes and Types". • For messages that are not listed here, see "Sizes Detectable with Auto Paper Select", Paper Specifications and Adding Paper . • Place the original correctly. • Specify the paper size. • When placing an original directly on the exposure glass, the lifting...

Manuals
Page 168
... authorized to delete files without access privileges. "Please wait." This message might appear for permissions, see "Optimum Environmental Conditions After Moving the Machine", Maintenance and Specifications . Wait a while. "The selected file(s) contained file(s) without the authority to use this paper size." Files can resume operation. the selected function. 166 "Rotate Sort...
... authorized to delete files without access privileges. "Please wait." This message might appear for permissions, see "Optimum Environmental Conditions After Moving the Machine", Maintenance and Specifications . Wait a while. "The selected file(s) contained file(s) without the authority to use this paper size." Files can resume operation. the selected function. 166 "Rotate Sort...
Manuals
Page 188
... For details about how to as the specified paper size. For details about how to change the paper size, see "Changing the Paper Size", Paper Specifications and Adding Paper . • Select the tray manually to change the paper size, see "Changing the Paper Size", Paper... Specifications and Adding Paper . do not match spcfd siz&typ. Troubleshooting Message Causes Solutions "Hardware Problem: Wireless Card" (A "wireless LAN board" or "Bluetooth interface unit" is...
... For details about how to as the specified paper size. For details about how to change the paper size, see "Changing the Paper Size", Paper Specifications and Adding Paper . • Select the tray manually to change the paper size, see "Changing the Paper Size", Paper... Specifications and Adding Paper . do not match spcfd siz&typ. Troubleshooting Message Causes Solutions "Hardware Problem: Wireless Card" (A "wireless LAN board" or "Bluetooth interface unit" is...

Manuals
Page 193
... use the Document Server function. • For details about using Document Server function, contact your administrator. • For details about paper, see "Specifications for the Main Unit", Maintenance and Specifications . • Change the setting for "Apply 2 sided" in the machine. 191 Duplex printing was exceeded. "Error has occurred." Delete some of Document...
... use the Document Server function. • For details about using Document Server function, contact your administrator. • For details about paper, see "Specifications for the Main Unit", Maintenance and Specifications . • Change the setting for "Apply 2 sided" in the machine. 191 Duplex printing was exceeded. "Error has occurred." Delete some of Document...

Manuals
Page 205
... properly inserted in the one of the pages could not be deleted." For details about changing scan area and scanning resolution, see "Loading Paper", Paper Specifications and Adding Paper . 203
... properly inserted in the one of the pages could not be deleted." For details about changing scan area and scanning resolution, see "Loading Paper", Paper Specifications and Adding Paper . 203


