Manuals
Page 1
For safe and correct use, be sure to read the Safety Information in this manual, refer to the HTML/PDF files on the supplied CD-ROM. User Guide What You Can Do with This Machine Getting Started Copy Fax Print Scan Document Server Web Image Monitor Adding Paper and Toner Troubleshooting For information not in "Read This First" before using the machine.
For safe and correct use, be sure to read the Safety Information in this manual, refer to the HTML/PDF files on the supplied CD-ROM. User Guide What You Can Do with This Machine Getting Started Copy Fax Print Scan Document Server Web Image Monitor Adding Paper and Toner Troubleshooting For information not in "Read This First" before using the machine.

Manuals
Page 16
...machine's display or control panels. It indicates where you can find further relevant information. [ ] Indicates the names of keys on resolving user errors. For details about which symbol corresponds to the region of the model you are using. Read the information indicated by two symbols....file on a provided CD-ROM. (mainly Europe and Asia), (mainly Europe) or (mainly Asia) (mainly North America) Differences in the Manuals This manual uses the following symbols: Indicates points to pay attention to when using the machine, and explanations of likely causes of paper misfeeds, damage to ...
...machine's display or control panels. It indicates where you can find further relevant information. [ ] Indicates the names of keys on resolving user errors. For details about which symbol corresponds to the region of the model you are using. Read the information indicated by two symbols....file on a provided CD-ROM. (mainly Europe and Asia), (mainly Europe) or (mainly Asia) (mainly North America) Differences in the Manuals This manual uses the following symbols: Indicates points to pay attention to when using the machine, and explanations of likely causes of paper misfeeds, damage to ...

Manuals
Page 103
... in the machine. A user name can be set for a stored document. A four to eight digit number can also change the file information after they are stored. If you do not specify a name, scanned documents will not be selected from the Address Book or entered manually. Select [Send & Store...] or [Store Only]. You can be automatically assigned names such as "FAX0001" or "FAX0002". File Name You can specify a name for the stored documents as necessary: User Name You can set this function so as a ...
... in the machine. A user name can be set for a stored document. A four to eight digit number can also change the file information after they are stored. If you do not specify a name, scanned documents will not be selected from the Address Book or entered manually. Select [Send & Store...] or [Store Only]. You can be automatically assigned names such as "FAX0001" or "FAX0002". File Name You can specify a name for the stored documents as necessary: User Name You can set this function so as a ...

Manuals
Page 104
To specify an unregistered user name, press [Manual Entry], and then enter the name. If you have selected [Send & Store], specify the receiver. 7. After specifying a user name, press [OK]. • File Name Press [File Name], enter a file name, and then press [OK]. • Password... Parallel Memory Transmission • On Hook Dial • Manual Dial 94 Press the [Start] key. Press [OK]. 6. Fax 4. Set the user name, file name, and password as necessary. • User Name Press [User Name], and then select a user name. The stored documents are deleted. The documents stored in...
To specify an unregistered user name, press [Manual Entry], and then enter the name. If you have selected [Send & Store], specify the receiver. 7. After specifying a user name, press [OK]. • File Name Press [File Name], enter a file name, and then press [OK]. • Password... Parallel Memory Transmission • On Hook Dial • Manual Dial 94 Press the [Start] key. Press [OK]. 6. Fax 4. Set the user name, file name, and password as necessary. • User Name Press [User Name], and then select a user name. The stored documents are deleted. The documents stored in...

Manuals
Page 106
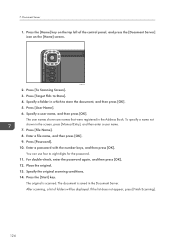
... 4. Press the [Start] key. 7. Fax Printing the Journal Manually To print the Journal manually, select the printing method: [All], [Print per File No.], or [Print per File No. If you selected [Print per User] in step 3, select a user from the list, and then press [OK]. 6. Prints only ...Print Journal]. 3. Press [TX/RX Status / Print]. 2. If you selected [Print per User Prints the results of communications in step 3, enter a 4-digit file number using the number keys. 5. Print per User]. Print per File No.] in the order made. All Prints the results of communications by ...
... 4. Press the [Start] key. 7. Fax Printing the Journal Manually To print the Journal manually, select the printing method: [All], [Print per File No.], or [Print per File No. If you selected [Print per User] in step 3, select a user from the list, and then press [OK]. 6. Prints only ...Print Journal]. 3. Press [TX/RX Status / Print]. 2. If you selected [Print per User Prints the results of communications in step 3, enter a 4-digit file number using the number keys. 5. Print per User]. Print per File No.] in the order made. All Prints the results of communications by ...

Manuals
Page 107
...]. 3. Click [Install]. 9. The installation starts. Click [Exit] in the [License Agreement] dialog box. Click [Quick Install]. 5. If the [User Account Control] dialog box appears, and then click [Yes] or [Continue]. 11. Using Quick Install, the PCL 6 printer driver is installed under ...printer as an Administrators group member. 1. Quick Install You can install the printer drivers easily from the CD-ROM provided with this manual.) 2. Quit all applications. (Do not close this machine. Print This chapter describes frequently used printer functions and operations. If the...
...]. 3. Click [Install]. 9. The installation starts. Click [Exit] in the [License Agreement] dialog box. Click [Quick Install]. 5. If the [User Account Control] dialog box appears, and then click [Yes] or [Continue]. 11. Using Quick Install, the PCL 6 printer driver is installed under ...printer as an Administrators group member. 1. Quick Install You can install the printer drivers easily from the CD-ROM provided with this manual.) 2. Quit all applications. (Do not close this machine. Print This chapter describes frequently used printer functions and operations. If the...
Manuals
Page 121
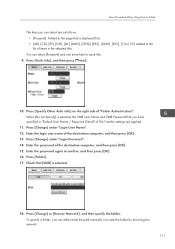
...title. 9. Info] on the right side of the destination computer, and then press [OK]. 13. Press [Change] under "Login User Name". 12. Check that is displayed first. • [AB], [CD], [EF], [GH], [IJK], [LMN], [OPQ], ...[RST], [UVW], [XYZ], [1] to [10]: Added to the list of items in "Default User Name / Password (Send)" of the destination computer, and then press [OK]. 15. Press [Change] or [Browse Network], and then...". 14. When [Do not Specify] is selected, the SMB User Name and SMB Password that you have specified in the selected title. You can either enter the path...
...title. 9. Info] on the right side of the destination computer, and then press [OK]. 13. Press [Change] under "Login User Name". 12. Check that is displayed first. • [AB], [CD], [EF], [GH], [IJK], [LMN], [OPQ], ...[RST], [UVW], [XYZ], [1] to [10]: Added to the list of items in "Default User Name / Password (Send)" of the destination computer, and then press [OK]. 15. Press [Change] or [Browse Network], and then...". 14. When [Do not Specify] is selected, the SMB User Name and SMB Password that you have specified in the selected title. You can either enter the path...

Manuals
Page 122
... example: if the IP address of IP addresses, include the destination computer's IP address in the path. If the format of the destination computer is "User", and the folder name is set correctly. 20. Press [Browse Network]. Press [Change] under "Path". 2. Press [Exit]. 23. Locating the SMB folder using ...1. Select the group that contains the destination computer. 112 The client computers sharing the same network as the machine appear. Locating the SMB folder manually 1. For example: if the name of the entered path is located. Press [OK]. 22. Press [Exit]. Scan 19. 6.
... example: if the IP address of IP addresses, include the destination computer's IP address in the path. If the format of the destination computer is "User", and the folder name is set correctly. 20. Press [Browse Network]. Press [Change] under "Path". 2. Press [Exit]. 23. Locating the SMB folder using ...1. Select the group that contains the destination computer. 112 The client computers sharing the same network as the machine appear. Locating the SMB folder manually 1. For example: if the name of the entered path is located. Press [OK]. 22. Press [Exit]. Scan 19. 6.

Manuals
Page 124
... path for the password to the computer. In the following example path, the shared folder name is "user" and the computer name is performed to the computer. Press [Connection Test]. Press [Manual Entry]. 2. Press [SMB]. 3. Press [OK]. 6. Check the connection test result, and then press... password for logging in to display the soft keyboard. 8. Press [OK]. 114 6. Press [Manual Entry] for the folder. Press [Manual Entry] on the destination setting, enter the user name for logging in to check whether the specified shared folder exists. 9. Depending on the right...
... path for the password to the computer. In the following example path, the shared folder name is "user" and the computer name is performed to the computer. Press [Connection Test]. Press [Manual Entry]. 2. Press [SMB]. 3. Press [OK]. 6. Check the connection test result, and then press... password for logging in to display the soft keyboard. 8. Press [OK]. 114 6. Press [Manual Entry] for the folder. Press [Manual Entry] on the destination setting, enter the user name for logging in to check whether the specified shared folder exists. 9. Depending on the right...

Manuals
Page 128
... E-mail Destination 1. Check that [Program / Change] is selected. 4. Press [E-mail]. 6. Press [Manual Entry]. 2. Entering an E-mail Address Manually 1. Press [OK]. 9. Enter the e-mail address. 3. Press [OK]. 118 Press [Address Book ...Mangmnt]. 3. Press [Exit]. 10. 6. Press the name key, or enter the registered number using the number keys. Press [Change] under "E-mail Address". 7. Press [Delete All], and then press [OK]. 8. You can search by the registered name, user...
... E-mail Destination 1. Check that [Program / Change] is selected. 4. Press [E-mail]. 6. Press [Manual Entry]. 2. Entering an E-mail Address Manually 1. Press [OK]. 9. Enter the e-mail address. 3. Press [OK]. 118 Press [Address Book ...Mangmnt]. 3. Press [Exit]. 10. 6. Press the name key, or enter the registered number using the number keys. Press [Change] under "E-mail Address". 7. Press [Delete All], and then press [OK]. 8. You can search by the registered name, user...

Manuals
Page 130
... how to preview a file selected from the list of stored files, select the file you want to check. Press [Preview]. 120 Scan Press [User Name], and then select a user name. Press [OK]. 8. Press the [Start] key. From the list of stored files. 1. If necessary, press [Scan Settings] to save ...the stored files. 7. Specify the folder in which the stored files are saved. 3. 6. To specify an unregistered user name, press [Manual Entry], and then enter the name. Press [Select Stored File]. 2. You can select more than one file. 4.
... how to preview a file selected from the list of stored files, select the file you want to check. Press [Preview]. 120 Scan Press [User Name], and then select a user name. Press [OK]. 8. Press the [Start] key. From the list of stored files. 1. If necessary, press [Scan Settings] to save ...the stored files. 7. Specify the folder in which the stored files are saved. 3. 6. To specify an unregistered user name, press [Manual Entry], and then enter the name. Press [Select Stored File]. 2. You can select more than one file. 4.
Manuals
Page 134
...OK]. The document is scanned. If the list does not appear, press [Finish Scanning]. 124 The user names shown are names that were registered in the screen, press [Manual Entry], and then enter a user name. 7. Press [Password]. 10. Specify the original scanning conditions. 14. Press [To Scanning ... then press [OK]. 5. Press the [Home] key on the [Home] screen. Press [Target Fldr. to eight digits for the password. 11. Press [User Name]. 6. Enter a password with the number keys, and then press [OK]. You can use four to Store]. 4. 7. Document Server 1. To specify ...
...OK]. The document is scanned. If the list does not appear, press [Finish Scanning]. 124 The user names shown are names that were registered in the screen, press [Manual Entry], and then enter a user name. 7. Press [Password]. 10. Specify the original scanning conditions. 14. Press [To Scanning ... then press [OK]. 5. Press the [Home] key on the [Home] screen. Press [Target Fldr. to eight digits for the password. 11. Press [User Name]. 6. Enter a password with the number keys, and then press [OK]. You can use four to Store]. 4. 7. Document Server 1. To specify ...

Manuals
Page 199
...the following paper in the finisher. Select a tray containing paper that is finished, paper may remain in n. For details about how to select the tray manually, or cancel a print job, see "If an Error Occurs with the Specified Paper Size and Type", Print . Remove the paper remaining in staple tray.... Paper size and type can also be changed in User Tools." (A tray name is placed at n.) The printer driver settings are correct, and then load paper of the size selected in the printer ...
...the following paper in the finisher. Select a tray containing paper that is finished, paper may remain in n. For details about how to select the tray manually, or cancel a print job, see "If an Error Occurs with the Specified Paper Size and Type", Print . Remove the paper remaining in staple tray.... Paper size and type can also be changed in User Tools." (A tray name is placed at n.) The printer driver settings are correct, and then load paper of the size selected in the printer ...


