
Printer Reference
Page 3
... Reset ...32 Printing on Thick or Thin Paper 33 Feed Roller Pressure Lever Position 33 Separation Pressure Lever Position 34 Auto Cycle ...35 Original Type...36 Sample Print and Adjustment 37 Adjusting the Print Image Position 37 Changing the Printing Speed 40 i Before Using the Machine Originals ...17 Recommended Sizes and Weights of RWARNING and RCAUTION Labels 8 Guide to Components 9 Options ...11 Option List...
... Reset ...32 Printing on Thick or Thin Paper 33 Feed Roller Pressure Lever Position 33 Separation Pressure Lever Position 34 Auto Cycle ...35 Original Type...36 Sample Print and Adjustment 37 Adjusting the Print Image Position 37 Changing the Printing Speed 40 i Before Using the Machine Originals ...17 Recommended Sizes and Weights of RWARNING and RCAUTION Labels 8 Guide to Components 9 Options ...11 Option List...

Printer Reference
Page 4
... Master Feed Section 88 "x + A + B" Paper Misfeeds in the Paper Feed Section 89 "x + B + E" Master Misfeeds in Two Colors 67 Combination Chart 68 4. 3. Troubleshooting If Your Machine Does Not Operate as You Want 69 Printing Problems 70 Printing Problems When Using Combine Mode 70 Loading Paper into the Paper Feed Tray 71 Replenishing Paper 71 Changing the Paper Size 72 When the Add Ink Indicator (j) Lights 73 Master Roll Replacement 77 Placing a New Roll of Optional Auto Document Feeder is Open 94 Master Eject Unit...
... Master Feed Section 88 "x + A + B" Paper Misfeeds in the Paper Feed Section 89 "x + B + E" Master Misfeeds in Two Colors 67 Combination Chart 68 4. 3. Troubleshooting If Your Machine Does Not Operate as You Want 69 Printing Problems 70 Printing Problems When Using Combine Mode 70 Loading Paper into the Paper Feed Tray 71 Replenishing Paper 71 Changing the Paper Size 72 When the Add Ink Indicator (j) Lights 73 Master Roll Replacement 77 Placing a New Roll of Optional Auto Document Feeder is Open 94 Master Eject Unit...

Printer Reference
Page 5
... of Paper (Black Line/Stain 100 Blank Prints or Incomplete Prints 101 5. User Tools Accessing the User Tools 105 Quitting User Tools 105 User Tools Menu 106 1 Counter ...106 2 System ...106 3 Set Operation Mode 107 4 Initial Settings...108 5 Mode Settings ...109 6 Administrator Tools 110 7 Online Settings...111 User Code ...113 Entering the User Code to Machine 119 Maintaining the Machine 120 Main Frame ...120 Optional Document Feeder 121 7. Remarks Operation Notes 115 General Cautions 115 Print Paper...
... of Paper (Black Line/Stain 100 Blank Prints or Incomplete Prints 101 5. User Tools Accessing the User Tools 105 Quitting User Tools 105 User Tools Menu 106 1 Counter ...106 2 System ...106 3 Set Operation Mode 107 4 Initial Settings...108 5 Mode Settings ...109 6 Administrator Tools 110 7 Online Settings...111 User Code ...113 Entering the User Code to Machine 119 Maintaining the Machine 120 Main Frame ...120 Optional Document Feeder 121 7. Remarks Operation Notes 115 General Cautions 115 Print Paper...
Printer Reference
Page 9
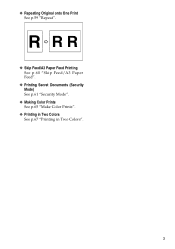
❖ Repeating Original onto One Print See p.59 "Repeat". ❖ Skip Feed/A3 Paper Feed Printing See p.60 "Skip Feed/A3 Paper Feed". ❖ Printing Secret Documents (Security Mode) See p.61 "Security Mode". ❖ Making Color Prints See p.65 "Make Color Prints". ❖ Printing in Two Colors See p.67 "Printing in Two Colors". 3
❖ Repeating Original onto One Print See p.59 "Repeat". ❖ Skip Feed/A3 Paper Feed Printing See p.60 "Skip Feed/A3 Paper Feed". ❖ Printing Secret Documents (Security Mode) See p.61 "Security Mode". ❖ Making Color Prints See p.65 "Make Color Prints". ❖ Printing in Two Colors See p.67 "Printing in Two Colors". 3

Printer Reference
Page 18
... the Open Cover/Unit Indicator (M) Lights and a Message is Displayed". 12 B: Load Paper indicator See p.71 "Loading Paper into the Paper Feed Tray". Panel Display The panel display shows the machine status, error messages, and function menus. 8. {Cancel} key Press to cancel a selection or an entry, and to return to save ink. C: Master End indicator See p.95 "When the Master End Indicator (C) Lights and a Message is Displayed". 7. Color: Color Drum...
... the Open Cover/Unit Indicator (M) Lights and a Message is Displayed". 12 B: Load Paper indicator See p.71 "Loading Paper into the Paper Feed Tray". Panel Display The panel display shows the machine status, error messages, and function menus. 8. {Cancel} key Press to cancel a selection or an entry, and to return to save ink. C: Master End indicator See p.95 "When the Master End Indicator (C) Lights and a Message is Displayed". 7. Color: Color Drum...

Printer Reference
Page 19
... to select Text, Photo, Text/Photo, Pale, or Pencil mode. See p.42 "Fine Mode". 19. {Security} key Press to make masters and prints in a single operation. 13. {Clear Modes/Energy Saver} key • Clear Modes Press to clear the previously entered job settings. • Energy Saver Press to switch to and from an optional printer controller. 24. {Hold Data-in} key Press to reject...
... to select Text, Photo, Text/Photo, Pale, or Pencil mode. See p.42 "Fine Mode". 19. {Security} key Press to make masters and prints in a single operation. 13. {Clear Modes/Energy Saver} key • Clear Modes Press to clear the previously entered job settings. • Energy Saver Press to switch to and from an optional printer controller. 24. {Hold Data-in} key Press to reject...

Printer Reference
Page 30
Basics D Make sure that the paper feed side plates touch the paper light- C Lift the paper delivery end plate and move it to its origi- ANT038S ANT035S B Lift the paper delivery side plates and adjust them to match the print pa- per size. 2 TSLY015E Setting Up the Paper Delivery Tray A Open the paper delivery tray. ANT037S D Lift the paper delivery end plate and adjust it to the paper size. 2 1 2 ANT062S 24 Shift the lock lever to match the paper size. ly. nal position.
Basics D Make sure that the paper feed side plates touch the paper light- C Lift the paper delivery end plate and move it to its origi- ANT038S ANT035S B Lift the paper delivery side plates and adjust them to match the print pa- per size. 2 TSLY015E Setting Up the Paper Delivery Tray A Open the paper delivery tray. ANT037S D Lift the paper delivery end plate and adjust it to the paper size. 2 1 2 ANT062S 24 Shift the lock lever to match the paper size. ly. nal position.

Printer Reference
Page 38
...; If there is no ink • If originals or paper are jammed • If the machine has not finished making changes to the user tools • If the screen for entering a user code is lit • If you press and hold the has not been operated for a certain pe- {Clear Modes/Energy Saver} key for a certain period of a Combine print • If there...
...; If there is no ink • If originals or paper are jammed • If the machine has not finished making changes to the user tools • If the screen for entering a user code is lit • If you press and hold the has not been operated for a certain pe- {Clear Modes/Energy Saver} key for a certain period of a Combine print • If there...
Printer Reference
Page 45
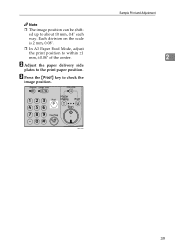
Each division on the scale is 2 mm, 0.08". ❒ In A3 Paper Feed Mode, adjust the print position to check the image position. Sample Print and Adjustment 2 ANT123S 39 C Press the {Proof} key to within ±1 mm, ±0.04" of the center. Note ❒ The image position can be shifted up to the print paper position. B Adjust the paper delivery side plates to about 10 mm, 0.4" each way.
Each division on the scale is 2 mm, 0.08". ❒ In A3 Paper Feed Mode, adjust the print position to check the image position. Sample Print and Adjustment 2 ANT123S 39 C Press the {Proof} key to within ±1 mm, ±0.04" of the center. Note ❒ The image position can be shifted up to the print paper position. B Adjust the paper delivery side plates to about 10 mm, 0.4" each way.
Printer Reference
Page 46
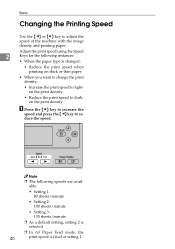
... of the machine with the image density and printing paper. Adjust the print speed using the Speed 2 Keys for the following speeds are available: • Setting 1: 80 sheets/minute • Setting 2: 100 sheets/minute • Setting 3: 130 sheets/minute ❒ As a default setting, setting 2 is selected. ❒ In A3 Paper Feed mode, the 40 print speed is changed: • Reduce the print speed when printing on thick...
... of the machine with the image density and printing paper. Adjust the print speed using the Speed 2 Keys for the following speeds are available: • Setting 1: 80 sheets/minute • Setting 2: 100 sheets/minute • Setting 3: 130 sheets/minute ❒ As a default setting, setting 2 is selected. ❒ In A3 Paper Feed mode, the 40 print speed is changed: • Reduce the print speed when printing on thick...
Printer Reference
Page 66
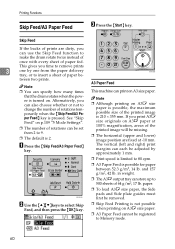
... size paper. ❒ A3 Paper Feed cannot be - Skip Feed If the backs of prints are fixed at 100% magnification, areas of rotations temporarily when the {Skip Feed/A3 Paper Feed} key is 2. A Press the {Skip Feed/A3 Paper Feed} key. in weight. ❒ The A3L output tray can use the Skip Feed function to 500 sheets of paper fed. If you can store up to make the drum...
... size paper. ❒ A3 Paper Feed cannot be - Skip Feed If the backs of prints are fixed at 100% magnification, areas of rotations temporarily when the {Skip Feed/A3 Paper Feed} key is 2. A Press the {Skip Feed/A3 Paper Feed} key. in weight. ❒ The A3L output tray can use the Skip Feed function to 500 sheets of paper fed. If you can store up to make the drum...
Printer Reference
Page 72
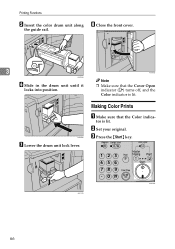
H Close the front cover. 3 ANT053S F Slide in the drum unit until it locks into position. tor is lit. B Set your original. ANT115S ANT128S 66 C Press the {Start} key. Printing Functions E Insert the color drum unit along the guide rail. ANT059S Note ❒ Make sure that the Color indica- Making Color Prints A Make sure that the Cover Open indicator (M) turns off, and the Color indicator is lit. ANT049S G Lower the drum unit lock lever.
H Close the front cover. 3 ANT053S F Slide in the drum unit until it locks into position. tor is lit. B Set your original. ANT115S ANT128S 66 C Press the {Start} key. Printing Functions E Insert the color drum unit along the guide rail. ANT059S Note ❒ Make sure that the Color indica- Making Color Prints A Make sure that the Cover Open indicator (M) turns off, and the Color indicator is lit. ANT049S G Lower the drum unit lock lever.
Printer Reference
Page 76
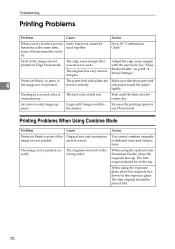
Troubleshooting Printing Problems Problem Cause Action When you set correctly. Parts of them cannot be placed first. 70 An uneven solid image appears. Printing Problems When Using Combine Mode Problem Cause Prints are blank or parts of The paper feed side plates are not printed. are not printed. The image is too wide. The originals were fed in a second color is The first color is still wet. When using the exposure glass...
Troubleshooting Printing Problems Problem Cause Action When you set correctly. Parts of them cannot be placed first. 70 An uneven solid image appears. Printing Problems When Using Combine Mode Problem Cause Prints are blank or parts of The paper feed side plates are not printed. are not printed. The image is too wide. The originals were fed in a second color is The first color is still wet. When using the exposure glass...
Printer Reference
Page 116
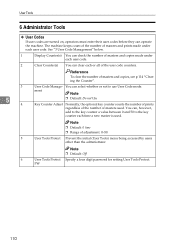
... of masters and copies, see p.114 "Clearing the Counter". 3 User Code Manage- The machine keeps count of the number of the user code counters. See "3 User Code Management" below. 1 Display Counter(s) You can check the number of masters and copies made under each or all of masters and prints made under each user code. 2 Clear Counter(s) You can operate the machine. Reference To clear the number of adjustment: 0-50 5 User Tools Protect Prevent the initial (User Tools) menu...
... of masters and copies, see p.114 "Clearing the Counter". 3 User Code Manage- The machine keeps count of the number of the user code counters. See "3 User Code Management" below. 1 Display Counter(s) You can check the number of masters and copies made under each or all of masters and prints made under each user code. 2 Clear Counter(s) You can operate the machine. Reference To clear the number of adjustment: 0-50 5 User Tools Protect Prevent the initial (User Tools) menu...

Printer Reference
Page 119
... machine keeps count of the numbers of masters and prints under each user code. Other users will not displayed 5 on p.110 "6 Administrator Tools". See "3 User Code Management" on the panel display. ❒ If you turn on the main switch, or after the machine has been reset. ❒ The following user codes are available: Note ❒ The user code will not be set . User Code User Code In User Code mode, users need to enter a user code before they can use...
... machine keeps count of the numbers of masters and prints under each user code. Other users will not displayed 5 on p.110 "6 Administrator Tools". See "3 User Code Management" on the panel display. ❒ If you turn on the main switch, or after the machine has been reset. ❒ The following user codes are available: Note ❒ The user code will not be set . User Code User Code In User Code mode, users need to enter a user code before they can use...
Printer Reference
Page 121
... not operate the machine without covers. Make extra prints until the image density recovers. • When the machine is used for a while before the next printing in order to let the ink dry on the printed paper. If this is not done, feed roller marks will appear on the print image. • If the machine is not consistent, slow the printing speed down to Setting 1. •...
... not operate the machine without covers. Make extra prints until the image density recovers. • When the machine is used for a while before the next printing in order to let the ink dry on the printed paper. If this is not done, feed roller marks will appear on the print image. • If the machine is not consistent, slow the printing speed down to Setting 1. •...
Printer Reference
Page 130
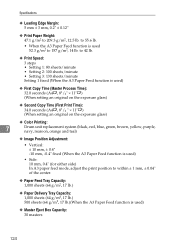
... sheets/minute • Setting 3: 130 sheets/minute Setting 1 fixed (When the A3 Paper Feed function is used) ❖ First Copy Time (Master Process Time): 32.0 seconds (A4L, 81/2" × 11"L) (When setting an original on the exposure glass) ❖ Second Copy Time (First Print Time): 34.0 seconds (A4L, 81/2 " × 11"L) (When setting an original on the exposure glass) ❖ Color Printing: 7 Drum unit replacement system (black, red, blue, green...
... sheets/minute • Setting 3: 130 sheets/minute Setting 1 fixed (When the A3 Paper Feed function is used) ❖ First Copy Time (Master Process Time): 32.0 seconds (A4L, 81/2" × 11"L) (When setting an original on the exposure glass) ❖ Second Copy Time (First Print Time): 34.0 seconds (A4L, 81/2 " × 11"L) (When setting an original on the exposure glass) ❖ Color Printing: 7 Drum unit replacement system (black, red, blue, green...

Printer Reference
Page 131
...Set up with Auto Document Feeder Width 750 mm, 29.5" 750 mm, 29.5" 1,244 mm, 49.0" 1,244 mm, 49.0" Depth 681 mm, 26.8" 681 mm, 26.8" 681 mm, 26.8" 681 mm, 26.8" Height 633 mm, 24.9" 686 mm, 27.0" 633 mm, 24.9" 686 mm, 27.0" ❖ Weight: • Main Frame with Exposure... value. *2 It is measured at the position of the operator. ❖ Power Source: See the inside front cover of this manual. ❖ Power Consumption: Printer Controller Sleep mode Ready mode Master Making Printing: Speed 1 Printing: Speed 2 Printing: Speed 3 Printer Unit VC-20 *1 Less than 0.0039 kW Less than 0.02...
...Set up with Auto Document Feeder Width 750 mm, 29.5" 750 mm, 29.5" 1,244 mm, 49.0" 1,244 mm, 49.0" Depth 681 mm, 26.8" 681 mm, 26.8" 681 mm, 26.8" 681 mm, 26.8" Height 633 mm, 24.9" 686 mm, 27.0" 633 mm, 24.9" 686 mm, 27.0" ❖ Weight: • Main Frame with Exposure... value. *2 It is measured at the position of the operator. ❖ Power Source: See the inside front cover of this manual. ❖ Power Consumption: Printer Controller Sleep mode Ready mode Master Making Printing: Speed 1 Printing: Speed 2 Printing: Speed 3 Printer Unit VC-20 *1 Less than 0.0039 kW Less than 0.02...
Printer Reference
Page 136
... List/Test Print, 111 Loading Paper, 23 Loading Paper into the Paper Feed Tray, 71 location indicator, 80 Longer Paper, 109 M 130 Main Frame, 123 main frame cleaning, 120 Main switch, 10 Maintaining the Machine, 120 Make Color Prints, 65 Making Color Prints, 66 master Master eject indicator (k), 96 Master eject box, 10, 96 Master eject unit, 10 Master end indicator (C) When the Master End Indicator (C) Lights and a Message is Displayed, 95 Master Making Density, 41, 108 {Master Making Density...
... List/Test Print, 111 Loading Paper, 23 Loading Paper into the Paper Feed Tray, 71 location indicator, 80 Longer Paper, 109 M 130 Main Frame, 123 main frame cleaning, 120 Main switch, 10 Maintaining the Machine, 120 Make Color Prints, 65 Making Color Prints, 66 master Master eject indicator (k), 96 Master eject box, 10, 96 Master eject unit, 10 Master end indicator (C) When the Master End Indicator (C) Lights and a Message is Displayed, 95 Master Making Density, 41, 108 {Master Making Density...

Printer Reference
Page 137
... feeder, 28 originals on exposure glass, 28 Placing a New Roll of Tape in the Tape Dispenser, 79 Placing Originals, 28 Poor Printing, 98 Dirt on the Back Side of Paper, 98 Dirt on the Front Side of Paper, 100 Power connection, 119 Preset Reduce/Enlarge, 42 Printer controller, 62 Printing Functions, 41 Printing in Two Colors, 67 Printing Problems, 70 When Using Combine Mode, 70 Printing Size...
... feeder, 28 originals on exposure glass, 28 Placing a New Roll of Tape in the Tape Dispenser, 79 Placing Originals, 28 Poor Printing, 98 Dirt on the Back Side of Paper, 98 Dirt on the Front Side of Paper, 100 Power connection, 119 Preset Reduce/Enlarge, 42 Printer controller, 62 Printing Functions, 41 Printing in Two Colors, 67 Printing Problems, 70 When Using Combine Mode, 70 Printing Size...


