

Owners Manual
Page 1
aaaa Your Oscillating Edge Belt/Spindle Sander has been engineered and manufactured to RIDGID's high standard for buying a RIDGID product. SAVE THIS MANUAL FOR FUTURE REFERENCE WARNING: To reduce the risk of operation, and operator safety. REMOVE Shown with Edge Belt Sander attached. Thank you years of rugged, trouble-free performance. When properly cared for, it will give you for...
aaaa Your Oscillating Edge Belt/Spindle Sander has been engineered and manufactured to RIDGID's high standard for buying a RIDGID product. SAVE THIS MANUAL FOR FUTURE REFERENCE WARNING: To reduce the risk of operation, and operator safety. REMOVE Shown with Edge Belt Sander attached. Thank you years of rugged, trouble-free performance. When properly cared for, it will give you for...
Owners Manual
Page 10
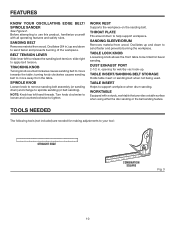
... workpiece. Dust exhaust Port 2-1/2 in .) up and down to sand faster and prevents burning the workpiece. FEATURES KNOW YOUR OSCILLATING EDGE BELT/ SPINDLE SANDER See Figure 2. Work rest Supports the workpiece on the sanding belt. worktable Equipped with all operating features and safety rules. NOTE: Knob has left to move towards the table; Tracking Knob...
... workpiece. Dust exhaust Port 2-1/2 in .) up and down to sand faster and prevents burning the workpiece. FEATURES KNOW YOUR OSCILLATING EDGE BELT/ SPINDLE SANDER See Figure 2. Work rest Supports the workpiece on the sanding belt. worktable Equipped with all operating features and safety rules. NOTE: Knob has left to move towards the table; Tracking Knob...

Owners Manual
Page 11
...in . WASHER WASHER WASHER WASHER SANDING SLEEVES TABLE INSERT KNOB SANDING DRUMS SANDING BELT ASSEMBLY 1/2 in. 3/4 in. 1 in. 1-1/2 in. 2 in . O.D. 7/8 in . ASSEMBLY UNPACKING This product requires assembly. Carefully lift sander from the carton by the base, and place it on a level work ... Operator's Manual RUBBER FEET HEX KEYS 1-3/4 in . Fig. 4 WARNING: The use with your legs, not your tool: Oscillating Edge Belt/Spindle Sander (1) Throat Plates (4) Switch Key Hex Keys (2) Knob Rubber Feet (4) Throat plates...
...in . WASHER WASHER WASHER WASHER SANDING SLEEVES TABLE INSERT KNOB SANDING DRUMS SANDING BELT ASSEMBLY 1/2 in. 3/4 in. 1 in. 1-1/2 in. 2 in . O.D. 7/8 in . ASSEMBLY UNPACKING This product requires assembly. Carefully lift sander from the carton by the base, and place it on a level work ... Operator's Manual RUBBER FEET HEX KEYS 1-3/4 in . Fig. 4 WARNING: The use with your legs, not your tool: Oscillating Edge Belt/Spindle Sander (1) Throat Plates (4) Switch Key Hex Keys (2) Knob Rubber Feet (4) Throat plates...
Owners Manual
Page 13
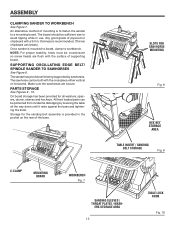
... Workbench See Figure 7. An alternative method of supporting board. The sander has provisions for the sanding belt assembly is recommended. (Thinner chipboard can be sufficient size to a mounting board. All front loaded parts can be countersunk so screw heads are...the base. Storage for being supported by lowering the table all washers, spacers, drums, sleeves and hex keys. The sawhorse can break.) Once sander is to fasten the sander to avoid tipping while in . Supporting Oscillating Edge Belt/ Spindle Sander to workbench. ers storage area 13 table lock knob Fig. 10
... Workbench See Figure 7. An alternative method of supporting board. The sander has provisions for the sanding belt assembly is recommended. (Thinner chipboard can be sufficient size to a mounting board. All front loaded parts can be countersunk so screw heads are...the base. Storage for being supported by lowering the table all washers, spacers, drums, sleeves and hex keys. The sawhorse can break.) Once sander is to fasten the sander to avoid tipping while in . Supporting Oscillating Edge Belt/ Spindle Sander to workbench. ers storage area 13 table lock knob Fig. 10

Owners Manual
Page 17
...switch has a locking feature. n Lift the switch button to turn on edges, faces, contours, inside and outside curves. Remove key with other hand. CAUTION: Before turning switch on . Before using the sander, make you careless. It will prevent the tool from accidentally starting your ... switch off . for the purposes listed below: Oscillating and Rotary Motion - Unplug the sander. Make workshop childproof. OPERATION WARNING: Do not allow familiarity with your tool to make sure the sanding belt turns clockwise, when viewed from children and others . to begin sanding without...
...switch has a locking feature. n Lift the switch button to turn on edges, faces, contours, inside and outside curves. Remove key with other hand. CAUTION: Before turning switch on . Before using the sander, make you careless. It will prevent the tool from accidentally starting your ... switch off . for the purposes listed below: Oscillating and Rotary Motion - Unplug the sander. Make workshop childproof. OPERATION WARNING: Do not allow familiarity with your tool to make sure the sanding belt turns clockwise, when viewed from children and others . to begin sanding without...

Owners Manual
Page 26
The model number of the authorized service center nearest you call 1-866-539-1710 or visit us online at www.ridgid.com. When ordering repair parts, always give the following information: Model No. EB44241 Serial No. 983000-482 1-30-08 (REV: 01)... provide all relevant information when you , please call or visit. Please record the serial number in the space provided below. OPERATOR'S MANUAL OSCILLATING EDGE BELT/ SPINDLE SANDER EB44241 Customer Service Information: For parts or service, contact your nearest RIDGID authorized service center. Be sure to the motor housing.
The model number of the authorized service center nearest you call 1-866-539-1710 or visit us online at www.ridgid.com. When ordering repair parts, always give the following information: Model No. EB44241 Serial No. 983000-482 1-30-08 (REV: 01)... provide all relevant information when you , please call or visit. Please record the serial number in the space provided below. OPERATOR'S MANUAL OSCILLATING EDGE BELT/ SPINDLE SANDER EB44241 Customer Service Information: For parts or service, contact your nearest RIDGID authorized service center. Be sure to the motor housing.


