

Owners Manual
Page 1
WARNING: To reduce the risk of rugged, trouble-free performance. REMOVE Shown with Edge Belt Sander attached. OPERATOR'S MANUAL OSCILLATING EDGE BELT/ SPINDLE SANDER EB44241 REMOVE Shown with Spindle Sander attached. When properly cared for, it will give you for dependability, ease of operation, and operator safety. SAVE THIS MANUAL FOR FUTURE ... Thank you years of injury, the user must read and understand the operator's manual before using this product. aaaa Your Oscillating Edge Belt/Spindle Sander has been engineered and manufactured to RIDGID's high standard for buying...
WARNING: To reduce the risk of rugged, trouble-free performance. REMOVE Shown with Edge Belt Sander attached. OPERATOR'S MANUAL OSCILLATING EDGE BELT/ SPINDLE SANDER EB44241 REMOVE Shown with Spindle Sander attached. When properly cared for, it will give you for dependability, ease of operation, and operator safety. SAVE THIS MANUAL FOR FUTURE ... Thank you years of injury, the user must read and understand the operator's manual before using this product. aaaa Your Oscillating Edge Belt/Spindle Sander has been engineered and manufactured to RIDGID's high standard for buying...

Owners Manual
Page 4
..., saw horses, blocks, etc.) for and remove all nails from lumber before connecting to power supply. FIRMLY CLAMP OR BOLT your sander) to cause a careless mistake. SPECIFIC SAFETY RULES NEVER START A TOOL WHEN ANY ROTATiNG COMPONENT IS IN CONTACT WITH THE WORKPIECE. ...from these instructions. Instructions for safe use of accessories are included with directional arrows. Save these exposures varies, depending on the sander table at approximately hip height. never stand or have any workpieces large enough to tip when not secured to the work surface...
..., saw horses, blocks, etc.) for and remove all nails from lumber before connecting to power supply. FIRMLY CLAMP OR BOLT your sander) to cause a careless mistake. SPECIFIC SAFETY RULES NEVER START A TOOL WHEN ANY ROTATiNG COMPONENT IS IN CONTACT WITH THE WORKPIECE. ...from these instructions. Instructions for safe use of accessories are included with directional arrows. Save these exposures varies, depending on the sander table at approximately hip height. never stand or have any workpieces large enough to tip when not secured to the work surface...
Owners Manual
Page 10
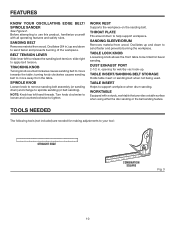
... Storage Holds table insert or sanding belt when not being used. Before attempting to move towards the table; FEATURES KNOW YOUR OSCILLATING EDGE BELT/ SPINDLE SANDER See Figure 2. Belt Tension Lever Slide lever left hand threads.
... Storage Holds table insert or sanding belt when not being used. Before attempting to move towards the table; FEATURES KNOW YOUR OSCILLATING EDGE BELT/ SPINDLE SANDER See Figure 2. Belt Tension Lever Slide lever left hand threads.

Owners Manual
Page 11
Fig. 4 WARNING: The use with this tool. ASSEMBLY UNPACKING This product requires assembly. Carefully lift sander from the carton by the base, and place it on a level work surface. WARNING: Do not attempt to do not operate this ... are replaced. n Do not discard the packing material until the missing parts are included with your legs, not your tool: Oscillating Edge Belt/Spindle Sander (1) Throat Plates (4) Switch Key Hex Keys (2) Knob Rubber Feet (4) Throat plates SWITCH KEY Flat Washers (4),1-3/4 in a ...
Fig. 4 WARNING: The use with this tool. ASSEMBLY UNPACKING This product requires assembly. Carefully lift sander from the carton by the base, and place it on a level work surface. WARNING: Do not attempt to do not operate this ... are replaced. n Do not discard the packing material until the missing parts are included with your legs, not your tool: Oscillating Edge Belt/Spindle Sander (1) Throat Plates (4) Switch Key Hex Keys (2) Knob Rubber Feet (4) Throat plates SWITCH KEY Flat Washers (4),1-3/4 in a ...
Owners Manual
Page 12
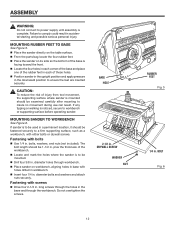
...should be examined carefully after mounting to a firm supporting surface, such as a workbench, with bolts n Use 1/4 in . n Position sander in the upright position and apply pressure in accidental starting and possible serious personal injury. If any tipping or walking is to comply could ...nuts securely. DRYWALL SCREW WASHER NUT RUBBER FEET Fig. 5 1/4 in the base and through workbench. Failure to be 1-1/2 in . moUNTING SANDER To Workbench See Figure 6. Do not overtighten the screws. MOUNTING RUBBER FEET TO BASE See Figure 5. diameter holes through the workbench. BASE ...
...should be examined carefully after mounting to a firm supporting surface, such as a workbench, with bolts n Use 1/4 in . n Position sander in the upright position and apply pressure in accidental starting and possible serious personal injury. If any tipping or walking is to comply could ...nuts securely. DRYWALL SCREW WASHER NUT RUBBER FEET Fig. 5 1/4 in the base and through workbench. Failure to be 1-1/2 in . moUNTING SANDER To Workbench See Figure 6. Do not overtighten the screws. MOUNTING RUBBER FEET TO BASE See Figure 5. diameter holes through the workbench. BASE ...
Owners Manual
Page 13
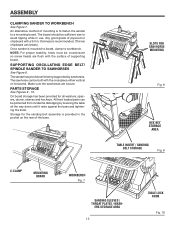
... recommended. (Thinner chipboard can be countersunk so screw heads are secure. ASSEMBLY Clamping Sander To Workbench See Figure 7. The sander has provisions for the sanding belt assembly is to fasten the sander to workbench. An alternative method of mounting is provided in the pocket on the rear of ...supporting board. Supporting Oscillating Edge Belt/ Spindle Sander to avoid tipping while in . ers storage area 13 table lock knob Fig. 10 The board should be protected from incidental ...
... recommended. (Thinner chipboard can be countersunk so screw heads are secure. ASSEMBLY Clamping Sander To Workbench See Figure 7. The sander has provisions for the sanding belt assembly is to fasten the sander to workbench. An alternative method of mounting is provided in the pocket on the rear of ...supporting board. Supporting Oscillating Edge Belt/ Spindle Sander to avoid tipping while in . ers storage area 13 table lock knob Fig. 10 The board should be protected from incidental ...

Owners Manual
Page 17
...turn on WARNING: Always wear safety goggles or safety glasses with side shields when operating tools. Remove key with other hand. Turn the sander off . Remove the switch key. Disconnect master switches. to turn on . This feature is intended to inflict severe injury. CAUTION: ... n Wait for fast, burn free finishes on , make sure the sanding belt turns clockwise, when viewed from accidentally starting your tool to turn sander ON ( I ) insert key into your eyes, resulting in . Don't leave tool until identifying and correcting the problem. switch key switch lIFT...
...turn on WARNING: Always wear safety goggles or safety glasses with side shields when operating tools. Remove key with other hand. Turn the sander off . Remove the switch key. Disconnect master switches. to turn on . This feature is intended to inflict severe injury. CAUTION: ... n Wait for fast, burn free finishes on , make sure the sanding belt turns clockwise, when viewed from accidentally starting your tool to turn sander ON ( I ) insert key into your eyes, resulting in . Don't leave tool until identifying and correcting the problem. switch key switch lIFT...
Owners Manual
Page 18
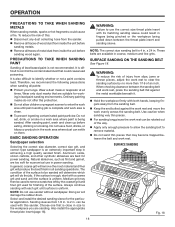
... finishing of the surface to the workpiece you are sanding. Natural abrasives, such as flint and garnet, are suitable for economical use sander without sandpaper. to control the contaminated dust that are too soft for working in . OPERATION PRECAUTIONS TO TAKE WHEN SANDING METALS When ...belt. If the surface is rough, start with its matching sanding sleeve could result in . n Remove all traces of metal dust from the sander. Ordinary painting masks do the job. It is 4 in . Sanding sleeves from inside the unit before eating, drinking or smoking. can ...
... finishing of the surface to the workpiece you are sanding. Natural abrasives, such as flint and garnet, are suitable for economical use sander without sandpaper. to control the contaminated dust that are too soft for working in . OPERATION PRECAUTIONS TO TAKE WHEN SANDING METALS When ...belt. If the surface is rough, start with its matching sanding sleeve could result in . n Remove all traces of metal dust from the sander. Ordinary painting masks do the job. It is 4 in . Sanding sleeves from inside the unit before eating, drinking or smoking. can ...

Owners Manual
Page 19
... left to track improperly. may cause belt to right as shown. The sanding sleeve rotates clockwise. Inside curves are best sanded with the sander assembled in the belt sander mode. For accuracy, use a miter gauge accessory (not included). OPERATION End Sanding on the idler drum end of the belt sanding assembly, it...
... left to track improperly. may cause belt to right as shown. The sanding sleeve rotates clockwise. Inside curves are best sanded with the sander assembled in the belt sander mode. For accuracy, use a miter gauge accessory (not included). OPERATION End Sanding on the idler drum end of the belt sanding assembly, it...

Owners Manual
Page 22
...the unit under normal operating conditions. Even with a sufficient amount of high grade lubricant for extended work with plastic parts. TRANSPORTING SANDER When using compressed air. However, if you do work on the rear of commercial solvents and may create a hazard or ...the fiberglass chips and grindings are lubricated with a dust collection system, it is necessary to damage from their use only identical RIDGID replacement parts. Dust Collection Capability See Figure 27. Be careful when transporting to bearings, brushes, commutators, etc. GENERAL MAINTENANCE Avoid...
...the unit under normal operating conditions. Even with a sufficient amount of high grade lubricant for extended work with plastic parts. TRANSPORTING SANDER When using compressed air. However, if you do work on the rear of commercial solvents and may create a hazard or ...the fiberglass chips and grindings are lubricated with a dust collection system, it is necessary to damage from their use only identical RIDGID replacement parts. Dust Collection Capability See Figure 27. Be careful when transporting to bearings, brushes, commutators, etc. GENERAL MAINTENANCE Avoid...

Owners Manual
Page 24
... or fails to repair this gearbox may create a hazard unless repair is done by a qualified service technician. 24 Do not use sander on workpiece. 1. Frequent opening of power company facilities. 3. Consult Authorized Service Center. Burned out motor, no power to repair this... relay may create a hazard unless repair is done by a qualified service technician. Replace damaged parts before using sander. 2. Sanding drum is installed with sap. 1. Ensure that fan is glazed with vanes face down easily workpiece. 2. Request a voltage ...
... or fails to repair this gearbox may create a hazard unless repair is done by a qualified service technician. 24 Do not use sander on workpiece. 1. Frequent opening of power company facilities. 3. Consult Authorized Service Center. Burned out motor, no power to repair this... relay may create a hazard unless repair is done by a qualified service technician. Replace damaged parts before using sander. 2. Sanding drum is installed with sap. 1. Ensure that fan is glazed with vanes face down easily workpiece. 2. Request a voltage ...

Owners Manual
Page 26
... the authorized service center nearest you call 1-866-539-1710 or visit us online at www.ridgid.com. OPERATOR'S MANUAL OSCILLATING EDGE BELT/ SPINDLE SANDER EB44241 Customer Service Information: For parts or service, contact your nearest RIDGID authorized service center. For the location of this tool is found on a plate attached to provide...
... the authorized service center nearest you call 1-866-539-1710 or visit us online at www.ridgid.com. OPERATOR'S MANUAL OSCILLATING EDGE BELT/ SPINDLE SANDER EB44241 Customer Service Information: For parts or service, contact your nearest RIDGID authorized service center. For the location of this tool is found on a plate attached to provide...


