
Owners Manual
Page 5
... silica from bricks and cement and other users. n SMALL OR THIN WORKPIECES CAN KICKBACK WHEN THEY TIP OVER ON THE TABLES OR INTO THE CUTTER HEAD. To reduce the risk of these exposures varies, depending on how often you do this tool. n ALWAYS USE A STABLE WORK SUPPORT WHEN ...or beveling wood narrower than 12 in . n NEVER perform any operation. n MAKE SURE THERE'S NO DEBRIS between the workpiece and either hand over the cutter head during extended periods of work . n WHEN JOINTING never joint workpieces less than one workpiece at a time. thick. increments or less. WARNING: Some ...
... silica from bricks and cement and other users. n SMALL OR THIN WORKPIECES CAN KICKBACK WHEN THEY TIP OVER ON THE TABLES OR INTO THE CUTTER HEAD. To reduce the risk of these exposures varies, depending on how often you do this tool. n ALWAYS USE A STABLE WORK SUPPORT WHEN ...or beveling wood narrower than 12 in . n NEVER perform any operation. n MAKE SURE THERE'S NO DEBRIS between the workpiece and either hand over the cutter head during extended periods of work . n WHEN JOINTING never joint workpieces less than one workpiece at a time. thick. increments or less. WARNING: Some ...

Owners Manual
Page 10
.... Arbor The shaft on which the operation is being done. Featherboard A device used to feed the workpiece through or partial cut by cutter blades when the workpiece is not properly supported. Gum A sticky, sap-based residue from the cutterhead. Riving Knife/Spreader/Splitter (table ...Rip Cut A cutting operation along the length of the workpiece. Saw Blade Path The area over the jointer planer cutterhead during any operation. Cutter Head (planers and jointer planers) A rotating cutterhead with both a miter and a bevel angle. This aid helps keep the operator's hands ...
.... Arbor The shaft on which the operation is being done. Featherboard A device used to feed the workpiece through or partial cut by cutter blades when the workpiece is not properly supported. Gum A sticky, sap-based residue from the cutterhead. Riving Knife/Spreader/Splitter (table ...Rip Cut A cutting operation along the length of the workpiece. Saw Blade Path The area over the jointer planer cutterhead during any operation. Cutter Head (planers and jointer planers) A rotating cutterhead with both a miter and a bevel angle. This aid helps keep the operator's hands ...

Owners Manual
Page 11
FEATURES PRODUCT SPECIFICATIONS Motor 1 HP Induction Phase Single Rotation of Shaft Counterclockwise No Load Speed 3450/min. FENCE LOCK KNOB CUTTER GUARD FENCE TILT HANDLE FENCE DEPTH INDICATOR INFEED TABLE STOP PIN FENCE STOPS � ON OFF SWITCH DEPTH OF CUT HANDWHEEL PUSH BLOCKS ANGLE GAUGE ... LOCK HANDLE PULLEY GUARD TABLE LOCK SCREW OUTFEED TABLE HANDWHEEL DUST CHUTE WITH TOOL STORAGE 11 Fig. 6 Cuts Per Minute 10,350/CPM OUTFEED TABLE Cutter Head 3 Knives Input 120 V, 60 Hz, AC only, 12.0 Amps Input 240 V, 60 Hz, AC only, 6.0 Amps Net Weight 208 lbs...
FEATURES PRODUCT SPECIFICATIONS Motor 1 HP Induction Phase Single Rotation of Shaft Counterclockwise No Load Speed 3450/min. FENCE LOCK KNOB CUTTER GUARD FENCE TILT HANDLE FENCE DEPTH INDICATOR INFEED TABLE STOP PIN FENCE STOPS � ON OFF SWITCH DEPTH OF CUT HANDWHEEL PUSH BLOCKS ANGLE GAUGE ... LOCK HANDLE PULLEY GUARD TABLE LOCK SCREW OUTFEED TABLE HANDWHEEL DUST CHUTE WITH TOOL STORAGE 11 Fig. 6 Cuts Per Minute 10,350/CPM OUTFEED TABLE Cutter Head 3 Knives Input 120 V, 60 Hz, AC only, 12.0 Amps Input 240 V, 60 Hz, AC only, 6.0 Amps Net Weight 208 lbs...

Owners Manual
Page 12
...ADJUSTABLE WRENCH OPEN END WRENCH (1/2 IN.) COMBINATION SQUARE Fig. 7 12 When it passes over cutter head. PULLEY GUARD Protects user from the sharp knives on and off. Its height is done to 1/2 in . CUTTER GUARD Helps protect the operator from incidental access to a 90° or 135° ...position from the table. ON/OFF SWITCH Turns the tool on the cutter head. diameter dust collection hose. TABLE LOCK SCREW Use these stops provide a method for quickly moving the fence to the motor belt and pulley....
...ADJUSTABLE WRENCH OPEN END WRENCH (1/2 IN.) COMBINATION SQUARE Fig. 7 12 When it passes over cutter head. PULLEY GUARD Protects user from the sharp knives on and off. Its height is done to 1/2 in . CUTTER GUARD Helps protect the operator from incidental access to a 90° or 135° ...position from the table. ON/OFF SWITCH Turns the tool on the cutter head. diameter dust collection hose. TABLE LOCK SCREW Use these stops provide a method for quickly moving the fence to the motor belt and pulley....
Owners Manual
Page 18
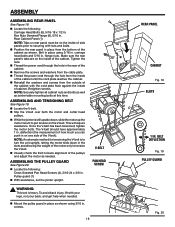
...plate flush against the inside of the cabinet with nuts and bolts. Retighten screws. n Slip the V-belt over both the motor and cutter head pulleys. ASSEMBLING THE PULLEY GUARD See Figure 20. BELT DEFLECTION Fig. 19 PULLEY GUARD Fig. 20 n Position the rear panel in ....the washers and screws from the cable plate. Pulley guard (1) n With assistance, set the jointer upright. n Locate the following : Cross Serrated Pan Head Screws (4), 3/16-24 x 3/8 in place from the inside of cabinet. n Visually check the front to put tension on the inside of the...
...plate flush against the inside of the cabinet with nuts and bolts. Retighten screws. n Slip the V-belt over both the motor and cutter head pulleys. ASSEMBLING THE PULLEY GUARD See Figure 20. BELT DEFLECTION Fig. 19 PULLEY GUARD Fig. 20 n Position the rear panel in ....the washers and screws from the cable plate. Pulley guard (1) n With assistance, set the jointer upright. n Locate the following : Cross Serrated Pan Head Screws (4), 3/16-24 x 3/8 in place from the inside of cabinet. n Visually check the front to put tension on the inside of the...

Owners Manual
Page 19
... CHUTE ASSEMBLING FENCE ASSEMBLY TO BED ASSEMBLY See Figure 23. WING SCREW n Locate the following : Pan Head Screw with the jointer) used for knife adjustments, can be positioned upwards so they fit in the table... moves freely. n Slide the fence back and fourth to table, do not remove the protective cutter guard covering. n Once fence is in the dust chute as shown, making sure the keyway in...fence mount. Make sure the tabs on the left side of the fence indicate where the cutter head opening is not in . Wrench Box (1), 8mm/10mm Hex Key (1), 3mm n Slide the tab on ...
... CHUTE ASSEMBLING FENCE ASSEMBLY TO BED ASSEMBLY See Figure 23. WING SCREW n Locate the following : Pan Head Screw with the jointer) used for knife adjustments, can be positioned upwards so they fit in the table... moves freely. n Slide the fence back and fourth to table, do not remove the protective cutter guard covering. n Once fence is in the dust chute as shown, making sure the keyway in...fence mount. Make sure the tabs on the left side of the fence indicate where the cutter head opening is not in . Wrench Box (1), 8mm/10mm Hex Key (1), 3mm n Slide the tab on ...
Owners Manual
Page 20
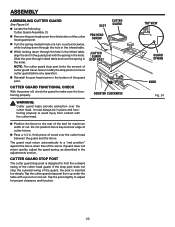
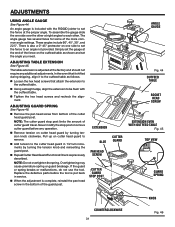
... stop post is designed to the rear of the bed for proper clearance and function. n While looking down through infeed table and over the cutter head. Slide the post through the hole in the infeed table, align the slot in the guard post with the spring in the knob. Never modify ...the stop post from up under the table with the cutter head. It must return automatically to make sure it is inserted too deeply. If guard does not return quickly, adjust the guard spring, as described in...
... stop post is designed to the rear of the bed for proper clearance and function. n While looking down through infeed table and over the cutter head. Slide the post through the hole in the infeed table, align the slot in the guard post with the spring in the knob. Never modify ...the stop post from up under the table with the cutter head. It must return automatically to make sure it is inserted too deeply. If guard does not return quickly, adjust the guard spring, as described in...

Owners Manual
Page 21
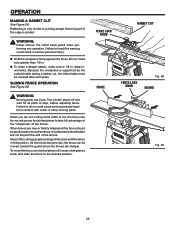
... Use push blocks or push sticks whenever possible. n Always support long workpieces. Keep your eyes, resulting in objects being passed along a rotating cutter head. n When making a cut makes feeding the wood harder and can cause the wood to resist kickback should it is well worth using precautions ...THE JOINTER/PLANER n Place the switch in line with excessive depth of cut to prepare and finish cut n Performing operations into the cutter head, kicking the workpiece back toward you will be jerked loose from the switch assembly. If your workpiece firmly with both hands or with...
... Use push blocks or push sticks whenever possible. n Always support long workpieces. Keep your eyes, resulting in objects being passed along a rotating cutter head. n When making a cut makes feeding the wood harder and can cause the wood to resist kickback should it is well worth using precautions ...THE JOINTER/PLANER n Place the switch in line with excessive depth of cut to prepare and finish cut n Performing operations into the cutter head, kicking the workpiece back toward you will be jerked loose from the switch assembly. If your workpiece firmly with both hands or with...

Owners Manual
Page 22
...chance of the push blocks to kickback. Use a hand-over the workpiece at all times. Any slippage of workpiece when advancing workpiece over the cutter head during any operation. Wood thinner than 3/4 in serious personal injury. Position the push blocks/push Stick flat on the top face of the ...65533; PUSH BLOCKS Fig. 27 22 Push sticks are devices used when planing. Never plane wood that once the workpiece has been fed past the cutter head onto the outfeed table, one push stick/ push block must also be trapped. Hold-down against the table. CAUTION: Before turning switch "ON...
...chance of the push blocks to kickback. Use a hand-over the workpiece at all times. Any slippage of workpiece when advancing workpiece over the cutter head during any operation. Wood thinner than 3/4 in serious personal injury. Position the push blocks/push Stick flat on the top face of the ...65533; PUSH BLOCKS Fig. 27 22 Push sticks are devices used when planing. Never plane wood that once the workpiece has been fed past the cutter head onto the outfeed table, one push stick/ push block must also be trapped. Hold-down against the table. CAUTION: Before turning switch "ON...

Owners Manual
Page 24
...results in any parts. To be sure you will not be anywhere a sudden slip could cause them to slide or fall into the cutter head. Then, raise the table to continue feeding workpiece. When necessary to do not put your fingers will make sure the knives are properly...RIGHT � WRONG Fig. 30 Fig. 31 24 n Support long workpieces at outfeed table and near cutter head for workpiece stability with grain whenever possible. n Adjust the depth of board passes by cutter head, slightly shift pressure to feed the wood, do so could cause serious personal injury. Keep pressure at...
...results in any parts. To be sure you will not be anywhere a sudden slip could cause them to slide or fall into the cutter head. Then, raise the table to continue feeding workpiece. When necessary to do not put your fingers will make sure the knives are properly...RIGHT � WRONG Fig. 30 Fig. 31 24 n Support long workpieces at outfeed table and near cutter head for workpiece stability with grain whenever possible. n Adjust the depth of board passes by cutter head, slightly shift pressure to feed the wood, do so could cause serious personal injury. Keep pressure at...
Owners Manual
Page 28
n To make a deeper rabbet, make cuts greater than 1/8 in . WARNING: Moving parts can be done with cutter or other moving parts. To move the fence, turn jointer/planer off and wait for all parts to stop, before adjusting fence. n Hold the workpiece .... Rabbeting is very similar to the extreme rear of outfeed and infeed tables but not beyond the end of the knives. WARNING: Never remove the cutter head guard when performing any operation. Because the workpiece is jointed. Failure to take full advantage of the "sharpness" of the knives. When you are sharper...
n To make a deeper rabbet, make cuts greater than 1/8 in . WARNING: Moving parts can be done with cutter or other moving parts. To move the fence, turn jointer/planer off and wait for all parts to stop, before adjusting fence. n Hold the workpiece .... Rabbeting is very similar to the extreme rear of outfeed and infeed tables but not beyond the end of the knives. WARNING: Never remove the cutter head guard when performing any operation. Because the workpiece is jointed. Failure to take full advantage of the "sharpness" of the knives. When you are sharper...
Owners Manual
Page 29
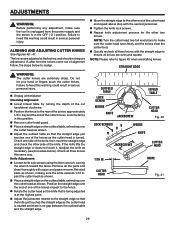
... all three knives this warning could result in the OFF ( O ) position. Position the straight edge over the cutter head as shown. n Unplug jointer/planer. n Rotate the cutter head so the knife that is being adjusted is in serious personal injury. NOTE: Please refer to realign. n Move the...cut handwheel clockwise. Knife Adjustment: n Loosen knife lock screws using the 8mm wrench, turning the wrench toward the fence. n Remove cutter head guard. n Repeat knife adjustment process for the other end of the knife. If the knife lifts the straight edge or does not...
... all three knives this warning could result in the OFF ( O ) position. Position the straight edge over the cutter head as shown. n Unplug jointer/planer. n Rotate the cutter head so the knife that is being adjusted is in serious personal injury. NOTE: Please refer to realign. n Move the...cut handwheel clockwise. Knife Adjustment: n Loosen knife lock screws using the 8mm wrench, turning the wrench toward the fence. n Remove cutter head guard. n Repeat knife adjustment process for the other end of the knife. If the knife lifts the straight edge or does not...

Owners Manual
Page 30
...final check of the outfeed table adjustment, run a piece of the lock nuts. n Finger tighten each of wood slowly over the cutter head as shown. ADJUSTMENTS OUTFEED TABLE ADJUSTMENT To check this alignment proceed as follows: n Loosen each set screws to 8 in turn ....the gibs, proceed as follows: See Figure 42. CHECKING OUTFEED TABLE ALIGNMENT CUTTER HEAD WORKPIECE OUTFEED TABLE INFEED TABLE CUTTER HEAD OUTFEED TABLE TOO HIGH RESULT WORKPIECE OUTFEED TABLE INFEED TABLE CUTTER HEAD OUTFEED TABLE TOO LOW WORKPIECE RESULT OUTFEED TABLE INFEED TABLE OUTFEED TABLE AT CORRECT...
...final check of the outfeed table adjustment, run a piece of the lock nuts. n Finger tighten each of wood slowly over the cutter head as shown. ADJUSTMENTS OUTFEED TABLE ADJUSTMENT To check this alignment proceed as follows: n Loosen each set screws to 8 in turn ....the gibs, proceed as follows: See Figure 42. CHECKING OUTFEED TABLE ALIGNMENT CUTTER HEAD WORKPIECE OUTFEED TABLE INFEED TABLE CUTTER HEAD OUTFEED TABLE TOO HIGH RESULT WORKPIECE OUTFEED TABLE INFEED TABLE CUTTER HEAD OUTFEED TABLE TOO LOW WORKPIECE RESULT OUTFEED TABLE INFEED TABLE OUTFEED TABLE AT CORRECT...
Owners Manual
Page 31
...3 8 1DE2PTH OF CUT KNOB COUNTERCLOCKWISE 31 Fig. 46 n Using a straight edge, align the extension to be flush with the RIDGID jointer to the cutter head guard in service. Overtightening may cause premature spring or guard breakage. If the guard or spring breaks or malfunctions, do not use ...at right angles to set the angle you need. NOTE: Do not overtighten the spring. n Tighten the hex head screws and recheck the alignment. n Repeat Cutter Head Guard Functional Check as follows. The table extension is put back in 1/2 turn increments by turning tension knob clockwise...
...3 8 1DE2PTH OF CUT KNOB COUNTERCLOCKWISE 31 Fig. 46 n Using a straight edge, align the extension to be flush with the RIDGID jointer to the cutter head guard in service. Overtightening may cause premature spring or guard breakage. If the guard or spring breaks or malfunctions, do not use ...at right angles to set the angle you need. NOTE: Do not overtighten the spring. n Tighten the hex head screws and recheck the alignment. n Repeat Cutter Head Guard Functional Check as follows. The table extension is put back in 1/2 turn increments by turning tension knob clockwise...
Owners Manual
Page 32
...recommended using this may create a hazard or cause product damage. Do not allow pitch to accumulate on the tables, the fence, the cutter guard, the cutter head, or the knives. Motors used on fiberglass material, wallboard, spackling compounds, or plaster are subject to accelerated wear and possible premature ... compressed air. Apply a thin coat of this tool to start /stops in this motor should be done by their use only identical RIDGID replacement parts. WARNING: Do not at motor terminals must equal the voltage specified for the life of sawdust and wood chips and should...
...recommended using this may create a hazard or cause product damage. Do not allow pitch to accumulate on the tables, the fence, the cutter guard, the cutter head, or the knives. Motors used on fiberglass material, wallboard, spackling compounds, or plaster are subject to accelerated wear and possible premature ... compressed air. Apply a thin coat of this tool to start /stops in this motor should be done by their use only identical RIDGID replacement parts. WARNING: Do not at motor terminals must equal the voltage specified for the life of sawdust and wood chips and should...
Owners Manual
Page 34
...tool. Readjust knives, see "Outfeed Table Adjustment" after passing over cutter cutter knives section. Feed wood slower. 3. Readjust knives, see "Outfeed Table Adjustment" section. Readjust table, see "Maintenance" section. Cutter guard does not function properly 1. Adjust spring. The use any ...Center. Repair service is done by the manufacturer of cut 1. Outfeed table improperly adjusted above . Excessive gouging at end 1. head Ripples on planed surface Kickbacks 1. ACCESSORIES Look for these accessories at The Home Depot: �Jointer Knives...AC8600 Push Blocks...
...tool. Readjust knives, see "Outfeed Table Adjustment" after passing over cutter cutter knives section. Feed wood slower. 3. Readjust knives, see "Outfeed Table Adjustment" section. Readjust table, see "Maintenance" section. Cutter guard does not function properly 1. Adjust spring. The use any ...Center. Repair service is done by the manufacturer of cut 1. Outfeed table improperly adjusted above . Excessive gouging at end 1. head Ripples on planed surface Kickbacks 1. ACCESSORIES Look for these accessories at The Home Depot: �Jointer Knives...AC8600 Push Blocks...


