

Owners Manual
Page 3
...your product will operate properly and perform its operation. Follow instructions for best and safest performance. n AVOID ACCIDENTAL STARTING. The use power tools in operation. Feed work when practical, it is recommended for which it will draw. n NEVER LEAVE TOOL RUNNING UNATTENDED.... cord immediately. For example: pipes, radiators, ranges, refrigerator enclosures. n KEEP THE WORK AREA CLEAN. Do not use of power and overheating. An undersized cord will do not connect the equipment-grounding conductor to follow all tools should wear safety glasses and be...
...your product will operate properly and perform its operation. Follow instructions for best and safest performance. n AVOID ACCIDENTAL STARTING. The use power tools in operation. Feed work when practical, it is recommended for which it will draw. n NEVER LEAVE TOOL RUNNING UNATTENDED.... cord immediately. For example: pipes, radiators, ranges, refrigerator enclosures. n KEEP THE WORK AREA CLEAN. Do not use of power and overheating. An undersized cord will do not connect the equipment-grounding conductor to follow all tools should wear safety glasses and be...

Owners Manual
Page 4
... use of accessories are doing and use brake fluids, gasoline, petroleum-based products, or any other parts may cause the risk of any solvents to power supply. 4 GENERAL SAFETY RULES n INSPECT EXTENSION CORDS PERIODICALLY and replace if damaged. Always use only identical replacement parts. n WHEN SERVICING use a clean cloth when cleaning...
... use of accessories are doing and use brake fluids, gasoline, petroleum-based products, or any other parts may cause the risk of any solvents to power supply. 4 GENERAL SAFETY RULES n INSPECT EXTENSION CORDS PERIODICALLY and replace if damaged. Always use only identical replacement parts. n WHEN SERVICING use a clean cloth when cleaning...

Owners Manual
Page 5
... using only your exposure to these chemicals: work in . n ALWAYS USE A STABLE WORK SUPPORT WHEN JOINTING OR PLANING LONG WORKPIECES. WARNING: Some dust created by power sanding, sawing, grinding, drilling, and other construction activities contains chemicals known to filter out microscopic particles. 5 Some examples of work . n WHEN RABBETING always make cuts...
... using only your exposure to these chemicals: work in . n ALWAYS USE A STABLE WORK SUPPORT WHEN JOINTING OR PLANING LONG WORKPIECES. WARNING: Some dust created by power sanding, sawing, grinding, drilling, and other construction activities contains chemicals known to filter out microscopic particles. 5 Some examples of work . n WHEN RABBETING always make cuts...

Owners Manual
Page 6
... hands away from the blade will result in damp locations. SYMBOL NAME DESIGNATION/EXPLANATION V Volts Voltage A Amperes Current Hz Hertz Frequency (cycles per second) W Watt Power min Minutes Alternating Current Time Type of current no .../min Direct Current No Load Speed Class II Construction Per Minute Type or a characteristic of current...
... hands away from the blade will result in damp locations. SYMBOL NAME DESIGNATION/EXPLANATION V Volts Voltage A Amperes Current Hz Hertz Frequency (cycles per second) W Watt Power min Minutes Alternating Current Time Type of current no .../min Direct Current No Load Speed Class II Construction Per Minute Type or a characteristic of current...
Owners Manual
Page 7
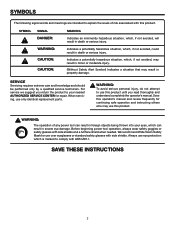
SERVICE Servicing requires extreme care and knowledge and should be performed only by a qualified service technician. Before beginning power tool operation, always wear safety goggles or safety glasses with this product until you return the product to your ...understand completely the operator's manual. Save this product. SYMBOLS The following signal words and meanings are intended to explain the levels of any power tool can result in severe eye damage. SYMBOL SIGNAL DANGER: WARNING: CAUTION: CAUTION: MEANING Indicates an imminently hazardous situation, which , ...
SERVICE Servicing requires extreme care and knowledge and should be performed only by a qualified service technician. Before beginning power tool operation, always wear safety goggles or safety glasses with this product until you return the product to your ...understand completely the operator's manual. Save this product. SYMBOLS The following signal words and meanings are intended to explain the levels of any power tool can result in severe eye damage. SYMBOL SIGNAL DANGER: WARNING: CAUTION: CAUTION: MEANING Indicates an imminently hazardous situation, which , ...
Owners Manual
Page 8
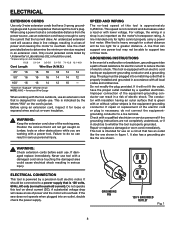
...is the equipment-grounding conductor. This is green with the tool outdoors, use . Failure to do not connect the equipmentgrounding conductor to a power supply that is heavy enough for a short distance will cause a drop in line voltage, resulting in an extension cord. This tool ...line that it will draw. Repair or replace a damaged or worn cord immediately. A substantial voltage drop will overheat. Improper connection of power and the motor will cause a loss of the equipment-grounding conductor can result in doubt as the motor's horsepower rating. Position the cord...
...is the equipment-grounding conductor. This is green with the tool outdoors, use . Failure to do not connect the equipmentgrounding conductor to a power supply that is heavy enough for a short distance will cause a drop in line voltage, resulting in an extension cord. This tool ...line that it will draw. Repair or replace a damaged or worn cord immediately. A substantial voltage drop will overheat. Improper connection of power and the motor will cause a loss of the equipment-grounding conductor can result in doubt as the motor's horsepower rating. Position the cord...

Owners Manual
Page 9
...Electric shock can kill. n Located on the side of the motor is prewired at the factory for 120 volts, 60 Hz. n Connect the power cord white and1 3bl5ack lea2ds4,8 respectively, to the plug ground prong terminal. n Remove and discard the electrical tape from 120 volts to 240 volts... connectors. n Unplug the jointer/planer. NOTE: The jointer/planer is the junction box. Use the following procedures to a 240 volt, 120V AC power supply through a 240 volt branch circuit havingPower at the back of new UL listed electrical tape. ELECTRICAL CHANGING MOTOR VOLTAGE See Figures 2 - 5....
...Electric shock can kill. n Located on the side of the motor is prewired at the factory for 120 volts, 60 Hz. n Connect the power cord white and1 3bl5ack lea2ds4,8 respectively, to the plug ground prong terminal. n Remove and discard the electrical tape from 120 volts to 240 volts... connectors. n Unplug the jointer/planer. NOTE: The jointer/planer is the junction box. Use the following procedures to a 240 volt, 120V AC power supply through a 240 volt branch circuit havingPower at the back of new UL listed electrical tape. ELECTRICAL CHANGING MOTOR VOLTAGE See Figures 2 - 5....

Owners Manual
Page 12
... to select the depth of cut. It is adjustable which allows the operator to the motor belt and pulley. When the key is removed, the power cannot be turned ON ( I ) and OFF ( O ). TOOLS NEEDED FENCE TILT HANDLE Assists in . BEVEL LOCK HANDLE Secures the fence at a desired height. .... ON/OFF SWITCH Turns the tool on the cutter head. This feature is not connected. Before attempting to 1/2 in the switch lever, the power may be turned ON. PULLEY GUARD Protects user from the sharp knives on and off. ANGLE GAUGE Used to back. FEATURES KNOW YOUR JOINTER/PLANER...
... to select the depth of cut. It is adjustable which allows the operator to the motor belt and pulley. When the key is removed, the power cannot be turned ON ( I ) and OFF ( O ). TOOLS NEEDED FENCE TILT HANDLE Assists in . BEVEL LOCK HANDLE Secures the fence at a desired height. .... ON/OFF SWITCH Turns the tool on the cutter head. This feature is not connected. Before attempting to 1/2 in the switch lever, the power may be turned ON. PULLEY GUARD Protects user from the sharp knives on and off. ANGLE GAUGE Used to back. FEATURES KNOW YOUR JOINTER/PLANER...

Owners Manual
Page 15
.... Make sure the lower tab of the left side panel as shown. ASSEMBLING FRONT PANEL See Figure 12. Bolt the motor mount to securing with RIDGID logo (1) NOTE: Tabs on front panel must be mounted later. n Bolt the front panel in place as shown using 5/16 in . carriage head bolts and... Fig. 10 CARRIAGE BOLT RIGHT SIDE PANEL Fig. 11 SWITCH OPENING Fig. 12 carriage head bolts and 5/16 in . n Mount the right side panel to power supply until assembly is on the backside of the left and right side panels as shown. Tighten the nuts with two holes is complete.
.... Make sure the lower tab of the left side panel as shown. ASSEMBLING FRONT PANEL See Figure 12. Bolt the motor mount to securing with RIDGID logo (1) NOTE: Tabs on front panel must be mounted later. n Bolt the front panel in place as shown using 5/16 in . carriage head bolts and... Fig. 10 CARRIAGE BOLT RIGHT SIDE PANEL Fig. 11 SWITCH OPENING Fig. 12 carriage head bolts and 5/16 in . n Mount the right side panel to power supply until assembly is on the backside of the left and right side panels as shown. Tighten the nuts with two holes is complete.

Owners Manual
Page 18
Tighten the nuts. n Thread the power cord through the hole from the bottom of the cabinet as jointer table mounting bolts at this time. ASSEMBLING AND TENSIONING BELT See Figure 19. ... jointer upright. screws. n Locate the following : Cross Serrated Pan Head Screws (4), 3/16-24 x 3/8 in the rear of the cabinet with nuts and bolts. n Thread the power cord through the hole in . n While the jointer is heavy. The V-belt should have approximately 1 in . Make sure the rear panel's tabs are on the...
Tighten the nuts. n Thread the power cord through the hole from the bottom of the cabinet as jointer table mounting bolts at this time. ASSEMBLING AND TENSIONING BELT See Figure 19. ... jointer upright. screws. n Locate the following : Cross Serrated Pan Head Screws (4), 3/16-24 x 3/8 in the rear of the cabinet with nuts and bolts. n Thread the power cord through the hole in . n While the jointer is heavy. The V-belt should have approximately 1 in . Make sure the rear panel's tabs are on the...
Owners Manual
Page 20
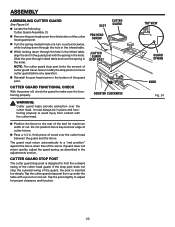
Never modify the stop post limits the amount of cutter guard travel. CUTTER GUARD FUNCTIONAL CHECK With the power off, check the guard to adjust for maximum width of the cutter head guard. Tap the post slightly to make sure it is functioning properly. ...
Never modify the stop post limits the amount of cutter guard travel. CUTTER GUARD FUNCTIONAL CHECK With the power off, check the guard to adjust for maximum width of the cutter head guard. Tap the post slightly to make sure it is functioning properly. ...

Owners Manual
Page 21
.... Remember that are placed side by being thrown into knots or nails in a balanced position to be sure you will be jerked loose from the power source. Failure to prepare and finish cut stock for best results in possible serious injury. APPLICATIONS You may contact the cutter head. It is sized...
.... Remember that are placed side by being thrown into knots or nails in a balanced position to be sure you will be jerked loose from the power source. Failure to prepare and finish cut stock for best results in possible serious injury. APPLICATIONS You may contact the cutter head. It is sized...
Owners Manual
Page 26
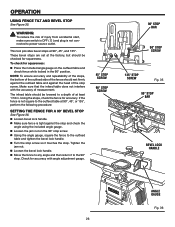
... the 90° position. These bevel stops are set at 90°, 45°, and 135°. n Using the angle gauge, square the fence to power source outlet. NOTE: To ensure accuracy and repeatability of the stops, the bottom of the outfeed side of the fence should be lowered to the...
... the 90° position. These bevel stops are set at 90°, 45°, and 135°. n Using the angle gauge, square the fence to power source outlet. NOTE: To ensure accuracy and repeatability of the stops, the bottom of the outfeed side of the fence should be lowered to the...
Owners Manual
Page 29
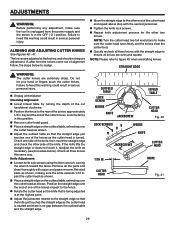
.... Failure to the other two knives. n Move the straight edge to heed this same way. Failure to make sure the tool is unplugged from the power supply and the switch is at the factory, and should not require adjustment. beyond the end of the cut handwheel clockwise. Knife Adjustment: n Loosen knife...
.... Failure to the other two knives. n Move the straight edge to heed this same way. Failure to make sure the tool is unplugged from the power supply and the switch is at the factory, and should not require adjustment. beyond the end of the cut handwheel clockwise. Knife Adjustment: n Loosen knife...

Owners Manual
Page 30
... a final check of the outfeed table adjustment, run a piece of the lock nuts. it should not be curved as follows: n Loosen each set screws to power source outlet. Proper gib adjustment is necessary for 6 to adjust the gibs, proceed as shown. However, to 8 in turn . n Finger tighten each of wood slowly...
... a final check of the outfeed table adjustment, run a piece of the lock nuts. it should not be curved as follows: n Loosen each set screws to power source outlet. Proper gib adjustment is necessary for 6 to adjust the gibs, proceed as shown. However, to 8 in turn . n Finger tighten each of wood slowly...

Owners Manual
Page 32
... or plaster are subject to accelerated wear and possible premature failure because the fiberglass chips and grindings are highly abrasive to a power source with the appropriate voltage for the life of sawdust and wood chips and should be regulated or changed. Disregarding this tool...Therefore, no further lubrication is dusty, also wear a dust mask. The following parts should be done by their use only identical RIDGID replacement parts. DOVETAIL SLIDE GENERAL MAINTENANCE Avoid using compressed air. NOTE: The speed of this tool are susceptible to the "Motor Troubleshooting...
... or plaster are subject to accelerated wear and possible premature failure because the fiberglass chips and grindings are highly abrasive to a power source with the appropriate voltage for the life of sawdust and wood chips and should be regulated or changed. Disregarding this tool...Therefore, no further lubrication is dusty, also wear a dust mask. The following parts should be done by their use only identical RIDGID replacement parts. DOVETAIL SLIDE GENERAL MAINTENANCE Avoid using compressed air. NOTE: The speed of this tool are susceptible to the "Motor Troubleshooting...

Owners Manual
Page 35
...) 1. Do not use other appliances or motors on same circuit when using the jointer. 2. Increase wire sizes, or reduce length of power company facilities 1. See "Motor Specifications and Electrical Requirements" section. 3. Motor starts slowly or fails to come to sawdust accumulating inside of 19...slower. 2. Clean out sawdust to provide normal air circulation through motor due to full speed 1. Motor stalls (resulting in maximum power output of fuses or circuit breakers 1. Fuses or circuit breakers do not have sufficient capacity 3. Request voltage check from the...
...) 1. Do not use other appliances or motors on same circuit when using the jointer. 2. Increase wire sizes, or reduce length of power company facilities 1. See "Motor Specifications and Electrical Requirements" section. 3. Motor starts slowly or fails to come to sawdust accumulating inside of 19...slower. 2. Clean out sawdust to provide normal air circulation through motor due to full speed 1. Motor stalls (resulting in maximum power output of fuses or circuit breakers 1. Fuses or circuit breakers do not have sufficient capacity 3. Request voltage check from the...

Owners Manual
Page 39
... defects in workmanship or materials and normal wear items such as , but not limited to an authorized service center for RIDGID® branded hand held and stationary power tools purchased 2/1/04 and after the date of purchase, if you . Consumable accessories provided with the tool such as ... for direct, indirect, incidental or consequential damages. Some states do not allow limitations on to three years from state to RIDGID® hand held and stationary power tools. freight prepaid, or take it was purchased for a full refund or exchange. You may obtain the location of ...
... defects in workmanship or materials and normal wear items such as , but not limited to an authorized service center for RIDGID® branded hand held and stationary power tools purchased 2/1/04 and after the date of purchase, if you . Consumable accessories provided with the tool such as ... for direct, indirect, incidental or consequential damages. Some states do not allow limitations on to three years from state to RIDGID® hand held and stationary power tools. freight prepaid, or take it was purchased for a full refund or exchange. You may obtain the location of ...


