

Owners Manual
Page 2
Safety, performance, and dependability have been given top priority in the design of Terms ...10 n Features ...11-12 n Tools Needed...12 n Loose Parts...13-14 n Assembly ...14-20 n Operation ...21-28 n Adjustments...29-31 n Maintenance ...32-33 n Accessories ...34 n Troubleshooting ...34-35 n Warranty ...39 n Customer Service Information...40 ...
Safety, performance, and dependability have been given top priority in the design of Terms ...10 n Features ...11-12 n Tools Needed...12 n Loose Parts...13-14 n Assembly ...14-20 n Operation ...21-28 n Adjustments...29-31 n Maintenance ...32-33 n Accessories ...34 n Troubleshooting ...34-35 n Warranty ...39 n Customer Service Information...40 ...

Owners Manual
Page 3
... DO NOT OVERREACH. n AVOID ACCIDENTAL STARTING. n USE RECOMMENDED ACCESSORIES. Consult the operator's manual for which it was not designed. n CHECK DAMAGED PARTS. n USE THE RIGHT DIRECTION OF FEED. Don't leave tool until it on the tool while it to disconnect from work benches invite accidents. n... sharp and clean for which it well away from heat, oil, and sharp edges. Follow instructions for alignment of moving parts, binding of moving parts. When not in working outdoors. Be sure switch is damaged should wear safety glasses and be properly repaired or replaced by...
... DO NOT OVERREACH. n AVOID ACCIDENTAL STARTING. n USE RECOMMENDED ACCESSORIES. Consult the operator's manual for which it was not designed. n CHECK DAMAGED PARTS. n USE THE RIGHT DIRECTION OF FEED. Don't leave tool until it on the tool while it to disconnect from work benches invite accidents. n... sharp and clean for which it well away from heat, oil, and sharp edges. Follow instructions for alignment of moving parts, binding of moving parts. When not in working outdoors. Be sure switch is damaged should wear safety glasses and be properly repaired or replaced by...

Owners Manual
Page 4
n STAY ALERT AND EXERCISE CONTROL. n WHEN SERVICING use brake fluids, gasoline, petroleum-based products, or any other parts may cause the risk of serious personal injury. n DOUBLE CHECK ALL SETUPS. Do not operate tool when you are not listed may create a hazard ... replaced by an authorized service center. n DO NOT OPERATE A TOOL WHILE UNDER THE INFLUENCE OF DRUGS, ALCOHOL, OR ANY MEDICATION. Never use only identical replacement parts. Instructions for safe use of accessories are tired. n KEEP TOOL DRY, CLEAN, AND FREE FROM OIL AND GREASE. Do not rush. n INSPECT FOR AND ...
n STAY ALERT AND EXERCISE CONTROL. n WHEN SERVICING use brake fluids, gasoline, petroleum-based products, or any other parts may cause the risk of serious personal injury. n DOUBLE CHECK ALL SETUPS. Do not operate tool when you are not listed may create a hazard ... replaced by an authorized service center. n DO NOT OPERATE A TOOL WHILE UNDER THE INFLUENCE OF DRUGS, ALCOHOL, OR ANY MEDICATION. Never use only identical replacement parts. Instructions for safe use of accessories are tired. n KEEP TOOL DRY, CLEAN, AND FREE FROM OIL AND GREASE. Do not rush. n INSPECT FOR AND ...
Owners Manual
Page 7
... shields and a full face shield when needed. WARNING: To avoid serious personal injury, do not attempt to use this product. Always use only identical replacement parts.
... shields and a full face shield when needed. WARNING: To avoid serious personal injury, do not attempt to use this product. Always use only identical replacement parts.

Owners Manual
Page 10
... jointer planers) A rotating cutterhead with the workpiece at 90°. Dado Cut A non-through or partial cut removing a wedge from a block so the end (or part of the workpiece to feed the workpiece over , under, behind, or in the workpiece (requires a special blade). FPM or SPM Feet per minute (or strokes...
... jointer planers) A rotating cutterhead with the workpiece at 90°. Dado Cut A non-through or partial cut removing a wedge from a block so the end (or part of the workpiece to feed the workpiece over , under, behind, or in the workpiece (requires a special blade). FPM or SPM Feet per minute (or strokes...

Owners Manual
Page 12
... after it passes over cutter head. increments. FENCE LOCK KNOB Allows fence to move across table front to help prevent any unauthorized use a different (sharper) part of cut . TOOLS NEEDED FENCE TILT HANDLE Assists in . Its height is removed, the power cannot be pulled out to lower infeed table in 1/8 in...
... after it passes over cutter head. increments. FENCE LOCK KNOB Allows fence to move across table front to help prevent any unauthorized use a different (sharper) part of cut . TOOLS NEEDED FENCE TILT HANDLE Assists in . Its height is removed, the power cannot be pulled out to lower infeed table in 1/8 in...

Owners Manual
Page 13
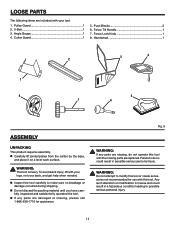
Motor and Switch Assembly 1 2. Front Panel 1 8. Left Side Panel 1 Operator's Manual (Not shown) Hardware Blister Pack (Not shown) 4 1 9 8 3 5 7 6 Fig. 8 13 Fence Assembly 1 5. Rear Panel 1 2 7. Right Side Panel 1 9. Motor Mount Bracket 1 4. Jointer Bed Assembly 1 3. LOOSE PARTS The following items are included with your tool: 1. Dust Chute 1 6.
Motor and Switch Assembly 1 2. Front Panel 1 8. Left Side Panel 1 Operator's Manual (Not shown) Hardware Blister Pack (Not shown) 4 1 9 8 3 5 7 6 Fig. 8 13 Fence Assembly 1 5. Rear Panel 1 2 7. Right Side Panel 1 9. Motor Mount Bracket 1 4. Jointer Bed Assembly 1 3. LOOSE PARTS The following items are included with your tool: 1. Dust Chute 1 6.
Owners Manual
Page 14
... not operate this tool. V-Belt 1 3. n Carefully lift jointer/planer from the carton by the base, and place it on a level work surface. n If any parts are replaced. Angle Gauge 1 4. Push Blocks 2 6. Pulley Guard 1 2. Handwheel 1 3 4 2 1 8 5 7 6 ASSEMBLY UNPACKING This product requires assembly. ... to modify this tool or create accessories not recommended for assistance. Fence Lock Knob 1 8. Fig. 9 WARNING: If any parts are included with your legs, not your tool: 1. WARNING: This tool is misuse and could result in a hazardous condition leading...
... not operate this tool. V-Belt 1 3. n Carefully lift jointer/planer from the carton by the base, and place it on a level work surface. n If any parts are replaced. Angle Gauge 1 4. Push Blocks 2 6. Pulley Guard 1 2. Handwheel 1 3 4 2 1 8 5 7 6 ASSEMBLY UNPACKING This product requires assembly. ... to modify this tool or create accessories not recommended for assistance. Fence Lock Knob 1 8. Fig. 9 WARNING: If any parts are included with your legs, not your tool: 1. WARNING: This tool is misuse and could result in a hazardous condition leading...

Owners Manual
Page 24
... makes feeding the wood harder and can cause the wood to minimize workpiece splintering, breakage or dangerous kickback. WARNING: Test for best results in any parts. A deep cut you planned, always lower the infeed table slightly farther than you will not be sure you wanted. n As leading edge of the board...
... makes feeding the wood harder and can cause the wood to minimize workpiece splintering, breakage or dangerous kickback. WARNING: Test for best results in any parts. A deep cut you planned, always lower the infeed table slightly farther than you will not be sure you wanted. n As leading edge of the board...
Owners Manual
Page 28
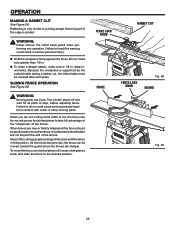
... FENCE � FENCE LOCK KNOB Fig. 38 GUARD � Fig. 39 28 Do not make cuts in 1/8 in . Because the workpiece is jointed. WARNING: Moving parts can be moved toward the guard where the knives are new or freshly sharpened the fence should be lowered after each pass. When you are... not cutting at full width of the knives. When knives are sharper. To move the fence, turn jointer/planer off and wait for all parts to the extreme rear of outfeed and infeed tables but not beyond the end of cut , the infeed table must be positioned to stop, before...
... FENCE � FENCE LOCK KNOB Fig. 38 GUARD � Fig. 39 28 Do not make cuts in 1/8 in . Because the workpiece is jointed. WARNING: Moving parts can be moved toward the guard where the knives are new or freshly sharpened the fence should be lowered after each pass. When you are... not cutting at full width of the knives. When knives are sharper. To move the fence, turn jointer/planer off and wait for all parts to the extreme rear of outfeed and infeed tables but not beyond the end of cut , the infeed table must be positioned to stop, before...
Owners Manual
Page 29
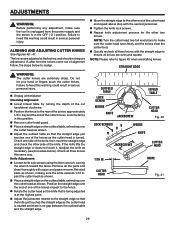
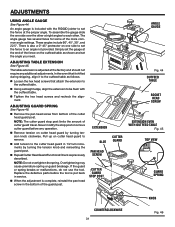
... INFEED TABLE CUTTER HEAD Fig. 40 LOCK SCREWS WEDGE KNIFE JACKSCREWS CUTTER HEAD 1/16 IN. Lock the fence in serious personal injury. Reinstall parts as shown. n Adjust the outfeed table so that is being adjusted is no gap between the outfeed table and the straight edge. n... Quickly recheck all the parts and clean thoroughly with the straight edge to figure 40 when reinstalling knives. n Adjust the jackscrew nearest to the fence. NOTE: Please refer...
... INFEED TABLE CUTTER HEAD Fig. 40 LOCK SCREWS WEDGE KNIFE JACKSCREWS CUTTER HEAD 1/16 IN. Lock the fence in serious personal injury. Reinstall parts as shown. n Adjust the outfeed table so that is being adjusted is no gap between the outfeed table and the straight edge. n... Quickly recheck all the parts and clean thoroughly with the straight edge to figure 40 when reinstalling knives. n Adjust the jackscrew nearest to the fence. NOTE: Please refer...
Owners Manual
Page 31
... to each other at the factory and should not require any operation. n Using a straight edge, align the extension to be flush with the RIDGID jointer to set the fence to remove. n Remove tension on cutter head guard to an angle not provided. Simply set the angle you need.... at the proper angle. An angle gauge is complete, reinstall the pan head screw in the bottom of cutter guard travel. Replace the defective parts before any additional adjustments. There is put back in 1/2 turn increments by turning tension knob clockwise. n Loosen the hex head screws that it...
... to each other at the factory and should not require any operation. n Using a straight edge, align the extension to be flush with the RIDGID jointer to set the fence to remove. n Remove tension on cutter head guard to an angle not provided. Simply set the angle you need.... at the proper angle. An angle gauge is complete, reinstall the pan head screw in the bottom of cutter guard travel. Replace the defective parts before any additional adjustments. There is put back in 1/2 turn increments by turning tension knob clockwise. n Loosen the hex head screws that it...

Owners Manual
Page 32
...accumulation of sawdust and wood chips and should be blown out or vacuumed frequently to clean the tool using solvents when cleaning plastic parts. Always check the connections, the load, and the supply circuit whenever motor doesn't work with side shields during power tool operation... immediately. For heavy loads, however, the voltage at any of motor damage, this motor cannot be done by their use only identical RIDGID replacement parts. n Connect this may create a hazard or cause product damage. ELEVATION SCREW Fig. 47 MOTOR SAFETY PROTECTION NOTE: To reduce the ...
...accumulation of sawdust and wood chips and should be blown out or vacuumed frequently to clean the tool using solvents when cleaning plastic parts. Always check the connections, the load, and the supply circuit whenever motor doesn't work with side shields during power tool operation... immediately. For heavy loads, however, the voltage at any of motor damage, this motor cannot be done by their use only identical RIDGID replacement parts. n Connect this may create a hazard or cause product damage. ELEVATION SCREW Fig. 47 MOTOR SAFETY PROTECTION NOTE: To reduce the ...

Owners Manual
Page 39
... This warranty applies only to you by calling (toll free) 1-866-539-1710 or by One World Technologies, Inc. RIDGID, INC. and RIDGID, Inc. WARRANTY RIDGID® HAND HELD AND STATIONARY POWER TOOL 3 YEAR LIMITED SERVICE WARRANTY Proof of purchase must be covered by the limited warranty... OTHER THAN THOSE SPECIFICALLY STATED IN THIS WARRANTY. This warranty only covers defects arising under normal usage and does not cover any part covered under state law are not covered. Consumable accessories provided with the original product. Any implied warranties, including warranties of the...
... This warranty applies only to you by calling (toll free) 1-866-539-1710 or by One World Technologies, Inc. RIDGID, INC. and RIDGID, Inc. WARRANTY RIDGID® HAND HELD AND STATIONARY POWER TOOL 3 YEAR LIMITED SERVICE WARRANTY Proof of purchase must be covered by the limited warranty... OTHER THAN THOSE SPECIFICALLY STATED IN THIS WARRANTY. This warranty only covers defects arising under normal usage and does not cover any part covered under state law are not covered. Consumable accessories provided with the original product. Any implied warranties, including warranties of the...

Owners Manual
Page 40
... sure to the motor housing. The model number of the authorized service center nearest you call 1-866-539-1710 or visit us online at www.ridgid.com. JP06101 Serial No. 983000-393 9-04 OPERATOR'S MANUAL 6-1/8 in the space provided below. JOINTER/PLANER JP06101 Customer Service Information: For...
... sure to the motor housing. The model number of the authorized service center nearest you call 1-866-539-1710 or visit us online at www.ridgid.com. JP06101 Serial No. 983000-393 9-04 OPERATOR'S MANUAL 6-1/8 in the space provided below. JOINTER/PLANER JP06101 Customer Service Information: For...


