
Owners Manual
Page 1
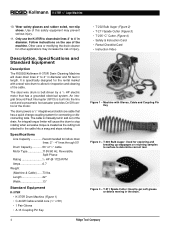
Read this Operator's Manual carefully before using this manual may result in electrical shock, fire and/or serious personal injury. Kollmann K-375R 1/2″ Cage Machine OPERATOR'S MANUAL • Pour français voire page 13 • Para el castellano vea la paginá 27 WARNING! Failure to understand and follow the contents of this tool.
Read this Operator's Manual carefully before using this manual may result in electrical shock, fire and/or serious personal injury. Kollmann K-375R 1/2″ Cage Machine OPERATOR'S MANUAL • Pour français voire page 13 • Para el castellano vea la paginá 27 WARNING! Failure to understand and follow the contents of this tool.
Owners Manual
Page 2
... Drain Cleaner Safety ...3 Description, Specifications and Standard Equipment Description ...4 Specifications ...4 Standard Equipment...4 Machine Assembly Instructions for Mounting Drum ...5 Instructions for Mounting Belt Guard...5 Machine Inspection ...5 Machine Set Up ...6 Operating Instructions ...7 Special Procedures Reverse Operating Instructions...8 Drum Removal ...8 Installing Replacement Cable...9 Accessories...9 Maintenance Instructions Lubrication ...9 Cables ...9 Machine Storage ...10 Service and Repair ...10 Trouble Shooting ...11 Wiring Diagram ...11 Lifetime Warranty...Back Cover...
... Drain Cleaner Safety ...3 Description, Specifications and Standard Equipment Description ...4 Specifications ...4 Standard Equipment...4 Machine Assembly Instructions for Mounting Drum ...5 Instructions for Mounting Belt Guard...5 Machine Inspection ...5 Machine Set Up ...6 Operating Instructions ...7 Special Procedures Reverse Operating Instructions...8 Drum Removal ...8 Installing Replacement Cable...9 Accessories...9 Maintenance Instructions Lubrication ...9 Cables ...9 Machine Storage ...10 Service and Repair ...10 Trouble Shooting ...11 Wiring Diagram ...11 Lifetime Warranty...Back Cover...

Owners Manual
Page 3
Serial No. Kollmann K-375R 1/2″ Cage Machine K-375R 1/2″ Cage Machine Record Serial Number below and retain product serial number which is located on nameplate.
Serial No. Kollmann K-375R 1/2″ Cage Machine K-375R 1/2″ Cage Machine Record Serial Number below and retain product serial number which is located on nameplate.
Owners Manual
Page 4
... electrical tools to lose control. GFCI reduces the risk of power. Kollmann K-375R 1/2″ Cage Machine General Safety Information WARNING! If the tools should electrically malfunction or break down, grounding provides a low resistance path to follow all instructions. Failure to carry electricity away from heat, oil, sharp edges or moving parts. • Avoid accidental starting. Tools create sparks which accept the tool's plug. Electrical Safety • Grounded tools...
... electrical tools to lose control. GFCI reduces the risk of power. Kollmann K-375R 1/2″ Cage Machine General Safety Information WARNING! If the tools should electrically malfunction or break down, grounding provides a low resistance path to follow all instructions. Failure to carry electricity away from heat, oil, sharp edges or moving parts. • Avoid accidental starting. Tools create sparks which accept the tool's plug. Electrical Safety • Grounded tools...
Owners Manual
Page 5
... hearing protection must control foot switch and cable. 6. Keep cutting tools sharp and clean. Properly maintained tools with belt guard removed. Specific Safety Information WARNING Read this manual. Never operate machine with sharp cutting edges are less likely to bind and are easier to understand and follow maintenance instructions may result in serious injury. 4. Keep two hands on another tool. • Keep handles dry and clean; Position machine...
... hearing protection must control foot switch and cable. 6. Keep cutting tools sharp and clean. Properly maintained tools with belt guard removed. Specific Safety Information WARNING Read this manual. Never operate machine with sharp cutting edges are less likely to bind and are easier to understand and follow maintenance instructions may result in serious injury. 4. Keep two hands on another tool. • Keep handles dry and clean; Position machine...
Owners Manual
Page 6
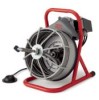
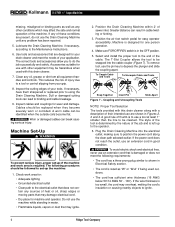
.... Description, Specifications and Standard Equipment Description The RIDGID/Kollmann K-375R Drain Cleaning Machine will cause the drum to stop rotating when excessive torque is belt-driven by a 1/3 HP electric motor that has a quick change coupling system for connecting or disconnecting tools. An integral torque limiter will clean drain lines 2″ to the cable hits a snag and stops rotating. Machine with a steel wire drum...
.... Description, Specifications and Standard Equipment Description The RIDGID/Kollmann K-375R Drain Cleaning Machine will cause the drum to stop rotating when excessive torque is belt-driven by a 1/3 HP electric motor that has a quick change coupling system for connecting or disconnecting tools. An integral torque limiter will clean drain lines 2″ to the cable hits a snag and stops rotating. Machine with a steel wire drum...
Owners Manual
Page 7
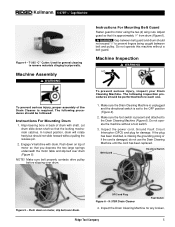
... belt and pulley. K-375R Drain Cleaner Foot Switch 4. Instructions For Mounting Belt Guard Fasten guard to the OFF position (Figure 6). 2. T-205 "C" Cutter: Used for general cleaning to remove materials clinging to the Drain Cleaning Machine (Figure 6). Belt Guard Electrical Switch Figure 5 - Inspect the Drain Cleaning Machine for damage. Adjust guard so that you depress the two large springs underneath the motor table and slip belt over drum (Figure 5). Let drum slide...
... belt and pulley. K-375R Drain Cleaner Foot Switch 4. Instructions For Mounting Belt Guard Fasten guard to the OFF position (Figure 6). 2. T-205 "C" Cutter: Used for general cleaning to remove materials clinging to the Drain Cleaning Machine (Figure 6). Belt Guard Electrical Switch Figure 5 - Inspect the Drain Cleaning Machine for damage. Adjust guard so that you depress the two large springs underneath the motor table and slip belt over drum (Figure 5). Let drum slide...
Owners Manual
Page 8
... FOR/OFF/REV switch is too small, the cord may ignite. 2. Select and install the proper tool to the Maintenance Instructions. 6. The style of the tool is determined by the nature of their intended use the pin key to the operator. 6. If the wire thickness is in good condition. Clean any problem has been repaired. 5. If necessary, have them sharpened or replaced prior to be...
... FOR/OFF/REV switch is too small, the cord may ignite. 2. Select and install the proper tool to the Maintenance Instructions. 6. The style of the tool is determined by the nature of their intended use the pin key to the operator. 6. If the wire thickness is in good condition. Clean any problem has been repaired. 5. If necessary, have them sharpened or replaced prior to be...
Owners Manual
Page 9
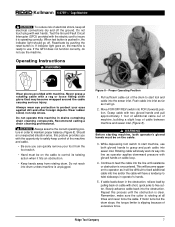
... machine. While depressing foot switch to start tool and cable into the line until the obstruction is slipping because of excessive force. If cable loads down in the obstruction, relieve load by pushing the reset button in , the indicator light should go . 2. When test button is operating correctly. Always wear eye protection to start machine, use both operator's gloved hands must be on the...
... machine. While depressing foot switch to start tool and cable into the line until the obstruction is slipping because of excessive force. If cable loads down in the obstruction, relieve load by pushing the reset button in , the indicator light should go . 2. When test button is operating correctly. Always wear eye protection to start machine, use both operator's gloved hands must be on the...
Owners Manual
Page 10
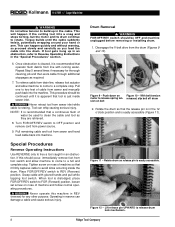
... feet of water be OFF and machine unplugged before removing or installing drum. 1. WARNING Never retract tool from power source. 9. Turn FOR/OFF/REV switch to REV (Reverse) position. Special Procedures Reverse Operating Instructions Use REVERSE only to FOR (Forward) position, loosen set screw on belt 2. Place FOR/OFF/REV switch to OFF position and remove cord from sewer inlet while cable is easily accessible...
... feet of water be OFF and machine unplugged before removing or installing drum. 1. WARNING Never retract tool from power source. 9. Turn FOR/OFF/REV switch to REV (Reverse) position. Special Procedures Reverse Operating Instructions Use REVERSE only to FOR (Forward) position, loosen set screw on belt 2. Place FOR/OFF/REV switch to OFF position and remove cord from sewer inlet while cable is easily accessible...

Owners Manual
Page 11
... should slide freely on the K-375R. Loosen screw on the machine and, leaving the Vbelt disengaged, push the cable into the drum in a counter-clockwise direction (Figure 13). Lubrication Grease all exposed, moving and rotating parts, such as guide tube assembly, as required. See accessories for use only the accessories listed below. Mount the drum on back of old cable from power source...
... should slide freely on the K-375R. Loosen screw on the machine and, leaving the Vbelt disengaged, push the cable into the drum in a counter-clockwise direction (Figure 13). Lubrication Grease all exposed, moving and rotating parts, such as guide tube assembly, as required. See accessories for use only the accessories listed below. Mount the drum on back of old cable from power source...
Owners Manual
Page 12
... taken to a RIDGID Independent Authorized Service Center or returned to follow these instructions may create a risk of electrical shock or other serious injury. Service and Repair Service and repair work on this machine, only identical replacement parts should be used. WARNING When servicing this Drain Cleaner must be kept indoors or well covered in a locked area that is out of reach of untrained users. A worn...
... taken to a RIDGID Independent Authorized Service Center or returned to follow these instructions may create a risk of electrical shock or other serious injury. Service and Repair Service and repair work on this machine, only identical replacement parts should be used. WARNING When servicing this Drain Cleaner must be kept indoors or well covered in a locked area that is out of reach of untrained users. A worn...

Owners Manual
Page 13
... service center. Cable worn out. Drum stops while pedal is Hole in incorrect pipe diameter. Drum turns in 2″ to reverse. Motor turning but not the other. Wiring Diagram 115V/60 Hz Ridge Tool Company 11 Let the cutter do the work. Use 1/2″ cables in one direc- Faulty reverse switch. Ground Fault Circuit Interrupter Trips when machine is depressed. Damaged power cord...
... service center. Cable worn out. Drum stops while pedal is Hole in incorrect pipe diameter. Drum turns in 2″ to reverse. Motor turning but not the other. Wiring Diagram 115V/60 Hz Ridge Tool Company 11 Let the cutter do the work. Use 1/2″ cables in one direc- Faulty reverse switch. Ground Fault Circuit Interrupter Trips when machine is depressed. Damaged power cord...

Owners Manual
Page 14
Kollmann K-375R 1/2″ Cage Machine 12 Ridge Tool Company
Kollmann K-375R 1/2″ Cage Machine 12 Ridge Tool Company


