Owners Manual
Page 2
Safety, performance, and dependability have been given top priority in the design of Terms ...7 n Features...8-9 n Assembly ...10 n Operation ...10-16 n Maintenance ...17 n Accessories ...17 n Troubleshooting...18 n Warranty ...19 n Customer Service Information...20 INTRODUCTION This tool has many features for making it easy to maintain and operate. 2 TABLE OF CONTENTS n Introduction ...2 n General Safety Rules ...3 n Specific Safety Rules...4-5 n Symbols...6 n Glossary of this product, making its use more pleasant and enjoyable.
Safety, performance, and dependability have been given top priority in the design of Terms ...7 n Features...8-9 n Assembly ...10 n Operation ...10-16 n Maintenance ...17 n Accessories ...17 n Troubleshooting...18 n Warranty ...19 n Customer Service Information...20 INTRODUCTION This tool has many features for making it easy to maintain and operate. 2 TABLE OF CONTENTS n Introduction ...2 n General Safety Rules ...3 n Specific Safety Rules...4-5 n Symbols...6 n Glossary of this product, making its use more pleasant and enjoyable.
Owners Manual
Page 3
... model. Always wear eye protection. Dust mask, nonskid safety shoes, hard hat, or hearing protection must be repaired. Stable footing on a ladder or unstable support. n Do not use only identical replacement parts. Do not use the tool if the workpiece contact mechanism is provided and used by the operator and others in the work area when loading, operating or servicing this tool. n Maintain tools with the proper operation of head...
... model. Always wear eye protection. Dust mask, nonskid safety shoes, hard hat, or hearing protection must be repaired. Stable footing on a ladder or unstable support. n Do not use only identical replacement parts. Do not use the tool if the workpiece contact mechanism is provided and used by the operator and others in the work area when loading, operating or servicing this tool. n Maintain tools with the proper operation of head...
Owners Manual
Page 4
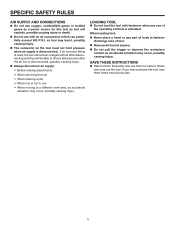
... when nailing into open air. n Do not drive fasteners close to the edge of other than the workpiece. SPECIFIC SAFETY RULES n Know your power tool. Learn its intended use the tool will recoil immediately after driving a fastener. Following this warning can cause injury to keep hands and body out of immediate work . n Make sure the hose is dusty. n Do not drive fasteners near edge of operation. The...
... when nailing into open air. n Do not drive fasteners close to the edge of other than the workpiece. SPECIFIC SAFETY RULES n Know your power tool. Learn its intended use the tool will recoil immediately after driving a fastener. Following this warning can cause injury to keep hands and body out of immediate work . n Make sure the hose is dusty. n Do not drive fasteners near edge of operation. The...
Owners Manual
Page 5
... this tool as tool will be able to instruct others who may use with fasteners when any part of tool. n Do not use this tool. If an incorrect fitting is activated. When loading tool: n Never place a hand or any one of the operating controls is used, the tool can potentially exceed 200 P.S.I. as tool may occur, possibly causing injury. LOADING TOOL n Do not load the tool with an air compressor which...
... this tool as tool will be able to instruct others who may use with fasteners when any part of tool. n Do not use this tool. If an incorrect fitting is activated. When loading tool: n Never place a hand or any one of the operating controls is used, the tool can potentially exceed 200 P.S.I. as tool may occur, possibly causing injury. LOADING TOOL n Do not load the tool with an air compressor which...
Owners Manual
Page 6
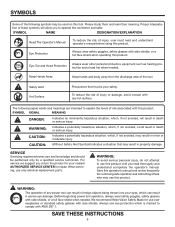
... power tool operation, always wear safety goggles, safety glasses with ANSI Z87.1. SAVE THESE INSTRUCTIONS 6 Proper interpretation of the following signal words and meanings are intended to use this product until you read and understand operator's manual before using this product. The following symbols may use only identical replacement parts. When servicing, use this product. Please study them and learn their meaning. Eye, Ear and Head...
... power tool operation, always wear safety goggles, safety glasses with ANSI Z87.1. SAVE THESE INSTRUCTIONS 6 Proper interpretation of the following signal words and meanings are intended to use this product until you read and understand operator's manual before using this product. The following symbols may use only identical replacement parts. When servicing, use this product. Please study them and learn their meaning. Eye, Ear and Head...

Owners Manual
Page 7
... cause movement of the selections shall be fastened. 7 Fastener A staple, pin, brad, nail, or other fastening device which is designed and manufactured for use of a trigger, workpiece contact and/or other than one requirement for operating a tool. Maximum air pressure The maximum allowable pressure of the compressed air, as part of an actuation system, can occur when any sequence to be...
... cause movement of the selections shall be fastened. 7 Fastener A staple, pin, brad, nail, or other fastening device which is designed and manufactured for use of a trigger, workpiece contact and/or other than one requirement for operating a tool. Maximum air pressure The maximum allowable pressure of the compressed air, as part of an actuation system, can occur when any sequence to be...

Owners Manual
Page 8
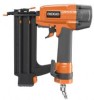
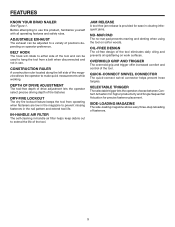
SELECTABLE TRIGGER ADJUSTABLE EXHAUST QUICK-CONNECT SWIVEL CONNECTOR JAM RELEASE BELT HOOK LATCH RELOAD INDICATOR NO-MAR PAD WORKPIECE CONTACT DEPTH OF DRIVE ADJUSTMENT 8 SIDE-LOADING MAGAZINE Fig. 1 to 2-1/8 in . FEATURES PRODUCT SPECIFICATIONS Operating Pressure...70-120 psi Fastener Type ...18 gauge brad nails Fastener Range ...5/8 in . Magazine Capacity...100 brad nails Air Consumption ...0.04 ft3/cycle at 100 psi Air Inlet ...1/4 in. NPT Weighted sound impulse power level...89.5 dBA Emission sound pressure level...77.2 dBA Vibration ...1.94 m/s2 Weight ...2.4 lbs.
SELECTABLE TRIGGER ADJUSTABLE EXHAUST QUICK-CONNECT SWIVEL CONNECTOR JAM RELEASE BELT HOOK LATCH RELOAD INDICATOR NO-MAR PAD WORKPIECE CONTACT DEPTH OF DRIVE ADJUSTMENT 8 SIDE-LOADING MAGAZINE Fig. 1 to 2-1/8 in . FEATURES PRODUCT SPECIFICATIONS Operating Pressure...70-120 psi Fastener Type ...18 gauge brad nails Fastener Range ...5/8 in . Magazine Capacity...100 brad nails Air Consumption ...0.04 ft3/cycle at 100 psi Air Inlet ...1/4 in. NPT Weighted sound impulse power level...89.5 dBA Emission sound pressure level...77.2 dBA Vibration ...1.94 m/s2 Weight ...2.4 lbs.
Owners Manual
Page 9
... NAILER See Figure 1. IN-HANDLE AIR FILTER The self-cleaning in use this product, familiarize yourself with all operating features and safety rules. JAM RELEASE A tool-free jam release is provided for precise fastener placement. OIL-FREE DESIGN The oil-free design of the tool. SELECTABLE TRIGGER The selectable trigger lets the operator choose between Contact Actuation for higher productivity and Single Sequential Actuation for ease in the nail...
... NAILER See Figure 1. IN-HANDLE AIR FILTER The self-cleaning in use this product, familiarize yourself with all operating features and safety rules. JAM RELEASE A tool-free jam release is provided for precise fastener placement. OIL-FREE DESIGN The oil-free design of the tool. SELECTABLE TRIGGER The selectable trigger lets the operator choose between Contact Actuation for higher productivity and Single Sequential Actuation for ease in the nail...
Owners Manual
Page 10
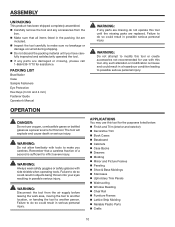
... discard the packing material until the missing parts are included. PACKING LIST Brad Nailer Case Sample Fasteners Eye Protection Hex Keys (3 mm and 4 mm) Fastener Guide Operator's Manual WARNING: If any parts are missing do so could result in the packing list are replaced. WARNING: Do not allow familiarity with this tool. n Carefully remove the tool and any parts are damaged or missing, please call...
... discard the packing material until the missing parts are included. PACKING LIST Brad Nailer Case Sample Fasteners Eye Protection Hex Keys (3 mm and 4 mm) Fastener Guide Operator's Manual WARNING: If any parts are missing do so could result in the packing list are replaced. WARNING: Do not allow familiarity with this tool. n Carefully remove the tool and any parts are damaged or missing, please call...
Owners Manual
Page 11
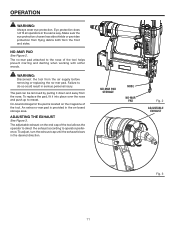
... when working with softer woods. To replace the pad, fit it down and away from the air supply before removing or replacing the no -mar pad is located on the end cap of the tool. To adjust, turn the exhaust cap until the exhaust blows in the same way. NO-MAR PAD STORAGE NOSE NO-MAR PAD Fig. 2 ADJUSTABLE EXHAUST Fig. 3 11 OPERATION WARNING...
... when working with softer woods. To replace the pad, fit it down and away from the air supply before removing or replacing the no -mar pad is located on the end cap of the tool. To adjust, turn the exhaust cap until the exhaust blows in the same way. NO-MAR PAD STORAGE NOSE NO-MAR PAD Fig. 2 ADJUSTABLE EXHAUST Fig. 3 11 OPERATION WARNING...

Owners Manual
Page 12
.... The tool and air hose must have a hose coupling that discharges all pressure to be removed from the tool when the coupling is connected to an air hose. Doing so could cause unintended operation and serious personal injury. female quick connector. WARNING: Disconnect the tool from the air supply before leaving the work area, moving the tool to another location, or handing the tool to another...
.... The tool and air hose must have a hose coupling that discharges all pressure to be removed from the tool when the coupling is connected to an air hose. Doing so could cause unintended operation and serious personal injury. female quick connector. WARNING: Disconnect the tool from the air supply before leaving the work area, moving the tool to another location, or handing the tool to another...

Owners Manual
Page 13
... a strip of any other nails can result in tool malfunction, leading to serious injuries. WARNING: Never load nails with this tool (refer to the air supply. OPERATION LOADING THE TOOL WITH NAILS See Figure 5. The use with the workpiece contact or trigger activated. n Connect the tool to do so could result in possible serious personal injury. WARNING: Keep the tool pointed away from unintended...
... a strip of any other nails can result in tool malfunction, leading to serious injuries. WARNING: Never load nails with this tool (refer to the air supply. OPERATION LOADING THE TOOL WITH NAILS See Figure 5. The use with the workpiece contact or trigger activated. n Connect the tool to do so could result in possible serious personal injury. WARNING: Keep the tool pointed away from unintended...
Owners Manual
Page 14
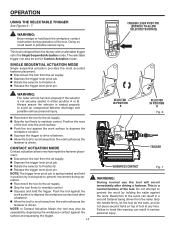
... trigger lever pivot pin is spring loaded and held in a second fastener being driven from the work surface as the fastener is seated properly to the air supply. Do not attempt to prevent the recoil by locking tab to recoil away from the nailer. Grip the handle firmly, let the tool do not place second hand on top of tool at any time. OPERATION USING...
... trigger lever pivot pin is spring loaded and held in a second fastener being driven from the work surface as the fastener is seated properly to the air supply. Do not attempt to prevent the recoil by locking tab to recoil away from the nailer. Grip the handle firmly, let the tool do not place second hand on top of tool at any time. OPERATION USING...
Owners Manual
Page 15
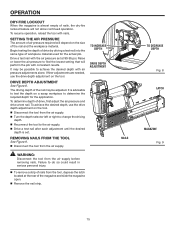
... driving a test nail into the same type of nails, the dry-fire lockout feature will not allow continued operation. If finer adjustments are needed, use the drive depth adjustment on the tool. To achieve the desired depth, use the drive depth adjustment on the tool. n Disconnect the tool from the air supply before removing nails. NAILS TO DECREASE DEPTH Fig. 8 LATCH MAGAZINE Fig. 9 15 It is set at the rear of drive, first adjust the air pressure and drive a test nail. n Turn...
... driving a test nail into the same type of nails, the dry-fire lockout feature will not allow continued operation. If finer adjustments are needed, use the drive depth adjustment on the tool. To achieve the desired depth, use the drive depth adjustment on the tool. n Disconnect the tool from the air supply before removing nails. NAILS TO DECREASE DEPTH Fig. 8 LATCH MAGAZINE Fig. 9 15 It is set at the rear of drive, first adjust the air pressure and drive a test nail. n Turn...

Owners Manual
Page 16
... result in the tool, disconnect the air hose and keep the tool pointed away from you while clearing the jam. n �Open magazine and remove fasteners from the air supply before clearing a jammed fastener. n Insert a flat blade screwdriver into the driving mechanism and push the driver mechanism back, freeing the fastener jam. n Remove the bent fastener. WARNING: Disconnect the tool from the tool. OPERATION CLEARING A JAMMED...
... result in the tool, disconnect the air hose and keep the tool pointed away from you while clearing the jam. n �Open magazine and remove fasteners from the air supply before clearing a jammed fastener. n Insert a flat blade screwdriver into the driving mechanism and push the driver mechanism back, freeing the fastener jam. n Remove the bent fastener. WARNING: Disconnect the tool from the tool. OPERATION CLEARING A JAMMED...
Owners Manual
Page 17
... a hazard or cause product damage. The air volume supplied to remove dirt, dust, oil, grease, etc. WARNING: Always wear safety goggles or safety glasses with this tool. MAINTENANCE WARNING: When servicing use . WARNING: Do not at any attachments or accessories not recommended by their use only identical RIDGID replacement parts. Driver Maintenance Kit ...079007001086 Wrench Kit ...079001001099 Overhaul Kit...079001001082 WARNING: Current attachments and accessories available for restrictive connectors, low points containing...
... a hazard or cause product damage. The air volume supplied to remove dirt, dust, oil, grease, etc. WARNING: Always wear safety goggles or safety glasses with this tool. MAINTENANCE WARNING: When servicing use . WARNING: Do not at any attachments or accessories not recommended by their use only identical RIDGID replacement parts. Driver Maintenance Kit ...079007001086 Wrench Kit ...079001001099 Overhaul Kit...079001001082 WARNING: Current attachments and accessories available for restrictive connectors, low points containing...
Owners Manual
Page 18
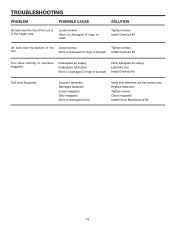
... Loose screws Tighten screws tool Worn or damaged O-rings or bumper Install Overhaul Kit Tool does nothing or operates sluggishly Inadequate air supply Inadequate lubrication Worn or damaged O-rings or bumper Verify adequate air supply Lubricate tool Install Overhaul Kit Tool jams frequently Incorrect fasteners Damaged fasteners Loose magazine Dirty magazine Worn or damaged driver Verify that fasteners are the correct size Replace fasteners Tighten screws Clean magazine Install Driver Maintenance Kit 18
... Loose screws Tighten screws tool Worn or damaged O-rings or bumper Install Overhaul Kit Tool does nothing or operates sluggishly Inadequate air supply Inadequate lubrication Worn or damaged O-rings or bumper Verify adequate air supply Lubricate tool Install Overhaul Kit Tool jams frequently Incorrect fasteners Damaged fasteners Loose magazine Dirty magazine Worn or damaged driver Verify that fasteners are the correct size Replace fasteners Tighten screws Clean magazine Install Driver Maintenance Kit 18
Owners Manual
Page 19
... state to , fasteners, oil, and safety glasses are not responsible for RIDGID® branded pneumatic tools. The authorized service center will be transferred. Consumable accessories provided with the original product. To receive a replacement tool you may not be covered by the limited warranty for a particular purpose, that cannot be presented when requesting warranty service. P.O. WARRANTY RIDGID® PNEUMATIC TOOL 3 YEAR LIMITED SERVICE WARRANTY Proof of purchase...
... state to , fasteners, oil, and safety glasses are not responsible for RIDGID® branded pneumatic tools. The authorized service center will be transferred. Consumable accessories provided with the original product. To receive a replacement tool you may not be covered by the limited warranty for a particular purpose, that cannot be presented when requesting warranty service. P.O. WARRANTY RIDGID® PNEUMATIC TOOL 3 YEAR LIMITED SERVICE WARRANTY Proof of purchase...

Owners Manual
Page 20
...:01) 20 Please record the serial number in the space provided below. OPERATOR'S MANUAL BRAD NAILER R213BNA Customer Service Information: For parts or service, contact your nearest RIDGID authorized service center. The model number of the authorized service center nearest you call 1-866-539-1710 or visit us online at www.ridgid.com. When ordering repair parts, always give the following information: Model No. Be sure to the magazine...
...:01) 20 Please record the serial number in the space provided below. OPERATOR'S MANUAL BRAD NAILER R213BNA Customer Service Information: For parts or service, contact your nearest RIDGID authorized service center. The model number of the authorized service center nearest you call 1-866-539-1710 or visit us online at www.ridgid.com. When ordering repair parts, always give the following information: Model No. Be sure to the magazine...

Repair Sheet
Page 3
... 1 FIXED PIN 1 SPRING 1 E-RING (ETW1.5 1 WORK CONTACT ELEMENT STOPPER 1 SCREW 1 LOCK NUT (M4 x 0.8 2 PUSHER 1 SHAFT 2 PUSHER SPRING 2 MAGAZINE B 1 SPRING PIN (Dp2-10 2 LATCH 1 LOCK SPRING 1 SPIRAL PINS (Dp3-24 2 HOOD COVER 1 BOLT (HEX SOC. NOT SHOWN (INCL. NOT SHOWN ...... 2 MODEL LABEL (TOOL CASE)....... 1 OPERATOR'S MANUAL - NOT SHOWN 1 REPAIR SHEET - KEY NO. 4, 7, 8, 13, 14, 16, 17, 19, 20-27, AND 29, PLUS LUBRICANT 1 DRIVER MAINTENANCE KIT - NOT SHOWN .......... 1 KEY NO. 8-10, 17, AND 19, PLUS LUBRICANT 1 DRIVER ASSEMBLY...
... 1 FIXED PIN 1 SPRING 1 E-RING (ETW1.5 1 WORK CONTACT ELEMENT STOPPER 1 SCREW 1 LOCK NUT (M4 x 0.8 2 PUSHER 1 SHAFT 2 PUSHER SPRING 2 MAGAZINE B 1 SPRING PIN (Dp2-10 2 LATCH 1 LOCK SPRING 1 SPIRAL PINS (Dp3-24 2 HOOD COVER 1 BOLT (HEX SOC. NOT SHOWN (INCL. NOT SHOWN ...... 2 MODEL LABEL (TOOL CASE)....... 1 OPERATOR'S MANUAL - NOT SHOWN 1 REPAIR SHEET - KEY NO. 4, 7, 8, 13, 14, 16, 17, 19, 20-27, AND 29, PLUS LUBRICANT 1 DRIVER MAINTENANCE KIT - NOT SHOWN .......... 1 KEY NO. 8-10, 17, AND 19, PLUS LUBRICANT 1 DRIVER ASSEMBLY...


