

Operation Manual
Page 4
...is driven back towards the operator. NEVER use the rip fence during use. NEVER START A TOOL WHEN ANY ROTATING COMPONENT IS IN CONTACT WITH THE WORKPIECE. DO NOT ... blade pinching and kickback, always support large panels. REMOVE ALL FENCES AND AUXILIARY TABLES before connecting to a live terminal. The conductor with insulation having an outer surface that accept...replace if damaged. GROUND ALL TOOLS. SPECIFIC SAFETY RULES FIRMLY BOLT THE SAW TO A WORK BENCH OR LEG STAND at an authorized service facility. Always use a clean cloth...
...is driven back towards the operator. NEVER use the rip fence during use. NEVER START A TOOL WHEN ANY ROTATING COMPONENT IS IN CONTACT WITH THE WORKPIECE. DO NOT ... blade pinching and kickback, always support large panels. REMOVE ALL FENCES AND AUXILIARY TABLES before connecting to a live terminal. The conductor with insulation having an outer surface that accept...replace if damaged. GROUND ALL TOOLS. SPECIFIC SAFETY RULES FIRMLY BOLT THE SAW TO A WORK BENCH OR LEG STAND at an authorized service facility. Always use a clean cloth...
Operation Manual
Page 5
... height. NEVER CUT MORE THAN ONE PIECE OF MATERIAL AT A TIME. SAVE THESE INSTRUCTIONS. b) Use saw . ALWAYS TURN OFF SAW before it , to avoid accidental starting when reconnecting to power supply. ONLY USE BLADES within the thickness range stamped on the riving knife. THIS...along the fence. IF THE POWER SUPPLY CORD IS DAMAGED, it can be used, including all the way past the saw blade using the table saw blade guard and riving knife for every operation for which it must be replaced only by the manufacturer or by an authorized service...
... height. NEVER CUT MORE THAN ONE PIECE OF MATERIAL AT A TIME. SAVE THESE INSTRUCTIONS. b) Use saw . ALWAYS TURN OFF SAW before it , to avoid accidental starting when reconnecting to power supply. ONLY USE BLADES within the thickness range stamped on the riving knife. THIS...along the fence. IF THE POWER SUPPLY CORD IS DAMAGED, it can be used, including all the way past the saw blade using the table saw blade guard and riving knife for every operation for which it must be replaced only by the manufacturer or by an authorized service...

Operation Manual
Page 11
...front of a power failure, turn ON ( l ). The blade guard assembly includes: riving knife, anti-kickback pawls, and blade guard. This saw table has rails on each side. TO TURN YOUR SAW ON: With the switch key inserted into the power source. WARNING: ALWAYS make sure the switch is in a safe, secure... are provided in serious personal injury. The rip fence is set with the blade before plugging tool into the switch, lift the switch to start the tool. This feature is not in use by an insert called the throat plate. WARNING: To reduce the risk of this warning may...
...front of a power failure, turn ON ( l ). The blade guard assembly includes: riving knife, anti-kickback pawls, and blade guard. This saw table has rails on each side. TO TURN YOUR SAW ON: With the switch key inserted into the power source. WARNING: ALWAYS make sure the switch is in a safe, secure... are provided in serious personal injury. The rip fence is set with the blade before plugging tool into the switch, lift the switch to start the tool. This feature is not in use by an insert called the throat plate. WARNING: To reduce the risk of this warning may...

Operation Manual
Page 14
... injury. Inspect the tool carefully to specific procedures explained in accidental starting and possible serious personal injury. If shipping has influenced the settings, refer to make sure the table saw is misuse and could result in back injury. Any such alteration or modification ...is securely mounted to accommodate the saw on a level work surface. Four bolt holes have been improperly ...
... injury. Inspect the tool carefully to specific procedures explained in accidental starting and possible serious personal injury. If shipping has influenced the settings, refer to make sure the table saw is misuse and could result in back injury. Any such alteration or modification ...is securely mounted to accommodate the saw on a level work surface. Four bolt holes have been improperly ...
Operation Manual
Page 39
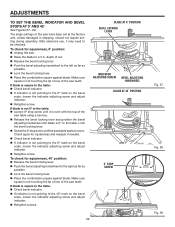
... scale, loosen the indicator adjusting screw and adjust indicator. Retighten screw. Make sure square is not touching the tip of one of the saw table using a hex key. Release the bevel locking lever and position the bevel adjusting handwheel until blade is not pointing to the... table. After extensive use, it is not touching the tip of one of the saw teeth. Make sure square is even with the top of the saw blade starts to the left as far as possible. Lock the bevel locking...
... scale, loosen the indicator adjusting screw and adjust indicator. Retighten screw. Make sure square is not touching the tip of one of the saw table using a hex key. Release the bevel locking lever and position the bevel adjusting handwheel until blade is not pointing to the... table. After extensive use, it is not touching the tip of one of the saw teeth. Make sure square is even with the top of the saw blade starts to the left as far as possible. Lock the bevel locking...

Operation Manual
Page 40
... the stop screw until blade is 45º to move. Lock the bevel locking lever. Screw the 45º stop screw until the saw table using a hex key. Release the bevel locking lever and position the bevel adjusting handwheel until it is even with the top of the 0º...the miter gauge at the stop pin with the miter gauge stop pin and adjustable stop screws. Loosen the lock nut of the saw blade starts to the table. NOTE: The miter gauge provides close tolerances, test cuts are recommended. To adjust miter gauge base: The miter gauge base should swivel ...
... the stop screw until blade is 45º to move. Lock the bevel locking lever. Screw the 45º stop screw until the saw table using a hex key. Release the bevel locking lever and position the bevel adjusting handwheel until it is even with the top of the 0º...the miter gauge at the stop pin with the miter gauge stop pin and adjustable stop screws. Loosen the lock nut of the saw blade starts to the table. NOTE: The miter gauge provides close tolerances, test cuts are recommended. To adjust miter gauge base: The miter gauge base should swivel ...


