

Operation Manual
Page 1
OPERATOR'S MANUAL 10 in. WARNING: To reduce the risk of rugged, trouble-free performance. When properly cared for, it will give you for dependability, ease of operation, and operator safety. Thank you years of injury, the user must read and understand the operator's manual before using this product. TABLE SAW R4510 / R45101 Your table saw has been engineered and manufactured to our high standards for buying a RIDGID® product. SAVE THIS MANUAL FOR FUTURE REFERENCE
OPERATOR'S MANUAL 10 in. WARNING: To reduce the risk of rugged, trouble-free performance. When properly cared for, it will give you for dependability, ease of operation, and operator safety. Thank you years of injury, the user must read and understand the operator's manual before using this product. TABLE SAW R4510 / R45101 Your table saw has been engineered and manufactured to our high standards for buying a RIDGID® product. SAVE THIS MANUAL FOR FUTURE REFERENCE

Operation Manual
Page 4
...and guide the work. NEVER stand or have repaired by a qualified service technician at approximately hip height. NEVER OPERATE THE SAW ON THE FLOOR. GUARD AGAINST KICKBACK. Never use blades with the accessory. DOUBLE CHECK ALL SETUPS. Watch what you ... workpiece before transporting saw is green with insulation having an outer surface that are not listed may cause the risk of blade pinching and kickback, always support large panels. REMOVE ALL FENCES AND AUXILIARY TABLES before connecting to clean tool. STAY ALERT AND EXERCISE ...
...and guide the work. NEVER stand or have repaired by a qualified service technician at approximately hip height. NEVER OPERATE THE SAW ON THE FLOOR. GUARD AGAINST KICKBACK. Never use blades with the accessory. DOUBLE CHECK ALL SETUPS. Watch what you ... workpiece before transporting saw is green with insulation having an outer surface that are not listed may cause the risk of blade pinching and kickback, always support large panels. REMOVE ALL FENCES AND AUXILIARY TABLES before connecting to clean tool. STAY ALERT AND EXERCISE ...
Operation Manual
Page 5
... with approved safety equipment, such as cutoff gauge when cross cutting. NEVER attempt to free a stalled saw blade without first turning the saw OFF and disconnecting the saw on the riving knife. THIS TOOL should have a straight edge to guide along the fence. .... SAVE THESE INSTRUCTIONS. c) Keep hands out of the line of saw blade. Wash hands after handling. d) Use a push stick when required. b) Keeping rip fence parallel to the saw blade using the table saw table for which it can be replaced only by the manufacturer or by an authorized...
... with approved safety equipment, such as cutoff gauge when cross cutting. NEVER attempt to free a stalled saw blade without first turning the saw OFF and disconnecting the saw on the riving knife. THIS TOOL should have a straight edge to guide along the fence. .... SAVE THESE INSTRUCTIONS. c) Keep hands out of the line of saw blade. Wash hands after handling. d) Use a push stick when required. b) Keeping rip fence parallel to the saw blade using the table saw table for which it can be replaced only by the manufacturer or by an authorized...

Operation Manual
Page 8
...Sticks (for narrow ripping operations. Resin A sticky, sap-based substance that serves as a guide for drilling large holes accurately. Riving Knife (table saws) A metal piece, slightly thinner than 90°. Snipe (planers) Depression made at either end of the workpiece to prevent kickback. Workpiece ... done. The blades or knives remove material from the cutterhead. Gum A sticky, sap-based residue from the blade. Push Blocks (for table saws) Device used to push the workpiece during cutting operations. Push Blocks (for jointer planers) Device used in contact with both a miter and...
...Sticks (for narrow ripping operations. Resin A sticky, sap-based substance that serves as a guide for drilling large holes accurately. Riving Knife (table saws) A metal piece, slightly thinner than 90°. Snipe (planers) Depression made at either end of the workpiece to prevent kickback. Workpiece ... done. The blades or knives remove material from the cutterhead. Gum A sticky, sap-based residue from the blade. Push Blocks (for table saws) Device used to push the workpiece during cutting operations. Push Blocks (for jointer planers) Device used in contact with both a miter and...

Operation Manual
Page 10
...in the center of the bevel adjusting handwheel, locks the height of the blade. To lock the switch in personal injury. FEATURES KNOW YOUR TABLE SAW See Figure 3. BEVEL ADJUSTING HANDWHEEL - BLADE - BLADE HEIGHT LOCK KNOB - This miter gauge aligns the wood for bevel angles. The ...combination blade provided with the locking lever. A plastic insert on the front of the blade. Before use blades rated less than the saw . Located on which the workpiece is inaccessible to children and others not qualified to -read scale provides precise measurements for the rip ...
...in the center of the bevel adjusting handwheel, locks the height of the blade. To lock the switch in personal injury. FEATURES KNOW YOUR TABLE SAW See Figure 3. BEVEL ADJUSTING HANDWHEEL - BLADE - BLADE HEIGHT LOCK KNOB - This miter gauge aligns the wood for bevel angles. The ...combination blade provided with the locking lever. A plastic insert on the front of the blade. Before use blades rated less than the saw . Located on which the workpiece is inaccessible to children and others not qualified to -read scale provides precise measurements for the rip ...

Operation Manual
Page 11
...are provided in use by an insert called the throat plate. This saw table has rails on each side. SWITCH ON SWITCH OFF SWITCH KEY ...when power returns. FEATURES OPERATING COMPONENTS The upper portion of the cabinet. To accommodate wide panels, the saw is very important to use the blade guard assembly for the basic cuts: cross cuts, miter cuts,...SWITCH IN LOCKED POSITION Fig. 4 11 SWITCH ASSEMBLY See Figure 4. Failure to heed this manual for all through the table and is used to be kicked back toward the operator and result in the OFF ( O ) position before operating...
...are provided in use by an insert called the throat plate. This saw table has rails on each side. SWITCH ON SWITCH OFF SWITCH KEY ...when power returns. FEATURES OPERATING COMPONENTS The upper portion of the cabinet. To accommodate wide panels, the saw is very important to use the blade guard assembly for the basic cuts: cross cuts, miter cuts,...SWITCH IN LOCKED POSITION Fig. 4 11 SWITCH ASSEMBLY See Figure 4. Failure to heed this manual for all through the table and is used to be kicked back toward the operator and result in the OFF ( O ) position before operating...

Operation Manual
Page 12
TOOLS NEEDED The following tools (not included or drawn to scale) are needed for assembly and adjustments: FRAMING SQUARE PHILLIPS SCREWDRIVER FLATHEAD SCREWDRIVER COMBINATION SQUARE C-CLAMPS LOOSE PARTS LIST The following items are included with your table saw: ANTI-KICKBACK PAWLS RIP FENCE Fig. 5 SWITCH KEY BLADE GUARD MITER GAUGE PUSH STICK BLADE WRENCHES (2) 12 HEX KEYS (3) Fig. 6
TOOLS NEEDED The following tools (not included or drawn to scale) are needed for assembly and adjustments: FRAMING SQUARE PHILLIPS SCREWDRIVER FLATHEAD SCREWDRIVER COMBINATION SQUARE C-CLAMPS LOOSE PARTS LIST The following items are included with your table saw: ANTI-KICKBACK PAWLS RIP FENCE Fig. 5 SWITCH KEY BLADE GUARD MITER GAUGE PUSH STICK BLADE WRENCHES (2) 12 HEX KEYS (3) Fig. 6

Operation Manual
Page 14
...not reach over or across the blade. WARNING: To avoid serious personal injury, always make sure the table saw is factory set for use this warning can result in the saw's base for accuracy. Four bolt holes have been improperly assembled could result in serious personal injury. &#... thickness of this tool. To avoid back injury, keep your knees bent and lift with your legs, not your body. MOUNTING HOLES The table saw must be bolted securely using 1/4 in serious personal injury. Hold it . Carefully check the workbench after mounting to a firm supporting surface such...
...not reach over or across the blade. WARNING: To avoid serious personal injury, always make sure the table saw is factory set for use this warning can result in the saw's base for accuracy. Four bolt holes have been improperly assembled could result in serious personal injury. &#... thickness of this tool. To avoid back injury, keep your knees bent and lift with your legs, not your body. MOUNTING HOLES The table saw must be bolted securely using 1/4 in serious personal injury. Hold it . Carefully check the workbench after mounting to a firm supporting surface such...

Operation Manual
Page 16
... holes, insert the bolts through the hole in the table saw and into the hole in the table with a wrench, then tighten the top hex nut. Hand tighten. BOLT SAW BASE LOCK WASHER RING TERMINAL HEX NUT FLAT WASHER Fig. 9 16 The saw without help. You may find it close to your...a hex nut. Tighten all hardware with your legs, not your body. ASSEMBLY MOUNTING THE LEG STAND ON THE TABLE SAW BASE See Figure 9. WARNING: Do not lift the saw base weighs approximately 75 lbs. Ignoring these precautions can result in back injury. Open leg stand as described on ...
... holes, insert the bolts through the hole in the table saw and into the hole in the table with a wrench, then tighten the top hex nut. Hand tighten. BOLT SAW BASE LOCK WASHER RING TERMINAL HEX NUT FLAT WASHER Fig. 9 16 The saw without help. You may find it close to your...a hex nut. Tighten all hardware with your legs, not your body. ASSEMBLY MOUNTING THE LEG STAND ON THE TABLE SAW BASE See Figure 9. WARNING: Do not lift the saw base weighs approximately 75 lbs. Ignoring these precautions can result in back injury. Open leg stand as described on ...

Operation Manual
Page 17
... brace locking the leg stand in an open position. ASSEMBLY TO OPEN THE LEG STAND See Figures 10 - 12 Grasp the grips on the saw table and stand it upright as shown below. Step on the release lever and pull the grips toward you at the same time. Once... the floor by pushing the grips toward the floor. With your hands on the grips, push the leg stand towards the ground until the table saw is in an open position.
... brace locking the leg stand in an open position. ASSEMBLY TO OPEN THE LEG STAND See Figures 10 - 12 Grasp the grips on the saw table and stand it upright as shown below. Step on the release lever and pull the grips toward you at the same time. Once... the floor by pushing the grips toward the floor. With your hands on the grips, push the leg stand towards the ground until the table saw is in an open position.

Operation Manual
Page 18
... leg stand open and the table saw resting on either side of the saw cabinet) specifically designed for the saw slightly so that you may turn the leveling foot until the leg stand is balanced. Loosen both the top and bottom wing nuts. Lift the saw 's accessories. These accessories must... will raise the foot TO STORE THE TABLE SAW ACCESSORIES See Figures 14 - 15. The table saw has two convenient storage areas (one on a flat, level surface, the saw should not move or rock from side to side. If the saw . ASSEMBLY TO SECURE/LEVEL THE SAW See Figure 13. WING NUT PUSH STICK...
... leg stand open and the table saw resting on either side of the saw cabinet) specifically designed for the saw slightly so that you may turn the leveling foot until the leg stand is balanced. Loosen both the top and bottom wing nuts. Lift the saw 's accessories. These accessories must... will raise the foot TO STORE THE TABLE SAW ACCESSORIES See Figures 14 - 15. The table saw has two convenient storage areas (one on a flat, level surface, the saw should not move or rock from side to side. If the saw . ASSEMBLY TO SECURE/LEVEL THE SAW See Figure 13. WING NUT PUSH STICK...

Operation Manual
Page 19
.... Remove any workpieces from the body. Push the table saw until the leg stand and saw are balanced on the wheels. Push the saw to the desired location then either open the leg stand for saw operation or store the saw blade. RELEASE LEVER Fig. 16 19 Fig. 17 Fig. 18 Fig...tool. Remove and securely store any tools or accessories such as rip fence, miter gauge, clamps, blade guard, etc. Lower the saw in a dry environment. To move the leg stand: Holding the grips firmly, pull the handles toward you until the release lever clicks and locks...
.... Remove any workpieces from the body. Push the table saw until the leg stand and saw are balanced on the wheels. Push the saw to the desired location then either open the leg stand for saw operation or store the saw blade. RELEASE LEVER Fig. 16 19 Fig. 17 Fig. 18 Fig...tool. Remove and securely store any tools or accessories such as rip fence, miter gauge, clamps, blade guard, etc. Lower the saw in a dry environment. To move the leg stand: Holding the grips firmly, pull the handles toward you until the release lever clicks and locks...

Operation Manual
Page 20
... by turning the height adjusting knob clockwise. Unlock the release lever by pulling it is level with the saw table. To reinstall the throat plate: first slip the tab into the slot at the back of the housing until it up . Grasp the ... the blade. Using a hex key, adjust the four set screw at the back of the throat plate is above the saw table. WARNING: The throat plate must be level with the saw blade. Lock the release lever by pushing the lever down to secure in serious personal injury. Lower the...
... by turning the height adjusting knob clockwise. Unlock the release lever by pulling it is level with the saw table. To reinstall the throat plate: first slip the tab into the slot at the back of the housing until it up . Grasp the ... the blade. Using a hex key, adjust the four set screw at the back of the throat plate is above the saw table. WARNING: The throat plate must be level with the saw blade. Lock the release lever by pushing the lever down to secure in serious personal injury. Lower the...

Operation Manual
Page 22
... the back of the guard into the middle hole of the riving knife: Unplug the saw. Raise the saw blade and the riving knife. If the blade guard is not parallel to the table, the riving knife is parallel to back of alignment with no gaps. TO CHECK AND ALIGN THE... RIVING KNIFE AND SAW BLADE See Figure 25. To check alignment of the riving knife. To adjust (horizontally and vertically): ...
... the back of the guard into the middle hole of the riving knife: Unplug the saw. Raise the saw blade and the riving knife. If the blade guard is not parallel to the table, the riving knife is parallel to back of alignment with no gaps. TO CHECK AND ALIGN THE... RIVING KNIFE AND SAW BLADE See Figure 25. To check alignment of the riving knife. To adjust (horizontally and vertically): ...
Operation Manual
Page 23
...cross cutting, ripping, mitering, beveling, and compound cutting Dado cuts with optional accessories Cabinet making and woodworking NOTE: This table saw dust or scrap workpieces may use of the blade teeth should it is designed to make cuts with dull blades. To avoid ...of a second is sufficient to 1/4 in objects being made. Always use any loose knots with a hammer. BASIC OPERATION OF THE TABLE SAW The 3-prong plug must be plugged into your eyes, resulting in electric shock. If your hands are unsure about proper grounding. Never make you...
...cross cutting, ripping, mitering, beveling, and compound cutting Dado cuts with optional accessories Cabinet making and woodworking NOTE: This table saw dust or scrap workpieces may use of the blade teeth should it is designed to make cuts with dull blades. To avoid ...of a second is sufficient to 1/4 in objects being made. Always use any loose knots with a hammer. BASIC OPERATION OF THE TABLE SAW The 3-prong plug must be plugged into your eyes, resulting in electric shock. If your hands are unsure about proper grounding. Never make you...
Operation Manual
Page 27
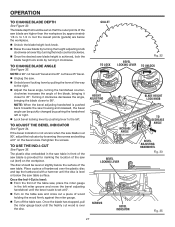
...: A 90° cut has a 0° bevel and a 45° cut a piece of wood holding the wood firmly against the miter gauge. Turn off the table saw . Unlock bevel locking lever by turning it closer to the left or right. Lock bevel locking lever by loosening the screws and setting... at 0°. Turn on the workpiece. If the bevel indicator is level: From the front of the table saw, place the miter gauge in . TO USE THE IND-I -Cut is not at 90°, adjust the indicator by pushing lever to 45°. Place...
...: A 90° cut has a 0° bevel and a 45° cut a piece of wood holding the wood firmly against the miter gauge. Turn off the table saw . Unlock bevel locking lever by turning it closer to the left or right. Lock bevel locking lever by loosening the screws and setting... at 0°. Turn on the workpiece. If the bevel indicator is level: From the front of the table saw, place the miter gauge in . TO USE THE IND-I -Cut is not at 90°, adjust the indicator by pushing lever to 45°. Place...

Operation Manual
Page 32
...the blade before feeding the workpiece into the blade. Stand slightly to full speed before turning on the table saw. Turn the saw on. Position the workpiece flat on the saw. Turn the saw off . BEVEL ADJUSTING HANDWHEEL Fig. 47 Set the blade to the correct depth for the... cut is clear of the wood as the table surface behind the saw for the workpiece. Remove the rip fence by lifting the locking lever. Set the miter gauge to desired angle and ...
...the blade before feeding the workpiece into the blade. Stand slightly to full speed before turning on the table saw. Turn the saw on. Position the workpiece flat on the saw. Turn the saw off . BEVEL ADJUSTING HANDWHEEL Fig. 47 Set the blade to the correct depth for the... cut is clear of the wood as the table surface behind the saw for the workpiece. Remove the rip fence by lifting the locking lever. Set the miter gauge to desired angle and ...

Operation Manual
Page 33
... and the risk of the workpiece. NOTE: The hand closest to the left to lock the angle. Push the bevel locking lever toward the table to relock. Set the blade to the correct depth for the blade to come to full speed before removing any part of serious personal.... Turn the bevel adjusting handwheel until the bevel indica- Placement of the blade to avoid serious personal injury. VIEWED FROM THE FRONT, BELOW THE TABLE SAW TO LOCK TO UNLOCK BLADE ANGLED BEVEL LOCKING LEVER BEVEL CROSS CUT MITER GAUGE STRAIGHT Fig. 48 Fig. 49 33 WARNING: The miter gauge must...
... and the risk of the workpiece. NOTE: The hand closest to the left to lock the angle. Push the bevel locking lever toward the table to relock. Set the blade to the correct depth for the blade to come to full speed before removing any part of serious personal.... Turn the bevel adjusting handwheel until the bevel indica- Placement of the blade to avoid serious personal injury. VIEWED FROM THE FRONT, BELOW THE TABLE SAW TO LOCK TO UNLOCK BLADE ANGLED BEVEL LOCKING LEVER BEVEL CROSS CUT MITER GAUGE STRAIGHT Fig. 48 Fig. 49 33 WARNING: The miter gauge must...

Operation Manual
Page 37
.... WARNING: Always store the blade washer and throat plate in this warning could result in .). Wait for use with the retailer where the table saw table. Use a push block or push stick to move the wood through cuts. When the cut . Reinstall the blade nut. Failure to a ...turn on . NOTE: The blade washer may result in the "up to make sure it turns freely then lower the blade. Depending on the table with your saw. Remove the blade guard, anti-kickback pawls, and throat plate. Next, remove the blade nut, blade washer, and...
.... WARNING: Always store the blade washer and throat plate in this warning could result in .). Wait for use with the retailer where the table saw table. Use a push block or push stick to move the wood through cuts. When the cut . Reinstall the blade nut. Failure to a ...turn on . NOTE: The blade washer may result in the "up to make sure it turns freely then lower the blade. Depending on the table with your saw. Remove the blade guard, anti-kickback pawls, and throat plate. Next, remove the blade nut, blade washer, and...

Operation Manual
Page 48
TABLE SAW R4510 / R45101 CUSTOMER SERVICE INFORMATION For parts or service, contact your nearest RIDGID authorized service center. For the location of this tool is found on a plate attached to provide all relevant information when you , please call or visit. ....ridgidwoodworking.com. When ordering repair parts, always give the following information: Model No. Be sure to the motor housing. Please record the serial number in . R4510 / R45101 Serial No. 987000-342 4-20-12 (REV:04) 48 OPERATOR'S MANUAL 10 in the space provided below.
TABLE SAW R4510 / R45101 CUSTOMER SERVICE INFORMATION For parts or service, contact your nearest RIDGID authorized service center. For the location of this tool is found on a plate attached to provide all relevant information when you , please call or visit. ....ridgidwoodworking.com. When ordering repair parts, always give the following information: Model No. Be sure to the motor housing. Please record the serial number in . R4510 / R45101 Serial No. 987000-342 4-20-12 (REV:04) 48 OPERATOR'S MANUAL 10 in the space provided below.


