
Owners Manual
Page 6
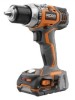
...base, illuminates when either LO (1) or HI (2) speed. FEATURES PRODUCT SPECIFICATIONS Chuck 1/2 in the storage area, located on the base of the drill. Keyless Motor 18 Volt DC Switch VSR (Variable Speed Reversible) No Load Speed 0-450/0-1,650 r/min. (RPM) Clutch 24 Position Torque with .... BIT STORAGE The bit provided with decreased trigger pressure. The torque adjustment ring can be turned to hand-tighten or release the drill bit in use . A slide switch is depressed. VARIABLE SPEED SWITCH The variable speed switch trigger delivers higher speed with increased trigger...
...base, illuminates when either LO (1) or HI (2) speed. FEATURES PRODUCT SPECIFICATIONS Chuck 1/2 in the storage area, located on the base of the drill. Keyless Motor 18 Volt DC Switch VSR (Variable Speed Reversible) No Load Speed 0-450/0-1,650 r/min. (RPM) Clutch 24 Position Torque with .... BIT STORAGE The bit provided with decreased trigger pressure. The torque adjustment ring can be turned to hand-tighten or release the drill bit in use . A slide switch is depressed. VARIABLE SPEED SWITCH The variable speed switch trigger delivers higher speed with increased trigger...

Owners Manual
Page 7
... sure that can be mounted on the Packing List are already assembled to modify this product if any parts on either side of the drill for assistance. WARNING: Do not use this product or create accessories not recommended for use with an auxiliary handle assembly that all items ...until you unpack it and open the hooks wide enough to loosen it . INSTALLING/REMOVING THE AUXILIARY HANDLE See Figures 2 - 3, page 13. The drill is equipped with this list are replaced. To install the auxiliary handle: n Turn the handle grip counterclockwise to fit over the mounting ribs, making sure...
... sure that can be mounted on the Packing List are already assembled to modify this product if any parts on either side of the drill for assistance. WARNING: Do not use this product or create accessories not recommended for use with an auxiliary handle assembly that all items ...until you unpack it and open the hooks wide enough to loosen it . INSTALLING/REMOVING THE AUXILIARY HANDLE See Figures 2 - 3, page 13. The drill is equipped with this list are replaced. To install the auxiliary handle: n Turn the handle grip counterclockwise to fit over the mounting ribs, making sure...

Owners Manual
Page 8
... personal injury. TO INSTALL/REMOVE BATTERY PACK See Figure 4, page 13. With the drill held in the drill. OPERATION WARNING: Do not allow familiarity with features that protect the lithium-ion cells and maximize battery life. BATTERY PROTECTION FEATURES RIDGID 18 V lithium-ion batteries are designed with products to make you are always...
... personal injury. TO INSTALL/REMOVE BATTERY PACK See Figure 4, page 13. With the drill held in the drill. OPERATION WARNING: Do not allow familiarity with features that protect the lithium-ion cells and maximize battery life. BATTERY PROTECTION FEATURES RIDGID 18 V lithium-ion batteries are designed with products to make you are always...

Owners Manual
Page 9
... the collar of the chuck with your hand could slip and come to a complete stop before changing the direction of rotation. When using drill in the LO (1) speed range, speed will decrease and unit will have difficulty changing from one gear range to the other hand. Failure...selector in the center position. Open or close the chuck jaws. Use LO (1) speed for high torque applications and HI (2) speed for drilling or driving at LO (1) or HI (2) speeds. OPERATION Setting the direction of rotation selector in the OFF (center lock) position helps reduce the ...
... the collar of the chuck with your hand could slip and come to a complete stop before changing the direction of rotation. When using drill in the LO (1) speed range, speed will decrease and unit will have difficulty changing from one gear range to the other hand. Failure...selector in the center position. Open or close the chuck jaws. Use LO (1) speed for high torque applications and HI (2) speed for drilling or driving at LO (1) or HI (2) speeds. OPERATION Setting the direction of rotation selector in the OFF (center lock) position helps reduce the ...

Owners Manual
Page 10
...visible through the vent slots on the housing. Remove the bit from the workpiece and determine the reason for metal or steel drilling. Begin drilling at the point to the direction of rotation and could cause loss of rotation selector in the workpiece or if the...: Be prepared for the correct setting (forward or reverse). Secure the material to be drilled in metal, start the drill. Move the drill bit into the material. When drilling through holes, place a block of wood behind the workpiece to keep it from slipping off -center or...
...visible through the vent slots on the housing. Remove the bit from the workpiece and determine the reason for metal or steel drilling. Begin drilling at the point to the direction of rotation and could cause loss of rotation selector in the workpiece or if the...: Be prepared for the correct setting (forward or reverse). Secure the material to be drilled in metal, start the drill. Move the drill bit into the material. When drilling through holes, place a block of wood behind the workpiece to keep it from slipping off -center or...

Owners Manual
Page 11
... GENERAL MAINTENANCE Avoid using solvents when cleaning plastic parts. Do not attempt to be replaced at a RIDGID authorized service center. The chuck may be unscrewed by their use only identical RIDGID® replacement parts. This will tighten the chuck on the spindle and develop a wobble. English ...hex key into the chuck and tighten the chuck jaws securely. Using a screwdriver, remove the chuck screw by placing the direction of the drill and tighten the chuck jaws securely. Tap the hex key sharply with heavy-duty adhesive tape. Also, the chuck screw may result...
... GENERAL MAINTENANCE Avoid using solvents when cleaning plastic parts. Do not attempt to be replaced at a RIDGID authorized service center. The chuck may be unscrewed by their use only identical RIDGID® replacement parts. This will tighten the chuck on the spindle and develop a wobble. English ...hex key into the chuck and tighten the chuck jaws securely. Using a screwdriver, remove the chuck screw by placing the direction of the drill and tighten the chuck jaws securely. Tap the hex key sharply with heavy-duty adhesive tape. Also, the chuck screw may result...


