User Manual (English)
Page 1
RF-SBM101 Soundbar Mount User Guide Safety information and specifications ........ 2 What you need 4 Package contents: parts 4 Package contents: hardware 5 Installation instructions 7 Before using your new product, please read these instructions to prevent any damage.
RF-SBM101 Soundbar Mount User Guide Safety information and specifications ........ 2 What you need 4 Package contents: parts 4 Package contents: hardware 5 Installation instructions 7 Before using your new product, please read these instructions to prevent any damage.
User Manual (English)
Page 2
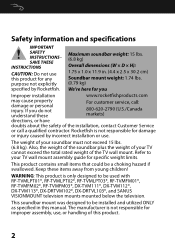
Rocketfish is only designed to be used with RF-TVMLPT01*, RF-TVMLPT02*, RF-TVMLPT03*, RF-TVMFM01*, RF-TVMFM02*, RF-TVMFM03*, DX-TVM111*, DX-TVM112*, DX-TVM113*, DX-DRTVM102*, DX-DRTVL103*, and SANUS VISIONMOUNT television mounts mounted below the television. Safety information and specifications IMPORTANT ...WARNING: This product is not responsible for damage or injury caused by Rocketfish. Keep these For customer service, call a qualified contractor. This soundbar mount was designed to your soundbar must not exceed 15 lbs. (6.8 kg). The manufacturer is not responsible...
Rocketfish is only designed to be used with RF-TVMLPT01*, RF-TVMLPT02*, RF-TVMLPT03*, RF-TVMFM01*, RF-TVMFM02*, RF-TVMFM03*, DX-TVM111*, DX-TVM112*, DX-TVM113*, DX-DRTVM102*, DX-DRTVL103*, and SANUS VISIONMOUNT television mounts mounted below the television. Safety information and specifications IMPORTANT ...WARNING: This product is not responsible for damage or injury caused by Rocketfish. Keep these For customer service, call a qualified contractor. This soundbar mount was designed to your soundbar must not exceed 15 lbs. (6.8 kg). The manufacturer is not responsible...
User Manual (English)
Page 4
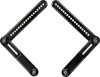
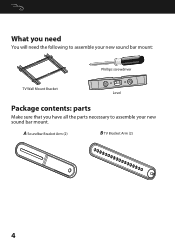
A Soundbar Bracket Arm (2) B TV Bracket Arm (2) 4 What you need You will need the following to assemble your new sound bar mount: Phillips screwdriver TV Wall Mount Bracket Level Package contents: parts Make sure that you have all the parts necessary to assemble your new sound bar mount.
A Soundbar Bracket Arm (2) B TV Bracket Arm (2) 4 What you need You will need the following to assemble your new sound bar mount: Phillips screwdriver TV Wall Mount Bracket Level Package contents: parts Make sure that you have all the parts necessary to assemble your new sound bar mount.
User Manual (English)
Page 5
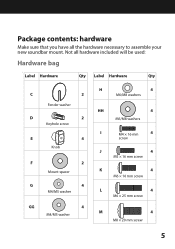
Not all the hardware necessary to assemble your new soundbar mount. Package contents: hardware Make sure that you have all hardware included will be used: Hardware bag GG Label Hardware Qty Label Hardware Qty C 2 Fender washer D 2 Keyhole screw E 4 Knob F 2 Mount spacer G 4 M4/M5 washer GG 4 M4/M5 washer H 4 M6/M8 washers HH 4 M6/M8 washers I M4 × 16 mm 4 screw J 4 M5 × 16 mm screw K 4 M6 × 16 mm screw L 4 M6 × 25 mm screw M 4 M8 × 20 mm screw 5
Not all the hardware necessary to assemble your new soundbar mount. Package contents: hardware Make sure that you have all hardware included will be used: Hardware bag GG Label Hardware Qty Label Hardware Qty C 2 Fender washer D 2 Keyhole screw E 4 Knob F 2 Mount spacer G 4 M4/M5 washer GG 4 M4/M5 washer H 4 M6/M8 washers HH 4 M6/M8 washers I M4 × 16 mm 4 screw J 4 M5 × 16 mm screw K 4 M6 × 16 mm screw L 4 M6 × 25 mm screw M 4 M8 × 20 mm screw 5
User Manual (English)
Page 7
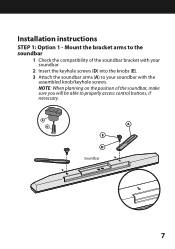
NOTE: When planning on the position of the soundbar bracket with the assembled knob/keyhole screws. E D A E D Soundbar 7 Mount the bracket arms to the soundbar 1 Check the compatibility of the soundbar, make sure you will be able to your soundbar with your soundbar. 2 Insert the keyhole screws (D) into the knobs (E). 3 Attach the soundbar arms (A) to properly access control buttons, if necessary. Installation instructions STEP 1: Option 1 -
NOTE: When planning on the position of the soundbar bracket with the assembled knob/keyhole screws. E D A E D Soundbar 7 Mount the bracket arms to the soundbar 1 Check the compatibility of the soundbar, make sure you will be able to your soundbar with your soundbar. 2 Insert the keyhole screws (D) into the knobs (E). 3 Attach the soundbar arms (A) to properly access control buttons, if necessary. Installation instructions STEP 1: Option 1 -
User Manual (English)
Page 9
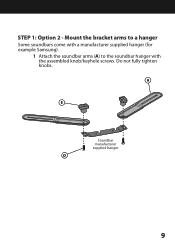
Do not fully tighten knobs. STEP 1: Option 2 - Mount the bracket arms to a hanger Some soundbars come with a manufacturer supplied hanger (for example Samsung). 1 Attach the soundbar arms (A) to the soundbar hanger with the assembled knob/keyhole screws. A E Soundbar manufacturer supplied hanger D 9
Do not fully tighten knobs. STEP 1: Option 2 - Mount the bracket arms to a hanger Some soundbars come with a manufacturer supplied hanger (for example Samsung). 1 Attach the soundbar arms (A) to the soundbar hanger with the assembled knob/keyhole screws. A E Soundbar manufacturer supplied hanger D 9
User Manual (English)
Page 10
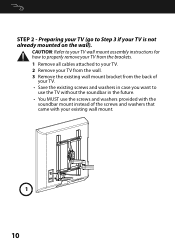
... TV. 2 Remove your TV from the wall. 3 Remove the existing wall mount bracket from the back of your TV. • Save the existing screws and washers in the future. • You MUST use the screws and washers provided with the soundbar mount instead of the screws and washers that came with your TV... is not already mounted on the wall). Preparing your TV (go to use the TV without the...
... TV. 2 Remove your TV from the wall. 3 Remove the existing wall mount bracket from the back of your TV. • Save the existing screws and washers in the future. • You MUST use the screws and washers provided with the soundbar mount instead of the screws and washers that came with your TV... is not already mounted on the wall). Preparing your TV (go to use the TV without the...
User Manual (English)
Page 17
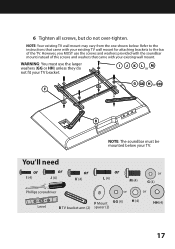
You'll need or I J K L or M G GG H or HH F B NOTE: The soundbar must use the screws and washers provided with the soundbar mount instead of the TV. WARNING: You must be mounted below . I (4) or J (4) or K (4) or L (4) M (4) or G (4) Phillips screwdriver or or Level F Mount GG (4) B TV bracket arm (2) spacer (2) H (4) HH (4) 17 However, you MUST use the larger washers...
You'll need or I J K L or M G GG H or HH F B NOTE: The soundbar must use the screws and washers provided with the soundbar mount instead of the TV. WARNING: You must be mounted below . I (4) or J (4) or K (4) or L (4) M (4) or G (4) Phillips screwdriver or or Level F Mount GG (4) B TV bracket arm (2) spacer (2) H (4) HH (4) 17 However, you MUST use the larger washers...
User Manual (English)
Page 19
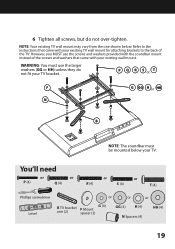
...use the larger washers (GG or HH) unless they do not over-tighten. P Q R S or T F G GG H or HH N B NOTE: The soundbar must use the screws and washers provided with the soundbar mount instead of the TV. Refer to the back of the screws and washers that came with your existing TV wall... mount for attaching brackets to the instructions that came with your existing wall mount. 6 Tighten all screws, but do not ...
...use the larger washers (GG or HH) unless they do not over-tighten. P Q R S or T F G GG H or HH N B NOTE: The soundbar must use the screws and washers provided with the soundbar mount instead of the TV. Refer to the back of the screws and washers that came with your existing TV wall... mount for attaching brackets to the instructions that came with your existing wall mount. 6 Tighten all screws, but do not ...

User Manual (English)
Page 24
You'll need Phillips screwdriver For customer service, call: 800-620-2790 (U.S./Canada markets) or 01-800-926-3010 (Mexico). 24 3 Hang the TV/soundbar assembly on the wall, following the instructions that came with your existing TV wall mount, then reconnect the cables and power cord.
You'll need Phillips screwdriver For customer service, call: 800-620-2790 (U.S./Canada markets) or 01-800-926-3010 (Mexico). 24 3 Hang the TV/soundbar assembly on the wall, following the instructions that came with your existing TV wall mount, then reconnect the cables and power cord.
